Clicksev.pro – an advertising service which can compromise your machine and start unwanted redirects
Clicksev.pro is a dubious domain which users get redirected to if the adware-type[1] program is installed on their machines. Adware programs are designed to display various advertisements, pop-up windows, play video-commercials and similar content in exchange for money. Developers of the Clicksev.pro virus are working on the same goal – earning as much money as possible.
Therefore, as soon as adware related to Clicksev.pro makes its way to the system, it initiates unwanted changes on every installed web browser – Google Chrome, Internet Explorer, MS Edge, Mozilla Firefox, and others. Typically, it enters target machines via bundling – a legal (although, not very fair) marketing campaign used by free software developers all over the world.
As soon as Clicksev.pro infiltrates users’ machines, it starts suspicious activity instantaneously. Security experts[2] note that browsers affected by this adware are spammed with continual ads, banners, deals, coupons, discounts and similar flashy offers.
Some users might be even lured into clicking on them and proceeding with a purchase. However, you should never buy anything from these websites and remove Clicksev.pro virus from your machine instead.
Adware is not dangerous on its own, as it does not damage system files. However, it can be extremely bothersome to deal with. Flashing Clicksev.pro ads might conceal the background of legitimate websites which do not display advertisements. Additionally, they might be difficult to close.
Some of the text can be turned into hyperlinks, connecting to partners’ websites. Sometimes, browser helper objects might be installed without user’s consent. All this activity slows down the browser and makes the browsing experience a real nightmare for a user.
No matter how irritating the presence of Clicksev.pro might be, it is not the most dangerous feature users should be concerned about. The riskiest factor of adware is redirects to malicious websites. Adware developers do not care where they might redirect you to; therefore, domains you might be linked to might run malicious JavaScripts and install malware on your machine. You might even encounter ransomware – and then you could potentially lose all your files if you do not keep them backed up.
There is no doubt that Clicksev.pro removal should be executed as soon as possible as it brings no benefit to a regular user. You can achieve that by automatically deleting it with robust security software or by following our guide below this post.
Dubious distribution practices of potentially unwanted programs
As already mentioned, adware distributes its payload by using the bundling technique. Therefore, as much as 5 million Google users are infected with adware [3]. Nevertheless, we assure you that avoiding PUP infections is rather simple.
Please practice the following cybersecurity measures:
Pick the source for software and updates carefully. There are plenty of phishing, scamming and similar websites which try to trick you into downloading dubious applications.
When installing the free software you obtained online, make sure never to use Recommended/Default settings. A lot of users might think that applying these settings will save time. However, by skipping steps in this mode, you unconsciously agree to install adware on your machine. Thus, only use Advanced/Custom installation mode and opt out of any additional components (such as toolbars, add-ons, search engines, etc.)
Avoid websites of dubious content (such as gambling, adult content, free online gaming, online dating and similar). These sites might promote or trick you into the installation of unwanted programs.
Invest into a robust security software and make sure it is updated continually.
Get rid of the troublesome intruder and enjoy adware-free browser
To remove Clicksev.pro virus from your computer, we recommend downloading and installing a sturdy security tool. This method is advised for less experienced users and those who do not mind downloading extra programs on their machines. It is quick, easy and will prevent further infections in the future.
However, if you are a proficient computer user, you can proceed with Clicksev.pro removal by using our step-by-step guide. Please be aware that incorrect elimination might not delete the virus. Thus, follow each step attentively.
Uninstall from Windows
Uninstall from Windows 10/8:
Type Control Panel into the Windows search box and open the result.
Under Programs, select Uninstall a program.
Uninstall from Windows 7/XP:
Click on Windows Start > Control Panel (Windows XP users should click on Add/Remove Programs).
In Control Panel, select Programs > Uninstall a program.
Remove the unwanted program:
In the Programs and Features window, look for any recently installed suspicious entries, select them, and click Uninstall.
If User Account Control appears, click Yes to confirm, then complete the removal.
Delete from macOS
Remove the unwanted application:
From the menu bar, select Go > Applications.
In the Applications folder, look for any suspicious entries, then drag them to Trash (or right-click and pick Move to Trash).
Delete leftover files and folders:
Select Go > Go to Folder.
Enter /Library/Application Support and remove any suspicious folders related to the unwanted program.
Repeat the same check in the /Library/LaunchAgents and /Library/LaunchDaemons folders, deleting any suspicious entries.
Finally, empty the Trash to permanently remove the leftovers.
Reset Internet Explorer
Remove dangerous add-ons:
Open Internet Explorer, click on the Gear icon (IE menu) on the top-right corner of the browser
Pick Manage Add-ons.
You will see a Manage Add-ons window. Here, look for suspicious plugins. Click on these entries and select Disable.
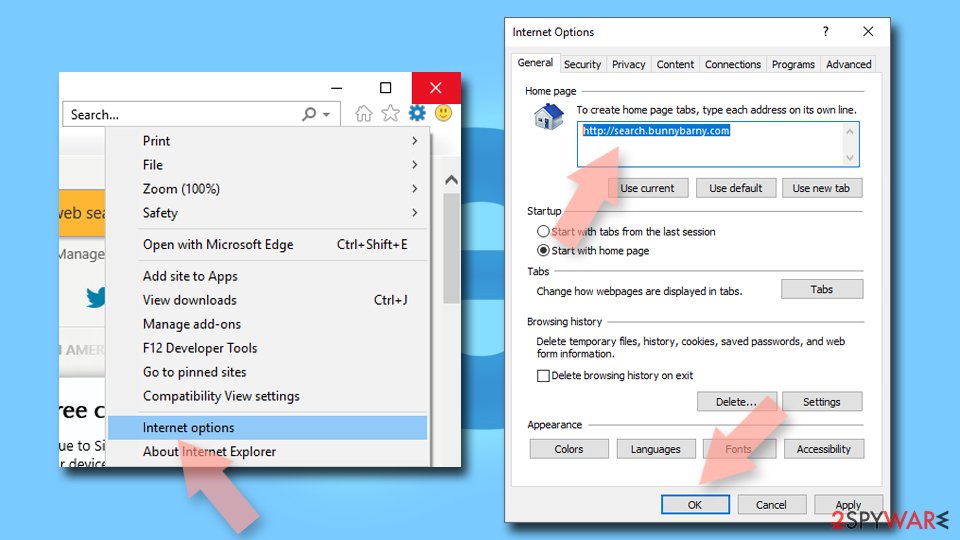
Change your homepage if it was altered:
Open IE and click on the Gear icon.
Select Internet Options.
In the General tab, delete the Home page address and replace it by your preferred one (for example, Google.com).
Click Apply and then select OK.
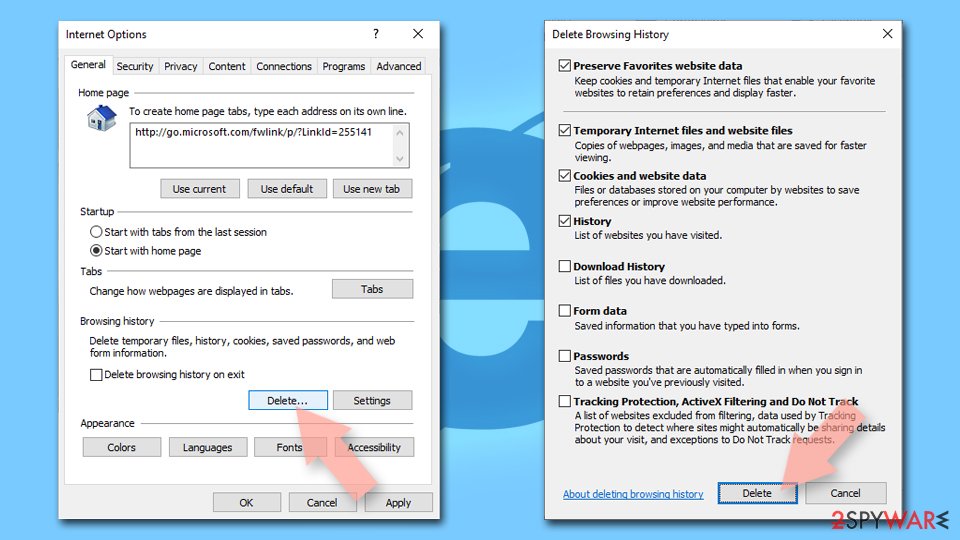
Delete temporary files:
Press on the Gear icon and select Internet Options.
Under Browsing history, click Delete...
Select relevant fields and press Delete.
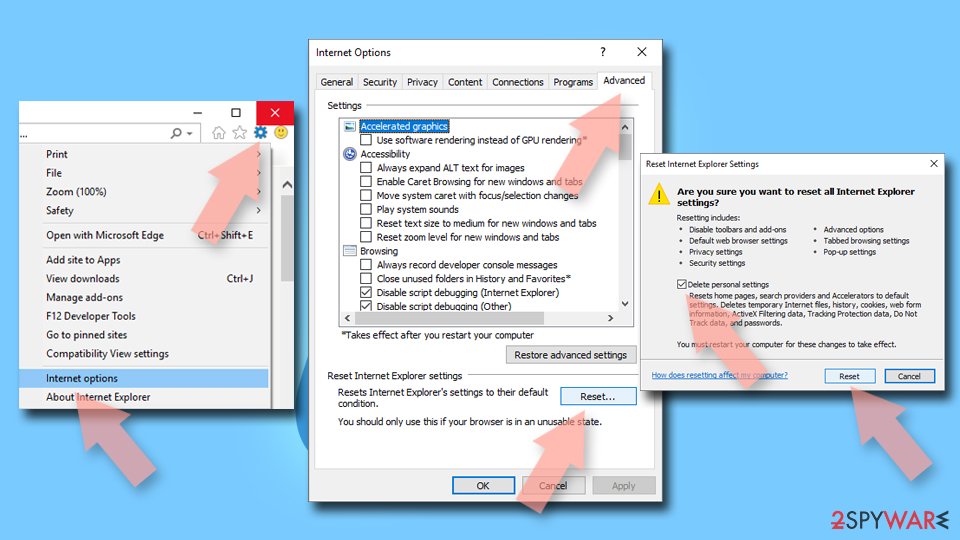
Reset Internet Explorer:
Click on Gear icon > Internet options and select Advanced tab.
Select Reset.
In the new window, check Delete personal settings and select Reset.
Remove from Microsoft Edge
Delete unwanted extensions from MS Edge:
Select Menu (three horizontal dots at the top-right of the browser window) and pick Extensions.
From the list, pick the extension and click on the Gear icon.
Click Remove.
Clear cookies and other browser data:
Click on the Menu (three horizontal dots at the top-right of the browser window) and select Settings > Privacy, search, and services..
Under Clear browsing data, pick Choose what to clear.
Select Cookies and other site data and Cached images and files. (apart from passwords, although you might want to include Media licenses as well, if applicable) and click on Clear.
Restore new tab and homepage settings:
Click the menu icon and choose Settings.
Then find On startup section.
Click Remove next to any suspicious startup page.
Reset MS Edge if the above steps did not work:
Press on Ctrl + Shift + Esc to open Task Manager.
Click on More details arrow at the bottom of the window.
Select Details tab.
Now scroll down and locate every entry with Microsoft Edge name in it. Right-click on each of them and select End Task to stop MS Edge from running.
Instructions for Chromium-based Edge
Delete extensions from MS Edge (Chromium):
Open Edge and click select Settings > Extensions.
Delete unwanted extensions by clicking Remove.
Clear cache and site data:
Click on Menu and go to Settings.
Select Privacy, search and services.
Under Clear browsing data, pick Choose what to clear.
Under Time range, pick All time.
Select Clear now.
Reset Chromium-based MS Edge:
Click on Menu and select Settings.
On the left side, pick Reset settings.
Select Restore settings to their default values.
Confirm with Reset.
This will disable extensions and reset startup pages but will not delete bookmarks, saved passwords, or browsing history.
Remove from Mozilla Firefox (FF)
Remove dangerous extensions:
Open Mozilla Firefox browser and click on the Menu (three horizontal lines at the top-right of the window).
Select Add-ons.
In here, select the unwanted extension and click Remove.
Reset the homepage:
Click three horizontal lines at the top right corner to open the menu.
Choose Settings.
Under Home, set your preferred homepage and new tab settings.
Clear cookies and site data:
Click Menu and pick Settings.
Go to Privacy & Security section.
Scroll down to locate Cookies and Site Data.
Click on Clear Data...
Select Cookies and Site Data and Temporary cached files and pages, then click Clear.
Reset Mozilla Firefox
If clearing the browser as explained above did not help, reset Mozilla Firefox:
Open Mozilla Firefox browser and click the Menu.
Go to Help and then choose Troubleshooting Information.
Under Give Firefox a tune up section, click on Refresh Firefox...
Once the pop-up shows up, confirm the action by pressing on Refresh Firefox.
Remove from Google Chrome
Delete malicious extensions from Google Chrome:
Open Google Chrome, click on the Menu (three vertical dots at the top-right corner) and select More tools > Extensions.
In the newly opened window, you will see all the installed extensions. Uninstall all suspicious extensions related to the unwanted program by clicking Remove.
Clear cache and web data from Chrome:
Click on Menu and pick Settings.
Under Privacy and security, select Clear browsing data.
Select Browsing history, Cookies and other site data, as well as Cached images and files.
Click Clear data.
Change your homepage:
Click menu and choose Settings.
Look for a suspicious site in the On startup section.
Click on Open a specific or set of pages and click on three dots to find the Remove option.
Reset Google Chrome:
If the previous methods did not help you, reset Google Chrome to eliminate all the unwanted components:
Click on Menu and select Settings.
In the Settings, scroll down and click Advanced.
Scroll down and locate Reset and clean up section.
Now click Restore settings to their original defaults.
Confirm with Reset settings.
Delete from Safari
Remove dangerous extensions:
Open Safari, click Safari in the menu at the top-left of the screen, and select Preferences.
Go to the Extensions tab, look for any suspicious entries, and click Uninstall to remove them.
Clear history and website data:
Click Safari in the menu and pick Clear History.
Set Clear to all history and confirm with Clear History.
Reset Safari:
Click Safari in the menu and select Preferences > Advanced.
Enable Show Develop menu in menu bar.
From the menu bar, click Develop and select Empty Caches.
Was this guide helpful?
Be the first to comment
Editor's pick · tested 2026
FortectIntego
9.4 / 109.6 / 10Best overall pick
Real-time ransomware shield
Free 14-day trial, no card
Cleans the threats listed above
Ad — we may earn a commission if you buy via this link.


Be the first to comment