CRITICAL ALERT – Automatic disinfection failed is a scam message that seeks to empty your pockets

CRITICAL ALERT – Automatic disinfection failed is a technical support scam[1] scheme led by cybercriminals in order to extort money out of innocent users. The fake message appears once victims get redirected to a malicious domain which spawns a full-screen pop-up, and it does not matter which browser is used – Google Chrome, Safari, Mozilla Firefox, Opera, or Internet Explorer, as the virus behaves the same.
Essentially, CRITICAL ALERT – Automatic disinfection failed tries to mimic legitimate Windows error and a Blue Screen of Death.[2] The latter is a so-called system crash can be experienced due to various computer problems, such as corrupted OS files, broken drivers, and many other factors. unfortunately, some users might not be able to differentiate between the real alert from Microsoft and the fake one.
While anyone can accidentally visit a site that shows CRITICAL ALERT – Automatic disinfection failed scam message, most users who see these type of fake alerts are infected with adware. These potentially unwanted programs enter computers via software bundling, alter browser settings, and then start showing various advertisements and redirect users to potentially malicious sites.
| Name | CRITICAL ALERT – Automatic disinfection failed |
| Type | Tech support scam |
| Category | Adware |
| Infection means | Software bundles, third-party sites, ads |
| Symptoms | The screen seems to be locked, and you are prompted to call a fake tech support number; other symptoms of adware include redirects to suspicious domains, pop-up ads on all sites you visit, sponsored links, not-organic search results, etc. |
| Risks | Loss of money, installation of unwanted or malicious software |
| Termination | To remove adware from your computer, scan it with FortectIntego or use our manual guide below |
CRITICAL ALERT – Automatic disinfection failed virus is just one of many of hundreds of tech support scams. Users can encounter a variety of others around the web, including “Call Microsoft Support,” “Microsoft has detected suspicious activity,” VIRUS ALERT FROM MICROSOFT, and many others. While different cybercriminals might operate these malicious plots, the scheme only seeks to extort money.
While fake sites might show a pop-up message or use the background text of the webpage within the browser, CRITICAL ALERT – Automatic disinfection failed goes a little bit further and opens a full-screen pop-up which makes it look like the computer has crashed. However, the best hint that it is not the case is another pop-up message which reads:
CRITICAL ALERT
Automatic disinfection failed.
From now on, only a Windows technician is able to intervene and prevent data loss.CONTACT THE Windows SUPPORT TO:
+1(833)244-7113
(Free and non-premium call)
Data loss can occur in 174 seconds if a Windows technician does not assist you in time
While this message might look like an obvious scam to most, some victims might find it difficult to separate real warning from CRITICAL ALERT – Automatic disinfection failed fake pop-up. However, users should know that Microsoft-initiated messages would never provide a contact number, and they would not show some bogus timers of the “doom's day.” Besides, the tech giant would not make grammar and spelling mistakes within their texts.

However, even those who suspect that the message is fake might not know how to remove CRITICAL ALERT – Automatic disinfection failed screen lock. However, in most of the cases, users can shut down the malicious site via the Task Manager – by pressing Ctrl + Shift + Esc and then shutting down the browser the redirect occurred in.
Once the malicious message is terminated, it is time to proceed with CRITICAL ALERT – Automatic disinfection failed removal. For that, you will have to delete adware that is secretly installed on your computer – you can do it either manually or automatically. In case you decide to go for the latter, mane use of security software such as FortectIntego.
As evident, you should never contact cyber criminals as they might ask you to pay money for the bogus service or make you install malware on your computer.
Decline all the offers and deals during the installation of freeware or shareware
Those who suffer from frequent redirects to unknown websites and see excessive pop-ups, deals, offers, coupons, flashing windows, auto-play videos, and other ads are rarely aware why the activity is taking place on their browsers. This is because such users install potentially unwanted programs unintentionally when establishing free applications downloaded from the internet, so they rarely know that their devices are infected in the first place.
Therefore, it is vital to pay attention when installing free software from third-party sites. Security experts[3] prompt users to be vigilant:
- Pick your download sources carefully – avoid torrent and similar P2P sites;
- Never rush the installation;
- Read through the installation instructions carefully;
- Check if important documents (ToS, EULA, Privacy Policy) are present;
- Decline all the offers/deals on the way;
- Pick Advanced/Custom settings instead of Recommended/Quick ones and see if optional components are hidden there; if there are – remove the ticks next to them to avoid the installation of PUPs.

Never contact crooks and terminate CRITICAL ALERT – Automatic disinfection failed scam message along with adware installed on your PC
If you call the crooks and paid them money – contact your bank and local authorities dealing with a scam. Make sure you include all the relevant information, such as the provided phone number and what you spoke on the phone with the criminals. To remove CRITICAL ALERT – Automatic disinfection failed message from your screen, you need to press Ctrl + Shift + Esc and shut down the browser you were using when you encountered it.
However, be aware that CRITICAL ALERT – Automatic disinfection failed removal from your screen does not mean that your computer is adware-free. You need to terminate it to stop all the intrusive content that has been bugging you. To do that, you should either scan your PC with anti-malware software or check our detailed guide below this article. As soon as you remove the CRITICAL ALERT – Automatic disinfection failed virus, you should also reset all the installed browsers, such as Google Chrome, Internet Explorer, Mozilla Firefox, Opera, Safari, etc.
Uninstall from Windows
Uninstall from Windows 10/8:
- Type Control Panel into the Windows search box and open the result.
- Under Programs, select Uninstall a program.


Uninstall from Windows 7/XP:
- Click on Windows Start > Control Panel (Windows XP users should click on Add/Remove Programs).
- In Control Panel, select Programs > Uninstall a program.


Remove the unwanted program:
- In the Programs and Features window, look for any recently installed suspicious entries, select them, and click Uninstall.
- If User Account Control appears, click Yes to confirm, then complete the removal.


Reset Internet Explorer
Remove dangerous add-ons:
- Open Internet Explorer, click on the Gear icon (IE menu) on the top-right corner of the browser
- Pick Manage Add-ons.
- You will see a Manage Add-ons window. Here, look for suspicious plugins. Click on these entries and select Disable.


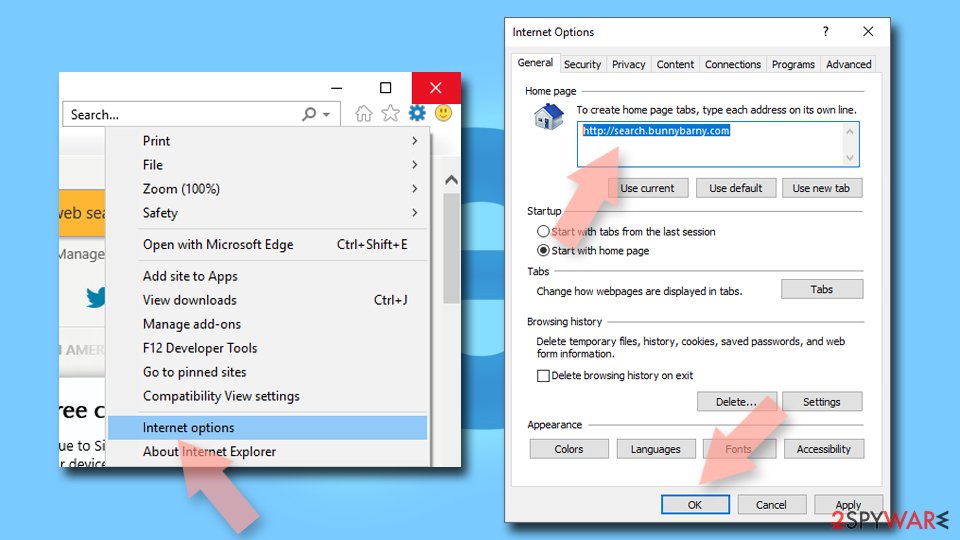
Change your homepage if it was altered:
- Open IE and click on the Gear icon.
- Select Internet Options.
- In the General tab, delete the Home page address and replace it by your preferred one (for example, Google.com).
- Click Apply and then select OK.

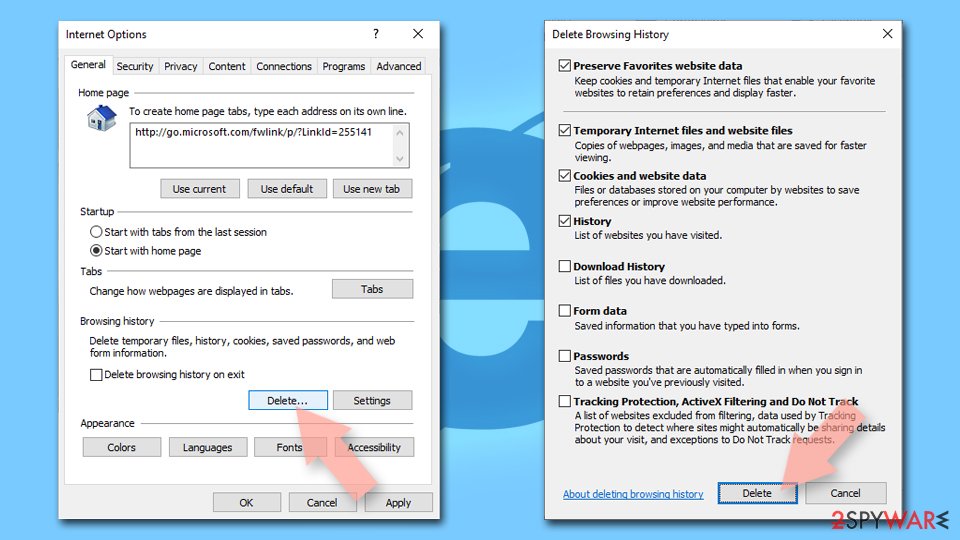
Delete temporary files:
- Press on the Gear icon and select Internet Options.
- Under Browsing history, click Delete...
- Select relevant fields and press Delete.

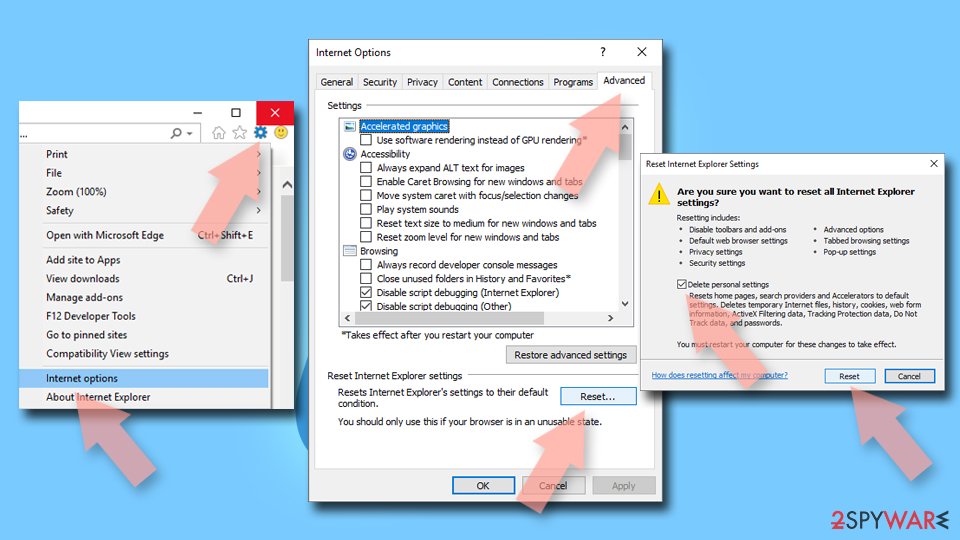
Reset Internet Explorer:
- Click on Gear icon > Internet options and select Advanced tab.
- Select Reset.
- In the new window, check Delete personal settings and select Reset.

Remove from Microsoft Edge
Delete unwanted extensions from MS Edge:
- Select Menu (three horizontal dots at the top-right of the browser window) and pick Extensions.
- From the list, pick the extension and click on the Gear icon.
- Click Remove.


Clear cookies and other browser data:
- Click on the Menu (three horizontal dots at the top-right of the browser window) and select Settings > Privacy, search, and services..
- Under Clear browsing data, pick Choose what to clear.
- Select Cookies and other site data and Cached images and files. (apart from passwords, although you might want to include Media licenses as well, if applicable) and click on Clear.


Restore new tab and homepage settings:
- Click the menu icon and choose Settings.
- Then find On startup section.
- Click Remove next to any suspicious startup page.
Reset MS Edge if the above steps did not work:
- Press on Ctrl + Shift + Esc to open Task Manager.
- Click on More details arrow at the bottom of the window.
- Select Details tab.
- Now scroll down and locate every entry with Microsoft Edge name in it. Right-click on each of them and select End Task to stop MS Edge from running.


Instructions for Chromium-based Edge
Delete extensions from MS Edge (Chromium):
- Open Edge and click select Settings > Extensions.
- Delete unwanted extensions by clicking Remove.


Clear cache and site data:
- Click on Menu and go to Settings.
- Select Privacy, search and services.
- Under Clear browsing data, pick Choose what to clear.
- Under Time range, pick All time.
- Select Clear now.


Reset Chromium-based MS Edge:
- Click on Menu and select Settings.
- On the left side, pick Reset settings.
- Select Restore settings to their default values.
- Confirm with Reset.
- This will disable extensions and reset startup pages but will not delete bookmarks, saved passwords, or browsing history.


Remove from Mozilla Firefox (FF)
Remove dangerous extensions:
- Open Mozilla Firefox browser and click on the Menu (three horizontal lines at the top-right of the window).
- Select Add-ons.
- In here, select the unwanted extension and click Remove.


Reset the homepage:
- Click three horizontal lines at the top right corner to open the menu.
- Choose Settings.
- Under Home, set your preferred homepage and new tab settings.
Clear cookies and site data:
- Click Menu and pick Settings.
- Go to Privacy & Security section.
- Scroll down to locate Cookies and Site Data.
- Click on Clear Data...
- Select Cookies and Site Data and Temporary cached files and pages, then click Clear.


Reset Mozilla Firefox
If clearing the browser as explained above did not help, reset Mozilla Firefox:
- Open Mozilla Firefox browser and click the Menu.
- Go to Help and then choose Troubleshooting Information.

- Under Give Firefox a tune up section, click on Refresh Firefox...
- Once the pop-up shows up, confirm the action by pressing on Refresh Firefox.


Remove from Google Chrome
Delete malicious extensions from Google Chrome:
- Open Google Chrome, click on the Menu (three vertical dots at the top-right corner) and select More tools > Extensions.
- In the newly opened window, you will see all the installed extensions. Uninstall all suspicious extensions related to the unwanted program by clicking Remove.


Clear cache and web data from Chrome:
- Click on Menu and pick Settings.
- Under Privacy and security, select Clear browsing data.
- Select Browsing history, Cookies and other site data, as well as Cached images and files.
- Click Clear data.


Change your homepage:
- Click menu and choose Settings.
- Look for a suspicious site in the On startup section.
- Click on Open a specific or set of pages and click on three dots to find the Remove option.
Reset Google Chrome:
If the previous methods did not help you, reset Google Chrome to eliminate all the unwanted components:
- Click on Menu and select Settings.
- In the Settings, scroll down and click Advanced.
- Scroll down and locate Reset and clean up section.
- Now click Restore settings to their original defaults.
- Confirm with Reset settings.


Delete from Safari
Remove dangerous extensions:
- Open Safari, click Safari in the menu at the top-left of the screen, and select Preferences.
- Go to the Extensions tab, look for any suspicious entries, and click Uninstall to remove them.


Clear history and website data:
- Click Safari in the menu and pick Clear History.
- Set Clear to all history and confirm with Clear History.


Reset Safari:
- Click Safari in the menu and select Preferences > Advanced.
- Enable Show Develop menu in menu bar.
- From the menu bar, click Develop and select Empty Caches.


Was this guide helpful?
Be the first to comment