D1ue3yi0hkdsdl.cloudfront.net ads is the content related to scam campaigns and fake errors or warnings

D1ue3yi0hkdsdl.cloudfront.net is the program that causes notifications and advertisements that may appear unexpectedly, preventing you from viewing the page or opening your web browser. Clicking on these intrusive advertisements can result in the installation of various malware or unwanted programs. The main adware-type program is not considered a malicious virus, but can expose users to possibly dangerous content online.
Do not click on the “Allow” button when you see messages asking for permission to display pop-up ads. If you do, you will start seeing spam pop-ups from D1ue3yi0hkdsdl.cloudfront.net, even when your browser is closed. These annoying pop-ups can link to 18+ sites, fake software updates, and unwanted programs.[1]
Pop-ups and push notifications to other sites can also appear when you interact with the particular content displayed via those advertisements. These sites can show Captcha forms, Allow or Agree on buttons, and pop-up windows. Try to ignore any of suspicious materials and make sure to remove the useless adware
Adware details
| Name | D1ue3yi0hkdsdl.cloudfront.net |
|---|---|
| Type | Adware, push notifications virus, redirect |
| Category | Potentially unwanted program |
| Serving IP | 108.138.24.173 |
| Distribution | Freeware installation processes, threats like this, and other advertising-supported pages |
| Symptoms | These pop-ups show up on the screen out of nowhere and redirect users to malicious pages or dangerous platforms |
| Removal | Clear threats with anti-malware tools and a system scan |
| Repair | The program like FortectIntego can help with issues caused by the PUP |
You see the D1ue3yi0hkdsdl.cloudfront.net pop-ups because your PC is infected with a piece of adware in most cases. These commercial pop-ups can appear because you have visited a site that has redirected your browser to this domain. However, constant redirects and issues with advertisements, speed issues, and performance problems mean that the application is running in the background.
Removing the threat
This browser-based scam is just one of many ways that scammers try to trick people into buying unnecessary antivirus subscriptions. If you encounter this scam or any similar ones, don't fall for it! Don't renew your subscription, and don't give the scammers your money. D1ue3yi0hkdsdl.cloudfront.net ads are just fake.
There are no antivirus providers that could scan the machine and show these update requirements and malware indication alerts on the web browser directly. The threat can cause additional issues with the security if users fall for these tricks and install or even purchases tools that are useless to the computer.

You need to remove D1ue3yi0hkdsdl.cloudfront.net, and that is possible with proper anti-malware programs that experts[2] always recommend using and running more often on the system. Threats can be detected and removed with the help of a tool like MalwarebytesMalwarebytes or SpyHunterCombo Cleaner.
Make sure to properly check the machine and remove all applications or files that get listed by the antivirus program. You also should run through particular settings on web browsers and the machine to block this unwanted behavior and those intrusive notifications and D1ue3yi0hkdsdl.cloudfront.net ads.
Remove unwanted notifications from Google Chrome (desktop):
- Open Google Chrome browser and go to Menu > Settings.
- Scroll down and click on Advanced.
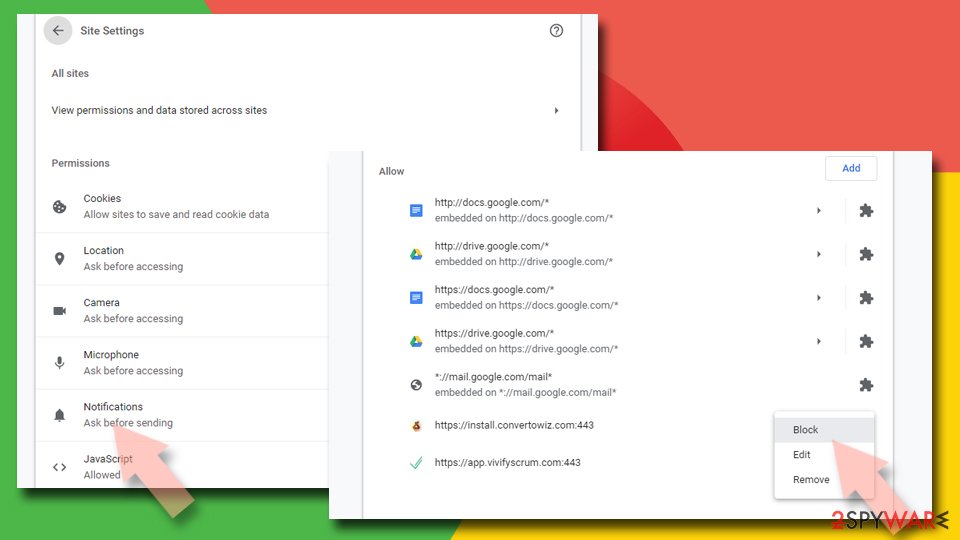
- Locate Privacy and security section and pick Site Settings > Notifications.
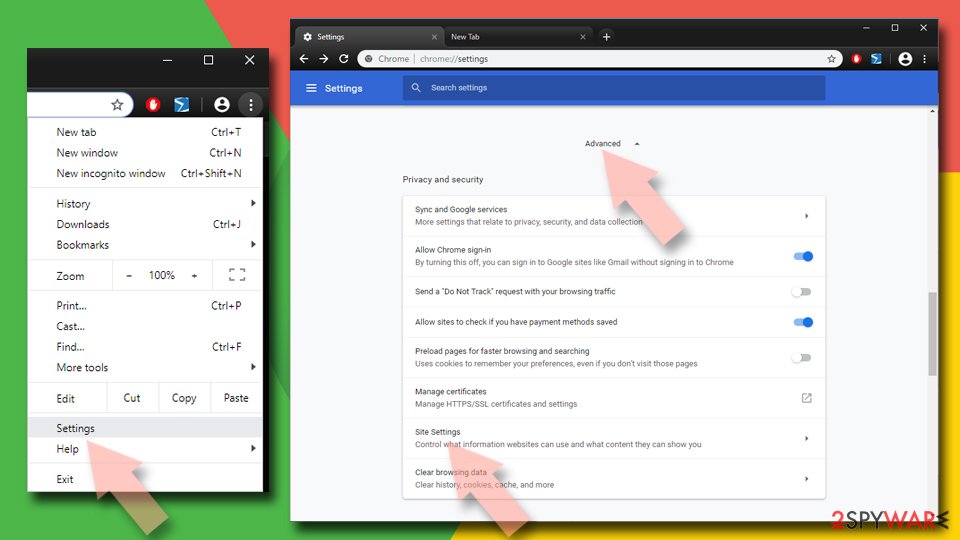
- Look at the Allow section and look for a suspicious URL.
- Click the three vertical dots next to it and pick Block. This should remove unwanted notifications from Google Chrome.


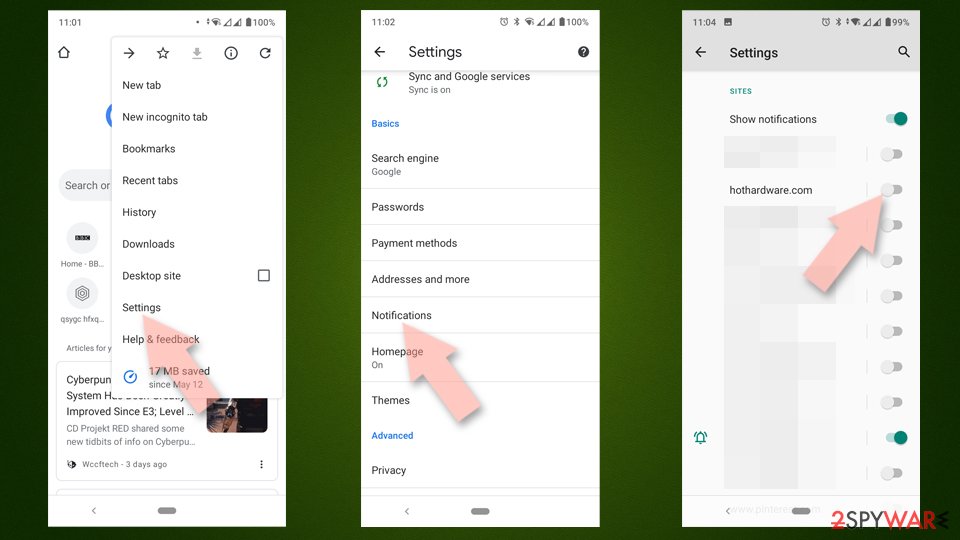
Remove unwanted notifications from Google Chrome (Android):
- Open Google Chrome and tap on Settings (three vertical dots).
- Select Notifications.
- Scroll down to the Sites section.
- Locate the unwanted URL and toggle the button to the left (Off setting).

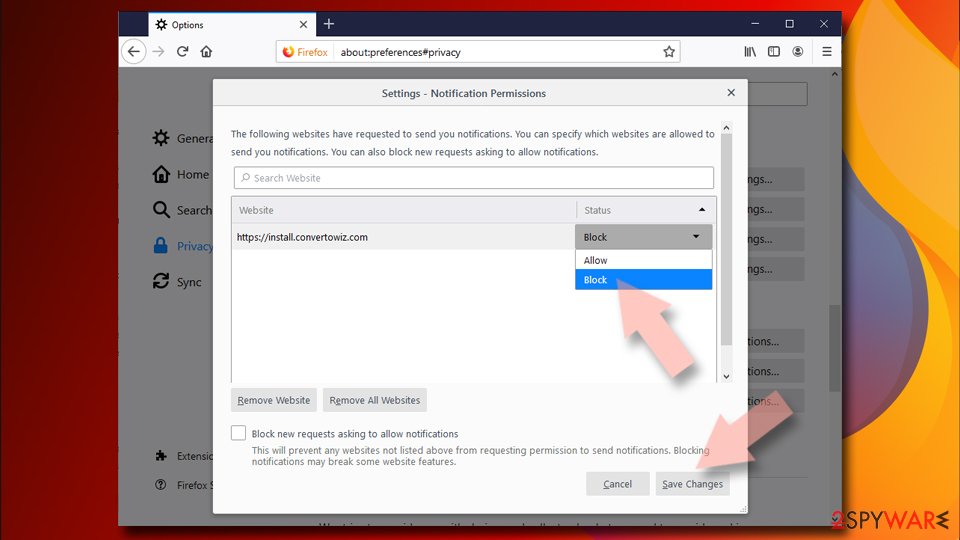
Remove unwanted notifications from Mozilla Firefox:
- Open Mozilla Firefox and go to Menu > Options.
- Click on Privacy & Security section.
- Under Permissions, you should be able to see Notifications. Click the Settings button next to it.
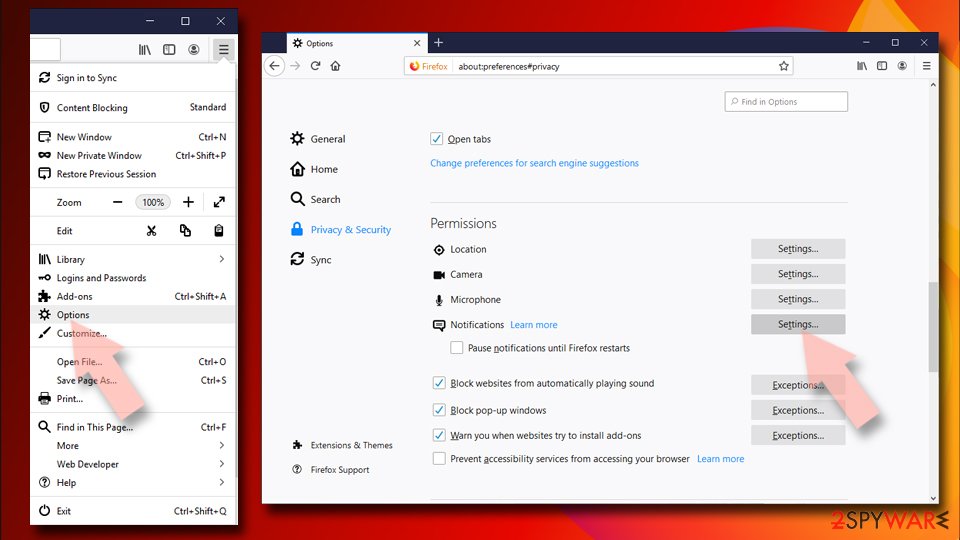
- In the Settings – Notification Permissions window, click on the drop-down menu by the URL in question.
- Select Block and then click on Save Changes. This should remove unwanted notifications from Mozilla Firefox.


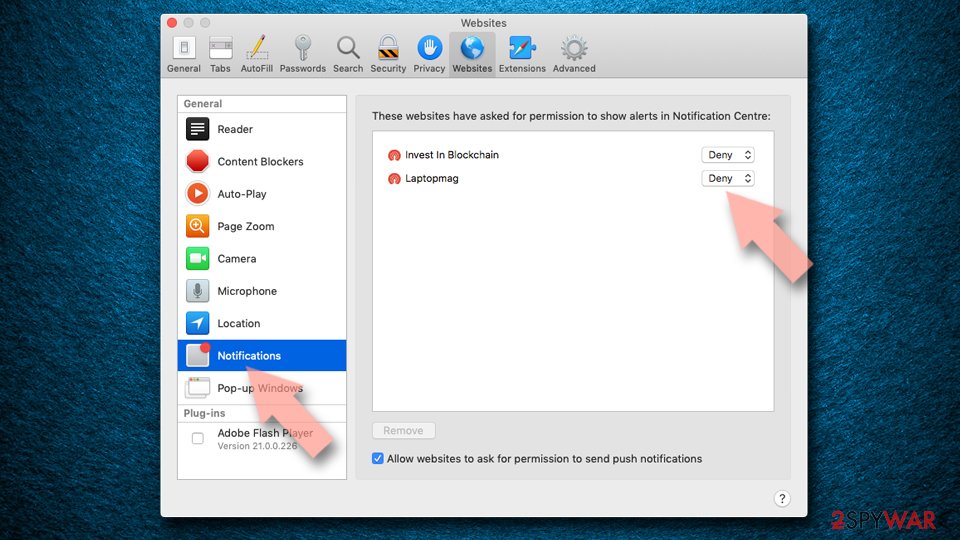
Remove unwanted notifications from Safari:
- Click on Safari > Preferences…
- Go to the Websites tab and, under General, select Notifications.
- Select the web address in question, click the drop-down menu and select Deny.

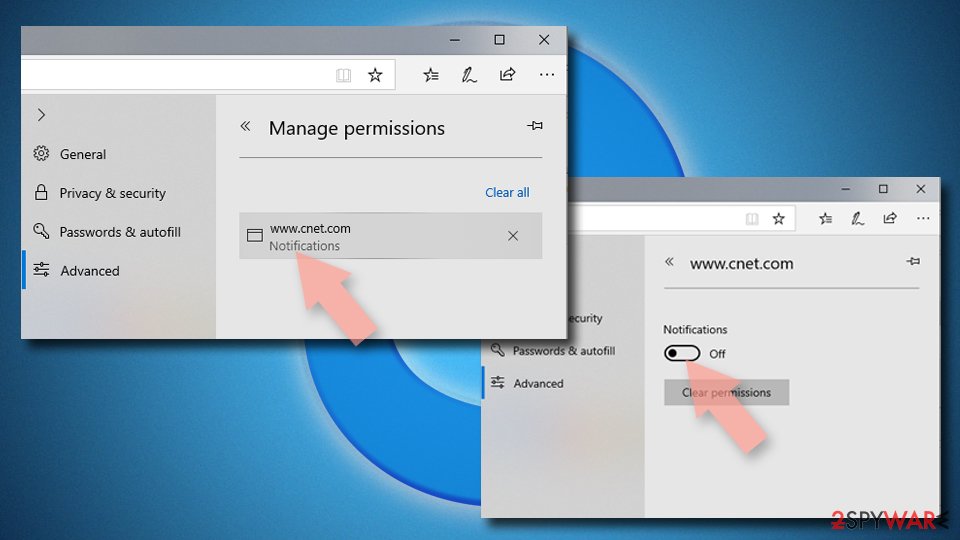
Remove unwanted notifications from MS Edge:
- Open Microsoft Edge, and click the Settings and more button (three horizontal dots) at the top-right of the window.
- Select Settings and then go to Advanced.
- Under Website permissions, pick Manage permissions and select the URL in question.
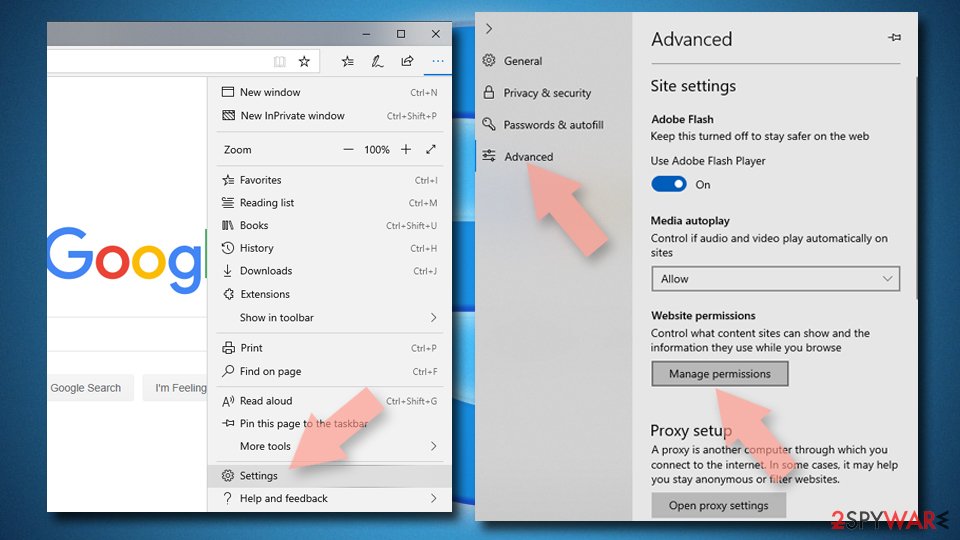
- Toggle the switch to the left to turn notifications off on Microsoft Edge.


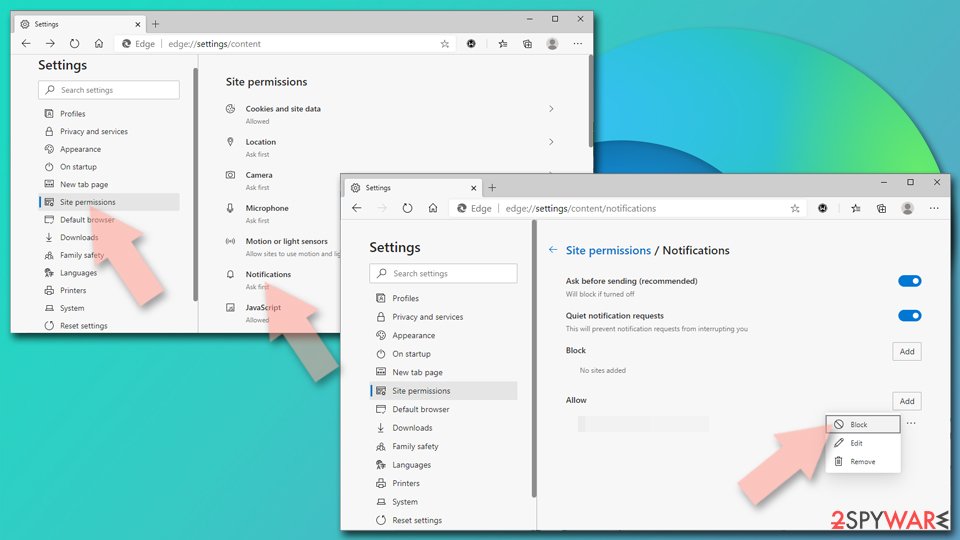
Remove unwanted notifications from MS Edge (Chromium):
- Open Microsoft Edge, and go to Settings.
- Select Site permissions.
- Go to Notifications on the right.
- Under Allow, you will find the unwanted entry.
- Click on More actions and select Block.

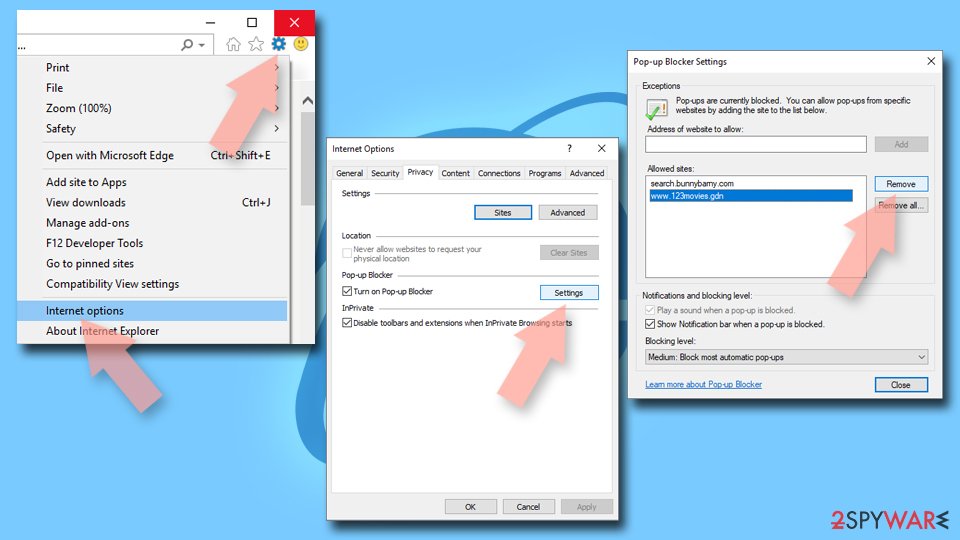
Remove unwanted notifications from Internet Explorer:
- Open Internet Explorer, and click on the Gear icon at the top-right of the window.
- Select Internet options and go to the Privacy tab.
- In the Pop-up Blocker section, click on Settings.
- Locate web address in question under Allowed sites and pick Remove.

Scamming via adware pages
Less than reputable sites can display malicious ads that redirect your browser to D1ue3yi0hkdsdl.cloudfront.net in order to generate advertising revenue. If this happens, you can close the page and install a free browser extension like Adblock in order to block the ads.
However, if you find that you continuously see pop-ups from shady sites, then it is likely that the threat is controlling these processes from the background. Adware is a type of malware that displays pay-per-view or pay-per-click ads, which generates a lot of money for the people who created it.[3]
These ads may include explicit material or links to malicious websites. These ads can even show fake errors like this:
McAfee
Your PC is infected with 5 viruses!
ACTION REQUIRED!
Your McAfee Subscription Has Expired!
Renew now to keep your pc protected.
If your PC is unprotected, it is at risk for viruses and other malware.
This browser-based scam tries to trick you by making you believe that an antivirus quick scan has found 5 viruses and you need to renew your subscription to remove them. The scammers do this to scare you into buying an antivirus license so they can earn a commission from the sale.
Uninstall from Windows
Uninstall from Windows 10/8:
- Type Control Panel into the Windows search box and open the result.
- Under Programs, select Uninstall a program.


Uninstall from Windows 7/XP:
- Click on Windows Start > Control Panel (Windows XP users should click on Add/Remove Programs).
- In Control Panel, select Programs > Uninstall a program.


Remove the unwanted program:
- In the Programs and Features window, look for any recently installed suspicious entries, select them, and click Uninstall.
- If User Account Control appears, click Yes to confirm, then complete the removal.


Delete from macOS
Remove the unwanted application:
- From the menu bar, select Go > Applications.
- In the Applications folder, look for any suspicious entries, then drag them to Trash (or right-click and pick Move to Trash).


Delete leftover files and folders:
- Select Go > Go to Folder.
- Enter /Library/Application Support and remove any suspicious folders related to the unwanted program.
- Repeat the same check in the /Library/LaunchAgents and /Library/LaunchDaemons folders, deleting any suspicious entries.

- Finally, empty the Trash to permanently remove the leftovers.

Remove from Microsoft Edge
Delete unwanted extensions from MS Edge:
- Select Menu (three horizontal dots at the top-right of the browser window) and pick Extensions.
- From the list, pick the extension and click on the Gear icon.
- Click Remove.


Clear cookies and other browser data:
- Click on the Menu (three horizontal dots at the top-right of the browser window) and select Settings > Privacy, search, and services..
- Under Clear browsing data, pick Choose what to clear.
- Select Cookies and other site data and Cached images and files. (apart from passwords, although you might want to include Media licenses as well, if applicable) and click on Clear.


Restore new tab and homepage settings:
- Click the menu icon and choose Settings.
- Then find On startup section.
- Click Remove next to any suspicious startup page.
Reset MS Edge if the above steps did not work:
- Press on Ctrl + Shift + Esc to open Task Manager.
- Click on More details arrow at the bottom of the window.
- Select Details tab.
- Now scroll down and locate every entry with Microsoft Edge name in it. Right-click on each of them and select End Task to stop MS Edge from running.


Instructions for Chromium-based Edge
Delete extensions from MS Edge (Chromium):
- Open Edge and click select Settings > Extensions.
- Delete unwanted extensions by clicking Remove.


Clear cache and site data:
- Click on Menu and go to Settings.
- Select Privacy, search and services.
- Under Clear browsing data, pick Choose what to clear.
- Under Time range, pick All time.
- Select Clear now.


Reset Chromium-based MS Edge:
- Click on Menu and select Settings.
- On the left side, pick Reset settings.
- Select Restore settings to their default values.
- Confirm with Reset.
- This will disable extensions and reset startup pages but will not delete bookmarks, saved passwords, or browsing history.


Remove from Mozilla Firefox (FF)
Remove dangerous extensions:
- Open Mozilla Firefox browser and click on the Menu (three horizontal lines at the top-right of the window).
- Select Add-ons.
- In here, select the unwanted extension and click Remove.


Reset the homepage:
- Click three horizontal lines at the top right corner to open the menu.
- Choose Settings.
- Under Home, set your preferred homepage and new tab settings.
Clear cookies and site data:
- Click Menu and pick Settings.
- Go to Privacy & Security section.
- Scroll down to locate Cookies and Site Data.
- Click on Clear Data...
- Select Cookies and Site Data and Temporary cached files and pages, then click Clear.


Reset Mozilla Firefox
If clearing the browser as explained above did not help, reset Mozilla Firefox:
- Open Mozilla Firefox browser and click the Menu.
- Go to Help and then choose Troubleshooting Information.

- Under Give Firefox a tune up section, click on Refresh Firefox...
- Once the pop-up shows up, confirm the action by pressing on Refresh Firefox.


Remove from Google Chrome
Delete malicious extensions from Google Chrome:
- Open Google Chrome, click on the Menu (three vertical dots at the top-right corner) and select More tools > Extensions.
- In the newly opened window, you will see all the installed extensions. Uninstall all suspicious extensions related to the unwanted program by clicking Remove.


Clear cache and web data from Chrome:
- Click on Menu and pick Settings.
- Under Privacy and security, select Clear browsing data.
- Select Browsing history, Cookies and other site data, as well as Cached images and files.
- Click Clear data.


Change your homepage:
- Click menu and choose Settings.
- Look for a suspicious site in the On startup section.
- Click on Open a specific or set of pages and click on three dots to find the Remove option.
Reset Google Chrome:
If the previous methods did not help you, reset Google Chrome to eliminate all the unwanted components:
- Click on Menu and select Settings.
- In the Settings, scroll down and click Advanced.
- Scroll down and locate Reset and clean up section.
- Now click Restore settings to their original defaults.
- Confirm with Reset settings.


Delete from Safari
Remove dangerous extensions:
- Open Safari, click Safari in the menu at the top-left of the screen, and select Preferences.
- Go to the Extensions tab, look for any suspicious entries, and click Uninstall to remove them.


Clear history and website data:
- Click Safari in the menu and pick Clear History.
- Set Clear to all history and confirm with Clear History.


Reset Safari:
- Click Safari in the menu and select Preferences > Advanced.
- Enable Show Develop menu in menu bar.
- From the menu bar, click Develop and select Empty Caches.


Was this guide helpful?
Be the first to comment