Facebook UnFriend Finder is a potentially unwanted program that shows many different types of ads
Facebook UnFriend Finder is created by the PC-Gizmos company. It should be a useful tool for people who want to track who have removed them from the Facebook friends list, but in reality, things are a little different.
Facebook UnFriend Finder is labeled as a potentially unwanted program by PC security experts. It is considered to be a browser hijacker as well.
Facebook UnFriend Finder reveals itself as a browser extension, which attaches to your browser and modifies its settings. In addition to that, we have found many complaints in web forums about this program from the users who have tried this application.
This description may sound cool, but it is better not to believe every word of the developers. This is how Facebook UnFriend Finder presents itself:
Facebook UnFriend Finder will let you know all Facebook is trying to hide. Install Facebook UnFriend Finder now and get notified whenever anyone stops being your friend on Facebook. Facebook UnFriend Finder is extremely easy to use and install, with the same software working on IE, Firefox, and Chrome. Simply download the installation file and follow the instructions. No one will be able to remove you from their Friend List without you knowing ever again.
Also, the official webpage of this application is closed and its explains that ''The social network asked the removal of the extension because it violates its terms: […] injects unauthorized code into the social networks' source code in order to alter the way that the web pages are rendered in users browsers […] it adds unauthorized links to user's bookmark sections […] posts unauthorized notifications regarding which users have “unfriended” the user or “ignored” his or her friend requests.''
Moreover, this questionable application is able to collect information about your browsing habits and share them with third-party companies. As a result, you may receive Facebook UnFriend Finder ads as well. These ads can show up as pop-ups, in-text links, or banners.

To sum up, we can say that this program is going to do activities that may interrupt your browsing experience. This application also will cause a slowdown of your computer. In order to recover your computer's good performance, you need to uninstall Facebook UnFriend Finder. For that, we recommend using a reliable anti-malware program, for example, SpyHunterCombo Cleaner or MalwarebytesMalwarebytes.
In addition, after various infections or Facebook UnFriend Finder removal your computer may work slower. This can happen due to changed or broken system files. Try to use FortectIntego or another fixing tool to repair the system.
Browser hijackers – a known problem that occurs due to the rash installation of free programs
This particular potentially unwanted program is no longer available on its official website; however, it can still be circulating the web bundled with other free programs. You should know that most likely you are not going to be notified about these attachments.
Unfortunately, the majority of computer users fail to recognize if there are any optional applications attached to the software they have downloaded. You can check if your downloaded file does not include any extra programs by selecting ''advanced'' or ''custom'' installation settings on the installation process.
These options provide an opportunity to customize which software components you want to install and which ones you choose to reject. So look for any suggestions to install unfamiliar apps, plug-ins, add-ons, browser extensions, or other PUPs and untick the boxes near such proposals.
Ways how to delete Facebook UnFriend Finder from the system
It should be clear that this application is not beneficial at all, and it only does suspicious activities on the victim's computer. You can eliminate Facebook UnFriend Finder virus either by anti-spyware software or manually.
We have provided the manual Facebook UnFriend Finder uninstall instructions below. However, we advise you to get a professional anti-malware program, because it will be able to find and eliminate all infectious files on your computer. Such data can be hidden all over your computer, so it can be hard to detect them if you are an inexperienced computer user.
Uninstall from Windows
Uninstall from Windows 10/8:
- Type Control Panel into the Windows search box and open the result.
- Under Programs, select Uninstall a program.


Uninstall from Windows 7/XP:
- Click on Windows Start > Control Panel (Windows XP users should click on Add/Remove Programs).
- In Control Panel, select Programs > Uninstall a program.


Remove the unwanted program:
- In the Programs and Features window, look for any recently installed suspicious entries, select them, and click Uninstall.
- If User Account Control appears, click Yes to confirm, then complete the removal.


Delete from macOS
Remove the unwanted application:
- From the menu bar, select Go > Applications.
- In the Applications folder, look for any suspicious entries, then drag them to Trash (or right-click and pick Move to Trash).


Delete leftover files and folders:
- Select Go > Go to Folder.
- Enter /Library/Application Support and remove any suspicious folders related to the unwanted program.
- Repeat the same check in the /Library/LaunchAgents and /Library/LaunchDaemons folders, deleting any suspicious entries.

- Finally, empty the Trash to permanently remove the leftovers.

Reset Internet Explorer
Remove dangerous add-ons:
- Open Internet Explorer, click on the Gear icon (IE menu) on the top-right corner of the browser
- Pick Manage Add-ons.
- You will see a Manage Add-ons window. Here, look for suspicious plugins. Click on these entries and select Disable.


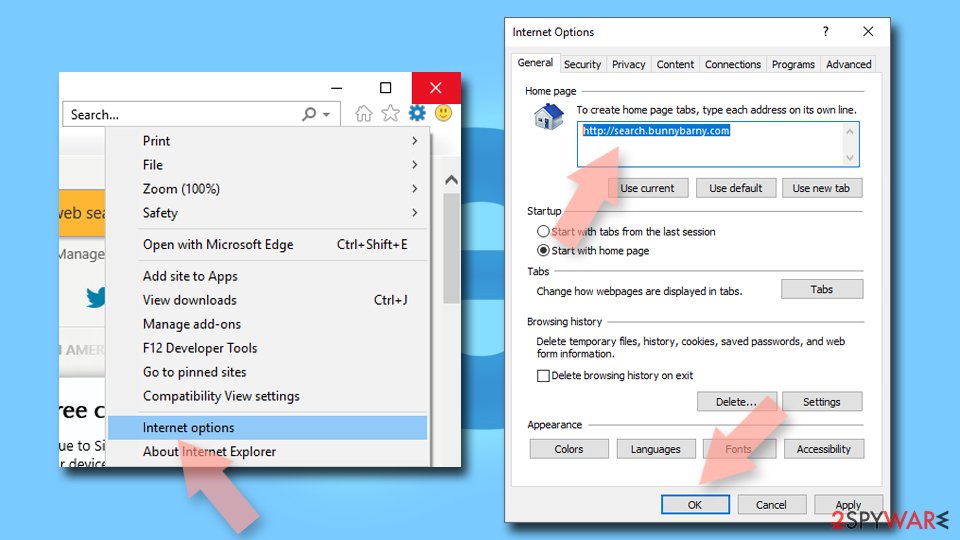
Change your homepage if it was altered:
- Open IE and click on the Gear icon.
- Select Internet Options.
- In the General tab, delete the Home page address and replace it by your preferred one (for example, Google.com).
- Click Apply and then select OK.

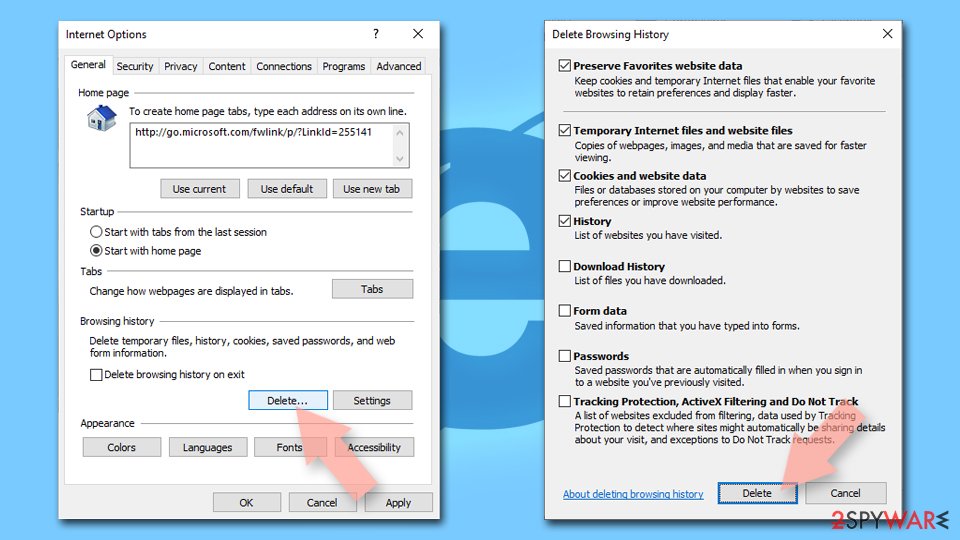
Delete temporary files:
- Press on the Gear icon and select Internet Options.
- Under Browsing history, click Delete...
- Select relevant fields and press Delete.

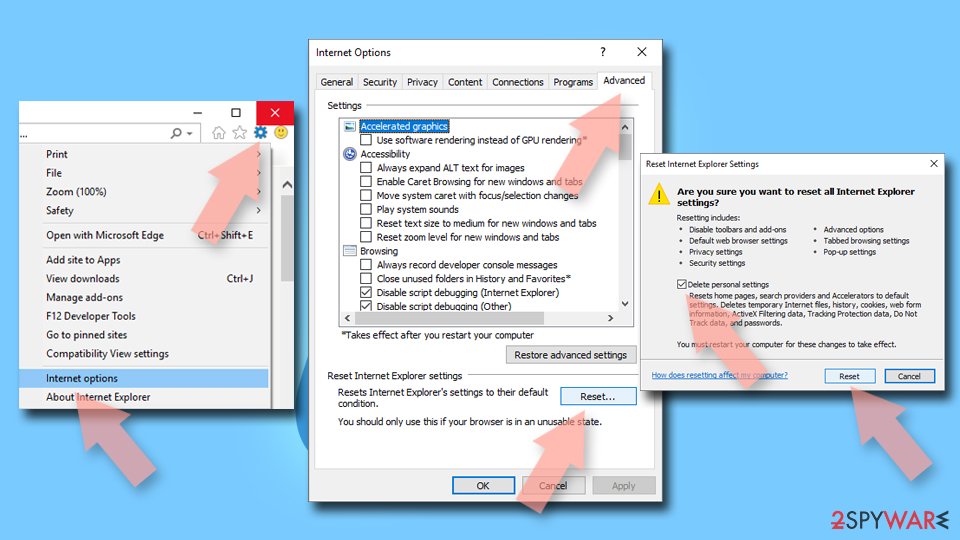
Reset Internet Explorer:
- Click on Gear icon > Internet options and select Advanced tab.
- Select Reset.
- In the new window, check Delete personal settings and select Reset.

Remove from Microsoft Edge
Delete unwanted extensions from MS Edge:
- Select Menu (three horizontal dots at the top-right of the browser window) and pick Extensions.
- From the list, pick the extension and click on the Gear icon.
- Click Remove.


Clear cookies and other browser data:
- Click on the Menu (three horizontal dots at the top-right of the browser window) and select Settings > Privacy, search, and services..
- Under Clear browsing data, pick Choose what to clear.
- Select Cookies and other site data and Cached images and files. (apart from passwords, although you might want to include Media licenses as well, if applicable) and click on Clear.


Restore new tab and homepage settings:
- Click the menu icon and choose Settings.
- Then find On startup section.
- Click Remove next to any suspicious startup page.
Reset MS Edge if the above steps did not work:
- Press on Ctrl + Shift + Esc to open Task Manager.
- Click on More details arrow at the bottom of the window.
- Select Details tab.
- Now scroll down and locate every entry with Microsoft Edge name in it. Right-click on each of them and select End Task to stop MS Edge from running.


Instructions for Chromium-based Edge
Delete extensions from MS Edge (Chromium):
- Open Edge and click select Settings > Extensions.
- Delete unwanted extensions by clicking Remove.


Clear cache and site data:
- Click on Menu and go to Settings.
- Select Privacy, search and services.
- Under Clear browsing data, pick Choose what to clear.
- Under Time range, pick All time.
- Select Clear now.


Reset Chromium-based MS Edge:
- Click on Menu and select Settings.
- On the left side, pick Reset settings.
- Select Restore settings to their default values.
- Confirm with Reset.
- This will disable extensions and reset startup pages but will not delete bookmarks, saved passwords, or browsing history.


Remove from Mozilla Firefox (FF)
Remove dangerous extensions:
- Open Mozilla Firefox browser and click on the Menu (three horizontal lines at the top-right of the window).
- Select Add-ons.
- In here, select the unwanted extension and click Remove.


Reset the homepage:
- Click three horizontal lines at the top right corner to open the menu.
- Choose Settings.
- Under Home, set your preferred homepage and new tab settings.
Clear cookies and site data:
- Click Menu and pick Settings.
- Go to Privacy & Security section.
- Scroll down to locate Cookies and Site Data.
- Click on Clear Data...
- Select Cookies and Site Data and Temporary cached files and pages, then click Clear.


Reset Mozilla Firefox
If clearing the browser as explained above did not help, reset Mozilla Firefox:
- Open Mozilla Firefox browser and click the Menu.
- Go to Help and then choose Troubleshooting Information.

- Under Give Firefox a tune up section, click on Refresh Firefox...
- Once the pop-up shows up, confirm the action by pressing on Refresh Firefox.


Remove from Google Chrome
Delete malicious extensions from Google Chrome:
- Open Google Chrome, click on the Menu (three vertical dots at the top-right corner) and select More tools > Extensions.
- In the newly opened window, you will see all the installed extensions. Uninstall all suspicious extensions related to the unwanted program by clicking Remove.


Clear cache and web data from Chrome:
- Click on Menu and pick Settings.
- Under Privacy and security, select Clear browsing data.
- Select Browsing history, Cookies and other site data, as well as Cached images and files.
- Click Clear data.


Change your homepage:
- Click menu and choose Settings.
- Look for a suspicious site in the On startup section.
- Click on Open a specific or set of pages and click on three dots to find the Remove option.
Reset Google Chrome:
If the previous methods did not help you, reset Google Chrome to eliminate all the unwanted components:
- Click on Menu and select Settings.
- In the Settings, scroll down and click Advanced.
- Scroll down and locate Reset and clean up section.
- Now click Restore settings to their original defaults.
- Confirm with Reset settings.


Delete from Safari
Remove dangerous extensions:
- Open Safari, click Safari in the menu at the top-left of the screen, and select Preferences.
- Go to the Extensions tab, look for any suspicious entries, and click Uninstall to remove them.


Clear history and website data:
- Click Safari in the menu and pick Clear History.
- Set Clear to all history and confirm with Clear History.


Reset Safari:
- Click Safari in the menu and select Preferences > Advanced.
- Enable Show Develop menu in menu bar.
- From the menu bar, click Develop and select Empty Caches.


Was this guide helpful?
4 comments