

Hacking Alert virus: the threat you should not ignore
Hacking Alert virus might convince users that their computers have completely crashed. The computer screen is locked, and the victims are presented with the ominous message that the system was blocked for security reasons. Despite such dramatic alerts, you should not panic and, instead, remove Hacking Alert as soon as possible. As a matter of fact, your device has been targeted by the adware which is at fault for creating such messages. They are fake alerts designed to persuade you into calling an imposter who presents himself as a tech support specialist. Therefore, we deliver the overview of this malware and the options to complete Hacking Alert removal. Let FortectIntego assist you in the termination process.
Lately, there has been an increase in such technical support scams. They prove to be an effective way to wheedle out money from credulous and alarmed users. Nonetheless, if you know some essential tips, you can easily distinguish the real system error from the fraud. The original notification caused by the system error which is commonly known as BsoD (“blue screen of death”) does not include any phone numbers. In this case, Hacking alert scam shows this message and indicates the specific number, 0-800-098-8383, to solve the supposed issue. Obviously, users who face this problem for the first time might recklessly dial the number only to find out some suspicious “specialist” offering to obtain a program. Hoping to end the suffering, you purchase the recommended software.
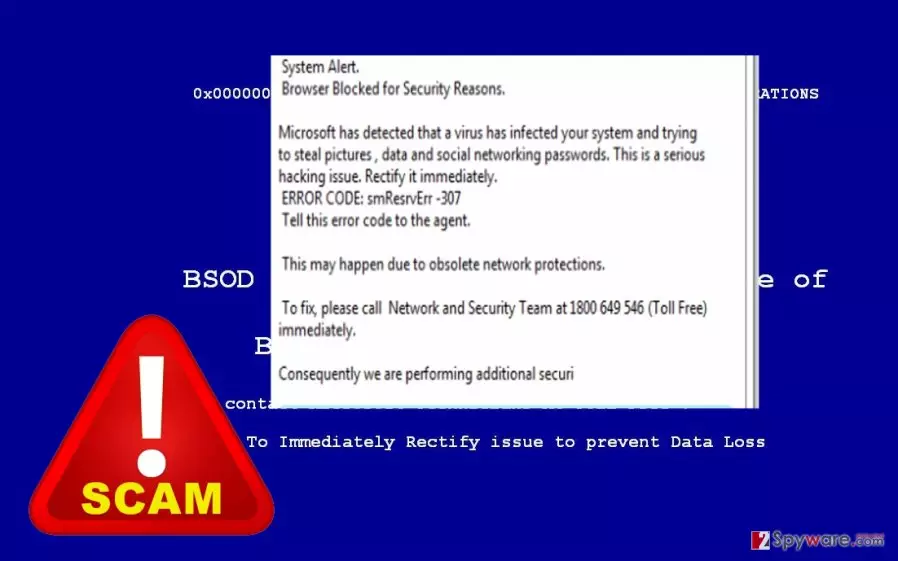
To your bewilderment, you find that the program proves to be completely futile. What is more, there are no guarantees that you will not see Hacking Alert ads or similar notifications again. It is likely that such scammers who make the profit of creating such scams might sell not only useless apps but potentially malignant ones as well. Thus, while they operate on the device, you might be bothered by Hacking Alert redirect tendency or the redirects caused by other programs. Their essence is to misguide you to the websites full of annoying ads or links to visit infected domains.
How did the adware manage to sneak into my computer?
Hacking Alert scam uses the same method to attack computers like ordinary browser hijackers or adware. They tend to disguise themselves under free applications. Unfortunately, few users pay attention to the installation process. As a result, unwanted or potentially malignant programs pave their way into the operating system. Likewise, Hacking Alert hijack occurred. Though this malware might be stressful, detecting does not require any specific preparation or knowledge. Before you install a new application, choose “Advanced” settings. Later on, make sure no unnecessary programs get installed without your notice.
Remove the malware easily
Despite its menacing appearance, eliminating Hacking Alert virus does not cause trouble. Install an anti-spyware program to ensure that no file related to this adware remains. Keeping the program updated also increases the overall protection of the computer. You can try to remove Hacking Alert manually as well. Implement each step carefully and attentively. Otherwise, a missed detail might increase the risk of the re-hijack. Thus, if manual Hacking Alert removal does not seem attractive entrust the elimination to a reliable security program.
Uninstall from Windows
Uninstall from Windows 10/8:
- Type Control Panel into the Windows search box and open the result.
- Under Programs, select Uninstall a program.


Uninstall from Windows 7/XP:
- Click on Windows Start > Control Panel (Windows XP users should click on Add/Remove Programs).
- In Control Panel, select Programs > Uninstall a program.


Remove the unwanted program:
- In the Programs and Features window, look for any recently installed suspicious entries, select them, and click Uninstall.
- If User Account Control appears, click Yes to confirm, then complete the removal.


Delete from macOS
Remove the unwanted application:
- From the menu bar, select Go > Applications.
- In the Applications folder, look for any suspicious entries, then drag them to Trash (or right-click and pick Move to Trash).


Delete leftover files and folders:
- Select Go > Go to Folder.
- Enter /Library/Application Support and remove any suspicious folders related to the unwanted program.
- Repeat the same check in the /Library/LaunchAgents and /Library/LaunchDaemons folders, deleting any suspicious entries.

- Finally, empty the Trash to permanently remove the leftovers.

Remove from Microsoft Edge
Delete unwanted extensions from MS Edge:
- Select Menu (three horizontal dots at the top-right of the browser window) and pick Extensions.
- From the list, pick the extension and click on the Gear icon.
- Click Remove.


Clear cookies and other browser data:
- Click on the Menu (three horizontal dots at the top-right of the browser window) and select Settings > Privacy, search, and services..
- Under Clear browsing data, pick Choose what to clear.
- Select Cookies and other site data and Cached images and files. (apart from passwords, although you might want to include Media licenses as well, if applicable) and click on Clear.


Restore new tab and homepage settings:
- Click the menu icon and choose Settings.
- Then find On startup section.
- Click Remove next to any suspicious startup page.
Reset MS Edge if the above steps did not work:
- Press on Ctrl + Shift + Esc to open Task Manager.
- Click on More details arrow at the bottom of the window.
- Select Details tab.
- Now scroll down and locate every entry with Microsoft Edge name in it. Right-click on each of them and select End Task to stop MS Edge from running.


Instructions for Chromium-based Edge
Delete extensions from MS Edge (Chromium):
- Open Edge and click select Settings > Extensions.
- Delete unwanted extensions by clicking Remove.


Clear cache and site data:
- Click on Menu and go to Settings.
- Select Privacy, search and services.
- Under Clear browsing data, pick Choose what to clear.
- Under Time range, pick All time.
- Select Clear now.


Reset Chromium-based MS Edge:
- Click on Menu and select Settings.
- On the left side, pick Reset settings.
- Select Restore settings to their default values.
- Confirm with Reset.
- This will disable extensions and reset startup pages but will not delete bookmarks, saved passwords, or browsing history.


Remove from Mozilla Firefox (FF)
Remove dangerous extensions:
- Open Mozilla Firefox browser and click on the Menu (three horizontal lines at the top-right of the window).
- Select Add-ons.
- In here, select the unwanted extension and click Remove.


Reset the homepage:
- Click three horizontal lines at the top right corner to open the menu.
- Choose Settings.
- Under Home, set your preferred homepage and new tab settings.
Clear cookies and site data:
- Click Menu and pick Settings.
- Go to Privacy & Security section.
- Scroll down to locate Cookies and Site Data.
- Click on Clear Data...
- Select Cookies and Site Data and Temporary cached files and pages, then click Clear.


Reset Mozilla Firefox
If clearing the browser as explained above did not help, reset Mozilla Firefox:
- Open Mozilla Firefox browser and click the Menu.
- Go to Help and then choose Troubleshooting Information.

- Under Give Firefox a tune up section, click on Refresh Firefox...
- Once the pop-up shows up, confirm the action by pressing on Refresh Firefox.



Remove from Google Chrome
Delete malicious extensions from Google Chrome:
- Open Google Chrome, click on the Menu (three vertical dots at the top-right corner) and select More tools > Extensions.
- In the newly opened window, you will see all the installed extensions. Uninstall all suspicious extensions related to the unwanted program by clicking Remove.


Clear cache and web data from Chrome:
- Click on Menu and pick Settings.
- Under Privacy and security, select Clear browsing data.
- Select Browsing history, Cookies and other site data, as well as Cached images and files.
- Click Clear data.


Change your homepage:
- Click menu and choose Settings.
- Look for a suspicious site in the On startup section.
- Click on Open a specific or set of pages and click on three dots to find the Remove option.
Reset Google Chrome:
If the previous methods did not help you, reset Google Chrome to eliminate all the unwanted components:
- Click on Menu and select Settings.
- In the Settings, scroll down and click Advanced.
- Scroll down and locate Reset and clean up section.
- Now click Restore settings to their original defaults.
- Confirm with Reset settings.


Delete from Safari
Remove dangerous extensions:
- Open Safari, click Safari in the menu at the top-left of the screen, and select Preferences.
- Go to the Extensions tab, look for any suspicious entries, and click Uninstall to remove them.


Clear history and website data:
- Click Safari in the menu and pick Clear History.
- Set Clear to all history and confirm with Clear History.


Reset Safari:
- Click Safari in the menu and select Preferences > Advanced.
- Enable Show Develop menu in menu bar.
- From the menu bar, click Develop and select Empty Caches.


Did this guide help?
3 comments
StephenK
This alert scared the life out of me!
Uma
Now we know the main weakness of such frauds.
ChristianBach
I checked my PC with the anti-virus and it found several PUPs. Luckily, after that, the alert disappeared.