

Valid-check-tl.azurewebsites.net is a malicious website that can put your computer security in danger

Valid-check-tl.azurewebsites.net is a deceptive website that masquerades as a legitimate browser feature to ultimately generate advertising revenue. Scammers frequently create such fake websites, and push notification scams are especially common when visiting high-risk sites like illegal video streaming platforms or websites distributing pirated software. Additionally, users might encounter a phishing site when their systems are infected with adware, a type of unwanted software that delivers intrusive ads.
When users are tricked by the misleading messages from Valid-check-tl.azurewebsites.net, they may not notice anything unusual at first, except for being redirected to other scam sites. Over time, they start seeing intrusive pop-up notifications with dubious content on their screens. Since users have been deceived into subscribing to these notifications, identifying the source of these annoying pop-ups can be challenging. Fortunately, stopping this activity is not overly complicated—simply follow the guide below.
| Name | Valid-check-tl.azurewebsites.net |
| Type | Push notifications, ads, scam, pop-ups |
| Distribution | After you click the “Allow” button within the prompt upon site entry |
| Symptoms | Notifications show up at the bottom-right corner of the screen – these include fraudulent content and links to potentially dangerous websites |
| Risks | Push notification prompts might include links to malicious websites, resulting in financial losses, personal information disclosure, or malware infections |
| Removal | To prevent the site from displaying notifications to you, access the site permission section via your web browser settings – you can find more details below. We also recommend checking the system for adware with SpyHunterCombo Cleaner security software |
| Other tips | It is important to clean web browser caches to prevent further data tracking and other issues related to web data corruption – use FortectIntego to do this quicker |
The creators of Valid-check-tl.azurewebsites.net have perfected their deceptive methods, leveraging psychological tactics and social engineering to lure users into their traps. They take advantage of human tendencies such as curiosity, trust, and lack of awareness to succeed in their schemes.
How the scam works
When users are redirected to Valid-check-tl.azurewebsites.net, they typically encounter prompts to click an “Allow” button, presented with little to no context. The manipulative wording of these prompts is designed to be enticing and adaptable, often appearing as:
- Click Allow to verify you are not a robot
- Click Allow to begin downloading
- If you are over 18, click Allow
- Click “Allow” to claim your prize
- Press “Allow” to view the video
Many users might click “Allow,” believing it is a necessary step for their desired action, only to find themselves redirected to another suspicious site that does not deliver the promised content. At first, this interaction may seem harmless, leading users to continue their normal online activities without concern.
However, this single click grants permission for a flood of unwanted ads from Valid-check-tl.azurewebsites.net, which can clutter the screen and pose security risks. Fortunately, there is an easy fix: changing browser settings to block notifications from Valid-check-tl.azurewebsites.net can quickly eliminate these intrusive ads. This scenario underscores the importance of being cautious and informed about the advanced tactics cybercriminals use to exploit internet users.

Removing unwanted pop-ups
Push notifications are a widely used feature on many websites, yet they are often misunderstood. Many users, unfamiliar with how they work, might assume their computer is infected with a virus when they see suspicious pop-ups. This reaction is understandable, given the unexpected nature of these notifications.
Push notifications are not caused by adware or other infections directly. They appear only when users have allowed a specific website to send them notifications via a prompt. Therefore, encountering ads from Valid-check-tl.azurewebsites.net does not indicate a virus but rather that the website was granted permission to show notifications. This means traditional virus removal methods won't work to stop these notifications.
To stop the ads from Valid-check-tl.azurewebsites.net, you need to adjust your browser settings. This involves blocking the website's URL to prevent it from delivering further notifications. By doing this, you can eliminate intrusive ads and reduce the risk of encountering malicious links. This highlights the importance of being cautious when granting permissions to websites and staying informed about how push notifications work.
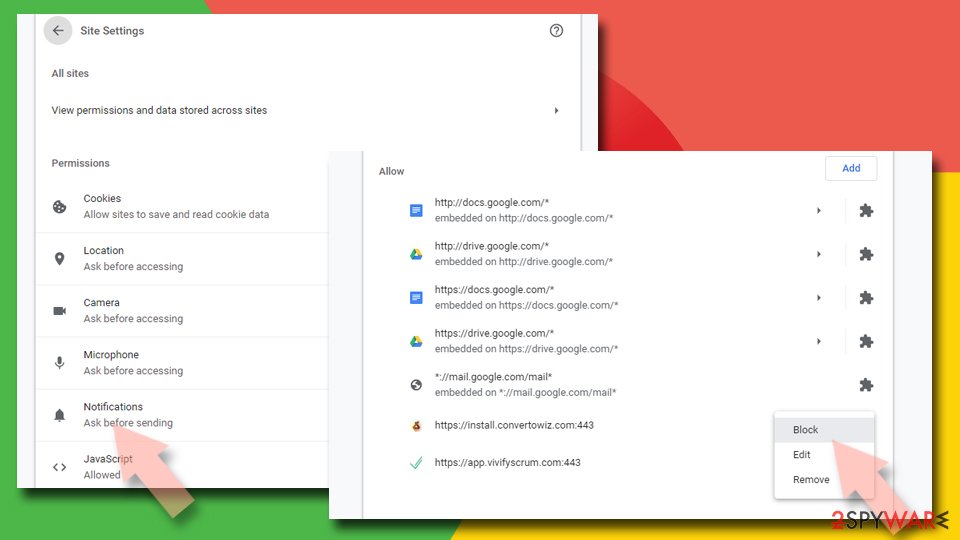
Google Chrome
- Open the Google Chrome browser and go to Menu > Settings.
- Scroll down and click on Advanced.
- Locate the Privacy and security section and pick Site Settings > Notifications.
- Look at the Allow section and look for a suspicious URL.
- Click the three vertical dots next to it and pick Block. This should remove unwanted notifications from Google Chrome.

Mozilla Firefox
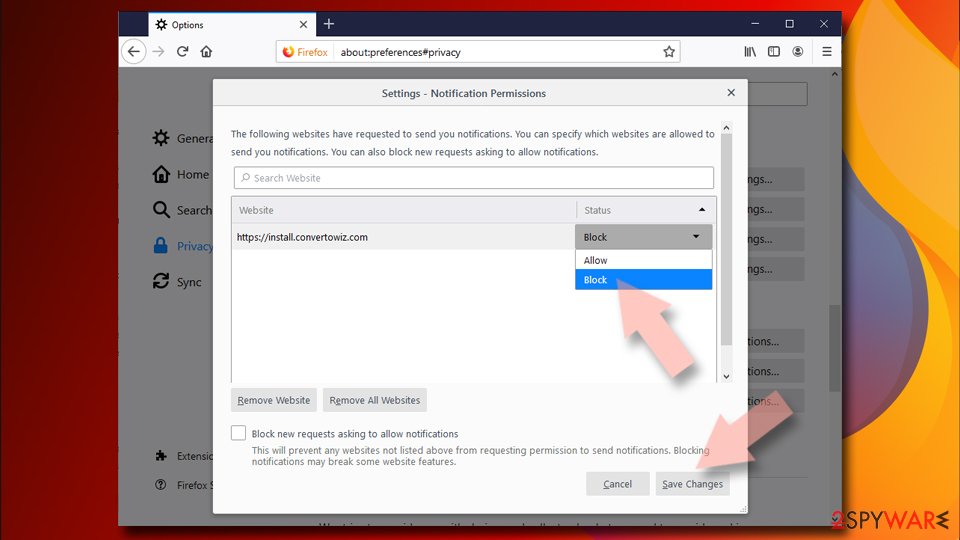
- Open Mozilla Firefox and go to Menu > Options.
- Click on Privacy & Security section.
- Under Permissions, you should be able to see Notifications. Click the Settings button next to it.
- In the Settings – Notification Permissions window, click on the drop-down menu by the URL in question.
- Select Block and then click on Save Changes. This should remove unwanted notifications from Mozilla Firefox.

Safari
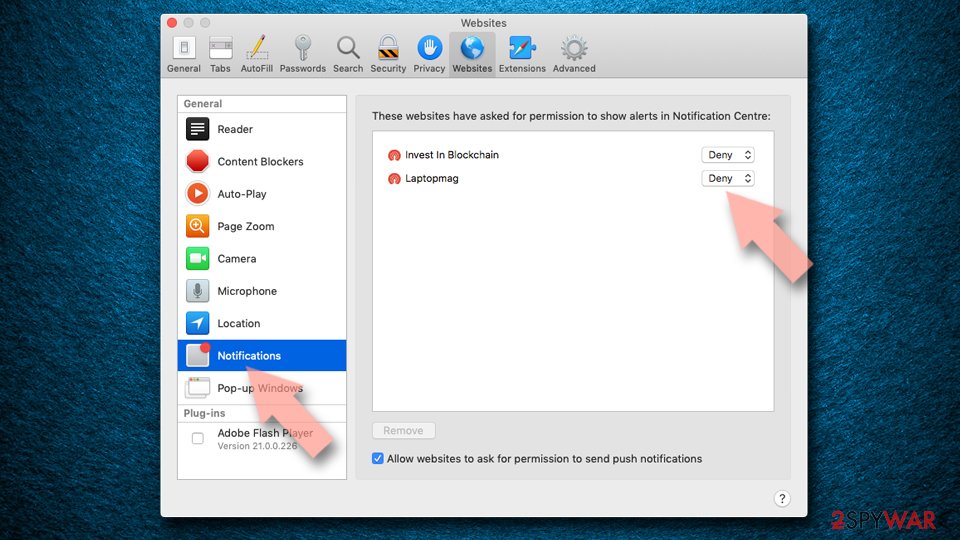
- Click on Safari > Preferences…
- Go to the Websites tab and, under General, select Notifications.
- Select the web address in question, click the drop-down menu and select Deny.

MS Edge (Chromium)
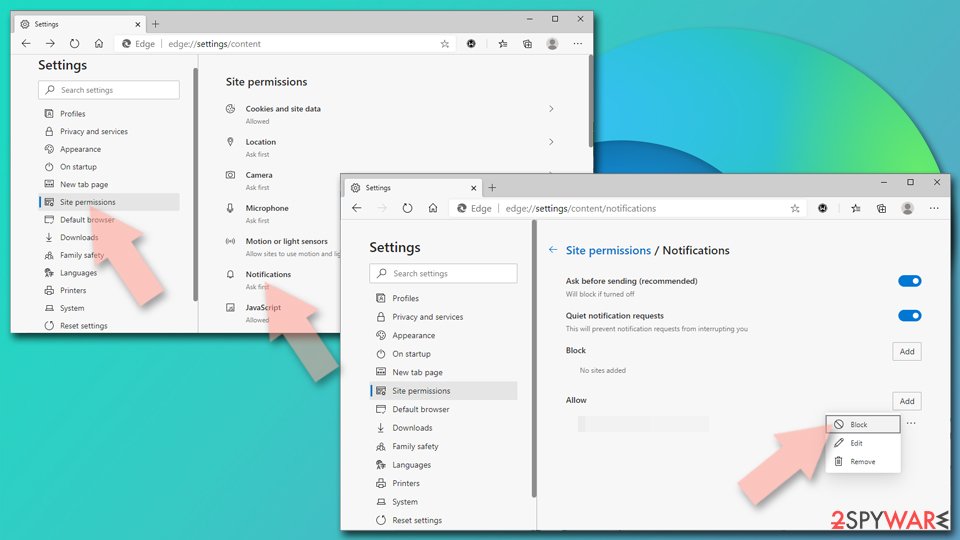
- Open Microsoft Edge, and go to Settings.
- Select Site permissions.
- Go to Notifications on the right.
- Under Allow, you will find the unwanted entry.
- Click on More actions and select Block.

Internet Explorer
- Open Internet Explorer, and click on the Gear icon at the top-right of the window.
- Select Internet options and go to the Privacy tab.
- In the Pop-up Blocker section, click on Settings.
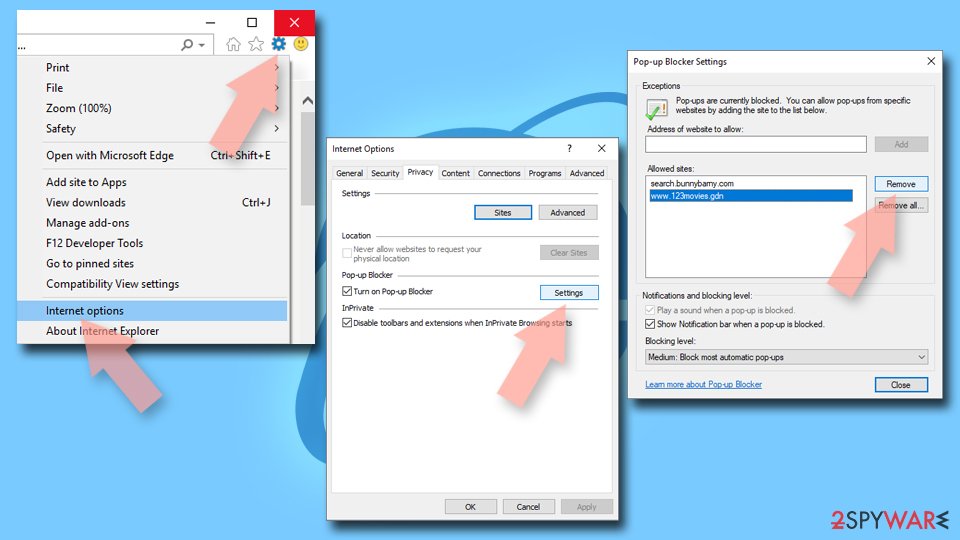
- Locate the web address in question under Allowed sites and pick Remove.

Taking take of other potential infections
Although adware is not the direct cause of push notifications, it can lead you to websites like Valid-check-tl.azurewebsites.net. Adware often comes bundled with free software downloads, so if you frequently visit sites to download such apps, you might unintentionally install adware. Additionally, infections can occur through fake Flash Player updates or visits to illegal software download sites.
Adware can redirect you to websites that then prompt you to allow push notifications, leading to the intrusive ads from Valid-check-tl.azurewebsites.net. This is a common tactic to generate revenue through advertising, exploiting the permissions you unknowingly grant. Therefore, it is important to be cautious about the sources of your software downloads and the prompts you accept.
It is crucial to check your system for adware or more severe threats that might be running unnoticed in the background. Performing a full system scan with reputable security software like SpyHunterCombo Cleaner or MalwarebytesMalwarebytes is highly recommended. These tools can identify and remove unwanted software, ensuring your system is clean.
After removing adware, use a maintenance tool like FortectIntego to clean your browsers and eliminate accumulated junk files. This includes removing third-party cookies that can track your online activities for years if not deleted. Cleaning these items helps protect your privacy and improves system performance.
If you prefer manual removal methods, we provide detailed instructions below to help you remove adware and stop push notifications from Valid-check-tl.azurewebsites.net. Following these steps ensures that your system remains secure and free from unwanted interruptions.
Uninstall from Windows
Uninstall from Windows 10/8:
- Type Control Panel into the Windows search box and open the result.
- Under Programs, select Uninstall a program.


Uninstall from Windows 7/XP:
- Click on Windows Start > Control Panel (Windows XP users should click on Add/Remove Programs).
- In Control Panel, select Programs > Uninstall a program.


Remove the unwanted program:
- In the Programs and Features window, look for any recently installed suspicious entries, select them, and click Uninstall.
- If User Account Control appears, click Yes to confirm, then complete the removal.


Delete from macOS
Remove the unwanted application:
- From the menu bar, select Go > Applications.
- In the Applications folder, look for any suspicious entries, then drag them to Trash (or right-click and pick Move to Trash).


Delete leftover files and folders:
- Select Go > Go to Folder.
- Enter /Library/Application Support and remove any suspicious folders related to the unwanted program.
- Repeat the same check in the /Library/LaunchAgents and /Library/LaunchDaemons folders, deleting any suspicious entries.

- Finally, empty the Trash to permanently remove the leftovers.

Remove from Microsoft Edge
Delete unwanted extensions from MS Edge:
- Select Menu (three horizontal dots at the top-right of the browser window) and pick Extensions.
- From the list, pick the extension and click on the Gear icon.
- Click Remove.


Clear cookies and other browser data:
- Click on the Menu (three horizontal dots at the top-right of the browser window) and select Settings > Privacy, search, and services..
- Under Clear browsing data, pick Choose what to clear.
- Select Cookies and other site data and Cached images and files. (apart from passwords, although you might want to include Media licenses as well, if applicable) and click on Clear.


Restore new tab and homepage settings:
- Click the menu icon and choose Settings.
- Then find On startup section.
- Click Remove next to any suspicious startup page.
Reset MS Edge if the above steps did not work:
- Press on Ctrl + Shift + Esc to open Task Manager.
- Click on More details arrow at the bottom of the window.
- Select Details tab.
- Now scroll down and locate every entry with Microsoft Edge name in it. Right-click on each of them and select End Task to stop MS Edge from running.


Instructions for Chromium-based Edge
Delete extensions from MS Edge (Chromium):
- Open Edge and click select Settings > Extensions.
- Delete unwanted extensions by clicking Remove.


Clear cache and site data:
- Click on Menu and go to Settings.
- Select Privacy, search and services.
- Under Clear browsing data, pick Choose what to clear.
- Under Time range, pick All time.
- Select Clear now.


Reset Chromium-based MS Edge:
- Click on Menu and select Settings.
- On the left side, pick Reset settings.
- Select Restore settings to their default values.
- Confirm with Reset.
- This will disable extensions and reset startup pages but will not delete bookmarks, saved passwords, or browsing history.


Remove from Mozilla Firefox (FF)
Remove dangerous extensions:
- Open Mozilla Firefox browser and click on the Menu (three horizontal lines at the top-right of the window).
- Select Add-ons.
- In here, select the unwanted extension and click Remove.


Reset the homepage:
- Click three horizontal lines at the top right corner to open the menu.
- Choose Settings.
- Under Home, set your preferred homepage and new tab settings.
Clear cookies and site data:
- Click Menu and pick Settings.
- Go to Privacy & Security section.
- Scroll down to locate Cookies and Site Data.
- Click on Clear Data...
- Select Cookies and Site Data and Temporary cached files and pages, then click Clear.


Reset Mozilla Firefox
If clearing the browser as explained above did not help, reset Mozilla Firefox:
- Open Mozilla Firefox browser and click the Menu.
- Go to Help and then choose Troubleshooting Information.

- Under Give Firefox a tune up section, click on Refresh Firefox...
- Once the pop-up shows up, confirm the action by pressing on Refresh Firefox.



Remove from Google Chrome
Delete malicious extensions from Google Chrome:
- Open Google Chrome, click on the Menu (three vertical dots at the top-right corner) and select More tools > Extensions.
- In the newly opened window, you will see all the installed extensions. Uninstall all suspicious extensions related to the unwanted program by clicking Remove.


Clear cache and web data from Chrome:
- Click on Menu and pick Settings.
- Under Privacy and security, select Clear browsing data.
- Select Browsing history, Cookies and other site data, as well as Cached images and files.
- Click Clear data.


Change your homepage:
- Click menu and choose Settings.
- Look for a suspicious site in the On startup section.
- Click on Open a specific or set of pages and click on three dots to find the Remove option.
Reset Google Chrome:
If the previous methods did not help you, reset Google Chrome to eliminate all the unwanted components:
- Click on Menu and select Settings.
- In the Settings, scroll down and click Advanced.
- Scroll down and locate Reset and clean up section.
- Now click Restore settings to their original defaults.
- Confirm with Reset settings.


Delete from Safari
Remove dangerous extensions:
- Open Safari, click Safari in the menu at the top-left of the screen, and select Preferences.
- Go to the Extensions tab, look for any suspicious entries, and click Uninstall to remove them.


Clear history and website data:
- Click Safari in the menu and pick Clear History.
- Set Clear to all history and confirm with Clear History.


Reset Safari:
- Click Safari in the menu and select Preferences > Advanced.
- Enable Show Develop menu in menu bar.
- From the menu bar, click Develop and select Empty Caches.


Did this guide help?
Be the first to comment