
Is VideoBox a virus? What Baidu's VideoBox player installs and how to remove it
VideoBox is a Windows media player from Baidu, built around the Arabic version of its hao123 movie site, and our 2017 guide called it a virus. We found no source that it is malware, but we did not run its installer, so the safe answer is to keep it only if you use it and otherwise uninstall it through Installed apps.
Facts checked October 6, 2026. Removal steps tested on Windows 11 (26H2) and checked against Microsoft's and the browser makers' current documentation.
Automatic
Get a free scan and check if your PC is infected.
Fortect finds malware, unwanted programs and the Windows damage they leave behind, and repairs it in one pass.
An automatic scan checks installed programs, startup items and browser extensions for anything that came with VideoBox.
Do it yourself · free Remove VideoBox yourself 4 steps, about 12 minutes, no software needed.

VideoBox: summary
| Type | Legitimate Windows media player and downloader from Baidu; our 2017 guide called it a virus and adware, which we could not confirm |
|---|---|
| Risk | Medium: nothing we read calls it malware, but it starts with Windows, runs an update service, and its installer and ads were not tested |
| Symptoms | VideoBox or Baidu entries in Installed apps that you do not remember; a start-up entry and a VBUpSvr service; a hao123 home page or ads you did not choose (our 2017 claims, unconfirmed) |
| How to get rid of it | Close it in Task Manager, uninstall VideoBox and anything installed the same day in Installed apps, delete the leftover %APPDATA%\Baidu\VideoBox folder, scan, reset the home page |
| Our check (6 October 2026) | Portal pages and one registry record read, one address tried; no installer run, no browser test, so ads, redirects and offers seen today: none seen, not tested |
| Running since | hao123.com registered 15 November 2000; Softonic's VideoBox 1.9 last updated 30 June 2014 |
| Removal | Scan the PC with security software to find and remove the malware and anything installed with it. Fortect scans Windows for malware and repairs the system files and settings it damaged. Remove it nowTo use the full-featured product, you have to purchase a license for Fortect. The scan is free. |
Show 12 more facts
| First reported by us | 24 February 2017 |
|---|---|
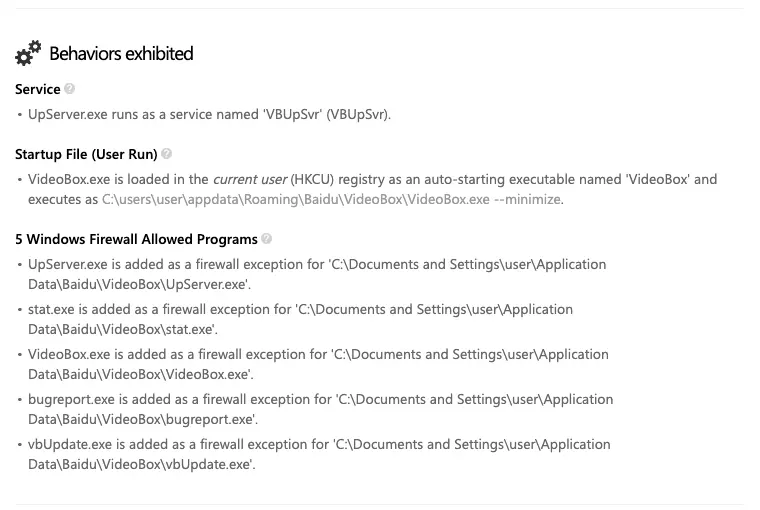
| Installed on the PC | Files in AppData\Roaming\Baidu\VideoBox, a start-up entry, the VBUpSvr service and firewall exceptions (Should I Remove It, builds 2.x) |
| Detection | No Microsoft detection name is known for VideoBox; Softonic's 2020 VirusTotal scan of version 1.9 was marked clean; we scanned no sample |
| Damage | No harm to files recorded; our 2017 claims of ads, changed settings and a slow PC are unconfirmed |
| Distribution | Download portals and the Arabic hao123 movie page; our 2017 suspicion that it came bundled with free programs is unconfirmed |
| Evidence | Softonic, Should I Remove It, File.net, Baidu Baike, a registry record, our 2017 report |
| Name | VideoBox |
| Program | VideoBox |
| Publisher | Baidu (Baidu.com, Inc) |
| Category | Media player |
| First seen | 24 February 2017 |
| Facts checked | 6 October 2026 |
Facts checked on 6 October 2026 against Softonic, Should I Remove It, File.net, Baidu's encyclopedia entry for hao123 and one registry record. We did not run an installer or open any page in a browser, so what the installer offers today is not confirmed; the ads, home-page change and slowdown claimed in our 2017 guide could not be sourced.
What VideoBox is, and what our 2017 guide got wrong
VideoBox is a real Windows media player and downloader from Baidu, built around the Arabic version of Baidu's hao123 movie site. Nothing we read calls it malware, and nothing we read clears it either: our 2017 guide called it a "virus" and listed ads and setting changes that we could not confirm.
- What it is
- A free media player and downloader for Windows. Softonic describes it as integrated with the Arabic version of hao123 movies, with more than 17,000 online videos: films, drama, shows, sports and music videos
- Who makes it
- Baidu, Inc. Softonic lists the developer as Baidu.com, Inc and links the developer page
ar.hao123.com/movie/videobox; Should I Remove It lists it as VideoBox from Baidu, Inc. - Platforms
- Windows only. Softonic lists Windows and says it runs best on Windows 7; Should I Remove It's user data shows Windows 7 (about 68%) and Windows 10 (about 29%). We found no Mac or Android build of Baidu's VideoBox
- Versions
- Softonic's page offers version 1.9 (14.82 MB, last update shown 30 June 2014). Should I Remove It lists builds from 1.0.0.9 up to 2.2.0.4587, so newer ones exist; about 98% of the installs it counts were version 2.1.1.3 at the time of its page
- Where it installs
C:\Users\<your name>\AppData\Roaming\Baidu\VideoBox, main filevideobox.exeand uninstalleruninst.exe(Should I Remove It)- Installer names
- Softonic's copy is
VideoBoxSetup_softonic.exe. Our 2017 guide namedVideoBoxSetup_officialsite.exeat 22.5 MB; we could not find that file again, so its name and size are unconfirmed - Where it is used
- Should I Remove It's data puts about 42% of installs in Egypt, 14% in Saudi Arabia, 10% in Algeria, 8% in the United States and 7% in Morocco
- What our 2017 guide claimed
- That it shows pop-ups, pop-unders, banners and full-screen ads, may change the home page, may slow the PC and "can pose a threat" to security and privacy; each is marked below as not confirmed
So "VideoBox virus" mixes two questions. The program itself is a legitimate Baidu player, as our 2017 guide also said. What is not settled is what its installer and its background update service do on a PC today, which we did not run.
Is VideoBox safe? Why it is flagged
What we checked on 6 October 2026
We read the download portals and the registry record and tried the address from our 2017 picture. We did not install VideoBox and we did not open any page in a browser.
VideoBox by Baidu · portal pages, registry record, one address · 6 October 2026
- The address in our 2017 picture
ar.hao123.com/movie/videobox, the page Softonic names as the developer page, did not load from our machine: the request failed. One public resolver (1.1.1.1) returned the name of an Amazon load balancer forar.hao123.com, another (8.8.8.8) answered that the name does not exist. That is two resolvers from one place, so it shows the page is hard to reach from here, not that it is gone for everyone. - Baidu's hao123 main site
www.hao123.comanswered a plain request with a normal response (HTTP 200). We did not open it in a browser, so we saw no pop-ups, redirects or notification requests, and cannot say there are none. - Domain
hao123.comwas registered on 15 November 2000 and runs to 15 November 2028 (registry record, RDAP): a long-lived domain, not a throwaway one. - A portal's scan of the installerSoftonic lists
VideoBoxSetup_softonic.exe(version 1.9), scanned with VirusTotal on 2 December 2020 and marked "Clean", SHA-2567befa2b2967962789c69bdfcb6091d824beb6438a828bb5981f194d97687eea5. That is a portal's statement about one 2020 scan of the old build; it says nothing about the 2.x builds or about today. - What users' PCs showShould I Remove It (crowd-collected data, builds 2.x) lists a start-up entry named VideoBox that runs
VideoBox.exe --minimize, a Windows serviceVBUpSvrrunningUpServer.exe, firewall exceptions for five of its files andupdate.dllas an auto-updater. 3% of its users removed the program and 97% kept it. This is not our test and it counts opinions, not infections. - A process-library ratingFile.net says
videobox.exeis signed by "a trustworthy company", "is able to monitor applications" and rates it "16% dangerous". That is that site's own automated score; we do not know how it is worked out. - Ads, pop-ups, changed settingsNot tested. We did not install VideoBox, so we did not see the ads, pop-unders or home-page change our 2017 guide described, and we cannot say they do not happen.
- Notification request, redirects, installer offersNot seen and not tested. Offers inside an installer can differ by country, by Windows version and from one download to the next, and we ran no installer.
Medium risk, from one reading Nothing we read describes VideoBox as malware, and nothing we read clears it: we ran no installer and the maker's page is out of reach from here. It is an old Windows program that starts with Windows, runs an update service and has firewall exceptions, so keep it only if you use it.
How the picture has changed since 2017
November 2000
hao123.com is registered
hao123.comwas registered on 15 November 2000, according to the registry record (RDAP). Baidu's own encyclopedia says the hao123 navigation site was created in May 1999 by Li Xingping.August 2004
Baidu buys hao123
Baidu acquired hao123 on 31 August 2004, for 50 million RMB plus a share of Baidu equity (Baidu Baike). hao123 is a start page that collects links to news, video, games and shopping, and earns from advertising.
June 2014
Softonic's page shows version 1.9
The version Softonic still offers is 1.9, 14.82 MB, with a last update of 30 June 2014, for Windows, in Arabic and English. Later builds up to 2.2.0.4587 appear in Should I Remove It's data, without dates.
February 2017
Our first report
Our guide called VideoBox adware from Baidu that shows ads, may change the home page and slows the PC. The picture at the top of this page is a detail of the one we published then: the player window showing an Arabic film page. The original also showed VideoBox's page on
ar.hao123.comwith the menu Index, Term of Services, Feedback and Mobile, beside a stock photo that we left out.March 2017
Baidu cleans malicious code out of hao123 download links
Baidu's encyclopedia says that on 3 March 2017 a third-party outsourcing team had planted malicious code in hao123, and that Baidu cleaned the infected download links with security companies. No source we read ties this to VideoBox; it shows why a hao123 download link is not a safe source in itself.
December 2020
A portal scans the old installer
Softonic's last scan of
VideoBoxSetup_softonic.exewas on 2 December 2020 (VirusTotal, result "Clean"). It was the 1.9 build.October 2026
The portals still list it
Softonic still offers the download (after an advertisement) and Should I Remove It still lists VideoBox with 2.x builds. The developer page from our 2017 picture did not load from our machine. Baidu's hao123 start page, which the old guide linked to VideoBox, loads normally.

www.hao123.com on 6 October 2026: weather bar, Baidu search box and a grid of site links, in Chinese. Our test of one visit.
What can actually go wrong
"VideoBox virus" is not an accurate name for a Baidu media player. These are the real concerns, from most to least serious, with what we could and could not confirm.
- Medium
Ads you did not ask for
Our 2017 guide said VideoBox shows pop-ups, pop-unders, banners and full-screen ads, and that clicking them can lead to sites you did not want to visit. We did not install it and no source we read reports these ads, so this is not confirmed. If you see ads outside the player, they can come from a browser extension or another program, so check Installed apps for anything installed the same day.
- Medium
A changed home page or search engine
Our 2017 guide said VideoBox might set a different home page. hao123 is a start page, and Baidu's own encyclopedia quotes a People's Daily investigation saying that posts asking what to do when the browser home page is hijacked to hao123 are common in China. That describes other programs that set it; nothing we read shows VideoBox doing it. Check your home page and search engine once.
- Medium
A program that starts and updates by itself
Users' data shows a start-up entry, an always-on update service and firewall exceptions. That is more than a plain player needs, and its updates depend on a server that we could not reach for the developer page. We found no privacy policy for it, so we cannot say what it sends.
- Low
A slower PC
Our 2017 guide said the PC can run slower than before the install. An entry that starts with Windows and a service that runs all the time use some memory and time at start-up; we did not measure how much.
- Low
A fake
videobox.exeFile.net warns that some malware camouflages itself as
VideoBox.exe, particularly inC:\WindowsorC:\Windows\System32. The real file sits under your user profile inAppData\Roaming\Baidu\VideoBox.
How VideoBox got installed
Most reports of an unwanted VideoBox follow one of these routes. Check them in this order.
| Route | What you would see | How to check |
|---|---|---|
| You downloaded VideoBox yourself, from a download portal or from the Arabic hao123 movie page | VideoBox in the list of apps and an icon next to the clock (File.net says the program has a taskbar icon) | Settings > Apps > Installed apps, search for VideoBox and read the install date |
| It came inside another free program's installer (our 2017 suspicion; we could not confirm it) | VideoBox, publisher Baidu, that you do not remember choosing; sometimes other Baidu entries installed the same day | Sort Installed apps by install date and look at everything installed the same day as VideoBox |
| An old copy that updated itself | A VideoBox you installed years ago, still starting with Windows and checking for updates through its update service | Task Manager > Startup apps for VideoBox; Services for VBUpSvr |
A lookalike file named videobox.exe | A videobox.exe outside AppData\Roaming\Baidu\VideoBox; File.net warns that malware can pose as VideoBox.exe, particularly in C:\Windows or C:\Windows\System32 | In Task Manager right-click the process and choose Open file location; if it is not in the Baidu folder, scan the PC |
Free programs often come with extra offers, and the Default or Standard setup accepts them for you. The Custom or Advanced setup lists them, often with ticks already placed; remove the ticks before you go on. Take the installer from the maker's own page and not from a portal that repackages it. Our 2017 guide suspected that VideoBox was bundled this way; we found no report that confirms it.
Check your PC and browser
We did not install VideoBox in 2026, so this list comes from Should I Remove It's user-collected data for 2.x builds and from our 2017 guide, and is not a record of a fresh install. Treat any item that is not on your PC as not applicable.
| What you see | What it means |
|---|---|
| VideoBox, publisher Baidu, in Installed apps | The player. Keep it only if you use it. |
The folder %APPDATA%\Baidu\VideoBox (paste it into the File Explorer address bar; it is C:\Users\<your name>\AppData\Roaming\Baidu\VideoBox) | The program's files: videobox.exe, uninst.exe, update.dll, UpServer.exe, vbUpdate.exe, upworker.exe, stat.exe and bugreport.exe among them (Should I Remove It). |
| VideoBox in Startup apps | The program starting with Windows. Should I Remove It lists the command as VideoBox.exe --minimize, so it starts minimized to the icon next to the clock. |
A service called VBUpSvr (UpServer.exe) in Services | An update service set to start automatically. Should I Remove It says stopping it by hand made the program stop working properly. |
| Entries for VideoBox files in Windows Defender Firewall > Allowed apps | Should I Remove It lists firewall exceptions for five of its files so that it can reach the internet. We do not know whether its uninstaller removes them. |
| A new home page, search engine or hao123 page you did not choose | Our 2017 guide said VideoBox might change the home page. We did not see it and no source we read confirms it for VideoBox; see the risks below. |
- 1
Close it if it runs
Press Ctrl + Shift + Esc, look for VideoBox in Processes, right-click it and choose End task.
- 2
Turn off the startup entry
Open Settings > Apps > Startup and set VideoBox to Off, or use the Startup apps tab of Task Manager and choose Disable.
- 3
Uninstall
Open Settings > Apps > Installed apps, find VideoBox, choose More (the three dots) > Uninstall. In Windows 10 the list is called Apps & features (Uninstall a program or app in Windows On uGetFix).
- 4
Look at the browsers
The browser tabs below show where to remove extensions you did not add and how to put your search engine back.
How to uninstall VideoBox
How to remove VideoBox
Uninstall it and remove the extras it installed, then scan for the files you downloaded with it.
Which browser shows the ads?
Set your home page and search engine
Open Settings > Search engine, click Change next to the search engine used in the address bar and pick the one you want. Then open Manage search engines and site search and delete any entry you did not add.
Remove extensions you do not recognise
Paste
chrome://extensionsinto the address bar and click Remove on anything you did not install yourself, especially video downloaders, "search" tools or helpers added recently.Full procedure with screenshots: Remove a browser extension
Clear the site data
Press Ctrl + Shift + Delete, choose All time, tick Cookies and other site data and Cached images and files, and click Delete data.
Reset Chrome
Open Settings > Reset settings > Restore settings to their original defaults and confirm with Reset settings. This resets the start page, search engine and pinned tabs and turns off extensions; bookmarks and saved passwords stay.
Full procedure with screenshots: Reset a browser and fix a hijacked search engine
Set your home page and search engine
Open Settings > Privacy, search, and services > Address bar and search and choose the search engine used in the address bar. Check Manage search engines for entries you did not add.
Remove extensions you do not recognise
Paste
edge://extensionsinto the address bar and click Remove under anything you did not install yourself.Full procedure with screenshots: Remove a browser extension
Clear the site data
Open Settings > Privacy, search, and services > Delete browsing data > Choose what to clear, set All time, tick Cookies and other site data and Cached images and files, and click Clear now.
Reset Edge
Open Settings > Reset settings > Restore settings to their default values and confirm with Reset. Extensions are turned off and the start page goes back to default; favourites, history and saved passwords stay.
Full procedure with screenshots: Reset a browser and fix a hijacked search engine
Set your home page and search engine
Open Settings > Search and pick another engine under Default Search Engine. Under Search Shortcuts, remove any entry you did not add.
Remove add-ons you do not recognise
Paste
about:addonsinto the address bar, open Extensions, and choose Remove from the three-dot menu of anything you did not install yourself.Full procedure with screenshots: Remove a browser extension
Clear cookies and site data
Open Settings > Privacy & Security > Cookies and Site Data > Clear Data, tick both boxes and click Clear.
Refresh Firefox
Open the menu > Help > More troubleshooting information and click Refresh Firefox. Add-ons and custom settings are removed and the home page goes back to default; bookmarks, history and passwords stay.
Full procedure with screenshots: Reset a browser and fix a hijacked search engine
VideoBox has no Mac version that we found
Softonic lists VideoBox for Windows only. If an app called VideoBox is in Finder > Applications on a Mac, it is not Baidu's player; drag it to the Bin and look in System Settings > General > Login Items & Extensions for any entry with the same name.
Set another search engine
Open Safari > Settings > Search and choose a different Search engine if the one shown is not the one you picked.
Remove extensions you do not recognise
In Safari > Settings > Extensions, select anything you did not install yourself and click Uninstall.
Clear the site data
In Safari > Settings > Privacy > Manage Website Data, remove the site's data, or use History > Clear History > all history. To empty the cache as well, turn on Show features for web developers in Settings > Advanced and choose Develop > Empty Caches.
Check the Mac for apps from the ads
Ads also target Mac users with fake players and "cleaners". In Finder > Applications, move anything unknown to the Bin. In System Settings > General > Login Items & Extensions, remove unknown items. Then use Go > Go to Folder to check
/Library/LaunchAgents,~/Library/LaunchAgents,/Library/LaunchDaemonsand/Library/Application Supportfor folders and files with the same unknown names, and empty the Bin.
Then, whichever browser you use
Step 1: Uninstall VideoBox
Open Settings > Apps > Installed apps in Windows 11, or Settings > Apps > Apps & features in Windows 10. Sort the list by install date and find VideoBox, then choose Uninstall from the three-dot menu next to it (in Windows 10, click the entry and then Uninstall).
Remove anything else installed on the same day that you do not recognise, because such programs usually arrive together in one installer. If the uninstaller opens a browser page with an offer or a survey, close it: the program is removed either way.
Full procedure with screenshots: Uninstall a program or app in Windows On uGetFix
Step 2: Remove it from startup
Whatever VideoBox installed usually starts with Windows. Open Task Manager with Ctrl + Shift + Esc, go to Startup apps in Windows 11 or the Startup tab in Windows 10, and disable what you do not know, starting with entries that have an empty Publisher column.
Open file location on the right-click menu shows the file, which helps you decide and tells you what to delete later. Disabling is safe: if something you need stops working, switch it back on.
Full procedure with screenshots: Stop apps from opening at startup On uGetFix
Step 3: Delete the folders left behind
What the uninstaller leaves behind is usually in the user folders. Open File Explorer, switch on View > Show > Hidden items (in Windows 10 View > Hidden items), and go through
%LocalAppData%,%AppData%, %ProgramData% and the two Program Files folders.Sort by Date modified and delete folders that appeared together with the problem and belong to no program you use. Folders with random names that hold
.exe,.dll, .js or .ps1 files are the strongest sign.Full procedure with screenshots: Remove what malware leaves behind in Windows
Step 4: Scan the PC, then run the offline scan
Open Windows Security > Virus & threat protection > Scan options, run a Full scan and remove everything it finds. Then select Microsoft Defender Antivirus (offline scan) and click Scan now: the PC restarts and scans before Windows loads, which finds files that hide while Windows runs.
Save your work first, because the offline scan takes about 15 minutes. Both scans are built into Windows 11 and Windows 10, and a second scanner from another vendor is a useful extra opinion.
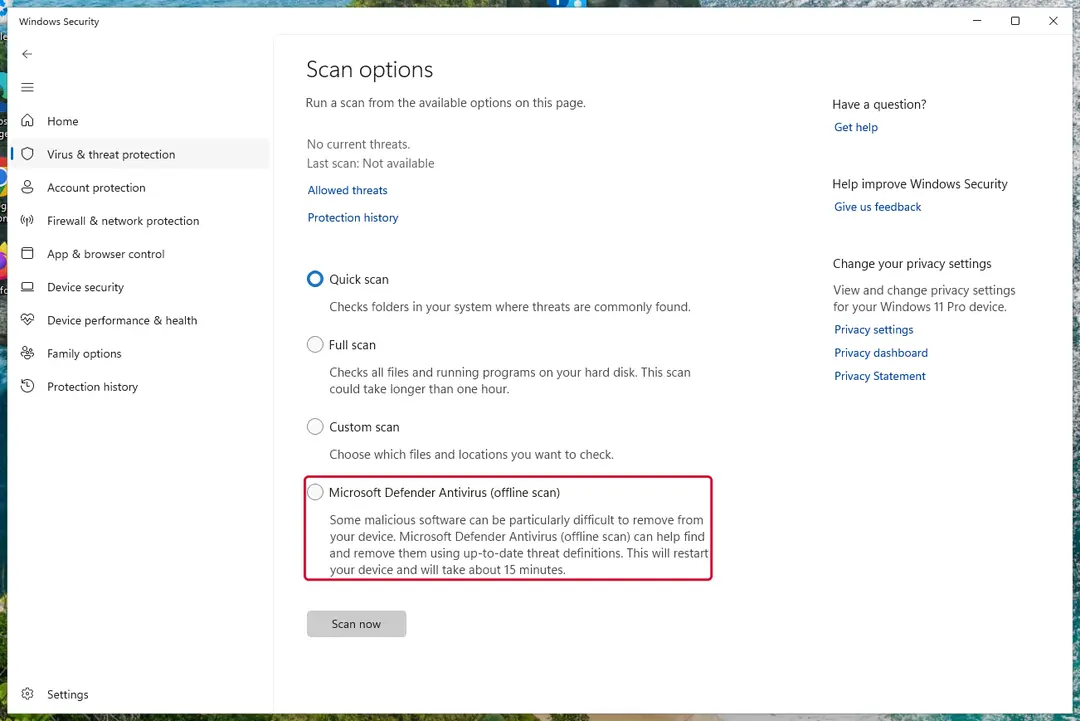
Windows 11: Windows Security > Virus & threat protection > Scan options. Full procedure with screenshots: Run a Microsoft Defender Offline scan
After removal and prevention
If you installed VideoBox and want it gone
Uninstall the program, then check what is left of it and what came with it, then put the browser settings right.
- 1
Uninstall VideoBox
Open Settings > Apps > Installed apps in Windows 11 (Apps & features in Windows 10), sort by install date and uninstall VideoBox and anything else installed the same day that you do not recognise. The program's own uninstaller is
uninst.exein its folder (Uninstall a program or app in Windows On uGetFix). - 2
Delete what is left
Our 2017 guide quoted users' complaints that the bundled uninstaller does not delete every file at once. Paste
%APPDATA%\Baiduinto the File Explorer address bar; if a VideoBox folder is still there after the uninstall, delete that folder. Do not delete files in other folders by hand, and do not edit the registry for this. - 3
Check the start-up list and the service
Open Task Manager > Startup apps and confirm VideoBox is gone. If a service called VBUpSvr is still listed in Services, run the scan below first; we have not tested removing that service by hand.
- 4
Look for other Baidu programs
Should I Remove It lists other Baidu programs that can sit on the same PC, among them Hao123-Client, Baidu PC Faster, Baidu Antivirus, Baidu Browser and PC App Store. Uninstall any you did not choose to install.
- 5
Scan the PC
Open Windows Security > Virus & threat protection > Scan options and run a Full scan, then the Microsoft Defender Antivirus (offline scan). We found no Microsoft detection name for VideoBox, so a clean scan does not prove that an extra program is gone.
- 6
Fix the browser
Open each browser's home page and search engine settings after a restart. If a setting returns, an extension or program is still putting it back; use the browser steps below.
If only VideoBox was installed and it is gone, nothing else came with it from the installer and the one job left is the browser check.
How to keep it from happening again
Do
- Take the installer only from the maker's own page, and read the file name and the screens before you accept anything.
- Choose Custom or Advanced setup in any installer and remove the ticks from extra programs, toolbars and home-page settings.
- Read the licence and the privacy policy of a free program; they tell you what it may collect and show.
- After installing free software, open the browser's home page and search engine settings and check them once.
- Keep Microsoft Defender SmartScreen on, or Chrome's Enhanced protection: both warn before known malicious pages and downloads.
- Keep a current backup of your files (File History or OneDrive), so an infection or a failed disk does not cost you your documents.
- On public networks, a VPN hides your IP address from the sites and ad networks you visit; it does not block ads or malware.
Don't
- Click through Default or Standard setup without reading it.
- Take the installer from a download portal or an ad when the maker has its own page.
- Delete registry keys, services or system files by hand because a guide says a program changed them.
- Accept "make this your home page" prompts from a program you did not go to install.
- Leave an old program installed for years if you no longer use it.
Keep VideoBox, or choose another way
You do not have to keep an old player to watch video. Compare the options by who controls the installer and whether the program is still maintained.
| Option | What to know |
|---|---|
| Keep VideoBox | Only if you use its Arabic movie catalogue. We could not reach the developer page, so check that it still plays anything, and take no installer from a portal or an ad. |
| VLC media player | A free, open-source player for Windows, Mac, Linux, iOS and Android. Its own page says it plays most files without codec packs and that it has no spyware, no ads and no user tracking, which is the maker's statement and not our test. Download it only from videolan.org. |
| The video site's own app or page | If you used VideoBox for a service's films, the service's own site or app is the route its owner controls; it needs no extra program. |
| Leave it uninstalled | If VideoBox was installed for one job that is done, uninstalling it removes the start-up entry, the update service and the question. |
Questions about VideoBox
Is VideoBox safe?
VideoBox is a real Windows media player from Baidu, and nothing we read calls it malware, but safe depends on the build and on where you got it. Softonic's 2020 VirusTotal scan of its 1.9 installer was marked clean, which is a portal's statement about one old file.
We did not run an installer, and the developer page from our 2017 picture did not load from our machine. It also starts with Windows and runs an update service. Keep it only if you use it, take any installer from the maker's page and not from an ad, and read every screen of the setup.
Is VideoBox a virus?
No, not by anything we read: VideoBox is a media player and downloader made by Baidu, and no page we read gives it a malware detection name. Our 2017 guide used "virus" in the title but also said it is a legitimate program.
What can make it unwelcome is its behaviour: users' data shows a start-up entry, an always-on update service and firewall exceptions. The ads and home-page change our old guide described are not confirmed. If a scanner flags a file called videobox.exe, check where it sits: the real one is under AppData\Roaming\Baidu\VideoBox.
What is VideoBox by Baidu?
VideoBox by Baidu is a free Windows player for online video, built around the Arabic version of Baidu's hao123 movie site. Softonic says it offers more than 17,000 online videos, among them films, drama, shows, sports and music videos, and that it works as a player and a downloader.
Should I Remove It's data shows most users in Egypt (about 42%), Saudi Arabia, Algeria, the United States and Morocco. We found no Mac or Android version of it. Baidu also owns hao123, the start page that other installers are known to set as a home page.
How do I uninstall VideoBox on Windows?
Open Settings > Apps > Installed apps in Windows 11 (Apps & features in Windows 10), find VideoBox, choose the three dots and Uninstall. First close it:
- press Ctrl + Shift + Esc
- select VideoBox
- choose End task
Afterwards, paste %APPDATA%\Baidu into the File Explorer address bar and delete the VideoBox folder if it is still there, because our 2017 guide quoted users saying the uninstaller does not remove every file. Then run a Full scan in Windows Security and check your browser's home page and search engine.
Does VideoBox change my home page to hao123?
We could not confirm that it does.
Our 2017 guide said VideoBox might change browser settings and set a different home page, but we did not install it and no source we read reports it for VideoBox. hao123 is Baidu's start page, and Baidu's encyclopedia quotes a People's Daily investigation saying hao123 home-page hijacks are a common complaint in China, which concerns other programs.
If hao123 is your home page and you did not choose it, change it in your browser settings, then uninstall anything installed the same day.
Where does VideoBox install itself?
VideoBox installs under your user profile, in C:\Users\<your name>\AppData\Roaming\Baidu\VideoBox, according to Should I Remove It. The main file is videobox.exe and the folder holds uninst.exe, update.dll, UpServer.exe, vbUpdate.exe, upworker.exe, stat.exe and bugreport.exe.
Should I Remove It also lists a start-up entry named VideoBox, a service called VBUpSvr and firewall exceptions for five of its files. AppData is hidden by default, so paste %APPDATA%\Baidu\VideoBox into the File Explorer address bar to open it. A videobox.exe in any other folder is not the player's own location.
What is VBUpSvr or UpServer.exe?
VBUpSvr is the Windows service that runs UpServer.exe, VideoBox's update component, according to Should I Remove It's data for 2.x builds. It is set to start automatically, and the same page says stopping it by hand made the program stop working properly.
It lives in the VideoBox folder under AppData\Roaming\Baidu. We did not test removing it manually, so the safe route is to uninstall VideoBox from Installed apps, then check Services and run an offline scan in Windows Security if the service is still listed afterwards.
Is VideoBox still available to download?
Softonic still lists a VideoBox download, but we could not confirm that Baidu still maintains it. Its page shows version 1.9, 14.82 MB, last updated 30 June 2014, and the file is offered after an advertisement. Should I Remove It lists builds up to 2.2.0.4587.
The developer page from our 2017 picture, ar.hao123.com/movie/videobox, did not load from our machine on 6 October 2026. If you want a player, VLC from videolan.org is a maintained free one; if you do download VideoBox, expect an old build and decline every extra offer.
Can I use VideoBox on a Mac or Android phone?
No version for Mac or Android showed up in anything we read: Softonic lists VideoBox for Windows only, and Should I Remove It's data covers Windows versions from XP to 10. Search results for a similar name on Google Play, such as Video Player All Formats HD, belong to other developers and are not Baidu's VideoBox.
If a page offers you VideoBox for a Mac or a phone, treat it as a lookalike and do not install it. VLC is the free player with Mac and Android versions on its own page.
Will Fortect remove VideoBox?
Fortect scans Windows for malware and unwanted programs and repairs the system files and settings they change, and its free scan shows what it finds on your PC before you decide anything.
For VideoBox, follow the plan above as well: the browser steps take back permissions and settings that no scanner treats as a threat, and uninstalling the program that brought it removes the source.
Run Microsoft Defender's full scan and, if anything was found, its offline scan as a second opinion. If the symptoms are gone after the plan and both scans are clean, there is nothing more to do.
Sources
- Softonic: VideoBox for Windows (version 1.9, scan of 2 December 2020) (read October 6, 2026)
- Should I Remove It: VideoBox by Baidu (user-collected data) (read October 6, 2026)
- File.net: VideoBox.exe Windows process (read October 6, 2026)
- Baidu Baike: hao123, a web navigation platform owned by Baidu (no longer online) (read October 6, 2026)
- Verisign RDAP: hao123.com registration record (read October 6, 2026)
- VideoLAN: VLC media player (read October 6, 2026)
- Microsoft Support: Uninstall or remove apps and programs in Windows (read October 6, 2026)
- Microsoft Support: Configure startup applications in Windows (read October 6, 2026)
- Microsoft Support: Stay protected with the Windows Security app (read October 6, 2026)
- Our 2017 guide to VideoBox (pictures and text) (read October 6, 2026)