Xilbalar.com is the website related to advertising services that cause redirects and unwanted content on computers and mobile devices

Xilbalar.com is the adware-type cyber threat that affects web browsers and diminishes the performance in general. According to users online, this potentially unwanted program causes frustration on Android mobile devices and personal computers. The most distinct feature of such a program is the online traffic redirecting function. This website is the result of a cyber infection designed for the purpose of generating revenue for the publisher. Continuous redirects to such sites or pop-ups with commercial content indicate that computer or mobile device is affected by the potentially unwanted program.
Users state that while browsing online, they get randomly redirected to Xilbalar.com which also automatically opens other browser windows or pop-ups.[1] Since various third-party advertisers get involved in the distribution of such program, questionable applications or tools get promoted on those commercial pop-ups. It becomes especially difficult when ads appear on mobile devices since the screen gets filled with pop-ups. However, anti-malware tools can work for both types of devices and get rid of the intrusive program.
| Name | Xilbalar.com |
|---|---|
| Type | Adware |
| Symptoms | Redirects to questionable sites, delivers tons of pop-ups and exposes to malicious content |
| Main danger | Constant redirects keep from accessing the needed content, data regarding online browsing activity gets tracked and collected by third-party advertisers |
| Distribution | Freeware installations containing bundled PUPs |
| Prevention | Use FortectIntego to find all potentially unwanted programs. This tool can block sites filled with PUPs and keep you from accessing them |
| Affects | Android mobile phones and personal computers |
Various pop-ups or banners get injected to websites you often visit so Xilbalar.com adware can generate needed views and monetize them. Unfortunately, all those redirects also mean that information regarding your preferences online can be tracked and collected by these third-party advertisers.[2]
Xilbalar.comvirus gets this name because of the behavior this program causes on an affected machine. Constant redirects to suspicious domains can expose to harmful content or even lead to malware installation. For the sake of your security, experts[3] always advise avoiding any interaction with such content and questionable websites.
Unfortunately, Xilbalar.com comes to the system without your permission, and you can only notice the symptoms when the adware is already on your machine:
- pop-up ads and banners injected on commonly visited sites;
- web browser preferences changed;
- extensions, toolbar or bookmarks installed on the browser;
- redirects to suspicious domains;
- promotional pop-ups push questionable software.
Xilbalar.com is the ad-supported domain that affects users' time online significantly and diminishes the performance of a device it infects. In most cases, it causes the disturbance on Google Chrome browser, but Internet Explorer, Mozilla Firefox, or Safari can get affected too. For that reason, we have a few additional tips below the article.

You need to remove Xilbalar.com completely from your device so all redirects can stop and additional browser extensions get deleted. Since various adware programs can alter startup programs and registry entries, newly installed programs, browser content, or the PUP itself keeps loading on your machine every time you are using it.
Automatic Xilbalar.com removal using anti-malware programs or system optimization tools like FortectIntego, helps to remove all intruders at once. There is no need to be an advanced PC user or IT specialist to perform PUP elimination. In other cases, you would need to find all related files and programs to end the adware completely.
Remember that Xilbalar.com categorizes as potentially unwanted program and can access details regarding your online preferences immediately after it gets installed on the system. The IP addresses, location, most viewed items, visited sites, and search queries get tracked and collected. This information is valuable because it allows creating more personalized commercial content.
Potentially unwanted programs get distributed with the help of freeware bundles
It doesn't matter if the program affected your mobile device or personal computer, the spreading method involves the same deceptive techniques that employ software bundles and infected advertisements to deliver unwanted programs to the targeted machine.
Freeware installations or browsing on sites filled with advertising content often leads to infiltration of PUPs without users' knowledge because downloading applications from promotional ads or questionable providers includes pre-packed additional programs.
Choosing the official provider, the App store, or opting for Advanced or Custom installations can help to avoid such programs and cyber infections. When you can see the full list with all programs offered as additional, you can remove the check marks from programs you don't need and install the program that you wanted in the first place.
Terminate Xilbalar.com from the browser and the machine in general to end the unwanted online traffic redirects
You should focus on Xilbalar.com removal and make sure to run a full system scan on the system, regardless of the machine affected. Anti-malware programs can be found in the App Store too so you can be sure that the application you get is compatible with your operating system.
Make sure to remove Xilbalar.com using antivirus tools before changing any settings manually. This way, you ensure that the system is clean and all the additional changes would be useful. You may need to check each web browser manually, for that we have a guide below.
As for the Android users, we recommend deleting Xilbalar.com and turning off the option that allows installing apps that belong to unknown sources. You can find that option by going to Settings -> Security.
Uninstall from Windows
Uninstall from Windows 10/8:
- Type Control Panel into the Windows search box and open the result.
- Under Programs, select Uninstall a program.


Uninstall from Windows 7/XP:
- Click on Windows Start > Control Panel (Windows XP users should click on Add/Remove Programs).
- In Control Panel, select Programs > Uninstall a program.


Remove the unwanted program:
- In the Programs and Features window, look for any recently installed suspicious entries, select them, and click Uninstall.
- If User Account Control appears, click Yes to confirm, then complete the removal.


Delete from macOS
Remove the unwanted application:
- From the menu bar, select Go > Applications.
- In the Applications folder, look for any suspicious entries, then drag them to Trash (or right-click and pick Move to Trash).


Delete leftover files and folders:
- Select Go > Go to Folder.
- Enter /Library/Application Support and remove any suspicious folders related to the unwanted program.
- Repeat the same check in the /Library/LaunchAgents and /Library/LaunchDaemons folders, deleting any suspicious entries.

- Finally, empty the Trash to permanently remove the leftovers.

Reset Internet Explorer
Remove dangerous add-ons:
- Open Internet Explorer, click on the Gear icon (IE menu) on the top-right corner of the browser
- Pick Manage Add-ons.
- You will see a Manage Add-ons window. Here, look for suspicious plugins. Click on these entries and select Disable.


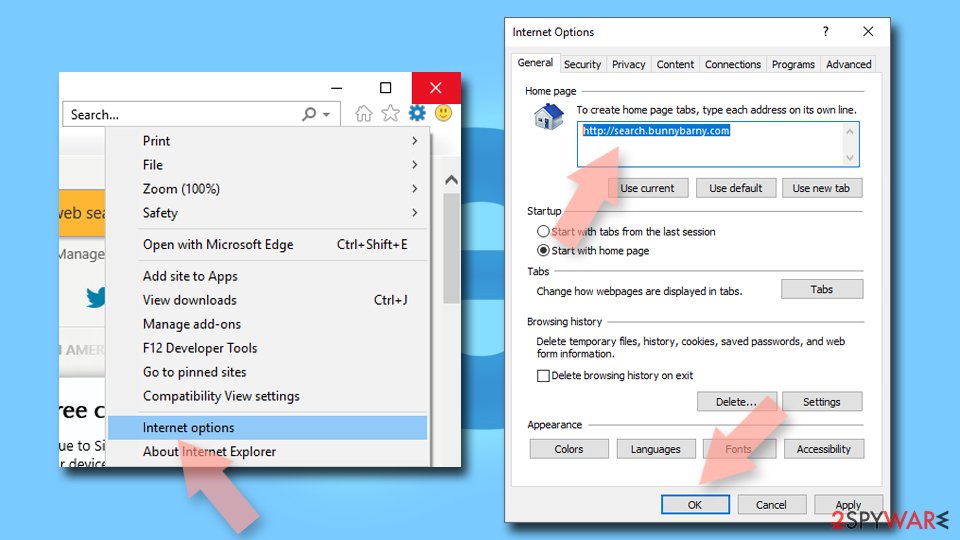
Change your homepage if it was altered:
- Open IE and click on the Gear icon.
- Select Internet Options.
- In the General tab, delete the Home page address and replace it by your preferred one (for example, Google.com).
- Click Apply and then select OK.

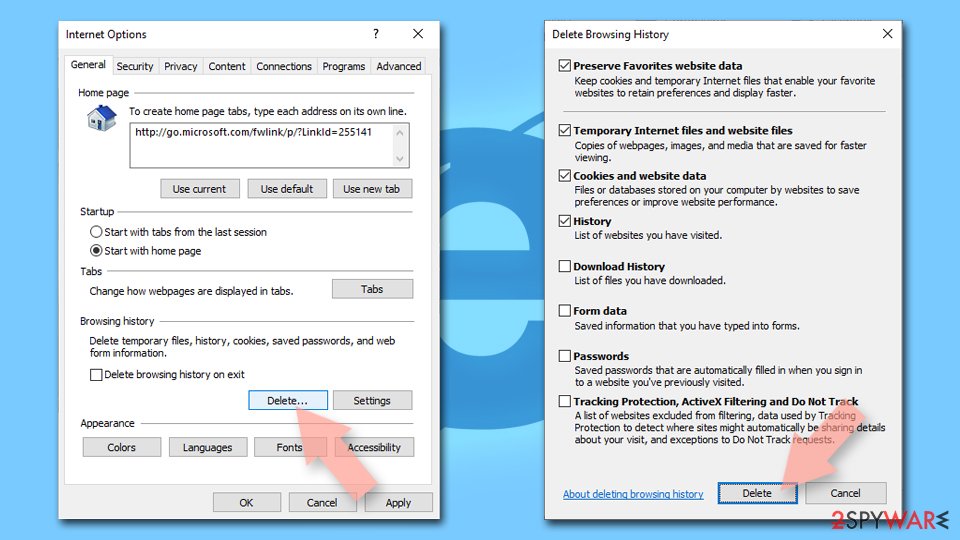
Delete temporary files:
- Press on the Gear icon and select Internet Options.
- Under Browsing history, click Delete...
- Select relevant fields and press Delete.

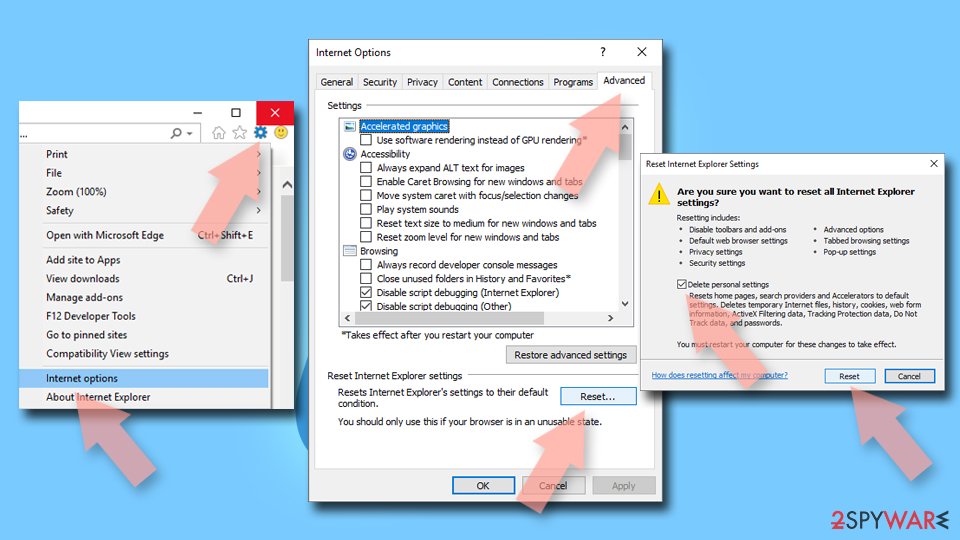
Reset Internet Explorer:
- Click on Gear icon > Internet options and select Advanced tab.
- Select Reset.
- In the new window, check Delete personal settings and select Reset.

Remove from Microsoft Edge
Delete unwanted extensions from MS Edge:
- Select Menu (three horizontal dots at the top-right of the browser window) and pick Extensions.
- From the list, pick the extension and click on the Gear icon.
- Click Remove.


Clear cookies and other browser data:
- Click on the Menu (three horizontal dots at the top-right of the browser window) and select Settings > Privacy, search, and services..
- Under Clear browsing data, pick Choose what to clear.
- Select Cookies and other site data and Cached images and files. (apart from passwords, although you might want to include Media licenses as well, if applicable) and click on Clear.


Restore new tab and homepage settings:
- Click the menu icon and choose Settings.
- Then find On startup section.
- Click Remove next to any suspicious startup page.
Reset MS Edge if the above steps did not work:
- Press on Ctrl + Shift + Esc to open Task Manager.
- Click on More details arrow at the bottom of the window.
- Select Details tab.
- Now scroll down and locate every entry with Microsoft Edge name in it. Right-click on each of them and select End Task to stop MS Edge from running.


Instructions for Chromium-based Edge
Delete extensions from MS Edge (Chromium):
- Open Edge and click select Settings > Extensions.
- Delete unwanted extensions by clicking Remove.


Clear cache and site data:
- Click on Menu and go to Settings.
- Select Privacy, search and services.
- Under Clear browsing data, pick Choose what to clear.
- Under Time range, pick All time.
- Select Clear now.


Reset Chromium-based MS Edge:
- Click on Menu and select Settings.
- On the left side, pick Reset settings.
- Select Restore settings to their default values.
- Confirm with Reset.
- This will disable extensions and reset startup pages but will not delete bookmarks, saved passwords, or browsing history.


Remove from Mozilla Firefox (FF)
Remove dangerous extensions:
- Open Mozilla Firefox browser and click on the Menu (three horizontal lines at the top-right of the window).
- Select Add-ons.
- In here, select the unwanted extension and click Remove.


Reset the homepage:
- Click three horizontal lines at the top right corner to open the menu.
- Choose Settings.
- Under Home, set your preferred homepage and new tab settings.
Clear cookies and site data:
- Click Menu and pick Settings.
- Go to Privacy & Security section.
- Scroll down to locate Cookies and Site Data.
- Click on Clear Data...
- Select Cookies and Site Data and Temporary cached files and pages, then click Clear.


Reset Mozilla Firefox
If clearing the browser as explained above did not help, reset Mozilla Firefox:
- Open Mozilla Firefox browser and click the Menu.
- Go to Help and then choose Troubleshooting Information.

- Under Give Firefox a tune up section, click on Refresh Firefox...
- Once the pop-up shows up, confirm the action by pressing on Refresh Firefox.


Remove from Google Chrome
Delete malicious extensions from Google Chrome:
- Open Google Chrome, click on the Menu (three vertical dots at the top-right corner) and select More tools > Extensions.
- In the newly opened window, you will see all the installed extensions. Uninstall all suspicious extensions related to the unwanted program by clicking Remove.


Clear cache and web data from Chrome:
- Click on Menu and pick Settings.
- Under Privacy and security, select Clear browsing data.
- Select Browsing history, Cookies and other site data, as well as Cached images and files.
- Click Clear data.


Change your homepage:
- Click menu and choose Settings.
- Look for a suspicious site in the On startup section.
- Click on Open a specific or set of pages and click on three dots to find the Remove option.
Reset Google Chrome:
If the previous methods did not help you, reset Google Chrome to eliminate all the unwanted components:
- Click on Menu and select Settings.
- In the Settings, scroll down and click Advanced.
- Scroll down and locate Reset and clean up section.
- Now click Restore settings to their original defaults.
- Confirm with Reset settings.


Delete from Safari
Remove dangerous extensions:
- Open Safari, click Safari in the menu at the top-left of the screen, and select Preferences.
- Go to the Extensions tab, look for any suspicious entries, and click Uninstall to remove them.


Clear history and website data:
- Click Safari in the menu and pick Clear History.
- Set Clear to all history and confirm with Clear History.


Reset Safari:
- Click Safari in the menu and select Preferences > Advanced.
- Enable Show Develop menu in menu bar.
- From the menu bar, click Develop and select Empty Caches.


Was this guide helpful?
Be the first to comment