Should you trust Zwangi.com?
Zwangi.com virus happens to be a search engine. Initially, it may look like an ordinary browsing tool. Nonetheless, it is none other than a browser hijacker. If you let it remain on the operating system, you might get bothered by various advertisements and offers. You might get redirected to other domains different from your initial inquiry. Such behavior should not be ignored since it might divert you to the domains harboring questionable content[1]. What is more, you are likely to get disappointed by its quality since it provides more advertising content rather than objective material. Therefore, we recommend you to remove Zwangi.com. If you encounter this potentially unwanted application for the first time, let FortectIntego deal with the elimination. Manual Zwangi.com removal is also an option.
There are several features which help you distinguish a browser hijacker from a reliable search engine. Firstly, you should take a look at its domain name. Various questionable websites bear quite random titles. In this case, “zwangi” does not suggest the nature of this search engine. What is more, the design is identical to another browser hijacker – Kwinzy.com virus. The developer aims to increase its profits by launching several web analogous pages. This is the same story as with Imali company. It has occupied the market with a dozen of browser hijackers which share common URL domains. Though rarely browser hijackers pose a threat to the operating system, it is not recommended to ignore their presence. Speaking of Zwangi.com, you should not expect much from it. Comparing its search results to the ones displayed by a reliable search provider, they do not fulfill quality requirements. In other words, they provide more sponsored content rather than objective search results. Thus, if you are looking for reviews about anti-virus applications, then you might notice the sponsored web pages promoting the products of one or a few companies.

Therefore, the privacy policy should be of interest to you as well[2]. It contains crucial information. Unfortunately, users tend to ignore it without the awareness that the PUP spies on not only their browsing habits but personal details such as name, email and shipping address, as well[3]. In this regard, Zwangi.com compiles such information. Though it disclaims of sharing it with third parties, it mentions possible data transfer to its partner companies and the service providers. Therefore, the outcome might be the same – you get bombarded with tons of personalized content. Your Inbox folder might not escape the stream of personal, commercial offers. Lastly, Zwangi.com redirect phenomenon does not only become an irritating tendency but might directly affect the processing performance of your browser. Simultaneously opening windows may deteriorate the browser’s capacity to provide fast browsing speed. If you have already decided to get rid of this hijacker, follow the instructions below.
When did the hijacker infect my computer?
Zwangi.com hijack might have taken place when you have inattentively installed a new application. How did it happen? The problem lies in the habit installing new applications. It is common knowledge that users skim through the wizards by clicking the “Next” button only to find unwanted applications installed on the computer. In order not to repeat the same mistake again, change the habit. Upon initiating the installation, opt for the “Advanced” settings. Then watch for add-ons. Rarely they happen to be useful tools, so it would be better to deselect them so that they would not settle on your computer. In addition, you can manage your browser settings to limit the risk of landing in a malicious domain[4].
Zwangi.com termination steps
It is not difficult to remove Zwangi.com virus. You can do it with the assistance of malware removal utility. One of the positive features is that it comes in handy eliminating more delicate virtual infections. Do not forget to update it daily to experience all functions. On the final note, you can check manual Zwangi.com removal guidelines. They will also explain how to reset the settings. Even if you are dealing with a browser hijacker, take it seriously. An insignificant detail might be only the beginning of bigger problems[5].
Uninstall from Windows
Uninstall from Windows 10/8:
- Type Control Panel into the Windows search box and open the result.
- Under Programs, select Uninstall a program.


Uninstall from Windows 7/XP:
- Click on Windows Start > Control Panel (Windows XP users should click on Add/Remove Programs).
- In Control Panel, select Programs > Uninstall a program.


Remove the unwanted program:
- In the Programs and Features window, look for any recently installed suspicious entries, select them, and click Uninstall.
- If User Account Control appears, click Yes to confirm, then complete the removal.


Delete from macOS
Remove the unwanted application:
- From the menu bar, select Go > Applications.
- In the Applications folder, look for any suspicious entries, then drag them to Trash (or right-click and pick Move to Trash).


Delete leftover files and folders:
- Select Go > Go to Folder.
- Enter /Library/Application Support and remove any suspicious folders related to the unwanted program.
- Repeat the same check in the /Library/LaunchAgents and /Library/LaunchDaemons folders, deleting any suspicious entries.

- Finally, empty the Trash to permanently remove the leftovers.

Reset Internet Explorer
Remove dangerous add-ons:
- Open Internet Explorer, click on the Gear icon (IE menu) on the top-right corner of the browser
- Pick Manage Add-ons.
- You will see a Manage Add-ons window. Here, look for suspicious plugins. Click on these entries and select Disable.


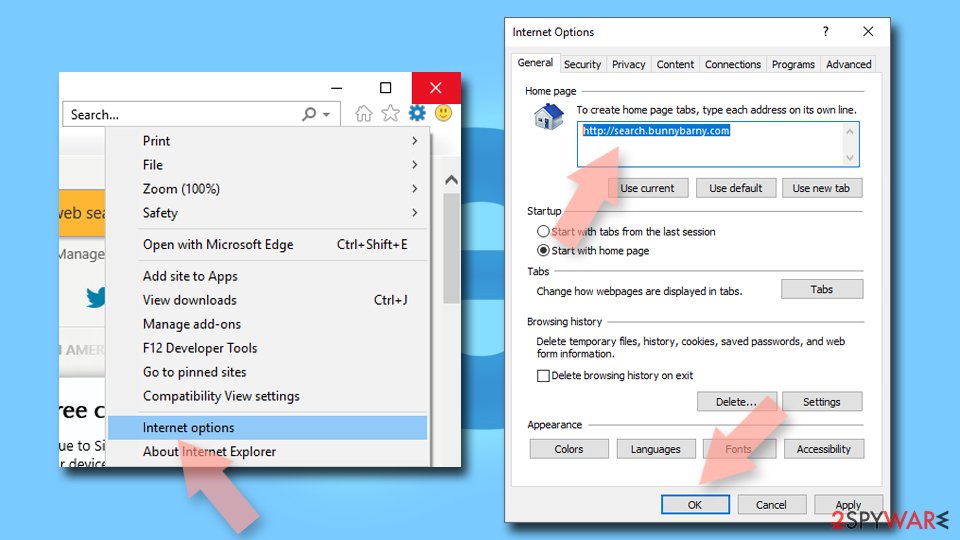
Change your homepage if it was altered:
- Open IE and click on the Gear icon.
- Select Internet Options.
- In the General tab, delete the Home page address and replace it by your preferred one (for example, Google.com).
- Click Apply and then select OK.

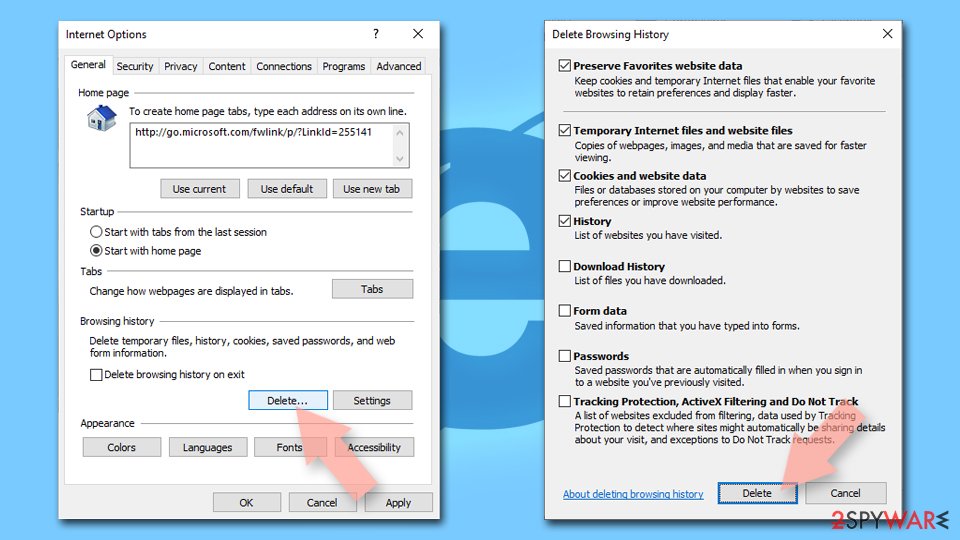
Delete temporary files:
- Press on the Gear icon and select Internet Options.
- Under Browsing history, click Delete...
- Select relevant fields and press Delete.

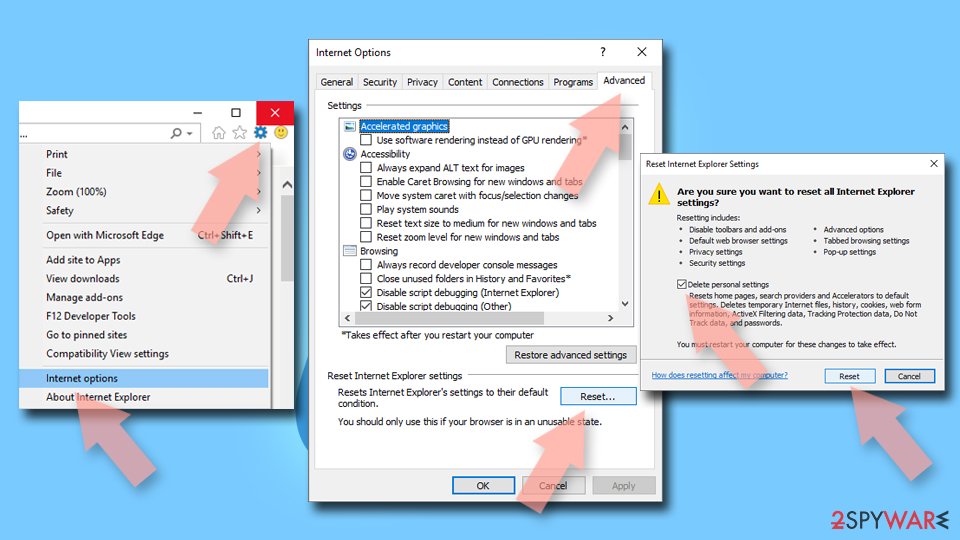
Reset Internet Explorer:
- Click on Gear icon > Internet options and select Advanced tab.
- Select Reset.
- In the new window, check Delete personal settings and select Reset.

Remove from Microsoft Edge
Delete unwanted extensions from MS Edge:
- Select Menu (three horizontal dots at the top-right of the browser window) and pick Extensions.
- From the list, pick the extension and click on the Gear icon.
- Click Remove.


Clear cookies and other browser data:
- Click on the Menu (three horizontal dots at the top-right of the browser window) and select Settings > Privacy, search, and services..
- Under Clear browsing data, pick Choose what to clear.
- Select Cookies and other site data and Cached images and files. (apart from passwords, although you might want to include Media licenses as well, if applicable) and click on Clear.


Restore new tab and homepage settings:
- Click the menu icon and choose Settings.
- Then find On startup section.
- Click Remove next to any suspicious startup page.
Reset MS Edge if the above steps did not work:
- Press on Ctrl + Shift + Esc to open Task Manager.
- Click on More details arrow at the bottom of the window.
- Select Details tab.
- Now scroll down and locate every entry with Microsoft Edge name in it. Right-click on each of them and select End Task to stop MS Edge from running.


Instructions for Chromium-based Edge
Delete extensions from MS Edge (Chromium):
- Open Edge and click select Settings > Extensions.
- Delete unwanted extensions by clicking Remove.


Clear cache and site data:
- Click on Menu and go to Settings.
- Select Privacy, search and services.
- Under Clear browsing data, pick Choose what to clear.
- Under Time range, pick All time.
- Select Clear now.


Reset Chromium-based MS Edge:
- Click on Menu and select Settings.
- On the left side, pick Reset settings.
- Select Restore settings to their default values.
- Confirm with Reset.
- This will disable extensions and reset startup pages but will not delete bookmarks, saved passwords, or browsing history.


Remove from Mozilla Firefox (FF)
Remove dangerous extensions:
- Open Mozilla Firefox browser and click on the Menu (three horizontal lines at the top-right of the window).
- Select Add-ons.
- In here, select the unwanted extension and click Remove.


Reset the homepage:
- Click three horizontal lines at the top right corner to open the menu.
- Choose Settings.
- Under Home, set your preferred homepage and new tab settings.
Clear cookies and site data:
- Click Menu and pick Settings.
- Go to Privacy & Security section.
- Scroll down to locate Cookies and Site Data.
- Click on Clear Data...
- Select Cookies and Site Data and Temporary cached files and pages, then click Clear.


Reset Mozilla Firefox
If clearing the browser as explained above did not help, reset Mozilla Firefox:
- Open Mozilla Firefox browser and click the Menu.
- Go to Help and then choose Troubleshooting Information.

- Under Give Firefox a tune up section, click on Refresh Firefox...
- Once the pop-up shows up, confirm the action by pressing on Refresh Firefox.


Remove from Google Chrome
Delete malicious extensions from Google Chrome:
- Open Google Chrome, click on the Menu (three vertical dots at the top-right corner) and select More tools > Extensions.
- In the newly opened window, you will see all the installed extensions. Uninstall all suspicious extensions related to the unwanted program by clicking Remove.


Clear cache and web data from Chrome:
- Click on Menu and pick Settings.
- Under Privacy and security, select Clear browsing data.
- Select Browsing history, Cookies and other site data, as well as Cached images and files.
- Click Clear data.


Change your homepage:
- Click menu and choose Settings.
- Look for a suspicious site in the On startup section.
- Click on Open a specific or set of pages and click on three dots to find the Remove option.
Reset Google Chrome:
If the previous methods did not help you, reset Google Chrome to eliminate all the unwanted components:
- Click on Menu and select Settings.
- In the Settings, scroll down and click Advanced.
- Scroll down and locate Reset and clean up section.
- Now click Restore settings to their original defaults.
- Confirm with Reset settings.


Delete from Safari
Remove dangerous extensions:
- Open Safari, click Safari in the menu at the top-left of the screen, and select Preferences.
- Go to the Extensions tab, look for any suspicious entries, and click Uninstall to remove them.


Clear history and website data:
- Click Safari in the menu and pick Clear History.
- Set Clear to all history and confirm with Clear History.


Reset Safari:
- Click Safari in the menu and select Preferences > Advanced.
- Enable Show Develop menu in menu bar.
- From the menu bar, click Develop and select Empty Caches.


Was this guide helpful?
Be the first to comment