Ads by DNSBlock (Improved Guide) - updated Jul 2016
DNSBlock ads Removal Guide
What is Ads by DNSBlock?
Should you remove DNSBlock virus?
If you have been convinced to install DNSBlock adware, you should have already noticed that this program functions quite suspiciously. Although it is advertised as a convenient tool that can keep malicious Internet sites out of user’s reach, its seems that this application can redirect the user to such sites itself. Just like any other typical ad-supported program, this one also advertises numerous third-party websites by displaying their ads on user’s screen at random times. When this program is active, it connects to its server via user’s network connection and loads various advertisements, and then displays them in a form or pop-up ads (most frequently) and also banners or in-text links. Ads by DNSBlock typically seem trustworthy and catchy at the first sight, however, trusting them may be a bad idea because you can never know where these ads can take you. Be aware of the fact that they can force you to visit highly dangerous sites that promote possibly infectious content, such as fake Java or Flash updates. If DNSBlock ads started to appear on your screen, stay alert and try not to click on them until you remove DNSBlock from your computer. You can easily delete it with FortectIntego or another reputable anti-spyware software.
Users who have their computers hijacked by this program says that it works suspiciously, but what annoys them the most is that this program slows down computer’s performance. That can be explained easily. To load up its ads, this application communicates with its remote server, so it uses computer’s active network connection for that. It also exploits computer’s resources to run its processes; meanwhile, other programs need them as well. As a result, all these activities slow overall computer’s performance. That is yet another reason to remove this ad-supported application from your computer. However, that is not the last negative thing that we have to say about this dubious application. We have already received several reports from the users claiming that they have noticed the presence of DNSBlock on their PCs even if they haven’t downloaded it by themselves. That’s because it is usually distributed bundled with other free programs. To learn more about this distribution method, read the information provided in the next paragraph.
How did DNSBlock hijack my PC?
This questionable application belongs to a huge family of adware-type programs that are also known as potentially unwanted programs (PUP) due to a misleading distribution method (‘bundling’). This method is a legitimate way to make people install unwanted add-ons, plug-ins, toolbars, and extensions on their PCs. In other words, right after installing a freeware, you may find DNSBlock ads within your web browser, experience redirects, and browser’s slowdowns. Fortunately, it’s quite easy to prevent this from happening. If you are going to install a download manager, media player, PDF creator or another free software, you should check its Advanced or Custom settings and try to find out if it’s carrying optional downloads or not. If you find suspicious apps set by default, it’s a sign that you are about to install a software bundle, so make sure that you unmark all ticks before finishing the installation.
How to remove DNSBlock from computer system?
DNSBlock virus can be eliminated with the help of the instructions below. In case you want to implement DNSBlock removal manually, our recommendation would be to check the system with a reliable anti-malware after in order to get rid of other PUPs that may be lurking on the system, because third-party programs that spread via bundling usually do not travel alone. In other words, when you agreed to install the discussed PUP, you probably have allowed to install several different PUPs alongside it as well.
You may remove virus damage with a help of FortectIntego. SpyHunter 5Combo Cleaner and Malwarebytes are recommended to detect potentially unwanted programs and viruses with all their files and registry entries that are related to them.
Getting rid of DNSBlock ads. Follow these steps
Uninstall from Windows
Instructions for Windows 10/8 machines:
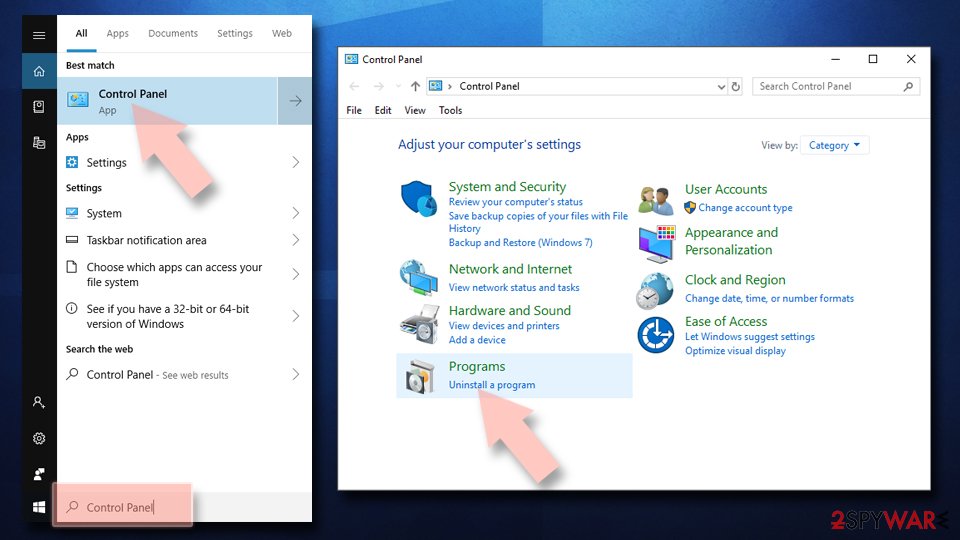
- Enter Control Panel into Windows search box and hit Enter or click on the search result.
- Under Programs, select Uninstall a program.

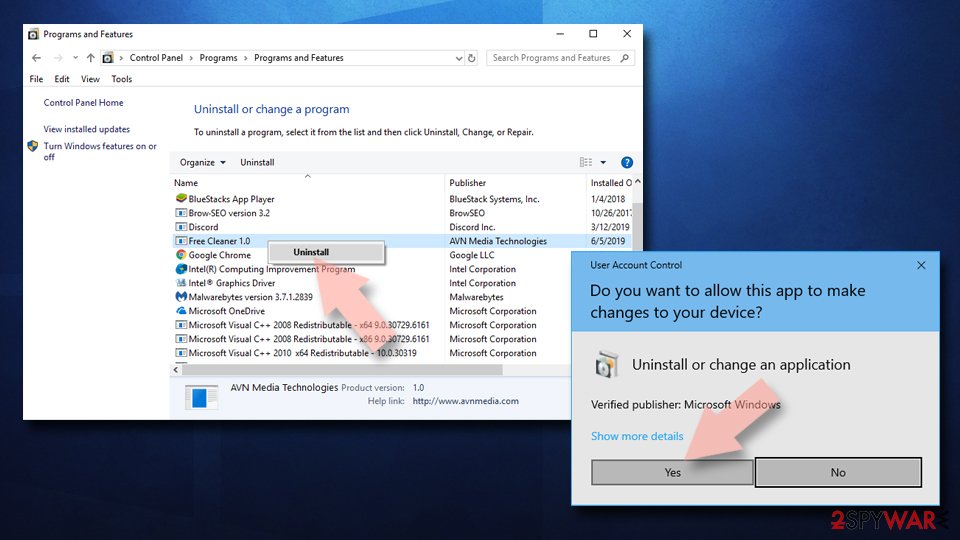
- From the list, find the entry of the suspicious program.
- Right-click on the application and select Uninstall.
- If User Account Control shows up, click Yes.
- Wait till uninstallation process is complete and click OK.

If you are Windows 7/XP user, proceed with the following instructions:
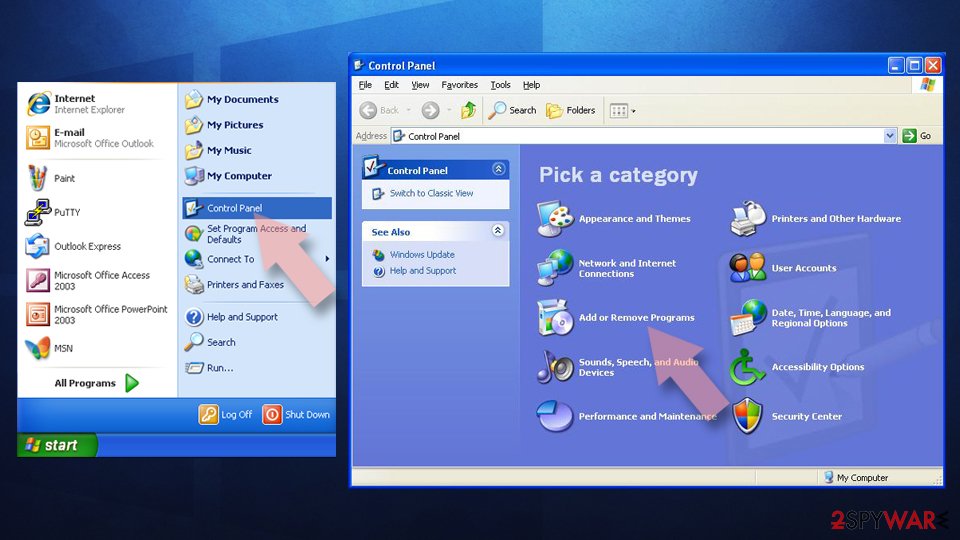
- Click on Windows Start > Control Panel located on the right pane (if you are Windows XP user, click on Add/Remove Programs).
- In Control Panel, select Programs > Uninstall a program.

- Pick the unwanted application by clicking on it once.
- At the top, click Uninstall/Change.
- In the confirmation prompt, pick Yes.
- Click OK once the removal process is finished.
Delete from macOS
Remove items from Applications folder:
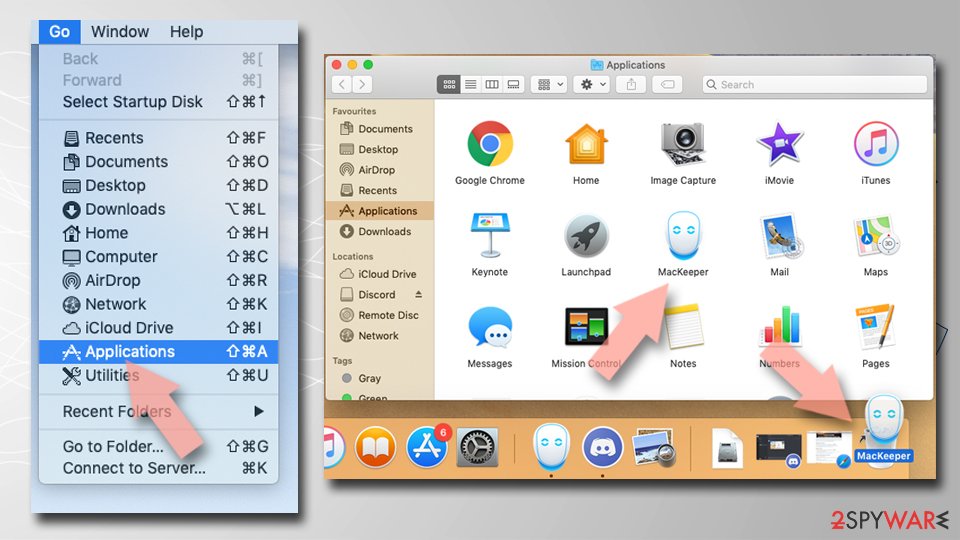
- From the menu bar, select Go > Applications.
- In the Applications folder, look for all related entries.
- Click on the app and drag it to Trash (or right-click and pick Move to Trash)

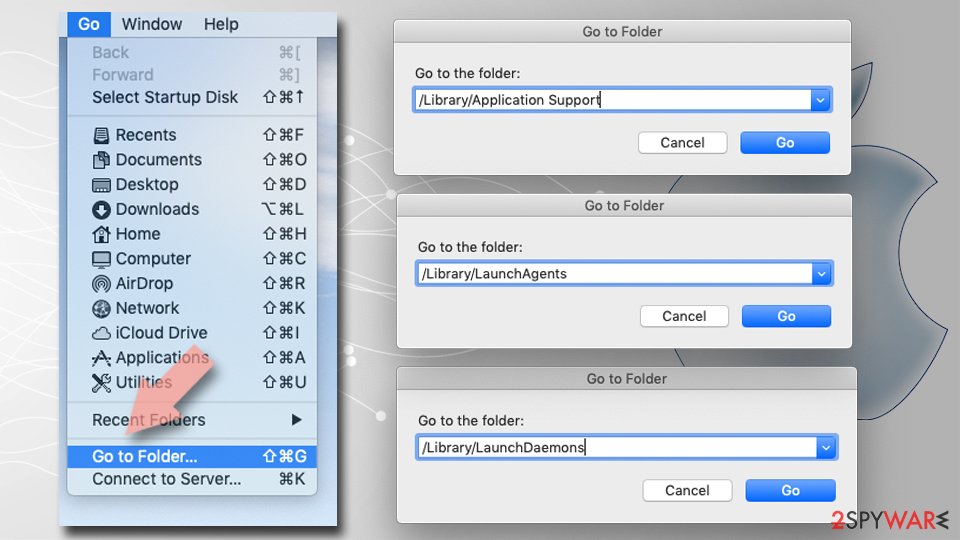
To fully remove an unwanted app, you need to access Application Support, LaunchAgents, and LaunchDaemons folders and delete relevant files:
- Select Go > Go to Folder.
- Enter /Library/Application Support and click Go or press Enter.
- In the Application Support folder, look for any dubious entries and then delete them.
- Now enter /Library/LaunchAgents and /Library/LaunchDaemons folders the same way and terminate all the related .plist files.

Remove from Microsoft Edge
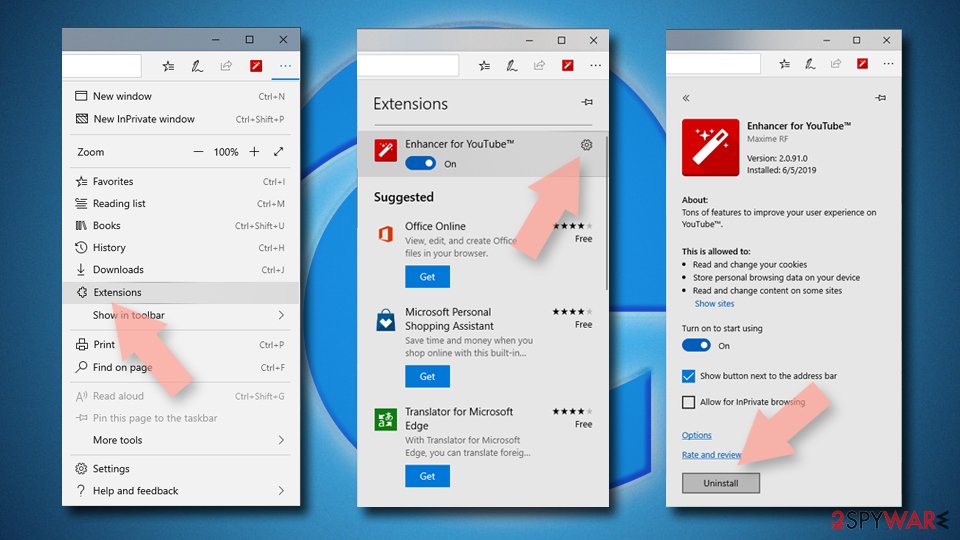
Delete unwanted extensions from MS Edge:
- Select Menu (three horizontal dots at the top-right of the browser window) and pick Extensions.
- From the list, pick the extension and click on the Gear icon.
- Click on Uninstall at the bottom.

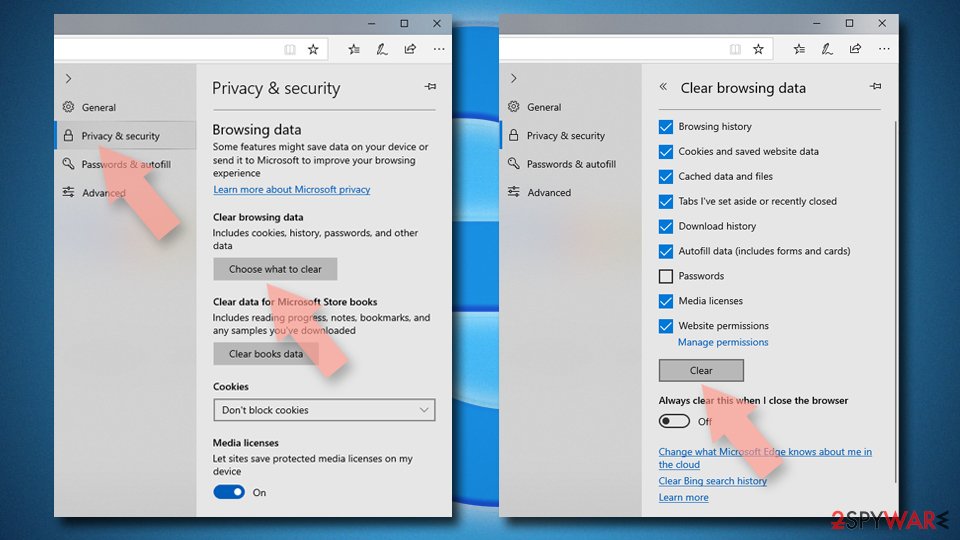
Clear cookies and other browser data:
- Click on the Menu (three horizontal dots at the top-right of the browser window) and select Privacy & security.
- Under Clear browsing data, pick Choose what to clear.
- Select everything (apart from passwords, although you might want to include Media licenses as well, if applicable) and click on Clear.

Restore new tab and homepage settings:
- Click the menu icon and choose Settings.
- Then find On startup section.
- Click Disable if you found any suspicious domain.
Reset MS Edge if the above steps did not work:
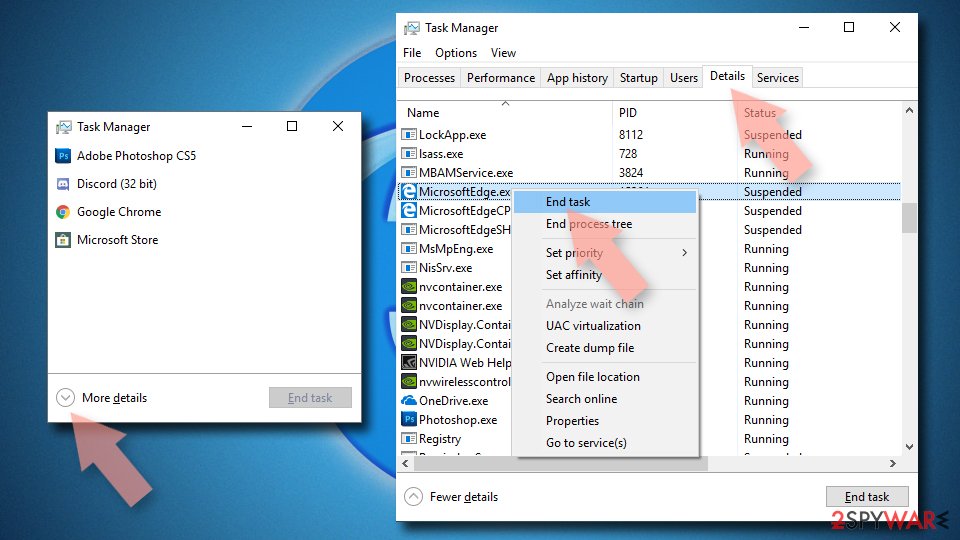
- Press on Ctrl + Shift + Esc to open Task Manager.
- Click on More details arrow at the bottom of the window.
- Select Details tab.
- Now scroll down and locate every entry with Microsoft Edge name in it. Right-click on each of them and select End Task to stop MS Edge from running.

If this solution failed to help you, you need to use an advanced Edge reset method. Note that you need to backup your data before proceeding.
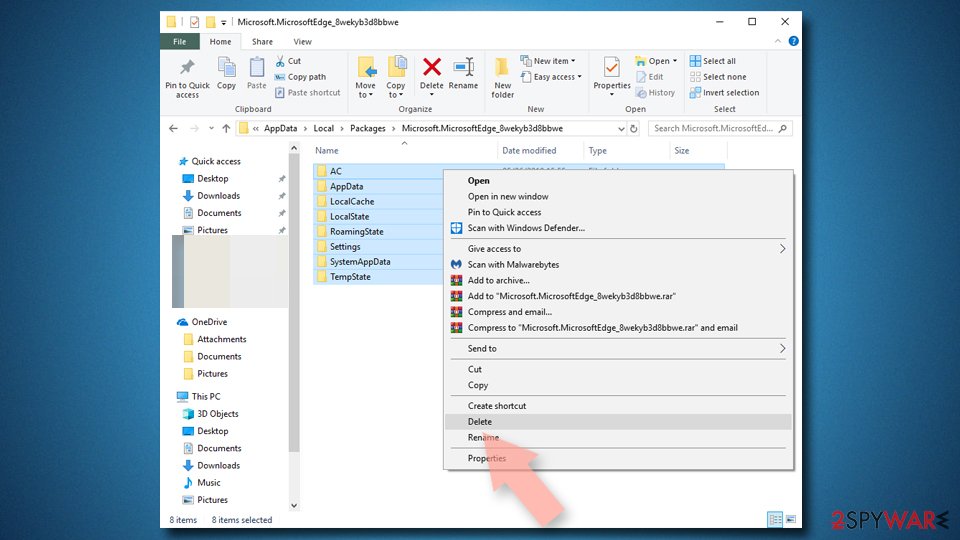
- Find the following folder on your computer: C:\\Users\\%username%\\AppData\\Local\\Packages\\Microsoft.MicrosoftEdge_8wekyb3d8bbwe.
- Press Ctrl + A on your keyboard to select all folders.
- Right-click on them and pick Delete

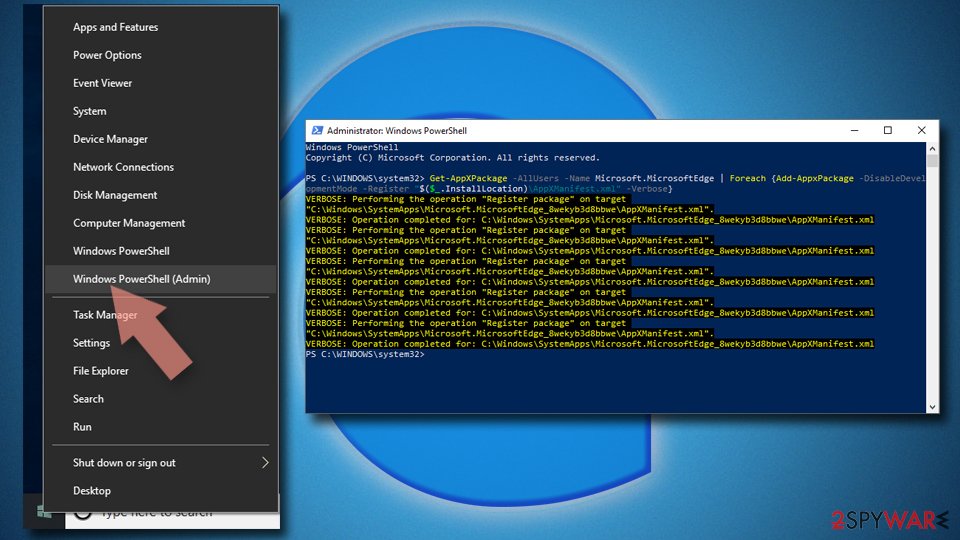
- Now right-click on the Start button and pick Windows PowerShell (Admin).
- When the new window opens, copy and paste the following command, and then press Enter:
Get-AppXPackage -AllUsers -Name Microsoft.MicrosoftEdge | Foreach {Add-AppxPackage -DisableDevelopmentMode -Register “$($_.InstallLocation)\\AppXManifest.xml” -Verbose

Instructions for Chromium-based Edge
Delete extensions from MS Edge (Chromium):
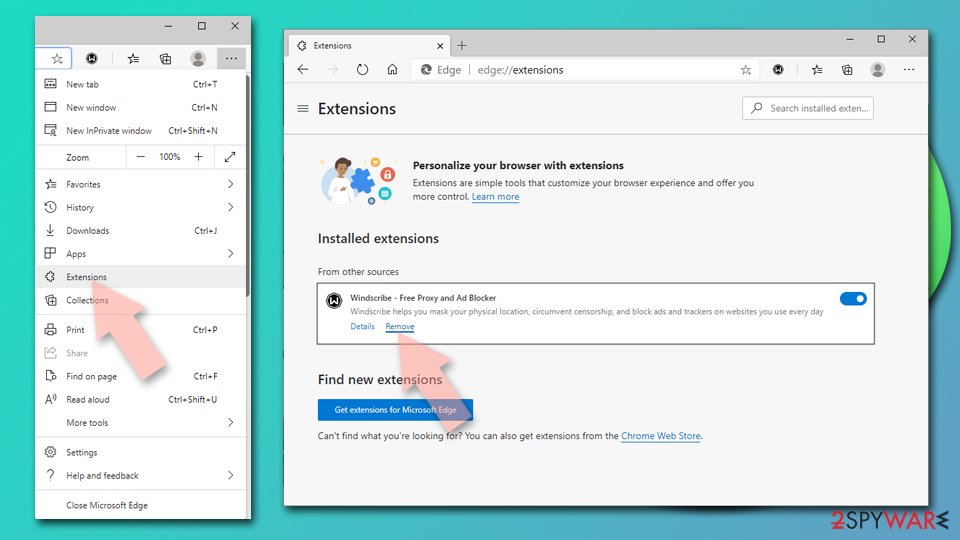
- Open Edge and click select Settings > Extensions.
- Delete unwanted extensions by clicking Remove.

Clear cache and site data:
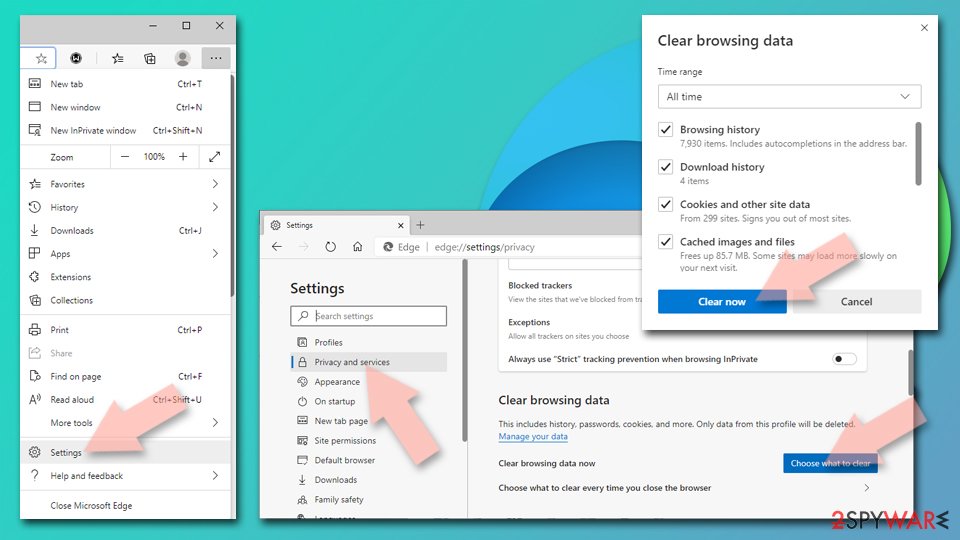
- Click on Menu and go to Settings.
- Select Privacy, search and services.
- Under Clear browsing data, pick Choose what to clear.
- Under Time range, pick All time.
- Select Clear now.

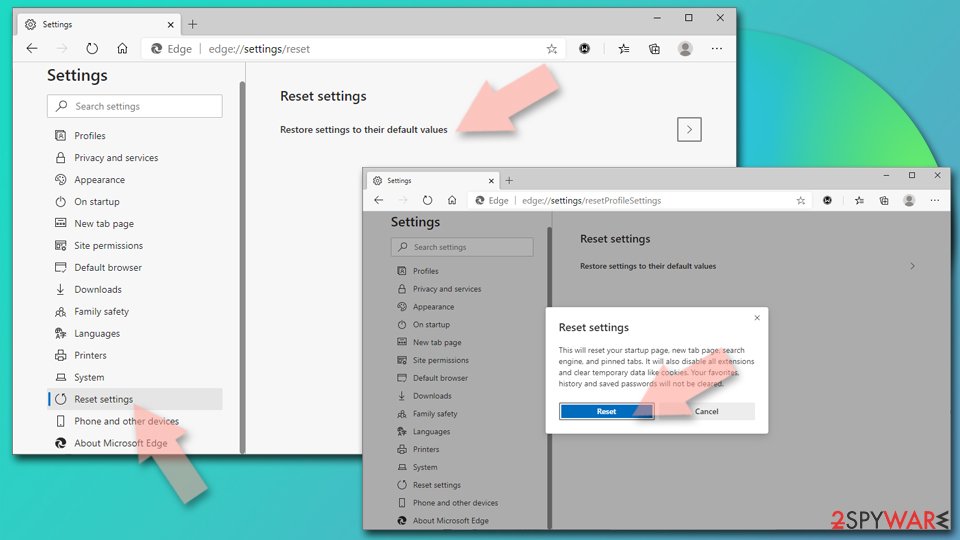
Reset Chromium-based MS Edge:
- Click on Menu and select Settings.
- On the left side, pick Reset settings.
- Select Restore settings to their default values.
- Confirm with Reset.

Remove from Mozilla Firefox (FF)
Remove dangerous extensions:
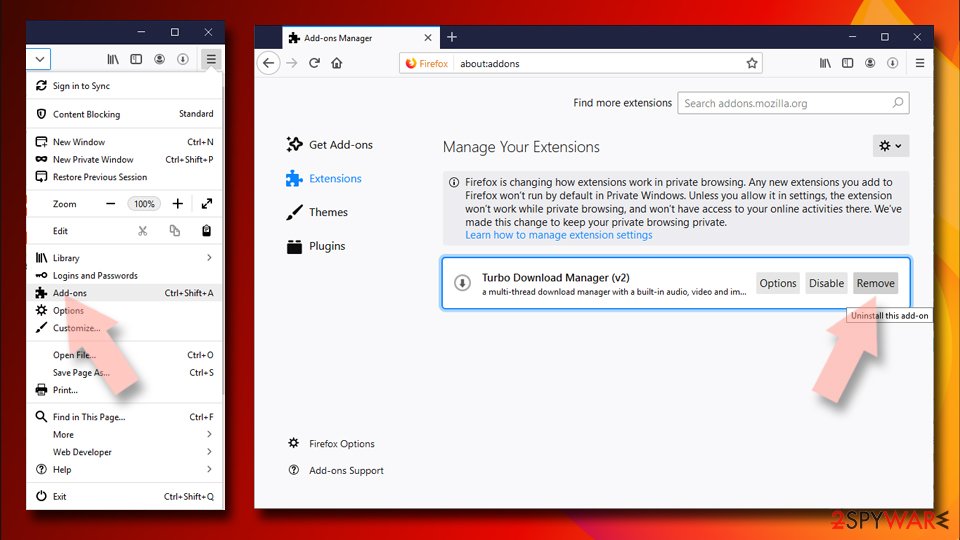
- Open Mozilla Firefox browser and click on the Menu (three horizontal lines at the top-right of the window).
- Select Add-ons.
- In here, select unwanted plugin and click Remove.

Reset the homepage:
- Click three horizontal lines at the top right corner to open the menu.
- Choose Options.
- Under Home options, enter your preferred site that will open every time you newly open the Mozilla Firefox.
Clear cookies and site data:
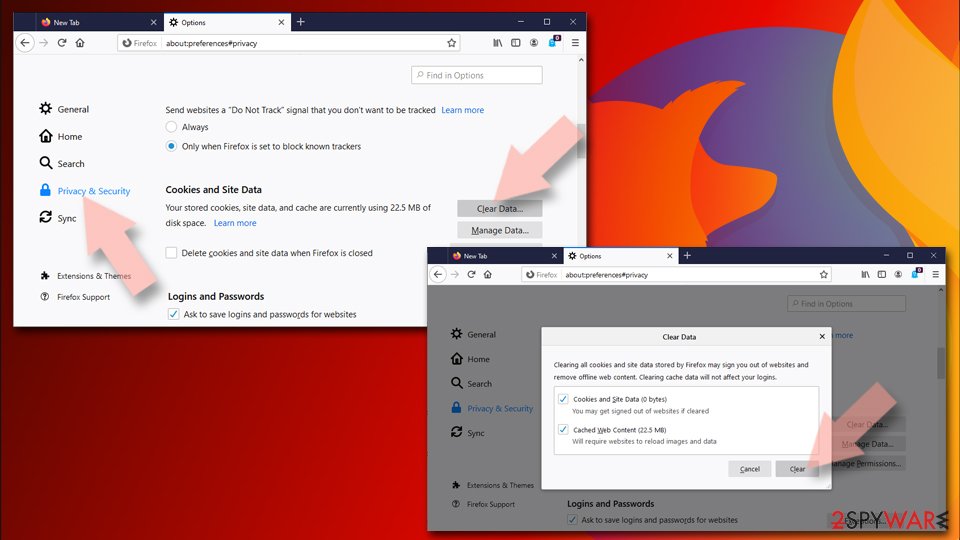
- Click Menu and pick Settings.
- Go to Privacy & Security section.
- Scroll down to locate Cookies and Site Data.
- Click on Clear Data…
- Select Cookies and Site Data, as well as Cached Web Content and press Clear.

Reset Mozilla Firefox
If clearing the browser as explained above did not help, reset Mozilla Firefox:
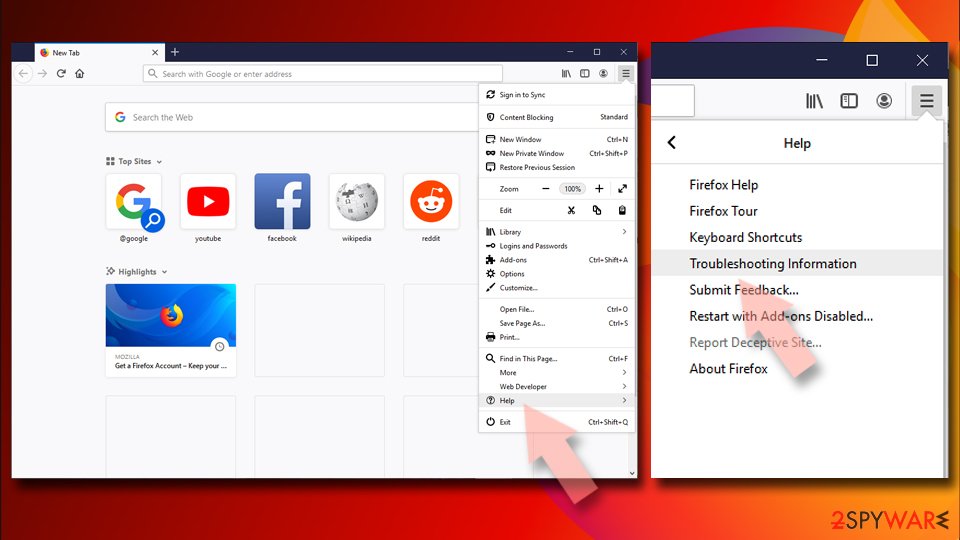
- Open Mozilla Firefox browser and click the Menu.
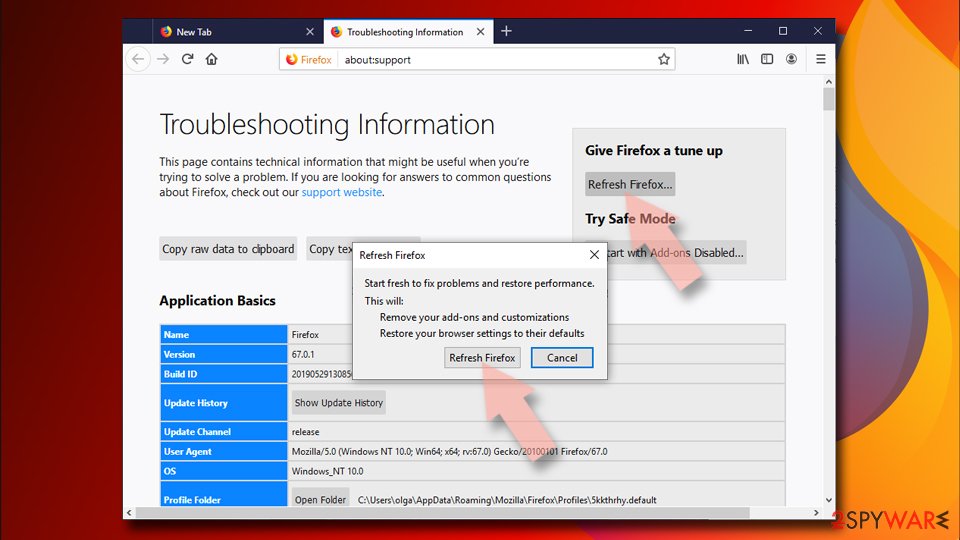
- Go to Help and then choose Troubleshooting Information.

- Under Give Firefox a tune up section, click on Refresh Firefox…
- Once the pop-up shows up, confirm the action by pressing on Refresh Firefox.

Remove from Google Chrome
Delete malicious extensions from Google Chrome:
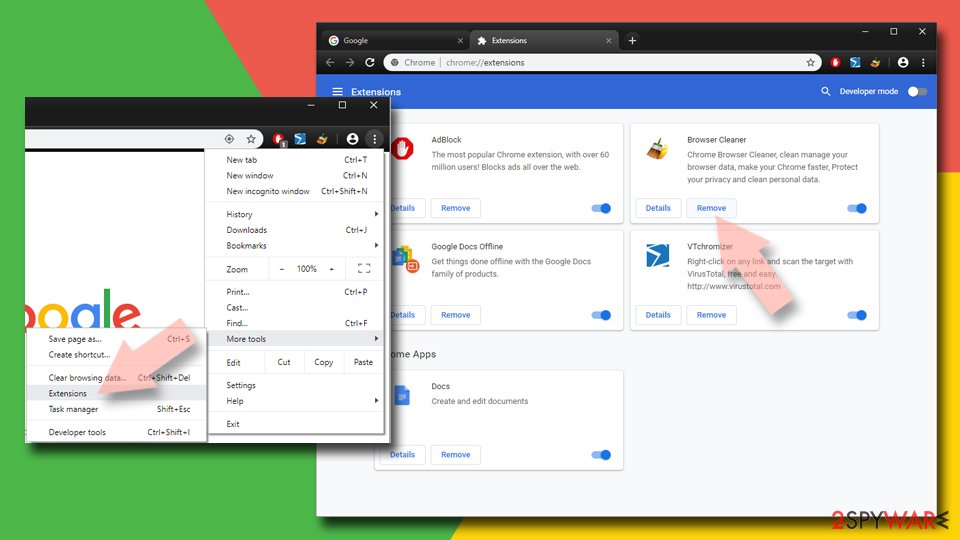
- Open Google Chrome, click on the Menu (three vertical dots at the top-right corner) and select More tools > Extensions.
- In the newly opened window, you will see all the installed extensions. Uninstall all the suspicious plugins that might be related to the unwanted program by clicking Remove.

Clear cache and web data from Chrome:
- Click on Menu and pick Settings.
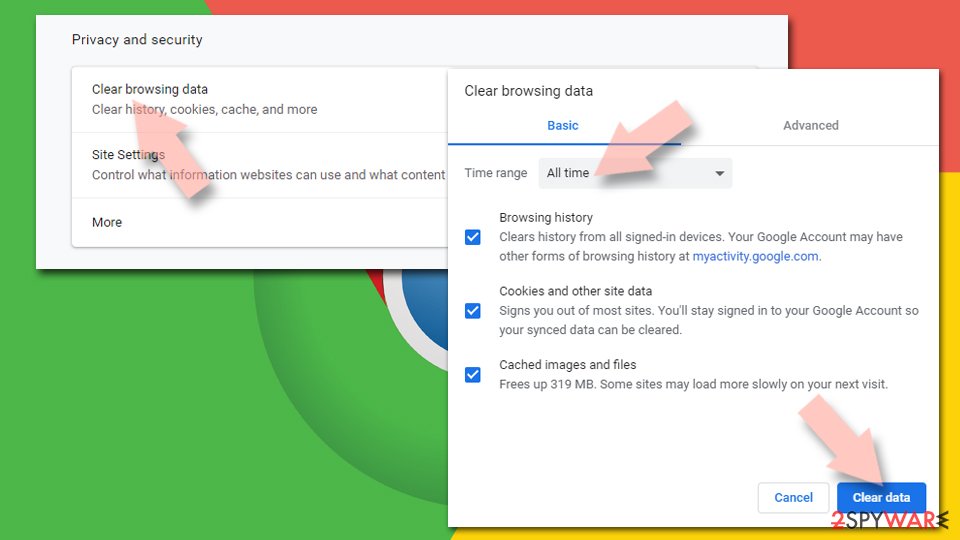
- Under Privacy and security, select Clear browsing data.
- Select Browsing history, Cookies and other site data, as well as Cached images and files.
- Click Clear data.

Change your homepage:
- Click menu and choose Settings.
- Look for a suspicious site in the On startup section.
- Click on Open a specific or set of pages and click on three dots to find the Remove option.
Reset Google Chrome:
If the previous methods did not help you, reset Google Chrome to eliminate all the unwanted components:
- Click on Menu and select Settings.
- In the Settings, scroll down and click Advanced.
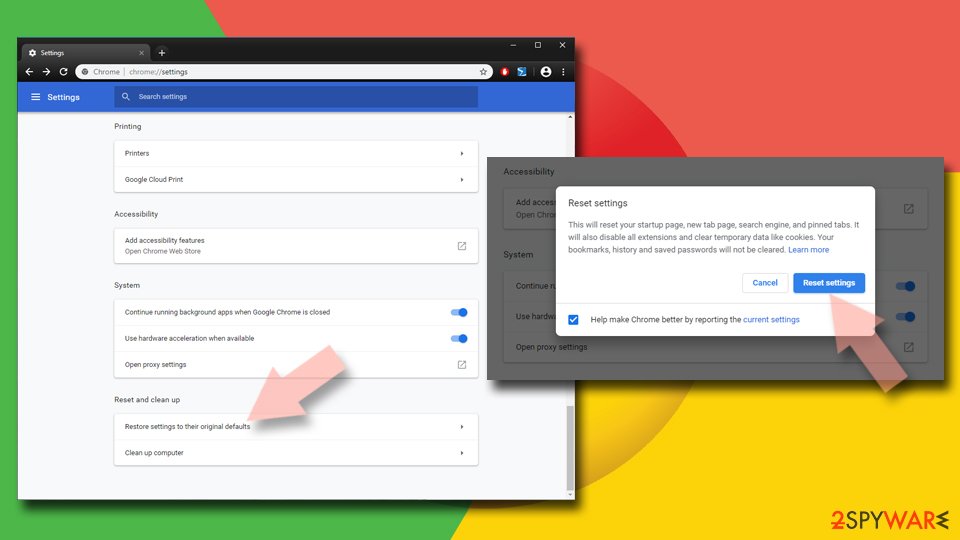
- Scroll down and locate Reset and clean up section.
- Now click Restore settings to their original defaults.
- Confirm with Reset settings.

Delete from Safari
Remove unwanted extensions from Safari:
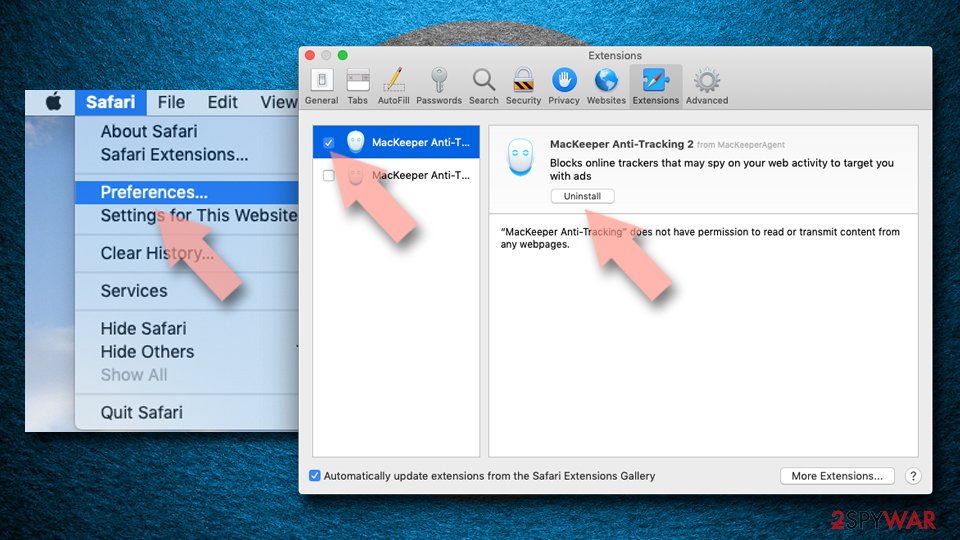
- Click Safari > Preferences…
- In the new window, pick Extensions.
- Select the unwanted extension and select Uninstall.

Clear cookies and other website data from Safari:
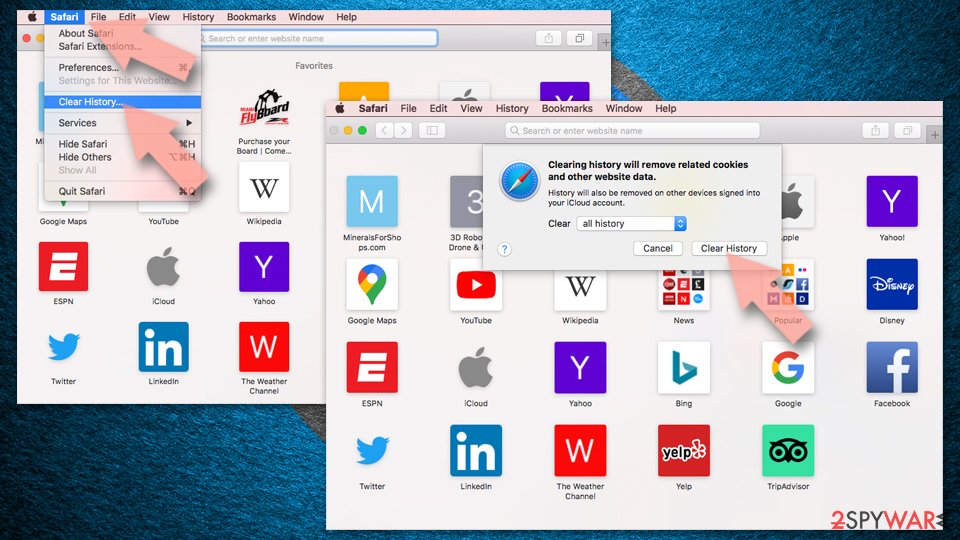
- Click Safari > Clear History…
- From the drop-down menu under Clear, pick all history.
- Confirm with Clear History.

Reset Safari if the above-mentioned steps did not help you:
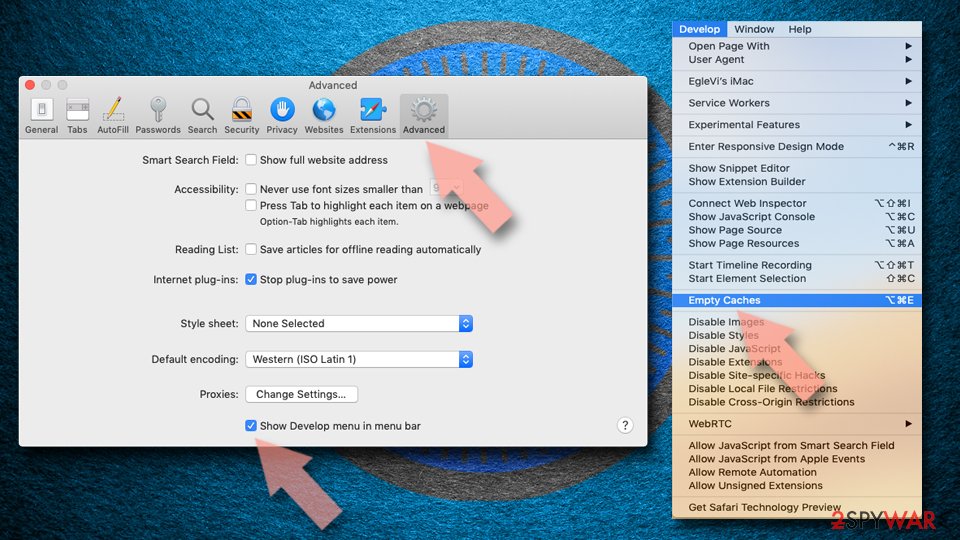
- Click Safari > Preferences…
- Go to Advanced tab.
- Tick the Show Develop menu in menu bar.
- From the menu bar, click Develop, and then select Empty Caches.

After uninstalling this potentially unwanted program (PUP) and fixing each of your web browsers, we recommend you to scan your PC system with a reputable anti-spyware. This will help you to get rid of DNSBlock registry traces and will also identify related parasites or possible malware infections on your computer. For that you can use our top-rated malware remover: FortectIntego, SpyHunter 5Combo Cleaner or Malwarebytes.
How to prevent from getting adware
Do not let government spy on you
The government has many issues in regards to tracking users' data and spying on citizens, so you should take this into consideration and learn more about shady information gathering practices. Avoid any unwanted government tracking or spying by going totally anonymous on the internet.
You can choose a different location when you go online and access any material you want without particular content restrictions. You can easily enjoy internet connection without any risks of being hacked by using Private Internet Access VPN.
Control the information that can be accessed by government any other unwanted party and surf online without being spied on. Even if you are not involved in illegal activities or trust your selection of services, platforms, be suspicious for your own security and take precautionary measures by using the VPN service.
Backup files for the later use, in case of the malware attack
Computer users can suffer from data losses due to cyber infections or their own faulty doings. Ransomware can encrypt and hold files hostage, while unforeseen power cuts might cause a loss of important documents. If you have proper up-to-date backups, you can easily recover after such an incident and get back to work. It is also equally important to update backups on a regular basis so that the newest information remains intact – you can set this process to be performed automatically.
When you have the previous version of every important document or project you can avoid frustration and breakdowns. It comes in handy when malware strikes out of nowhere. Use Data Recovery Pro for the data restoration process.
