

Hermantermi.com – a deceptive website that attempts to trick users into accepting push notifications that would deliver ads later

Hermantermi.com is a harmful website designed to deceive and scam users without their knowledge. Many people become aware of this website when sudden pop-ups begin appearing on their screens out of nowhere. These unexpected notifications usually result from push notifications previously enabled, often as part of a larger deceptive scheme.
Typically, users are redirected to the Hermantermi.com scam page after clicking on a malicious link found on an unreliable website or through adware-induced redirects. In most cases, people do not suspect anything unusual and believe they are completing a routine security check. Regardless of how someone lands on this site, it’s essential to stay cautious and mindful of online activities to avoid falling victim to such scams.
By clicking the “Allow” button on the notification prompt, users unknowingly grant Hermantermi.com permission to deliver push notifications whenever they choose. These notifications continue to appear as long as the browser remains open. However, there is a way to stop these persistent pop-ups, and all necessary steps for removal are detailed below.
| Name | Hermantermi.com |
| Type | Push notifications, pop-ups, ads, scam |
| Distribution | The website can begin to show ads at any point after the “Allow” button within the notification prompt is clicked |
| Symptoms | Pop-ups show up on a regular basis on the screen – these ads often include inappropriate, scam, phishing, or other similar content |
| Risks | Push notifications can sometimes contain misleading information and direct users to unsafe websites. Clicking on such advertisements can place your system at risk of being infiltrated by malicious software. Similarly, these untrustworthy ads can also pave the way for identity theft or potential financial losses |
| Removal | Access browser settings to stop intrusive push notifications. After that, make sure that your system is not infected with adware or malware – scan it with SpyHunterCombo Cleaner AV tool |
| Other checks | After the removal of adware and other PUPs, you should take your time to clean your browser from cookies and other trackers – FortectIntego can help you with that |
Cheap, yet effective tricks used by the Hermantermi.com scam
Push notification scams might seem less threatening compared to more significant risks like tech support scams, but their sheer volume makes them a concern that should not be dismissed. While these notifications may initially appear to be a minor annoyance, they can quickly escalate into persistent disturbances and potentially expose users to further risks.
These scams are typically hosted on malicious websites like Hermantermi.com, which are set up by cybercriminals. People often end up on such sites after being redirected from another web page, either by clicking on a risky link or due to adware active on their system. Such deceptive tactics lead users to these scam pages without their awareness.
Scammers often use convincing messages to manipulate users into interacting with their schemes. Common prompts may include messages such as “Click 'Allow' to begin downloading,” “Click 'Allow' to claim your prize,” or “Press 'Allow' to confirm you are not a robot.” These notifications are designed to trick users into enabling push notifications, effectively giving scammers permission to bombard their devices with unwanted ads and possibly harmful content.
Regardless of whether users select “Allow” or “Block” on the notification prompt, they are often redirected to similar scam sites with comparable deceptive tactics. As more sites gain permission to display notifications, the frequency of disruptive ads increases, potentially overwhelming the browser. This constant flow of intrusive content can interfere with browsing and expose users to more dangerous websites and scams.

You might be more likely to access scam sites when visiting dangerous places online
It’s natural for most users to avoid sites that might put them at risk. However, some individuals still disregard security warnings and deliberately visit high-risk websites, such as those offering torrents, software cracks, adult content, gambling services, and more.
It's important to recognize that these sites are not just conduits for installing ransomware, Trojans, and other cyber threats – they also commonly lead users to risky pages like Hermantermi.com and other dubious websites through redirects. This exposure often makes users more susceptible to further scams and malicious content.
In many cases, people end up on dangerous sites because of adware – malicious software often hidden within free program installations. These unwanted components are frequently bundled as optional additions, and users focused on getting free software may overlook the hidden risks, unintentionally allowing adware into their systems.
How to get rid of Hermantermi.com ads?
Push notifications, while not a new concept, have only recently become prevalent in desktop browsers. Unfortunately, many users are unfamiliar with how this feature works, making them easy targets for scams that trick them into subscribing, leading to a flood of unwanted pop-ups in their browsers.
Whether users are unknowingly subscribed or accidentally opted in, they can always prevent suspicious sites from sending push notifications by changing their browser’s site settings. Blocking such notifications is a straightforward way to reduce unwanted interruptions and regain control over browsing.
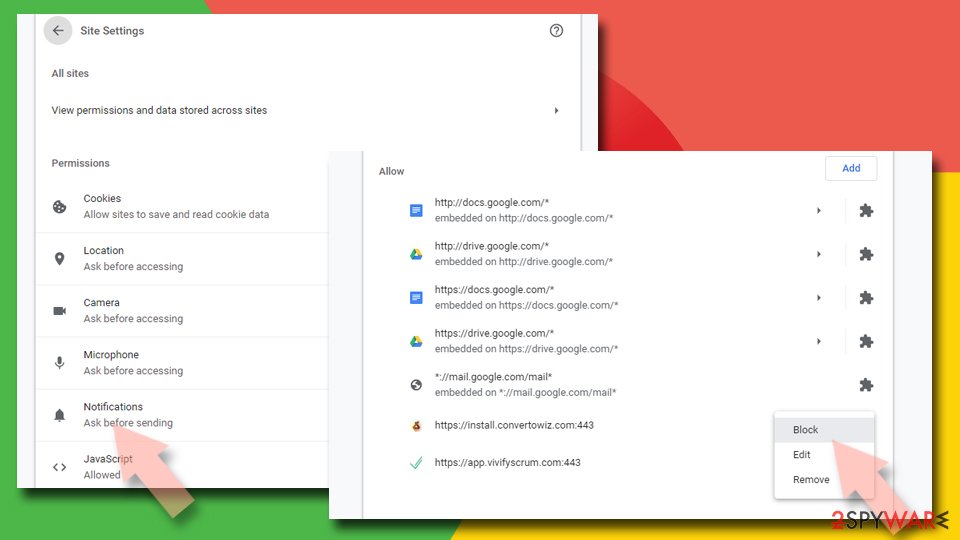
Google Chrome
- Open the Google Chrome browser and go to Menu > Settings.
- Scroll down and click on Advanced.
- Locate the Privacy and security section and pick Site Settings > Notifications.
- Look at the Allow section and look for a suspicious URL.
- Click the three vertical dots next to it and pick Block. This should remove unwanted notifications from Google Chrome.

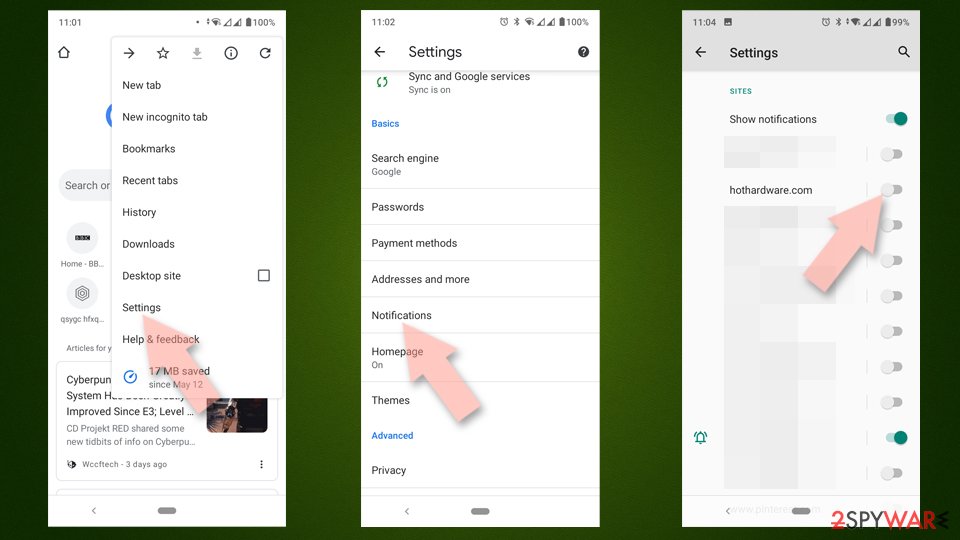
Google Chrome (Android)
- Open Google Chrome and tap on Settings (three vertical dots).
- Select Notifications.
- Scroll down to the Sites section.
- Locate the unwanted URL and toggle the button to the left (Off position).

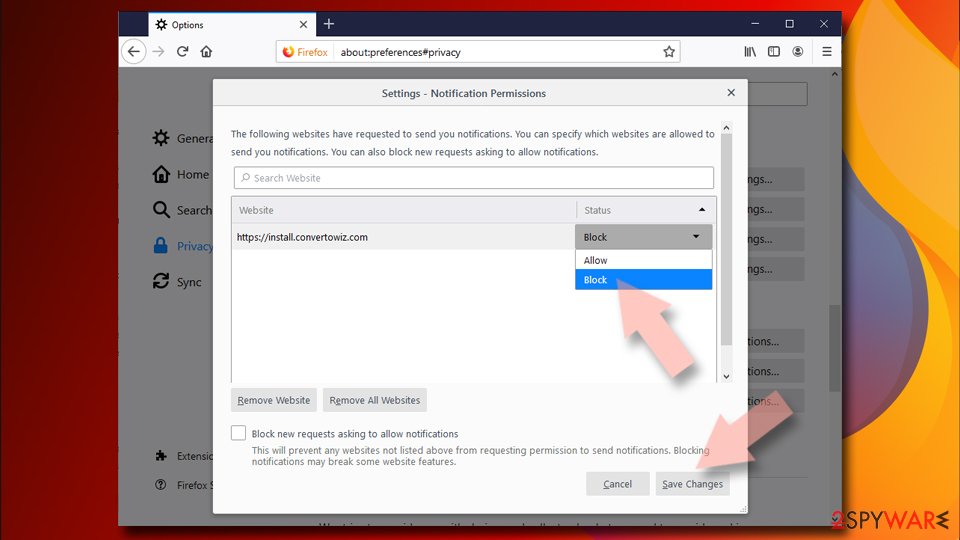
Mozilla Firefox
- Open Mozilla Firefox and go to Menu > Options.
- Click on Privacy & Security section.
- Under Permissions, you should be able to see Notifications. Click the Settings button next to it.
- In the Settings – Notification Permissions window, click on the drop-down menu by the URL in question.
- Select Block and then click on Save Changes. This should remove unwanted notifications from Mozilla Firefox.

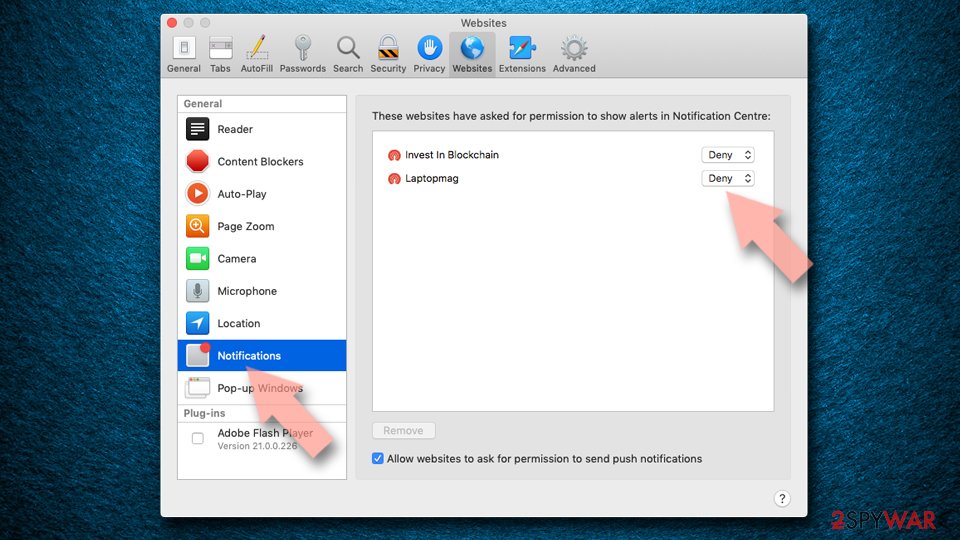
Safari
- Click on Safari > Preferences…
- Go to the Websites tab and, under General, select Notifications.
- Select the web address in question, click the drop-down menu and select Deny.

MS Edge
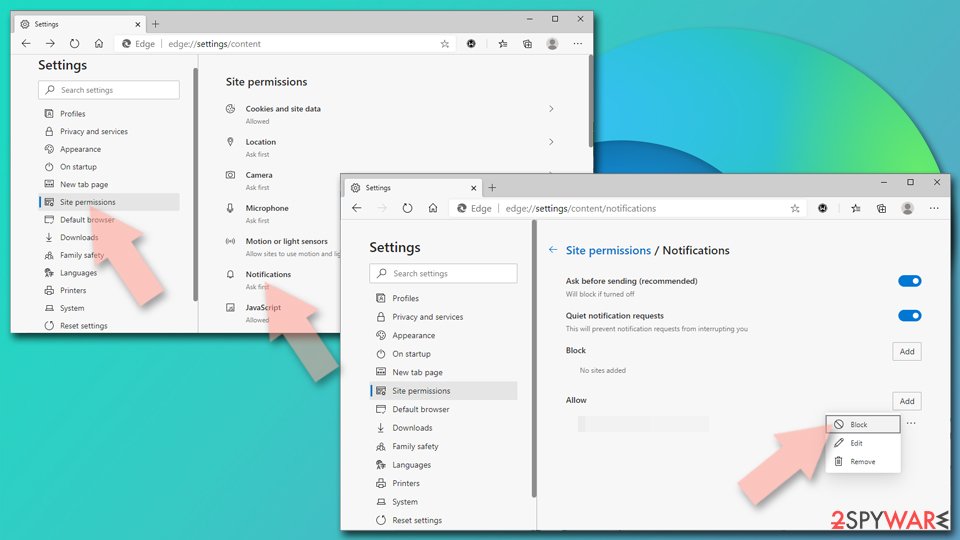
- Open Microsoft Edge, and go to Settings.
- Select Site permissions.
- Go to Notifications on the right.
- Under Allow, you will find the unwanted entry.
- Click on More actions and select Block.

Internet Explorer
- Open Internet Explorer, and click on the Gear icon at the top-right of the window.
- Select Internet options and go to the Privacy tab.
- In the Pop-up Blocker section, click on Settings.
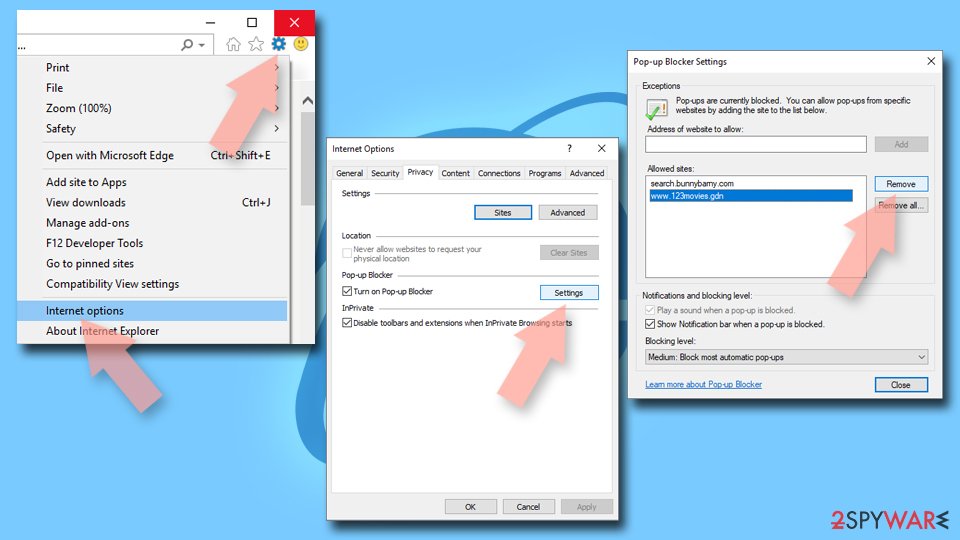
- Locate the web address in question under Allowed sites and pick Remove.

It’s crucial to ensure your device remains free from adware and other types of malware. While adware often presents clear signs, such as changes to browser settings, redirects to suspicious sites, or intrusive ads, some forms of malware operate quietly, with no obvious symptoms.
For this reason, we strongly recommend scanning your system for threats using trusted anti-malware tools like SpyHunterCombo Cleaner or MalwarebytesMalwarebytes. Keeping your system protected from adware and other malicious software is vital, as effective security software defends against potential cyber threats.
If any threats are found during a scan, they will be swiftly handled, with malicious files removed immediately. We also suggest using the FortectIntego Windows repair and maintenance tool afterward to automatically clean your browsers and address any damage caused by malware. This utility helps prevent crashes, errors, and other stability issues, maintaining smooth system performance.
Remove from Microsoft Edge
Delete unwanted extensions from MS Edge:
- Select Menu (three horizontal dots at the top-right of the browser window) and pick Extensions.
- From the list, pick the extension and click on the Gear icon.
- Click Remove.


Clear cookies and other browser data:
- Click on the Menu (three horizontal dots at the top-right of the browser window) and select Settings > Privacy, search, and services..
- Under Clear browsing data, pick Choose what to clear.
- Select Cookies and other site data and Cached images and files. (apart from passwords, although you might want to include Media licenses as well, if applicable) and click on Clear.


Restore new tab and homepage settings:
- Click the menu icon and choose Settings.
- Then find On startup section.
- Click Remove next to any suspicious startup page.
Reset MS Edge if the above steps did not work:
- Press on Ctrl + Shift + Esc to open Task Manager.
- Click on More details arrow at the bottom of the window.
- Select Details tab.
- Now scroll down and locate every entry with Microsoft Edge name in it. Right-click on each of them and select End Task to stop MS Edge from running.


Instructions for Chromium-based Edge
Delete extensions from MS Edge (Chromium):
- Open Edge and click select Settings > Extensions.
- Delete unwanted extensions by clicking Remove.


Clear cache and site data:
- Click on Menu and go to Settings.
- Select Privacy, search and services.
- Under Clear browsing data, pick Choose what to clear.
- Under Time range, pick All time.
- Select Clear now.


Reset Chromium-based MS Edge:
- Click on Menu and select Settings.
- On the left side, pick Reset settings.
- Select Restore settings to their default values.
- Confirm with Reset.
- This will disable extensions and reset startup pages but will not delete bookmarks, saved passwords, or browsing history.


Remove from Mozilla Firefox (FF)
Remove dangerous extensions:
- Open Mozilla Firefox browser and click on the Menu (three horizontal lines at the top-right of the window).
- Select Add-ons.
- In here, select the unwanted extension and click Remove.


Reset the homepage:
- Click three horizontal lines at the top right corner to open the menu.
- Choose Settings.
- Under Home, set your preferred homepage and new tab settings.
Clear cookies and site data:
- Click Menu and pick Settings.
- Go to Privacy & Security section.
- Scroll down to locate Cookies and Site Data.
- Click on Clear Data...
- Select Cookies and Site Data and Temporary cached files and pages, then click Clear.


Reset Mozilla Firefox
If clearing the browser as explained above did not help, reset Mozilla Firefox:
- Open Mozilla Firefox browser and click the Menu.
- Go to Help and then choose Troubleshooting Information.

- Under Give Firefox a tune up section, click on Refresh Firefox...
- Once the pop-up shows up, confirm the action by pressing on Refresh Firefox.



Remove from Google Chrome
Delete malicious extensions from Google Chrome:
- Open Google Chrome, click on the Menu (three vertical dots at the top-right corner) and select More tools > Extensions.
- In the newly opened window, you will see all the installed extensions. Uninstall all suspicious extensions related to the unwanted program by clicking Remove.


Clear cache and web data from Chrome:
- Click on Menu and pick Settings.
- Under Privacy and security, select Clear browsing data.
- Select Browsing history, Cookies and other site data, as well as Cached images and files.
- Click Clear data.


Change your homepage:
- Click menu and choose Settings.
- Look for a suspicious site in the On startup section.
- Click on Open a specific or set of pages and click on three dots to find the Remove option.
Reset Google Chrome:
If the previous methods did not help you, reset Google Chrome to eliminate all the unwanted components:
- Click on Menu and select Settings.
- In the Settings, scroll down and click Advanced.
- Scroll down and locate Reset and clean up section.
- Now click Restore settings to their original defaults.
- Confirm with Reset settings.


Delete from Safari
Remove dangerous extensions:
- Open Safari, click Safari in the menu at the top-left of the screen, and select Preferences.
- Go to the Extensions tab, look for any suspicious entries, and click Uninstall to remove them.


Clear history and website data:
- Click Safari in the menu and pick Clear History.
- Set Clear to all history and confirm with Clear History.


Reset Safari:
- Click Safari in the menu and select Preferences > Advanced.
- Enable Show Develop menu in menu bar.
- From the menu bar, click Develop and select Empty Caches.


Did this guide help?
Be the first to comment