

Is search.mymoviesxp.com virus destructive malware?
You should not get deluded by the veneer of search.mymoviesxp.com virus thinking that it is a reliable search engine. In fact, it operates as a browser hijacker. Consequently, you might get enraged by constant redirects to questionable and low-quality websites. Excessive advertising is a prevalent feature of this search provider as well. Thirdly, it is yet another hijacker from Safer Browser hijacker series. In short, remove search.mymoviesxp.com at once from the device. FortectIntego will help you to eliminate this browsing tool completely.
My Movies XP targets those users, whose browsing sessions mainly encompass watching movies online. Quick access to movie streaming websites might seem as the most practical feature. Such bait is the common strategy employed by Safer Browser creators. They also try to lure visitors by offering quick access to the weather alert websites, music, sports or news domains. Nonetheless, such property has its flaws. This browser hijacker is supported by third-parties. Thus, they are obliged to promote their services. As a result, your browser might be loaded with advertisements, banners, and commercial offers. In addition, due to search.mymoviesxp.com redirect tendency, you might find yourself in highly disturbing gambling or gaming website. The latter might harbor vivid malware, so staying there too long is potentially risky.
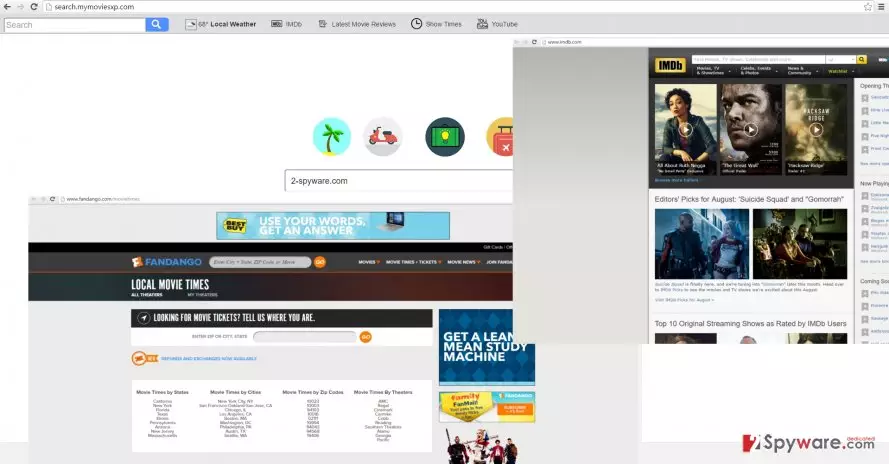
The longer you keep this hijacker on the device, the higher is the probability that your computer might be inhabited with unwanted toolbars, browser extensions and other sorts of adware applications. They do not have any practical value but instead greatly diminish the overall PC processes. Such programs rarely happen to be malignant, but the probability of a potentially fraudulent application infecting your computer still exists. Furthermore, users, who finally decide to perform search.mymoviesxp.com removal, might flare up after finding out to be unable to do that quickly. The PUP employs additional small files which create trouble for you. In other words, these files are scattered across the entire registry and they make necessary changes. They ensure that simply deleting the hijacker from the main browser settings does not eradicate the PUP. As a result, the hijacker remains – you hit the roof.
How does the hijacker occupy computers?
It prefers doing so using free applications as a disguise. Java or Skype updates, media players, file converters are in daily demand. Thus, crooks attach their PUP to one of the free applications knowing that they will be successfully installed along. Unfortunately, the majority of users encourage scammers to continue their business because they do not pay attention to the installation wizards. As a result, search.mymoviesxp.com or a similar hijacker successfully enters the PC. Likewise, you might be wondering whether there is a way to locate the PUP before the infiltration. Before hitting the “Install” button, choose “Advanced” settings. After that, carefully uncheck all irrelevant optional programs.
How can I perform search.mymoviesxp.com removal?
It is not difficult to root out the hijacker. You can do it in two ways – manually and automatically. We advise you to opt for the latter since the application is more apt in dealing with such virtual pests. Moreover, it is highly important to detect and remove all search.mymoviesxp.com files which might be roaming across the registry. In addition, along with the primary anti-virus application, this program will ensure that no malware gets past its security shield. Finally, remember that your participation is also important: download new programs only from its official websites and carefully conduct the installation of new applications.
Uninstall from Windows
Uninstall from Windows 10/8:
- Type Control Panel into the Windows search box and open the result.
- Under Programs, select Uninstall a program.


Uninstall from Windows 7/XP:
- Click on Windows Start > Control Panel (Windows XP users should click on Add/Remove Programs).
- In Control Panel, select Programs > Uninstall a program.


Remove the unwanted program:
- In the Programs and Features window, look for any recently installed suspicious entries, select them, and click Uninstall.
- If User Account Control appears, click Yes to confirm, then complete the removal.


Delete from macOS
Remove the unwanted application:
- From the menu bar, select Go > Applications.
- In the Applications folder, look for any suspicious entries, then drag them to Trash (or right-click and pick Move to Trash).


Delete leftover files and folders:
- Select Go > Go to Folder.
- Enter /Library/Application Support and remove any suspicious folders related to the unwanted program.
- Repeat the same check in the /Library/LaunchAgents and /Library/LaunchDaemons folders, deleting any suspicious entries.

- Finally, empty the Trash to permanently remove the leftovers.

Remove from Microsoft Edge
Delete unwanted extensions from MS Edge:
- Select Menu (three horizontal dots at the top-right of the browser window) and pick Extensions.
- From the list, pick the extension and click on the Gear icon.
- Click Remove.


Clear cookies and other browser data:
- Click on the Menu (three horizontal dots at the top-right of the browser window) and select Settings > Privacy, search, and services..
- Under Clear browsing data, pick Choose what to clear.
- Select Cookies and other site data and Cached images and files. (apart from passwords, although you might want to include Media licenses as well, if applicable) and click on Clear.


Restore new tab and homepage settings:
- Click the menu icon and choose Settings.
- Then find On startup section.
- Click Remove next to any suspicious startup page.
Reset MS Edge if the above steps did not work:
- Press on Ctrl + Shift + Esc to open Task Manager.
- Click on More details arrow at the bottom of the window.
- Select Details tab.
- Now scroll down and locate every entry with Microsoft Edge name in it. Right-click on each of them and select End Task to stop MS Edge from running.


Instructions for Chromium-based Edge
Delete extensions from MS Edge (Chromium):
- Open Edge and click select Settings > Extensions.
- Delete unwanted extensions by clicking Remove.


Clear cache and site data:
- Click on Menu and go to Settings.
- Select Privacy, search and services.
- Under Clear browsing data, pick Choose what to clear.
- Under Time range, pick All time.
- Select Clear now.


Reset Chromium-based MS Edge:
- Click on Menu and select Settings.
- On the left side, pick Reset settings.
- Select Restore settings to their default values.
- Confirm with Reset.
- This will disable extensions and reset startup pages but will not delete bookmarks, saved passwords, or browsing history.


Remove from Mozilla Firefox (FF)
Remove dangerous extensions:
- Open Mozilla Firefox browser and click on the Menu (three horizontal lines at the top-right of the window).
- Select Add-ons.
- In here, select the unwanted extension and click Remove.


Reset the homepage:
- Click three horizontal lines at the top right corner to open the menu.
- Choose Settings.
- Under Home, set your preferred homepage and new tab settings.
Clear cookies and site data:
- Click Menu and pick Settings.
- Go to Privacy & Security section.
- Scroll down to locate Cookies and Site Data.
- Click on Clear Data...
- Select Cookies and Site Data and Temporary cached files and pages, then click Clear.


Reset Mozilla Firefox
If clearing the browser as explained above did not help, reset Mozilla Firefox:
- Open Mozilla Firefox browser and click the Menu.
- Go to Help and then choose Troubleshooting Information.

- Under Give Firefox a tune up section, click on Refresh Firefox...
- Once the pop-up shows up, confirm the action by pressing on Refresh Firefox.



Remove from Google Chrome
Delete malicious extensions from Google Chrome:
- Open Google Chrome, click on the Menu (three vertical dots at the top-right corner) and select More tools > Extensions.
- In the newly opened window, you will see all the installed extensions. Uninstall all suspicious extensions related to the unwanted program by clicking Remove.


Clear cache and web data from Chrome:
- Click on Menu and pick Settings.
- Under Privacy and security, select Clear browsing data.
- Select Browsing history, Cookies and other site data, as well as Cached images and files.
- Click Clear data.


Change your homepage:
- Click menu and choose Settings.
- Look for a suspicious site in the On startup section.
- Click on Open a specific or set of pages and click on three dots to find the Remove option.
Reset Google Chrome:
If the previous methods did not help you, reset Google Chrome to eliminate all the unwanted components:
- Click on Menu and select Settings.
- In the Settings, scroll down and click Advanced.
- Scroll down and locate Reset and clean up section.
- Now click Restore settings to their original defaults.
- Confirm with Reset settings.


Delete from Safari
Remove dangerous extensions:
- Open Safari, click Safari in the menu at the top-left of the screen, and select Preferences.
- Go to the Extensions tab, look for any suspicious entries, and click Uninstall to remove them.


Clear history and website data:
- Click Safari in the menu and pick Clear History.
- Set Clear to all history and confirm with Clear History.


Reset Safari:
- Click Safari in the menu and select Preferences > Advanced.
- Enable Show Develop menu in menu bar.
- From the menu bar, click Develop and select Empty Caches.


Did this guide help?
2 comments
TerryByte
Safer Browser started its summer season, huh?
Willa
Its a shame I thought this hijacker to be a reliable engine.