

What do I need to know about TurboMac virus?
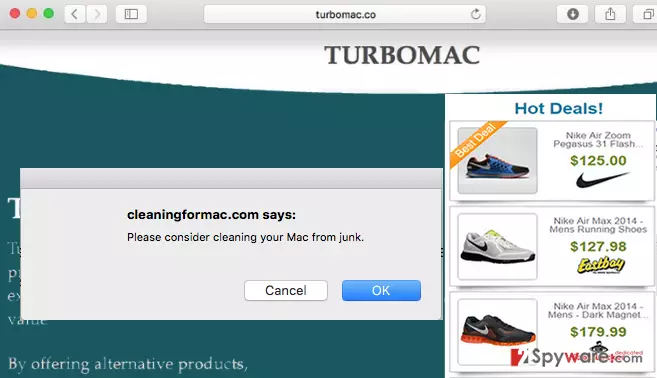
The developers of TurboMac claim that this application is necessary for those who like to shop online and save the money. How is that possible? As it is promised on the official website of this potentially unwanted program, it improves users’ browsing experience by displaying special offers and providing coupon codes that let people get special discounts. For some people, these features might look attractive. However, you should not take these promises for granted because TurboMac is also capable of initiating computer and privacy-related problems as well. Technically, this app is listed as adware and a potentially unwanted program (PUP). It targets Mac OS X owners who use Google Chrome, Mozilla Firefox, and Safari web browsers. Once TurboMac adware gets installed, it modifies the system and generates lots of pop-ups, coupon ads and banners that decrease the speed of web browser. Moreover, these ads can redirect you to shady websites that might contain malicious content and may try to infect your system with malware. Therefore, by clicking these advertisements you might put your computer at risk. To keep it safe, you should not download this application at first. However, if you already did it, you should remove TurboMac immediately. For that task, we recommend using FortectIntego.
Potentially unwanted programs are typically developed to generate revenue by showing sponsored advertisements or causing unwanted redirects to various websites. The developers of TurboMac virus have the same purpose. Moreover, after installation of this potentially unwanted program, they can also start monitoring user’s browsing activity and can collect information about his or hers computer’s geolocation, its IP address, visited websites, viewed pages, etc. Usually, this data is used for marketing activities, but there is no guarantee that it won’t be shared with third party companies that are seeking to use it for the illegal purpose. The only option to keep your personal information away from suspicious people is TurboMac removal.
How did it end up on my computer?
TurboMac hijack might occur when you download software from the Internet. Potentially unwanted programs can be bundled with other software because developers are aware that users do not pay proper attention to the installation process of the software. According to lots of researchers, users tend to choose “Default” installation option instead of “Custom” or “Advanced” options. Then, they just click the “Next” button when it is needed while trying to increase installation speed. This bad habit might cause serious damage and put your computer at risk!
To keep your PC safe, you should always choose “Advanced” or “Custom” installation settings. Also, make sure you check what additional programs are offered in a bundle with the primary program. If you find these programs suspicious, do not install them at all and look for another app from the same category. Moreover, you have to read Privacy Policy or Terms and Agreements to make sure that all statements are reliable. If they are not, cancel the installation.
TurboMac removal
Bellow you can find the step-by-step guide explaining how to remove this potentially unwanted program from your computer. TurboMac removal consists of two main steps. First of all, you have to find and delete all files that are related to this browser hijacker. You must not forget its browser helper objects, related files and registry entries that may cause the reappearance of TurboMac virus in the future. Then, scan your PC with reliable spyware program to make sure you have removed all unwanted components or reset your Internet browsers. While in your browser settings, you should find the “Extensions” tab and look for recently installed add-ons, Make sure you disable the ones that are suspicious to remove TurboMac from your computer manually. A step-by-step guide which could help you is given below.
Delete from macOS
Remove the unwanted application:
- From the menu bar, select Go > Applications.
- In the Applications folder, look for any suspicious entries, then drag them to Trash (or right-click and pick Move to Trash).


Delete leftover files and folders:
- Select Go > Go to Folder.
- Enter /Library/Application Support and remove any suspicious folders related to the unwanted program.
- Repeat the same check in the /Library/LaunchAgents and /Library/LaunchDaemons folders, deleting any suspicious entries.

- Finally, empty the Trash to permanently remove the leftovers.

Remove from Google Chrome
Delete malicious extensions from Google Chrome:
- Open Google Chrome, click on the Menu (three vertical dots at the top-right corner) and select More tools > Extensions.
- In the newly opened window, you will see all the installed extensions. Uninstall all suspicious extensions related to the unwanted program by clicking Remove.


Clear cache and web data from Chrome:
- Click on Menu and pick Settings.
- Under Privacy and security, select Clear browsing data.
- Select Browsing history, Cookies and other site data, as well as Cached images and files.
- Click Clear data.


Change your homepage:
- Click menu and choose Settings.
- Look for a suspicious site in the On startup section.
- Click on Open a specific or set of pages and click on three dots to find the Remove option.
Reset Google Chrome:
If the previous methods did not help you, reset Google Chrome to eliminate all the unwanted components:
- Click on Menu and select Settings.
- In the Settings, scroll down and click Advanced.
- Scroll down and locate Reset and clean up section.
- Now click Restore settings to their original defaults.
- Confirm with Reset settings.


Delete from Safari
Remove dangerous extensions:
- Open Safari, click Safari in the menu at the top-left of the screen, and select Preferences.
- Go to the Extensions tab, look for any suspicious entries, and click Uninstall to remove them.


Clear history and website data:
- Click Safari in the menu and pick Clear History.
- Set Clear to all history and confirm with Clear History.


Reset Safari:
- Click Safari in the menu and select Preferences > Advanced.
- Enable Show Develop menu in menu bar.
- From the menu bar, click Develop and select Empty Caches.


Did this guide help?
Be the first to comment