

Everything you need to know about Findoncloud.com
At first glance, Findoncloud.com virus looks to be an ordinary search engine. Even though the design seems attractive and it offers a bunch of useful features, we do not recommend setting this search engine as the primary one. In fact, remove Findoncloud.com if you accidentally installed it. If you are wondering why we encourage you to delete the browsing tool, note that IT experts label it as a browser hijacker. As a result, you may soon get disappointed by its quality. It promotes its activities by claims to deliver relevant search results quickly. If you follow the recommendations on how to increase your browser performance, this hijacker might ruin all your efforts [1]. Keep in mind that this browser hijacker may stuff with your computer screen with an excessive amount of advertisements. Additionally, using the PUP for a longer while, spam emails may even find their way to your inbox as well. Let us present a short review of the PUP and the arguments why should start Findoncloud.com removal procedure instead of keeping it. As for the termination, FortectIntego assists with the process.
Looking at the diverse category of browser hijackers, netizens might get lost in millions of vivid search engines offering their services. Some might attract users with colorful designs while others are plain in design but offer several links to other domains. In this case, Find On Cloud happens to appeal to users with inspiring background pictures and quick-access references to media streaming websites. What is more, there are links to web pages containing pornographic content. In this regard, Findoncloud.com redirect gets a really bothering phenomenon as you might find yourself in such domains which bear elaborate malware [2]. Note that they might be infected with severe and destructive malware. Likewise, make a haste to eliminate the hijacker completely.
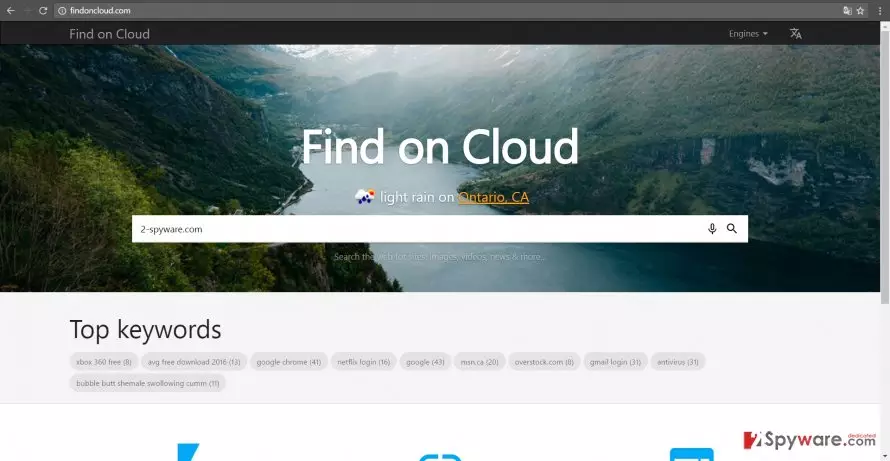
Additionally, the owners of this hijacker disclaim any liability for third-party links promoted in this search engine. Specifically, they are not liable for the tracking files employed by third parties. However, due to multiple links and obscure privacy policy of sponsored web pages, your non-personal information might fall into the hands of adverting companies. What is more, if you provide an email address when contacting the owners for any reason, do not get surprised if it gets also leaked to anonymous companies [3]. As a result, spam messages cram your Inbox folder. Beware of them as they might disguise highly destructive file-encrypting malware.
What are the chances to get infected with this virus?
Many users get puzzled when trying to remember when Findoncloud.com hijack took place. Usually, it might have occupied your device when you were installing a new application. Freeware is a preferred way for crooks to distribute PUPs. In order to lower the risk of encountering similar browser hijacker, we recommend you to opt for “Custom” settings. They will disclose optional tools and you will be able to spot suspicious software before they get installed. Unmark all optional applications and proceed with the installation of your preferred program [4].
Findoncloud.com elimination instructions
If you are looking for an effective solution to remove Findoncloud.com virus and all its components, install an anti-spyware tool. It is specifically designed for detecting and eliminating similar PUP applications and malware. Keep in mind that for it to work properly you need to update it. Alternatively, manual Findoncloud.com removal guidelines might be practical in eradicating the PUP. More information regarding this method is delivered below. In addition, we would like to remind you that cautiousness plays a significant importance while browsing the web. You might prevent quite a number of fishy applications by opting for “Advanced” method rather than “Recommended.” What is more, carefully reviewing spam messages [5] and restraining from visiting websites overcrowded with suspicious links might be a useful habit as well.
Uninstall from Windows
Uninstall from Windows 10/8:
- Type Control Panel into the Windows search box and open the result.
- Under Programs, select Uninstall a program.


Uninstall from Windows 7/XP:
- Click on Windows Start > Control Panel (Windows XP users should click on Add/Remove Programs).
- In Control Panel, select Programs > Uninstall a program.


Remove the unwanted program:
- In the Programs and Features window, look for any recently installed suspicious entries, select them, and click Uninstall.
- If User Account Control appears, click Yes to confirm, then complete the removal.


Delete from macOS
Remove the unwanted application:
- From the menu bar, select Go > Applications.
- In the Applications folder, look for any suspicious entries, then drag them to Trash (or right-click and pick Move to Trash).


Delete leftover files and folders:
- Select Go > Go to Folder.
- Enter /Library/Application Support and remove any suspicious folders related to the unwanted program.
- Repeat the same check in the /Library/LaunchAgents and /Library/LaunchDaemons folders, deleting any suspicious entries.

- Finally, empty the Trash to permanently remove the leftovers.

Reset Internet Explorer
Remove dangerous add-ons:
- Open Internet Explorer, click on the Gear icon (IE menu) on the top-right corner of the browser
- Pick Manage Add-ons.
- You will see a Manage Add-ons window. Here, look for suspicious plugins. Click on these entries and select Disable.


Change your homepage if it was altered:
- Open IE and click on the Gear icon.
- Select Internet Options.
- In the General tab, delete the Home page address and replace it by your preferred one (for example, Google.com).
- Click Apply and then select OK.


Delete temporary files:
- Press on the Gear icon and select Internet Options.
- Under Browsing history, click Delete...
- Select relevant fields and press Delete.


Reset Internet Explorer:
- Click on Gear icon > Internet options and select Advanced tab.
- Select Reset.
- In the new window, check Delete personal settings and select Reset.


Remove from Microsoft Edge
Delete unwanted extensions from MS Edge:
- Select Menu (three horizontal dots at the top-right of the browser window) and pick Extensions.
- From the list, pick the extension and click on the Gear icon.
- Click Remove.


Clear cookies and other browser data:
- Click on the Menu (three horizontal dots at the top-right of the browser window) and select Settings > Privacy, search, and services..
- Under Clear browsing data, pick Choose what to clear.
- Select Cookies and other site data and Cached images and files. (apart from passwords, although you might want to include Media licenses as well, if applicable) and click on Clear.


Restore new tab and homepage settings:
- Click the menu icon and choose Settings.
- Then find On startup section.
- Click Remove next to any suspicious startup page.
Reset MS Edge if the above steps did not work:
- Press on Ctrl + Shift + Esc to open Task Manager.
- Click on More details arrow at the bottom of the window.
- Select Details tab.
- Now scroll down and locate every entry with Microsoft Edge name in it. Right-click on each of them and select End Task to stop MS Edge from running.


Instructions for Chromium-based Edge
Delete extensions from MS Edge (Chromium):
- Open Edge and click select Settings > Extensions.
- Delete unwanted extensions by clicking Remove.


Clear cache and site data:
- Click on Menu and go to Settings.
- Select Privacy, search and services.
- Under Clear browsing data, pick Choose what to clear.
- Under Time range, pick All time.
- Select Clear now.


Reset Chromium-based MS Edge:
- Click on Menu and select Settings.
- On the left side, pick Reset settings.
- Select Restore settings to their default values.
- Confirm with Reset.
- This will disable extensions and reset startup pages but will not delete bookmarks, saved passwords, or browsing history.


Remove from Mozilla Firefox (FF)
Remove dangerous extensions:
- Open Mozilla Firefox browser and click on the Menu (three horizontal lines at the top-right of the window).
- Select Add-ons.
- In here, select the unwanted extension and click Remove.


Reset the homepage:
- Click three horizontal lines at the top right corner to open the menu.
- Choose Settings.
- Under Home, set your preferred homepage and new tab settings.
Clear cookies and site data:
- Click Menu and pick Settings.
- Go to Privacy & Security section.
- Scroll down to locate Cookies and Site Data.
- Click on Clear Data...
- Select Cookies and Site Data and Temporary cached files and pages, then click Clear.


Reset Mozilla Firefox
If clearing the browser as explained above did not help, reset Mozilla Firefox:
- Open Mozilla Firefox browser and click the Menu.
- Go to Help and then choose Troubleshooting Information.

- Under Give Firefox a tune up section, click on Refresh Firefox...
- Once the pop-up shows up, confirm the action by pressing on Refresh Firefox.



Remove from Google Chrome
Delete malicious extensions from Google Chrome:
- Open Google Chrome, click on the Menu (three vertical dots at the top-right corner) and select More tools > Extensions.
- In the newly opened window, you will see all the installed extensions. Uninstall all suspicious extensions related to the unwanted program by clicking Remove.


Clear cache and web data from Chrome:
- Click on Menu and pick Settings.
- Under Privacy and security, select Clear browsing data.
- Select Browsing history, Cookies and other site data, as well as Cached images and files.
- Click Clear data.


Change your homepage:
- Click menu and choose Settings.
- Look for a suspicious site in the On startup section.
- Click on Open a specific or set of pages and click on three dots to find the Remove option.
Reset Google Chrome:
If the previous methods did not help you, reset Google Chrome to eliminate all the unwanted components:
- Click on Menu and select Settings.
- In the Settings, scroll down and click Advanced.
- Scroll down and locate Reset and clean up section.
- Now click Restore settings to their original defaults.
- Confirm with Reset settings.


Delete from Safari
Remove dangerous extensions:
- Open Safari, click Safari in the menu at the top-left of the screen, and select Preferences.
- Go to the Extensions tab, look for any suspicious entries, and click Uninstall to remove them.


Clear history and website data:
- Click Safari in the menu and pick Clear History.
- Set Clear to all history and confirm with Clear History.


Reset Safari:
- Click Safari in the menu and select Preferences > Advanced.
- Enable Show Develop menu in menu bar.
- From the menu bar, click Develop and select Empty Caches.


Did this guide help?
Be the first to comment