

Analysis of search.moviecorner.com
If you have decided to renew your browsing experience, search.moviecorner.com virus seems like an entertaining alternative browsing tool. We do not advise using this search engine since it falls into the category of browser hijackers. Usually, they imitate reliable search engines. However, due to obscure privacy policy provisions and excessive advertising, they quickly gain poor reputation. In relation to that, we recommend you to remove search.moviecorner.com from the computer. FortectIntego quickens the entire removal process. If you still hesitate to delete the hijacker, let us present the key arguments.
It does not take long until you see the disadvantages of this hijacker. As you can see, this browsing tool offers additional services besides searching the Web. You can access movie streaming websites faster from this browsing tool. The developers of this website also try to attract attention with the links to popular social domains. All these specifications might seem fine and dandy. However, you should take a better look to realize how futile this website is. Users usually ignore Terms of Use or Privacy Policy, though they contain crucial information suggesting whether the website can be trusted. The document of search.moviecorner.com mentions that the browser is the property of Findinfo Ltd. It collects not only non-personal but personal information as well. The compiled data can be traded with third-parties and other questionable companies.
Such transfer might take outside the borders of your place of residence. In short, the recipients of your personal data may misuse it for marketing purposes and for broad-range misdeeds. Such act also may easily violate your privacy as unknown companies manage your data. Eventually, cyber-criminals may be the final recipients of such sensitive information. It is a completely different story for what purposes they misuse your personal details. Major data breach cases have reverberated throughout the last year [1]. In response to that, IT experts have been issuing recommendations and data leak prevention tips [2]. Microsoft has also initiated crucial changes to grant users more options to control their personal information [3].
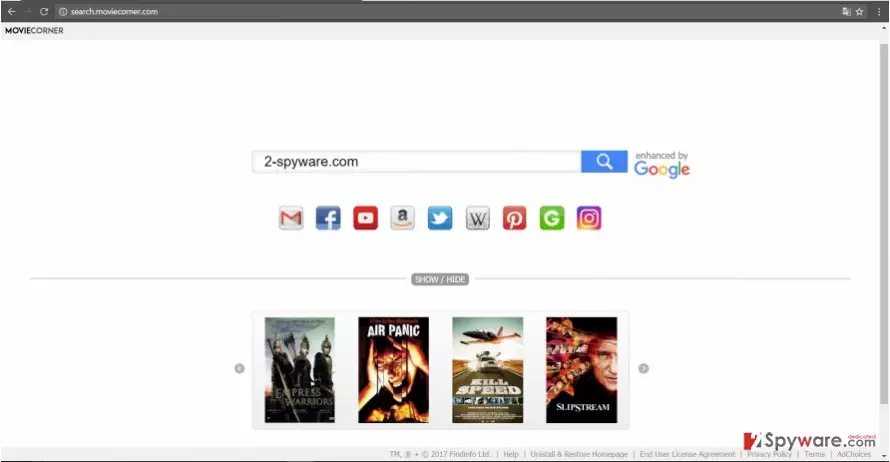
While this hijacker stays on the device, you may encounter search.moviecorner.com redirect occurrences. The most annoying problem is that they misguide to advertising domains before you requested domain. This phenomenon is far from just annoying as it may cause more serious problems. It is likely that you may have redirected to a similar movie streaming domain. However, the latter has served as the inspiration for ransomware crooks [4]. Thus, if you are keen movie watcher, you might check the redirected domains regularly. However, there is no certainty that such infection is not infected. Therefore, make a rush to perform search.moviecorner.com removal.
When did I come across this application?
If you are struggling to remember when search.moviecorner.com hijack took place, let us help you. Similar browser hijackers are pinned down as attachments to popular freeware. When users install new file converters or audio file managers, they hit the “Install” button and then dash through the settings without being aware that they installed the unwanted tool as well. If you are wondering how to escape such unpleasant PUPs, keep in mind our tips. Upon installing any new application, opt for “Custom” settings. Then, remove the checkmarks from the unnecessary add-ons and proceed with the installation. These tips serve as practical recommendations as well [5].
Removing search.moviecorner.com from the computer
The fastest way to remove search.moviecorner.com virus is to entrust the process to anti-spyware application. It is designed to eradicate all components of the hijacker. Do not forget that the application needs to be updated for it to fully eradicate the PUP. You may also be interested in manual search.moviecorner.com removal option. On the final note, find information and reviews about the program or website you are interested in before installing. User comments reveal crucial information which might help you evade troublesome PUPs.
Uninstall from Windows
Uninstall from Windows 10/8:
- Type Control Panel into the Windows search box and open the result.
- Under Programs, select Uninstall a program.


Uninstall from Windows 7/XP:
- Click on Windows Start > Control Panel (Windows XP users should click on Add/Remove Programs).
- In Control Panel, select Programs > Uninstall a program.


Remove the unwanted program:
- In the Programs and Features window, look for any recently installed suspicious entries, select them, and click Uninstall.
- If User Account Control appears, click Yes to confirm, then complete the removal.


Delete from macOS
Remove the unwanted application:
- From the menu bar, select Go > Applications.
- In the Applications folder, look for any suspicious entries, then drag them to Trash (or right-click and pick Move to Trash).


Delete leftover files and folders:
- Select Go > Go to Folder.
- Enter /Library/Application Support and remove any suspicious folders related to the unwanted program.
- Repeat the same check in the /Library/LaunchAgents and /Library/LaunchDaemons folders, deleting any suspicious entries.

- Finally, empty the Trash to permanently remove the leftovers.

Reset Internet Explorer
Remove dangerous add-ons:
- Open Internet Explorer, click on the Gear icon (IE menu) on the top-right corner of the browser
- Pick Manage Add-ons.
- You will see a Manage Add-ons window. Here, look for suspicious plugins. Click on these entries and select Disable.


Change your homepage if it was altered:
- Open IE and click on the Gear icon.
- Select Internet Options.
- In the General tab, delete the Home page address and replace it by your preferred one (for example, Google.com).
- Click Apply and then select OK.


Delete temporary files:
- Press on the Gear icon and select Internet Options.
- Under Browsing history, click Delete...
- Select relevant fields and press Delete.


Reset Internet Explorer:
- Click on Gear icon > Internet options and select Advanced tab.
- Select Reset.
- In the new window, check Delete personal settings and select Reset.


Remove from Microsoft Edge
Delete unwanted extensions from MS Edge:
- Select Menu (three horizontal dots at the top-right of the browser window) and pick Extensions.
- From the list, pick the extension and click on the Gear icon.
- Click Remove.


Clear cookies and other browser data:
- Click on the Menu (three horizontal dots at the top-right of the browser window) and select Settings > Privacy, search, and services..
- Under Clear browsing data, pick Choose what to clear.
- Select Cookies and other site data and Cached images and files. (apart from passwords, although you might want to include Media licenses as well, if applicable) and click on Clear.


Restore new tab and homepage settings:
- Click the menu icon and choose Settings.
- Then find On startup section.
- Click Remove next to any suspicious startup page.
Reset MS Edge if the above steps did not work:
- Press on Ctrl + Shift + Esc to open Task Manager.
- Click on More details arrow at the bottom of the window.
- Select Details tab.
- Now scroll down and locate every entry with Microsoft Edge name in it. Right-click on each of them and select End Task to stop MS Edge from running.


Instructions for Chromium-based Edge
Delete extensions from MS Edge (Chromium):
- Open Edge and click select Settings > Extensions.
- Delete unwanted extensions by clicking Remove.


Clear cache and site data:
- Click on Menu and go to Settings.
- Select Privacy, search and services.
- Under Clear browsing data, pick Choose what to clear.
- Under Time range, pick All time.
- Select Clear now.


Reset Chromium-based MS Edge:
- Click on Menu and select Settings.
- On the left side, pick Reset settings.
- Select Restore settings to their default values.
- Confirm with Reset.
- This will disable extensions and reset startup pages but will not delete bookmarks, saved passwords, or browsing history.


Remove from Mozilla Firefox (FF)
Remove dangerous extensions:
- Open Mozilla Firefox browser and click on the Menu (three horizontal lines at the top-right of the window).
- Select Add-ons.
- In here, select the unwanted extension and click Remove.


Reset the homepage:
- Click three horizontal lines at the top right corner to open the menu.
- Choose Settings.
- Under Home, set your preferred homepage and new tab settings.
Clear cookies and site data:
- Click Menu and pick Settings.
- Go to Privacy & Security section.
- Scroll down to locate Cookies and Site Data.
- Click on Clear Data...
- Select Cookies and Site Data and Temporary cached files and pages, then click Clear.


Reset Mozilla Firefox
If clearing the browser as explained above did not help, reset Mozilla Firefox:
- Open Mozilla Firefox browser and click the Menu.
- Go to Help and then choose Troubleshooting Information.

- Under Give Firefox a tune up section, click on Refresh Firefox...
- Once the pop-up shows up, confirm the action by pressing on Refresh Firefox.



Remove from Google Chrome
Delete malicious extensions from Google Chrome:
- Open Google Chrome, click on the Menu (three vertical dots at the top-right corner) and select More tools > Extensions.
- In the newly opened window, you will see all the installed extensions. Uninstall all suspicious extensions related to the unwanted program by clicking Remove.


Clear cache and web data from Chrome:
- Click on Menu and pick Settings.
- Under Privacy and security, select Clear browsing data.
- Select Browsing history, Cookies and other site data, as well as Cached images and files.
- Click Clear data.


Change your homepage:
- Click menu and choose Settings.
- Look for a suspicious site in the On startup section.
- Click on Open a specific or set of pages and click on three dots to find the Remove option.
Reset Google Chrome:
If the previous methods did not help you, reset Google Chrome to eliminate all the unwanted components:
- Click on Menu and select Settings.
- In the Settings, scroll down and click Advanced.
- Scroll down and locate Reset and clean up section.
- Now click Restore settings to their original defaults.
- Confirm with Reset settings.


Delete from Safari
Remove dangerous extensions:
- Open Safari, click Safari in the menu at the top-left of the screen, and select Preferences.
- Go to the Extensions tab, look for any suspicious entries, and click Uninstall to remove them.


Clear history and website data:
- Click Safari in the menu and pick Clear History.
- Set Clear to all history and confirm with Clear History.


Reset Safari:
- Click Safari in the menu and select Preferences > Advanced.
- Enable Show Develop menu in menu bar.
- From the menu bar, click Develop and select Empty Caches.


Did this guide help?
3 comments
YoungFang>8
Its nothing special..continue using it.
rubiconus
After getting infected with PopCorn Time virus, Ive got enough of these movie watching websites...
DorothyDD
Finally, got rid of it!