

Cloudnet continues hijacking systems in 2017
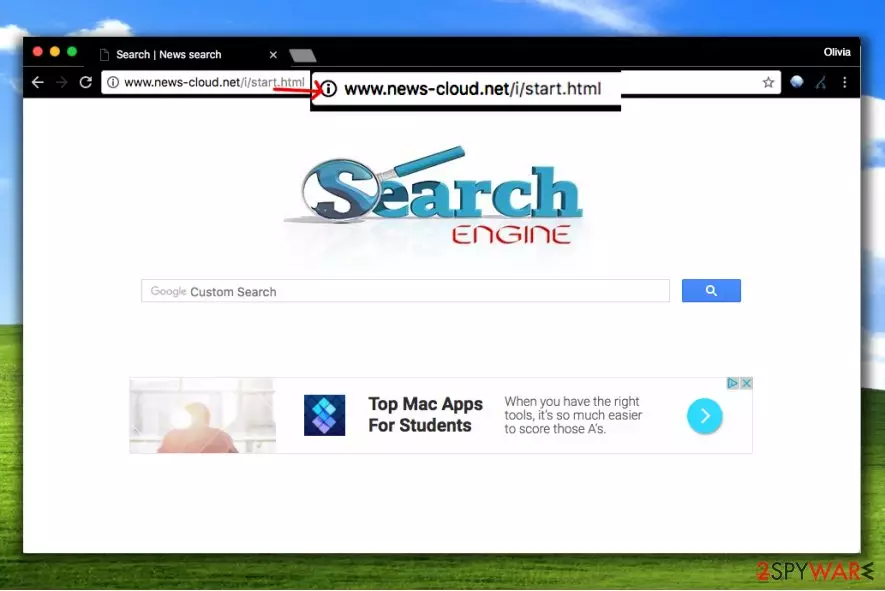
Cloudnet virus was noticed for the first time in a very beginning of 2017. Surprisingly, it didn't stop since then. The main its version is known as news-cloud.net, but it is believed that there are more hijackers released by the same developers.
The main task of Cloudnet is to change user’s browser’s homepage all of sudden, completely without user’s knowledge. Typically, programs like this virus attack[1] the system silently, when installed as a bonus item along with various free applications.
This browser-hijacking program sets a new homepage and new tab page address – News-cloud.net/i/start.html, which is a site that presents a simple-looking web search engine. However, you should forget this search engine because it is simply not trustworthy.
We discovered that Cloudnet brings many sponsored search results[2] that lead to third-party sites, and such feature is not praiseable one. Typically, users seek to receive relevant and important search results, and not sponsored ones, so we believe that you won’t enjoy getting customized search results filled with paid ones.
It is also possible to click on a sponsored search result unwillingly, which will result in a redirect to a possibly dangerous third-party website. It goes without saying that this is the main reason why we highly recommend automatic News-cloud.net removal option is the highly recommended one.
The sad news is that creators of ad-supported programs hardly ever care about safety and reliability of websites that they advertise. They justify themselves by saying that the user should get familiar with Privacy Policies[3] as well as Terms of Use of websites that they visit. Of course, practically it is nearly impossible to do so.

Redirects caused by Cloudnet virus can take you to sites that contain various untrustworthy content, for example, downloads that contain bundled software, surveys that demand personal information[4] disclosure, or your credit card details. If you feel that you cannot trust the page, do not download anything from it and also do not provide your personal information on it.
If you are unsure what should you do remove Cloudnet properly, use instructions that our experts prepared or simply perform a system scan with programs like FortectIntego or MalwarebytesMalwarebytes.
Ways to prevent browser hijacking
It is not hard to protect your browser from system hijack these days. Simply be more careful when choosing settings in the software installation wizards[5]. If you need a detailed guide, make sure you rely on Custom or Standard settings instead of Default/Standard options, which, unfortunately, are auto-selected for you. Otherwise, you can let Cloudnet to your computer.
This is the reason why so many potentially unwanted programs successfully infiltrate victims’ computers without being noticed. Users tend to rush to install programs faster, so they choose whatever settings the installer suggests choosing.
Custom or Advanced installation settings will allow you to see what third-party programs are bundled with your download and drop them off in case you do not want to install them.
Cloudnet virus is another suspicious infection that you should beware of
There is another suspicious program that is named similarly to the virus described in the article. If you are looking for an answer to “what is cloudnet” question, you came to the right place. NoVirus.uk experts[6] have recently noticed an increased number of complaints regarding cloudnet.exe process (by EpicNet, Inc.). Some security programs identify it as Trojan:Win32/Vorniac.A!Trak.
You must perform a precide Cloudnet removal because this program is not considered to be a safe nor trustworthy one. It can cause serious security-related issues or even steal private information.
If you are unsure how to remove cloudnet, try looking in %APPDATA%\EpicNet Inc\Cloudnet folder. Delete all suspicious files from there, including the folder itself and also the EpicNet Inc folder.
For a complete elimination of the program, perform a system scan using FortectIntego or a similar anti-spyware scanner.
Remove News-cloud.net virus for good
You can easily stop this annoying hijacker from rerouting you to suspicious third-party sites. All that you need to do is to remove News-cloud.net virus from the PC using spyware removal tool.
If your antivirus is not powerful enough to detect this browser hijacker, you should install anti-spyware or anti-malware software alongside and complete News-cloud.net removal automatically. Of course, if you want to remove this hijacker without using automated tools, follow instructions presented below.
If you are looking for a way to uninstall Cloudnet, we highly recommend choosing automatic removal option. This way, you will save tons of time and ensure a precise malware removal.
Uninstall from Windows
Uninstall from Windows 10/8:
- Type Control Panel into the Windows search box and open the result.
- Under Programs, select Uninstall a program.


Uninstall from Windows 7/XP:
- Click on Windows Start > Control Panel (Windows XP users should click on Add/Remove Programs).
- In Control Panel, select Programs > Uninstall a program.


Remove the unwanted program:
- In the Programs and Features window, look for any recently installed suspicious entries, select them, and click Uninstall.
- If User Account Control appears, click Yes to confirm, then complete the removal.


Delete from macOS
Remove the unwanted application:
- From the menu bar, select Go > Applications.
- In the Applications folder, look for any suspicious entries, then drag them to Trash (or right-click and pick Move to Trash).


Delete leftover files and folders:
- Select Go > Go to Folder.
- Enter /Library/Application Support and remove any suspicious folders related to the unwanted program.
- Repeat the same check in the /Library/LaunchAgents and /Library/LaunchDaemons folders, deleting any suspicious entries.

- Finally, empty the Trash to permanently remove the leftovers.

Reset Internet Explorer
Remove dangerous add-ons:
- Open Internet Explorer, click on the Gear icon (IE menu) on the top-right corner of the browser
- Pick Manage Add-ons.
- You will see a Manage Add-ons window. Here, look for suspicious plugins. Click on these entries and select Disable.


Change your homepage if it was altered:
- Open IE and click on the Gear icon.
- Select Internet Options.
- In the General tab, delete the Home page address and replace it by your preferred one (for example, Google.com).
- Click Apply and then select OK.


Delete temporary files:
- Press on the Gear icon and select Internet Options.
- Under Browsing history, click Delete...
- Select relevant fields and press Delete.


Reset Internet Explorer:
- Click on Gear icon > Internet options and select Advanced tab.
- Select Reset.
- In the new window, check Delete personal settings and select Reset.


Remove from Microsoft Edge
Delete unwanted extensions from MS Edge:
- Select Menu (three horizontal dots at the top-right of the browser window) and pick Extensions.
- From the list, pick the extension and click on the Gear icon.
- Click Remove.


Clear cookies and other browser data:
- Click on the Menu (three horizontal dots at the top-right of the browser window) and select Settings > Privacy, search, and services..
- Under Clear browsing data, pick Choose what to clear.
- Select Cookies and other site data and Cached images and files. (apart from passwords, although you might want to include Media licenses as well, if applicable) and click on Clear.


Restore new tab and homepage settings:
- Click the menu icon and choose Settings.
- Then find On startup section.
- Click Remove next to any suspicious startup page.
Reset MS Edge if the above steps did not work:
- Press on Ctrl + Shift + Esc to open Task Manager.
- Click on More details arrow at the bottom of the window.
- Select Details tab.
- Now scroll down and locate every entry with Microsoft Edge name in it. Right-click on each of them and select End Task to stop MS Edge from running.


Instructions for Chromium-based Edge
Delete extensions from MS Edge (Chromium):
- Open Edge and click select Settings > Extensions.
- Delete unwanted extensions by clicking Remove.


Clear cache and site data:
- Click on Menu and go to Settings.
- Select Privacy, search and services.
- Under Clear browsing data, pick Choose what to clear.
- Under Time range, pick All time.
- Select Clear now.


Reset Chromium-based MS Edge:
- Click on Menu and select Settings.
- On the left side, pick Reset settings.
- Select Restore settings to their default values.
- Confirm with Reset.
- This will disable extensions and reset startup pages but will not delete bookmarks, saved passwords, or browsing history.


Remove from Mozilla Firefox (FF)
Remove dangerous extensions:
- Open Mozilla Firefox browser and click on the Menu (three horizontal lines at the top-right of the window).
- Select Add-ons.
- In here, select the unwanted extension and click Remove.


Reset the homepage:
- Click three horizontal lines at the top right corner to open the menu.
- Choose Settings.
- Under Home, set your preferred homepage and new tab settings.
Clear cookies and site data:
- Click Menu and pick Settings.
- Go to Privacy & Security section.
- Scroll down to locate Cookies and Site Data.
- Click on Clear Data...
- Select Cookies and Site Data and Temporary cached files and pages, then click Clear.


Reset Mozilla Firefox
If clearing the browser as explained above did not help, reset Mozilla Firefox:
- Open Mozilla Firefox browser and click the Menu.
- Go to Help and then choose Troubleshooting Information.

- Under Give Firefox a tune up section, click on Refresh Firefox...
- Once the pop-up shows up, confirm the action by pressing on Refresh Firefox.



Remove from Google Chrome
Delete malicious extensions from Google Chrome:
- Open Google Chrome, click on the Menu (three vertical dots at the top-right corner) and select More tools > Extensions.
- In the newly opened window, you will see all the installed extensions. Uninstall all suspicious extensions related to the unwanted program by clicking Remove.


Clear cache and web data from Chrome:
- Click on Menu and pick Settings.
- Under Privacy and security, select Clear browsing data.
- Select Browsing history, Cookies and other site data, as well as Cached images and files.
- Click Clear data.


Change your homepage:
- Click menu and choose Settings.
- Look for a suspicious site in the On startup section.
- Click on Open a specific or set of pages and click on three dots to find the Remove option.
Reset Google Chrome:
If the previous methods did not help you, reset Google Chrome to eliminate all the unwanted components:
- Click on Menu and select Settings.
- In the Settings, scroll down and click Advanced.
- Scroll down and locate Reset and clean up section.
- Now click Restore settings to their original defaults.
- Confirm with Reset settings.


Delete from Safari
Remove dangerous extensions:
- Open Safari, click Safari in the menu at the top-left of the screen, and select Preferences.
- Go to the Extensions tab, look for any suspicious entries, and click Uninstall to remove them.


Clear history and website data:
- Click Safari in the menu and pick Clear History.
- Set Clear to all history and confirm with Clear History.


Reset Safari:
- Click Safari in the menu and select Preferences > Advanced.
- Enable Show Develop menu in menu bar.
- From the menu bar, click Develop and select Empty Caches.


Did this guide help?
4 comments
Laawi
I thought its imposssible to remove this!!!! Luckily, I was wrong. Big thanks to 2-spyware support team!
9172
These redirects were incredibly annoying. I feel sorry for everyone who has to undergo newscloud hijack
Genevi3ve
I am free of this virus! Thanks a million.
Skyrym
Computer works as new.