

This computer is blocked – a pop-up scam that imitates Microsoft
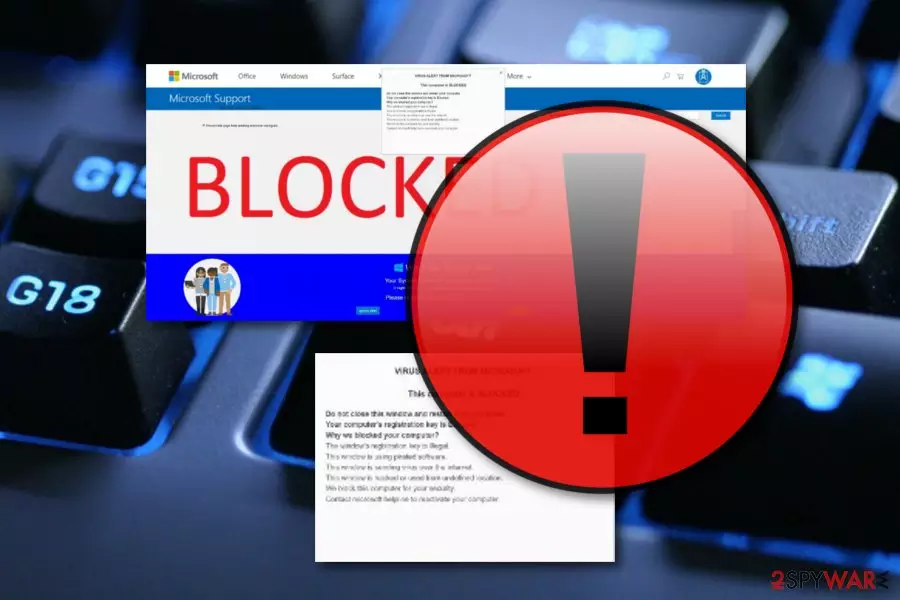
This computer is blocked is adware-based content that gets inside system unnoticed and tries to convince people to call the fake tech support line. This new example of tech support scam locks affected computer’s screen and delivers a fake security message that falsely informs about blocked computer due to detected unusual activity on the PC. The lock-screen also states that the computer has been infected with viruses and has been blocked due to security measures. In order to fix this issue, victims are asked to call nearest Microsoft Technician via the given mobile phone number. This computer is blocked lock screen message might trick and convince many computer users that it’s a real notification from Microsoft.[1]
If you take a closer look at the message, you may find spelling mistakes that should reveal the crooks. Thus, calling the provided number is not recommended. Scammers might try to get your private information, get access to your computer or convince to purchase the bogus software. Indeed, your computer might be infected and need to be taken care of, but you should focus on This computer is blocked removal only.
| Name | This computer is locked |
|---|---|
| Type | Pop-up scam |
| Caused by | Adware |
| Other versions | This Mac computer is locked |
| Purpose | To confuse users and trick them into calling the fake technical support number |
| Symptoms | Suspicious pop-up ads, redirects |
| Distribution | Third-party apps, unsafe pages |
| Detection | FortectIntego can detect suspicious content |
| Removal | Get rid of the cause and prevent the scam from appearing again |
“This PC Has Been Blocked” virus might make system modifications in order to start itself automatically every time the user reboots the computer. Thus, when you turn on the computer or log in to your account, the virus delivers a lock screen that prevents from accessing the desktop. The suspicious program might also be capable of disabling Task Manager[2] and other Windows services to make access to the computer more complicated. This is how the misleading text looks like:
VIRUS ALERT FROM MICROSOFT
This computer is BLOCKED
Do not close this window and restart your computer
Your computer’s registration key is Blocked.
Why we blocked your computer?
The window’s registration key is illegal.
This window is using pirated software.
This window is sending virus over the internet.
This window is hacked or used from undefined location.
We block this computer for your security.
Contact microsoft helpline to reactivate your computer.
——————————————————————————————–
Windows Support Alert
Your System Detected Some Unusual Activity.
It might harm your computer data and track your financial activities.
Please report this activity to
However, malware researchers found a few ways that help to unlock the screen and remove This computer is blocked from the system with the help of FortectIntego or other reputable malware removal program. Additionally, you can delete the adware application or another dubious application that is causing the appearance of this pop-up by using our manual step-by-step guide that has been provided at the end of this informative article.
However, you should identify the cause of this scam first before you start eliminating it as there might be no potentially content that has been forcing the This computer is blocked pop-up scam to appear. Similar scamming apps can be met on suspicious-looking websites and provided just as an additional pop-up notification or as a redirect. Prevention of these ads might be very simple, all you need is AdBlock[3] on your web browser.

If an ad-supported program is the guilty one for all of this scamming activity, the situation might be a little bit more difficult as adware programs have the capability of pushing a big number of pop-up ads, including This computer is blocked. Moreover, these potential threats are known for their redirecting activities that can take the computer users to affiliate websites and infect their computer with malware through infection hyperlinks/advertisements.
Getting back to This computer is blocked, we want to say that you should not postpone the elimination of this pop-up. You should take all actions possible to get rid of it from your computer screen. Be aware and do not call any given phone numbers and do not provide any sensitive details for these fake technical experts. If you do, you will supposedly regret it in the future as private information is very easy to misuse nowadays.

Mac version of This computer is blocked virus has also been released
Due to the increasing popularity of Mac machines and devices, hackers are not sleeping and creating more and more threats that can be launched in Mac systems. As we have already mentioned about This computer is blocked pop-up scam, developers have released a very similar version named This Mac computer is blocked that targets Mac operating systems.
Creators also announced potential danger and claim that the entire system has been locked due to safety measures. These people urge not to restart the computer or even more harm will be planted. Instead of taking actions on their own, users are convinced to call the fake technical support number for help to fix the issue.

This Mac computer is blocked is only another scary message that you should avoid believing. There is no need to call the fake tech experts as they might try to convince you to provide some private information about yourself or your computer system. The Apple logo is used here just to give a reliable look to the message but the original company does not have anything in common with it. If this scam appears on your computer system, you will receive this type of message:
VIRUS ALERT FROM APPLE
This Mac computer is BLOCKED
Do not close this warning or restart your Mac
Your Mac’s registration key is Blocked.
Why we blocked your Mac Computer?
The Mac’s registration key is illegal.
This Mac is using pirated software.
This Mac is sending virus over the internet.
This Mac is hacked or used from undefined location.
We block this Mac for your security.
Contact Apple helpline to reactivate your Mac.
Scamming content can be found on third-party websites
According to computer experts,[4] you can easily run into a pop-up scam on a suspicious-looking web page. However, if adware has been forcing the appearance of a scam, these programs use stealth techniques to infiltrate the computer system. One of them is known as “bundling”.
“Bundling”[5] is a deceptive marketing technique when the developer injects suspicious content into software packages. When downloading the software, the user also installs the PUP. To prevent this from happening, you should use the configuration mode which offers Custom or Advanced installation.
Additionally, download strong antivirus software that includes a browser protection feature. This function bombards alerts on your computer screen whenever you are trying to visit a questionable website.
This computer is blocked virus needs to be removed for good system stability
If you let scamming content to overflood your machine, you might find launching programs very troubling due to the CPU overuse that is caused by intrusive pop-up ads. Remove This computer is blocked virus from your Windows computer system and make sure that no adware-related content has been left in browsers.
If you want to, you can perform This computer is blocked removal by using the below-provided guidelines that will help you to get rid of the cyber threat and its cause from web browser applications such as Google Chrome, Mozilla Firefox, Internet Explorer, Microsoft Edge, and Safari. If your computer has been infected by the Mac version of this scam, you can find elimination instructions for OS X also.
Uninstall from Windows
Uninstall from Windows 10/8:
- Type Control Panel into the Windows search box and open the result.
- Under Programs, select Uninstall a program.


Uninstall from Windows 7/XP:
- Click on Windows Start > Control Panel (Windows XP users should click on Add/Remove Programs).
- In Control Panel, select Programs > Uninstall a program.


Remove the unwanted program:
- In the Programs and Features window, look for any recently installed suspicious entries, select them, and click Uninstall.
- If User Account Control appears, click Yes to confirm, then complete the removal.


Delete from macOS
Remove the unwanted application:
- From the menu bar, select Go > Applications.
- In the Applications folder, look for any suspicious entries, then drag them to Trash (or right-click and pick Move to Trash).


Delete leftover files and folders:
- Select Go > Go to Folder.
- Enter /Library/Application Support and remove any suspicious folders related to the unwanted program.
- Repeat the same check in the /Library/LaunchAgents and /Library/LaunchDaemons folders, deleting any suspicious entries.

- Finally, empty the Trash to permanently remove the leftovers.

Reset Internet Explorer
Remove dangerous add-ons:
- Open Internet Explorer, click on the Gear icon (IE menu) on the top-right corner of the browser
- Pick Manage Add-ons.
- You will see a Manage Add-ons window. Here, look for suspicious plugins. Click on these entries and select Disable.


Change your homepage if it was altered:
- Open IE and click on the Gear icon.
- Select Internet Options.
- In the General tab, delete the Home page address and replace it by your preferred one (for example, Google.com).
- Click Apply and then select OK.


Delete temporary files:
- Press on the Gear icon and select Internet Options.
- Under Browsing history, click Delete...
- Select relevant fields and press Delete.


Reset Internet Explorer:
- Click on Gear icon > Internet options and select Advanced tab.
- Select Reset.
- In the new window, check Delete personal settings and select Reset.


Remove from Microsoft Edge
Delete unwanted extensions from MS Edge:
- Select Menu (three horizontal dots at the top-right of the browser window) and pick Extensions.
- From the list, pick the extension and click on the Gear icon.
- Click Remove.


Clear cookies and other browser data:
- Click on the Menu (three horizontal dots at the top-right of the browser window) and select Settings > Privacy, search, and services..
- Under Clear browsing data, pick Choose what to clear.
- Select Cookies and other site data and Cached images and files. (apart from passwords, although you might want to include Media licenses as well, if applicable) and click on Clear.


Restore new tab and homepage settings:
- Click the menu icon and choose Settings.
- Then find On startup section.
- Click Remove next to any suspicious startup page.
Reset MS Edge if the above steps did not work:
- Press on Ctrl + Shift + Esc to open Task Manager.
- Click on More details arrow at the bottom of the window.
- Select Details tab.
- Now scroll down and locate every entry with Microsoft Edge name in it. Right-click on each of them and select End Task to stop MS Edge from running.


Instructions for Chromium-based Edge
Delete extensions from MS Edge (Chromium):
- Open Edge and click select Settings > Extensions.
- Delete unwanted extensions by clicking Remove.


Clear cache and site data:
- Click on Menu and go to Settings.
- Select Privacy, search and services.
- Under Clear browsing data, pick Choose what to clear.
- Under Time range, pick All time.
- Select Clear now.


Reset Chromium-based MS Edge:
- Click on Menu and select Settings.
- On the left side, pick Reset settings.
- Select Restore settings to their default values.
- Confirm with Reset.
- This will disable extensions and reset startup pages but will not delete bookmarks, saved passwords, or browsing history.


Remove from Mozilla Firefox (FF)
Remove dangerous extensions:
- Open Mozilla Firefox browser and click on the Menu (three horizontal lines at the top-right of the window).
- Select Add-ons.
- In here, select the unwanted extension and click Remove.


Reset the homepage:
- Click three horizontal lines at the top right corner to open the menu.
- Choose Settings.
- Under Home, set your preferred homepage and new tab settings.
Clear cookies and site data:
- Click Menu and pick Settings.
- Go to Privacy & Security section.
- Scroll down to locate Cookies and Site Data.
- Click on Clear Data...
- Select Cookies and Site Data and Temporary cached files and pages, then click Clear.


Reset Mozilla Firefox
If clearing the browser as explained above did not help, reset Mozilla Firefox:
- Open Mozilla Firefox browser and click the Menu.
- Go to Help and then choose Troubleshooting Information.

- Under Give Firefox a tune up section, click on Refresh Firefox...
- Once the pop-up shows up, confirm the action by pressing on Refresh Firefox.



Remove from Google Chrome
Delete malicious extensions from Google Chrome:
- Open Google Chrome, click on the Menu (three vertical dots at the top-right corner) and select More tools > Extensions.
- In the newly opened window, you will see all the installed extensions. Uninstall all suspicious extensions related to the unwanted program by clicking Remove.


Clear cache and web data from Chrome:
- Click on Menu and pick Settings.
- Under Privacy and security, select Clear browsing data.
- Select Browsing history, Cookies and other site data, as well as Cached images and files.
- Click Clear data.


Change your homepage:
- Click menu and choose Settings.
- Look for a suspicious site in the On startup section.
- Click on Open a specific or set of pages and click on three dots to find the Remove option.
Reset Google Chrome:
If the previous methods did not help you, reset Google Chrome to eliminate all the unwanted components:
- Click on Menu and select Settings.
- In the Settings, scroll down and click Advanced.
- Scroll down and locate Reset and clean up section.
- Now click Restore settings to their original defaults.
- Confirm with Reset settings.


Delete from Safari
Remove dangerous extensions:
- Open Safari, click Safari in the menu at the top-left of the screen, and select Preferences.
- Go to the Extensions tab, look for any suspicious entries, and click Uninstall to remove them.


Clear history and website data:
- Click Safari in the menu and pick Clear History.
- Set Clear to all history and confirm with Clear History.


Reset Safari:
- Click Safari in the menu and select Preferences > Advanced.
- Enable Show Develop menu in menu bar.
- From the menu bar, click Develop and select Empty Caches.


Did this guide help?
3 comments
Stone
Its easy to overlook these mistakes on the lockscreen because seeing this message shocks a lot!
Justice
Thanks for the passwords! XP8BF-F8HPF-PY6BX-K24PJ-RAA00 worked for me!
Bay
People should know already that theres no need to call Microsoft :))