

PUA:Win32/Puwaders.B!ml – a detection name for adware app that is hard to get rid of
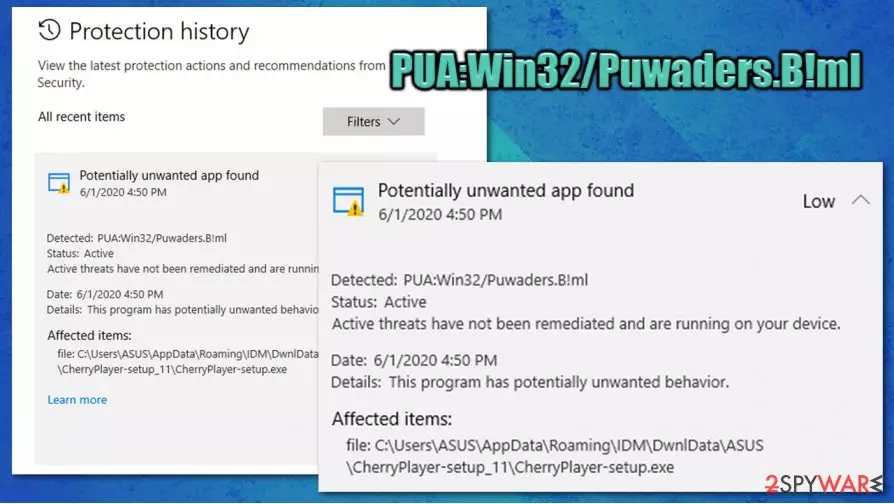
PUA:Win32/Puwaders.B!ml is a Windows Defender-assigned name for an adware application that has infiltrated your computer. It is based on heuristic analysis, which means that security software detected the potentially unwanted program based on the way it functions rather than its name. As a result, there could be many different apps that are hiding behind the PUA:Win32/Puwaders.B!ml virus name.
Adware, which is also known as ad-supported software, is a minor computer threat that typically arrives on the system without asking for direct permission, as developers use fake updates or software bundles to distribute it. Once installed, the app would change certain browser settings (in some cases, system file modification can occur as well) in order to deliver users popups, banners, deals, coupons, offers, and other commercial content, regardless if Google Chrome, Mozilla Firefox, or MS Edge is used.
If you are looking for the PUA:Win32/Puwaders.B!ml removal solutions because the threat seems to be coming back, we will explain why this happens and ways on how to get rid of this annoying infection once and for all.
| Name | PUA:Win32/Puwaders.B!ml |
|---|---|
| Type | Adware, potentially unwanted program |
| Distribution | Software bundles, third-party websites, deceptive ads, fake Flash Player updates |
| Symptoms | Windows Defender detects a potentially unwanted program repeatedly; potential browser settings changes; increased number of ads and redirects to unsafe sites |
| Dangers | Installation of other potentially unwanted programs or malware, monetary losses, sensitive information disclosure to unknown parties |
| Elimination | We recommend attempting to delete the PUP manually as per instructions below. If security software keeps detecting the same threat again, you need to delete Windows Defender history – check instructions below. Additionally, you should scan your computer with an alternative security tool, such as SpyHunterCombo Cleaner |
| Further steps | Malware or adware infections can diminish the performance of your computer or cause serious stability issues. Use FortectIntego to remediate your device and ensure that the virus damage is fixed |
Adware is usually not considered a dangerous piece of software, although some examples show the complete opposite. In most cases, the adware will hijack web browsers and inject advertisements into them, all while spying on users' web browsing activities in the background. Programs like PUA:Win32/Puwaders.B!ml typically have limited or no useful functionality and are not desired by most users.
In this particular case, the so-called PUA:Win32/Puwaders.B!ml virus might change your homepage without permission, redirect all your searches to another provider (such as Yahoo or Bing), install unwanted browser extensions, and drops its files all over the system. Certain modifications within the Windows registry can later cause problems with the computer's stability, so we recommend using FortectIntego after the threat is eliminated.
There is no doubt that you should not hesitate to remove PUA:Win32/Puwaders.B!ml from your machine as soon as possible, as it can not only diminish web browsing experience but also put your online privacy and security at risk (some links and redirects might bring you to malicious websites).
Unfortunately, most of the users who had Windows Defender detect this threat were unable to remove PUA:Win32/Puwaders.B!ml from their system as they would with any other detection. Even after their cleared web browsers cookies, web data and uninstalled the app in question, it would still return the next time the security software would perform a scan.
The truth is that repeated detection of the virus is caused by a bug within Windows Defender running on Windows versions 2004. Since the release of this OS version, Windows began flagging potentially unwanted programs as malicious, and many users complained that they are unable to remove many of such detections.
To get rid of the repeated detection, you should delete Protection History within Windows Defender. For more details, check the removal section below.

Potentially unwanted program prevention tips
In most cases, users find potentially unwanted programs installed on their systems without permission and tend to believe that they simply self-installed. However, adware does not possess such functionality, as these programs are relatively simple, and users install PUPs themselves (without the intention of doing so). It does not change the fact that the developers of freeware and sites that distribute them often to engage in deceptive practices in order to spread the software around the world.
There two main methods of how adware and other unwanted programs are distributed – software bundling and deceptive ads/fake updates. Security experts recommend the following to avoid unwanted infiltration of potentially dangerous software:
- If possible, download apps from official sources only;
- Never attempt to download pirated programs or software cracks;
- When visiting third-party sites, keep in mind that optional apps are likely to insert into the installer of your desired program;
- When you launch the installation wizard, do not rush the steps, and read the instructions carefully;
- When prompted, always pick Advanced/Custom settings instead of Recommended/Quick ones;
- Remove all ticks from pre-ticked checkboxes;
- Always read the fine print;
- Decline all the offers and watch out for misleading button placements (“Skip offer” is often placed on the right side of the pop-up window, resulting in the unintentional installation of PUPs);
- Install reliable security software that can warn you about unwanted programs.
The correct way to remove PUA:Win32/Puwaders.B!ml virus
PUA:Win32/Puwaders.B!ml removal proved to be more difficult than it should have been to most users. Potentially unwanted programs rarely engage in establishing persistence techniques on a computer, so they can be eliminated just like any other program or with security software. If you were unsuccessful in doing just that, you should employ alternative security software, such as SpyHunterCombo Cleaner or MalwarebytesMalwarebytes, and perform a full system scan to ensure that all the malicious components are gone.
If you are having a different problem (you can't remove PUA:Win32/Puwaders.B!ml because the detection keeps coming back), you need to clear Windows Defender's scan history in order to make it stop detecting its own results. This is a known bug, although it does not happen every time.

To delete the detection history of PUA:Win32/Puwaders.B!ml or other threats, you should navigate to a particular location on your File Explorer and delete the Service folder (note: before you do this, in File Explorer, go to the View tab at the top and tick Hidden items box):
C:\ProgramData\Microsoft\Windows Defender\Scans\History
To avoid such problems in the future, we highly recommend preventing Windows Defender from scanning its History holder in the future.
Uninstall from Windows
Uninstall from Windows 10/8:
- Type Control Panel into the Windows search box and open the result.
- Under Programs, select Uninstall a program.


Uninstall from Windows 7/XP:
- Click on Windows Start > Control Panel (Windows XP users should click on Add/Remove Programs).
- In Control Panel, select Programs > Uninstall a program.


Remove the unwanted program:
- In the Programs and Features window, look for any recently installed suspicious entries, select them, and click Uninstall.
- If User Account Control appears, click Yes to confirm, then complete the removal.


Reset Internet Explorer
Remove dangerous add-ons:
- Open Internet Explorer, click on the Gear icon (IE menu) on the top-right corner of the browser
- Pick Manage Add-ons.
- You will see a Manage Add-ons window. Here, look for suspicious plugins. Click on these entries and select Disable.


Change your homepage if it was altered:
- Open IE and click on the Gear icon.
- Select Internet Options.
- In the General tab, delete the Home page address and replace it by your preferred one (for example, Google.com).
- Click Apply and then select OK.


Delete temporary files:
- Press on the Gear icon and select Internet Options.
- Under Browsing history, click Delete...
- Select relevant fields and press Delete.


Reset Internet Explorer:
- Click on Gear icon > Internet options and select Advanced tab.
- Select Reset.
- In the new window, check Delete personal settings and select Reset.


Remove from Microsoft Edge
Delete unwanted extensions from MS Edge:
- Select Menu (three horizontal dots at the top-right of the browser window) and pick Extensions.
- From the list, pick the extension and click on the Gear icon.
- Click Remove.


Clear cookies and other browser data:
- Click on the Menu (three horizontal dots at the top-right of the browser window) and select Settings > Privacy, search, and services..
- Under Clear browsing data, pick Choose what to clear.
- Select Cookies and other site data and Cached images and files. (apart from passwords, although you might want to include Media licenses as well, if applicable) and click on Clear.


Restore new tab and homepage settings:
- Click the menu icon and choose Settings.
- Then find On startup section.
- Click Remove next to any suspicious startup page.
Reset MS Edge if the above steps did not work:
- Press on Ctrl + Shift + Esc to open Task Manager.
- Click on More details arrow at the bottom of the window.
- Select Details tab.
- Now scroll down and locate every entry with Microsoft Edge name in it. Right-click on each of them and select End Task to stop MS Edge from running.


Instructions for Chromium-based Edge
Delete extensions from MS Edge (Chromium):
- Open Edge and click select Settings > Extensions.
- Delete unwanted extensions by clicking Remove.


Clear cache and site data:
- Click on Menu and go to Settings.
- Select Privacy, search and services.
- Under Clear browsing data, pick Choose what to clear.
- Under Time range, pick All time.
- Select Clear now.


Reset Chromium-based MS Edge:
- Click on Menu and select Settings.
- On the left side, pick Reset settings.
- Select Restore settings to their default values.
- Confirm with Reset.
- This will disable extensions and reset startup pages but will not delete bookmarks, saved passwords, or browsing history.


Remove from Mozilla Firefox (FF)
Remove dangerous extensions:
- Open Mozilla Firefox browser and click on the Menu (three horizontal lines at the top-right of the window).
- Select Add-ons.
- In here, select the unwanted extension and click Remove.


Reset the homepage:
- Click three horizontal lines at the top right corner to open the menu.
- Choose Settings.
- Under Home, set your preferred homepage and new tab settings.
Clear cookies and site data:
- Click Menu and pick Settings.
- Go to Privacy & Security section.
- Scroll down to locate Cookies and Site Data.
- Click on Clear Data...
- Select Cookies and Site Data and Temporary cached files and pages, then click Clear.


Reset Mozilla Firefox
If clearing the browser as explained above did not help, reset Mozilla Firefox:
- Open Mozilla Firefox browser and click the Menu.
- Go to Help and then choose Troubleshooting Information.

- Under Give Firefox a tune up section, click on Refresh Firefox...
- Once the pop-up shows up, confirm the action by pressing on Refresh Firefox.



Remove from Google Chrome
Delete malicious extensions from Google Chrome:
- Open Google Chrome, click on the Menu (three vertical dots at the top-right corner) and select More tools > Extensions.
- In the newly opened window, you will see all the installed extensions. Uninstall all suspicious extensions related to the unwanted program by clicking Remove.


Clear cache and web data from Chrome:
- Click on Menu and pick Settings.
- Under Privacy and security, select Clear browsing data.
- Select Browsing history, Cookies and other site data, as well as Cached images and files.
- Click Clear data.


Change your homepage:
- Click menu and choose Settings.
- Look for a suspicious site in the On startup section.
- Click on Open a specific or set of pages and click on three dots to find the Remove option.
Reset Google Chrome:
If the previous methods did not help you, reset Google Chrome to eliminate all the unwanted components:
- Click on Menu and select Settings.
- In the Settings, scroll down and click Advanced.
- Scroll down and locate Reset and clean up section.
- Now click Restore settings to their original defaults.
- Confirm with Reset settings.


Delete from Safari
Remove dangerous extensions:
- Open Safari, click Safari in the menu at the top-left of the screen, and select Preferences.
- Go to the Extensions tab, look for any suspicious entries, and click Uninstall to remove them.


Clear history and website data:
- Click Safari in the menu and pick Clear History.
- Set Clear to all history and confirm with Clear History.


Reset Safari:
- Click Safari in the menu and select Preferences > Advanced.
- Enable Show Develop menu in menu bar.
- From the menu bar, click Develop and select Empty Caches.


Did this guide help?
Be the first to comment