

Clausephotographer.com has fooled you
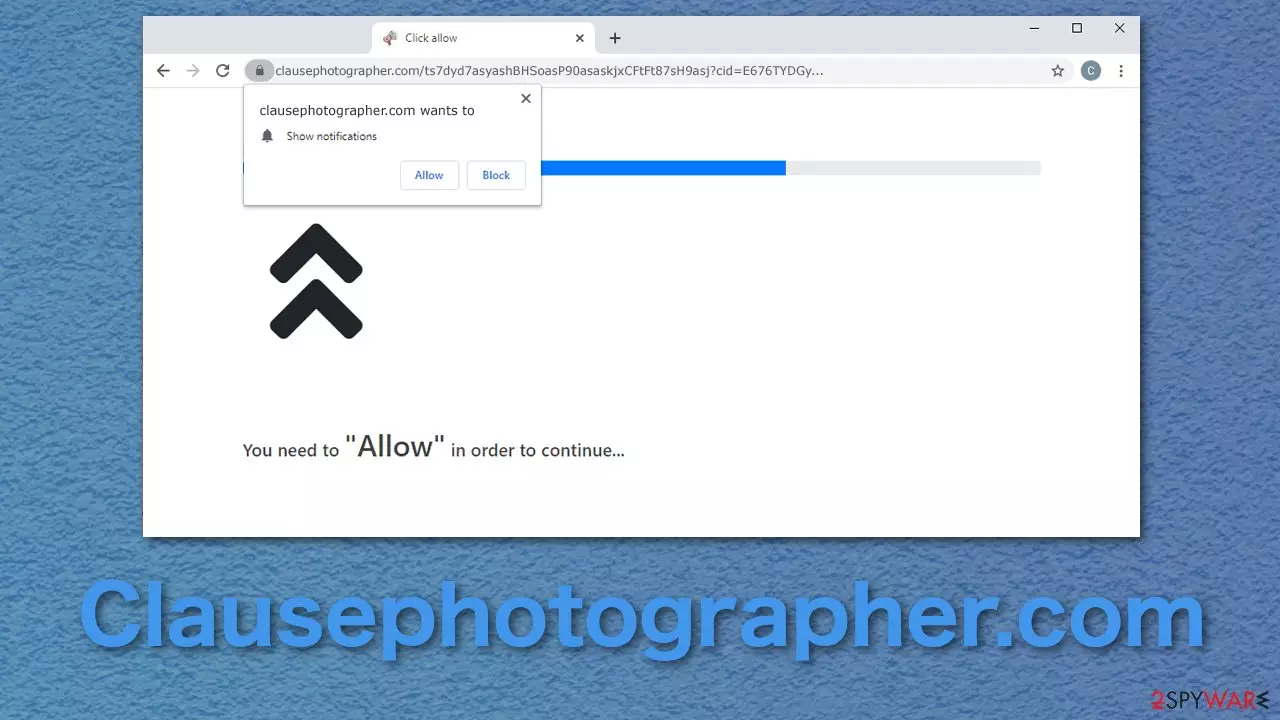
Push notifications are a great way for companies to reach their customers and alert them about the latest news, updates, etc. But it is also a great way to make money for shady individuals by sending ads. You might have come across Clausephotographer.com while browsing the internet and clicking on a deceptive ad. Users are usually redirected[1] to this page by other suspicious websites.
It uses social engineering tactics[2] to trick people into allowing push notifications. These are deceptive messages that say you have to click the “Allow” button in order to watch a video, confirm your age, that you are not a robot, or download something. Users fail to notice that the button is not on the website itself. Rather, it is a pop-up caused by the browser, which asks if you want the website to send you push notifications.
Of course, after clicking the button, users do not receive anything. There is nothing else to click on or explore. The most likely thing that happens is users are redirected somewhere else.
| NAME | Clausephotographer.com |
| TYPE | Push notification spam; adware |
| SYMPTOMS | Pop-up ads, banners, and sometimes full-screen ads appear on the desktop |
| DISTRIBUTION | Deceptive ads, shady websites, freeware installations |
| DANGERS | Ads can contain links leading to dangerous websites |
| ELIMINATION | Remove website permissions in your browser settings |
| FURTHER STEPS | A maintenance tool FortectIntego is recommended after removal to fix any damaged files |
A growing problem on the internet
Thousands of other websites look just like Clausephotographer.com, and there does not seem to be an end to this. The problem is, pages like this are so easily reproduced, so every day, the ones that go extinct, new ones take their place. Unsuspecting users will further get spammed with ads coming from various sources.
Because the responsible individuals do not filter any advertisers that come through their site, you could receive ads that contain links leading to questionable pages. These sites could be owned by scammers or hackers that have malicious intent. Users are at risk for falling for scams and providing their personal information or downloading potentially unwanted programs or even malware.

Users could think that their browser prevents the site from playing the video, and they need to allow it manually. But the content displayed is actually just a still picture or sometimes a GIF. Without reading the text in the fine print, they click the button and start receiving ads at the corner of their screen if they are on a PC or in the notifications section on the phone. The frequency of notifications depends on what settings the owner has set.
The intrusive nature of these pop-ups makes them particularly annoying. It is best to remove the website from your browser and not keep it, as the ads you receive can use clickbait to get your attention.
Additionally, the websites you visit can track your browsing behavior, habits, and purchases you make. If you allow the usage of cookies on one of the shady pages, they might provide the gathered information to third parties,[3] and they will not be responsible for what happens to it.
After Clausephotographer.com removal, we advise you to clear your cookies and cache to stop the tracking and improve the device speed. You can do that automatically with FortectIntego maintenance tool or manually. The steps for manually clearing your browsers will be available at the bottom of the article.
There will be two removal methods for the annoying pop-ups. If this first one does not work, you will have to proceed further. If you have this website's permissions allowed by yourself, you will have to remove them by yourself. You can do that via your browser settings:
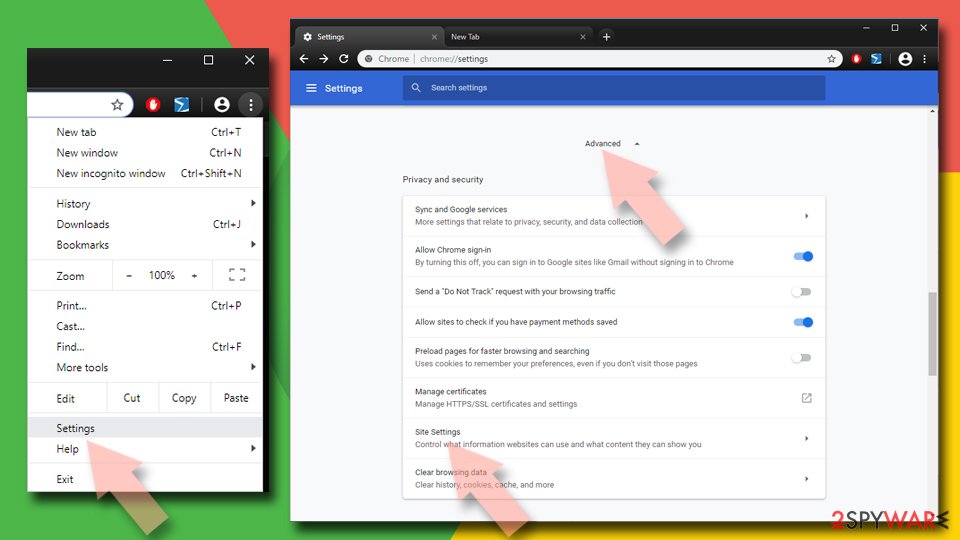
Google Chrome (desktop):
- Open Google Chrome browser and go to Menu > Settings.
- Scroll down and click on Advanced.
- Locate Privacy and security section and pick Site Settings > Notifications.

Safari
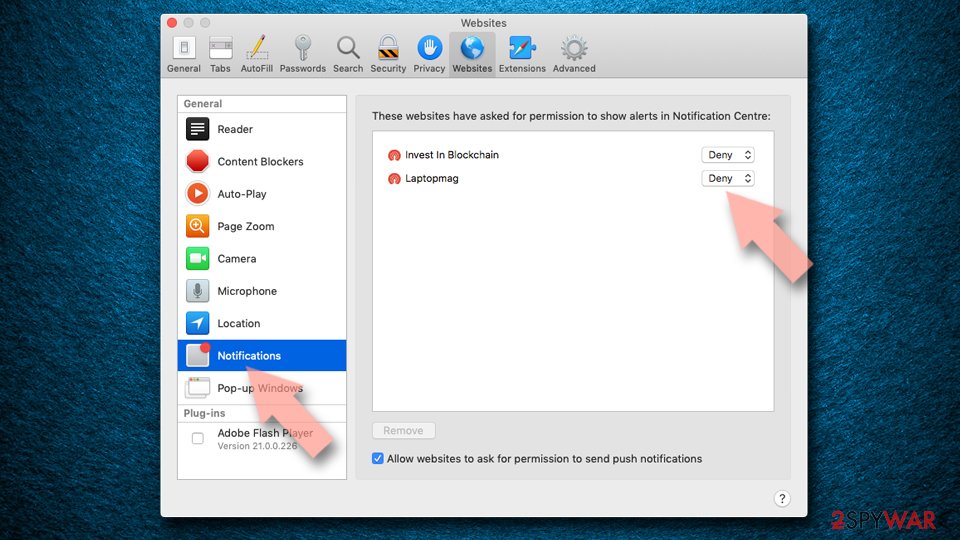
- Click on Safari > Preferences…
- Go to Websites tab and, under General, select Notifications.
- Select the web address in question, click the drop-down menu and select Deny.

Mozilla Firefox:
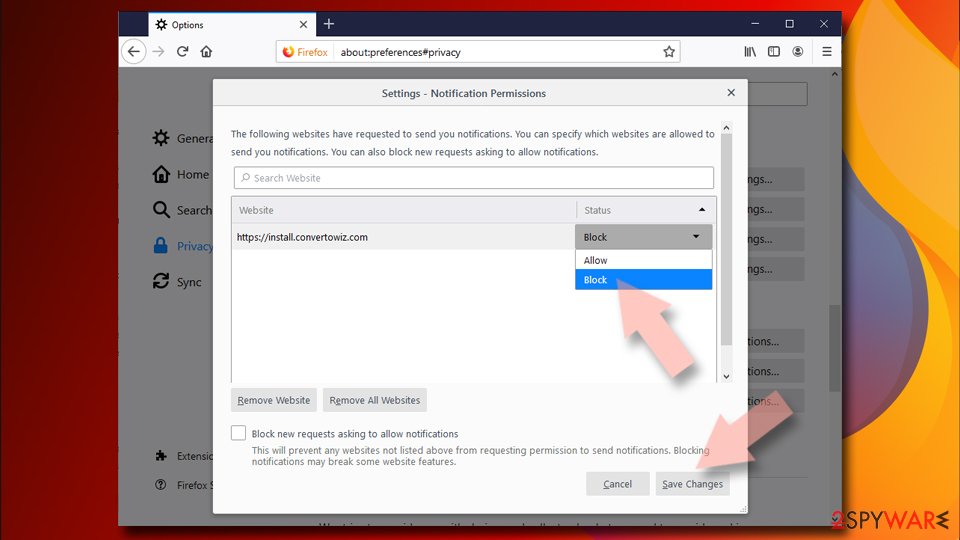
- Go to Menu and then select Options.
- Go to Privacy & Security > Notifications > Settings.
- Choose Block after picking this option from the drop-down menu.
- Confirm with Save Changes.

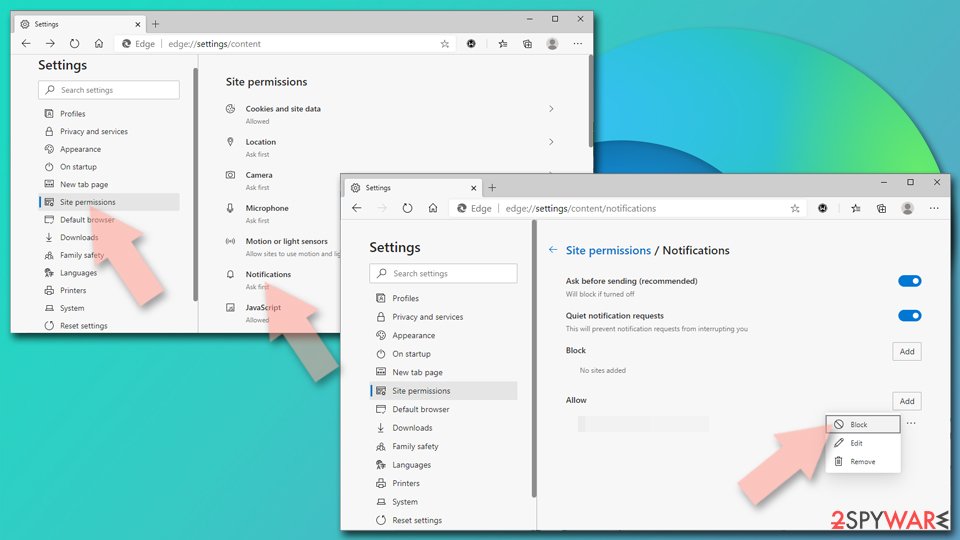
MS Edge (Chromium):
- Go to Menu and pick Settings.
- Select Site permissions.
- Click on Notifications.
- Find the site URL, and click More actions.
- Pick Block.

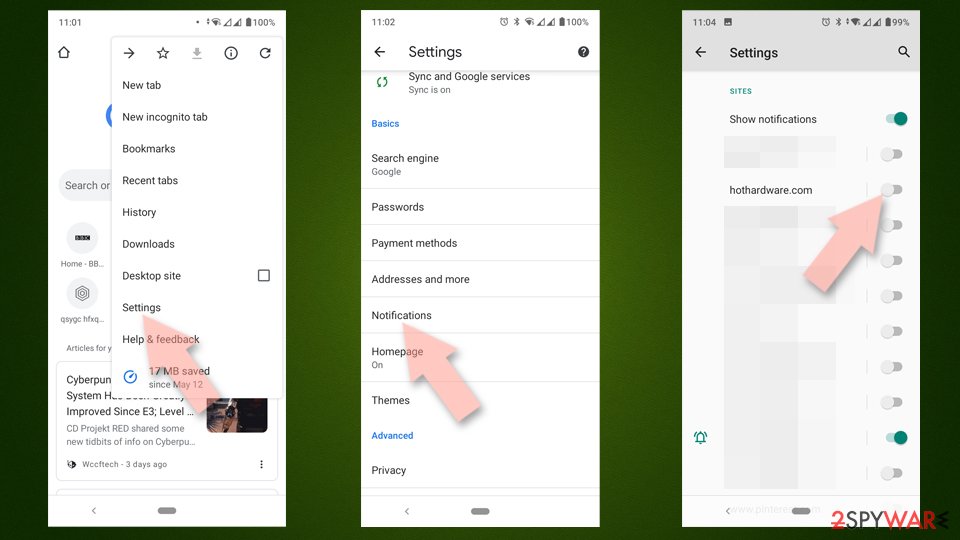
Android (Google Chrome):
- Open Google Chrome and tap on Settings (three vertical dots).
- Select Notifications.
- Scroll down to Sites section.
- Locate the unwanted URL and toggle the button to the left (Off setting).

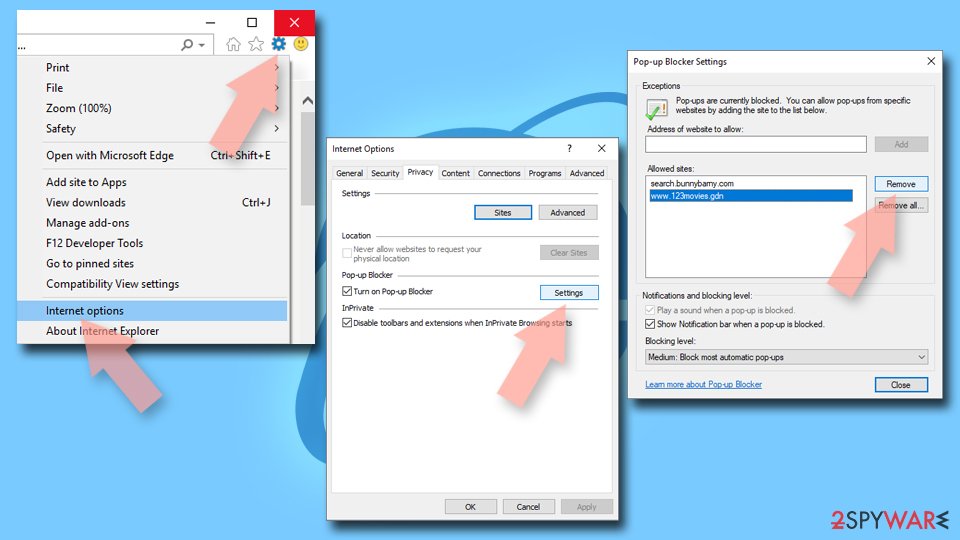
Internet Explorer:
- Open Internet Explorer, and click on the Gear icon at the top-right on the window.
- Select Internet options and go to Privacy tab.
- In the Pop-up Blocker section, click on Settings.
- Locate web address in question under Allowed sites and pick Remove.

Other options and potential causes
If you were unsuccessful in turning off permissions in your browsers, the problem might be hiding deeper. This might be the work of adware that falls into the potentially unwanted program category. These programs can come disguised as useful tools like antivirus software or video and image editing tools.
In reality, these kinds of programs sometimes are not even functional. You could have downloaded the app yourself because you thought it would be a great addition, or it came included as a package together with another application, and you were unaware of it.
Software bundling is a common method used to spread PUPs and PUAs. Often, users rush through the installation process, so they miss the important things. When installing anything on your machine, choose the “Custom” or “Advanced” installation method. This way, you will not skip any steps. Read the Privacy Policy and Terms of Use to find out what the program will do.
If everything checks out, the last step is to look for unrelated files in the installation window. If you see any additional programs, make sure to uncheck the boxes next to them. You do not need these programs.
Now to remove adware manually, you have to know which program is acting as adware. Do not worry if you do not have any experience and cannot find the program that sticks out on the list. We have an automatic removal option for this as well. SpyHunterCombo Cleaner and MalwarebytesMalwarebytes are anti-malware tools that scan your system and find suspicious programs. It will also warn you about threats in the future, so it is not valuable just for one-time use.
Instructions for Windows 10/8 machines:
- Enter Control Panel into Windows search box and hit Enter or click on the search result.
- Under Programs, select Uninstall a program.

- From the list, find the entry of the suspicious program.
- Right-click on the application and select Uninstall.
- If User Account Control shows up, click Yes.
- Wait till uninstallation process is complete and click OK.



If you are Windows 7/XP user, proceed with the following instructions:
- Click on Windows Start > Control Panel located on the right pane (if you are Windows XP user, click on Add/Remove Programs).
- In Control Panel, select Programs > Uninstall a program.

- Pick the unwanted application by clicking on it once.
- At the top, click Uninstall/Change.
- In the confirmation prompt, pick Yes.
- Click OK once the removal process is finished.

If you are using Mac:
- From the menu bar, select Go > Applications.
- In the Applications folder, look for all related entries.
- Click on the app and drag it to Trash (or right-click and pick Move to Trash)


To fully remove an unwanted app, you need to access Application Support, LaunchAgents, and LaunchDaemons folders and delete relevant files:
- Select Go > Go to Folder.
- Enter /Library/Application Support and click Go or press Enter.
- In the Application Support folder, look for any dubious entries and then delete them.
- Now enter /Library/LaunchAgents and /Library/LaunchDaemons folders the same way and terminate all the related .plist files.


Remove from Microsoft Edge
Delete unwanted extensions from MS Edge:
- Select Menu (three horizontal dots at the top-right of the browser window) and pick Extensions.
- From the list, pick the extension and click on the Gear icon.
- Click Remove.


Clear cookies and other browser data:
- Click on the Menu (three horizontal dots at the top-right of the browser window) and select Settings > Privacy, search, and services..
- Under Clear browsing data, pick Choose what to clear.
- Select Cookies and other site data and Cached images and files. (apart from passwords, although you might want to include Media licenses as well, if applicable) and click on Clear.


Restore new tab and homepage settings:
- Click the menu icon and choose Settings.
- Then find On startup section.
- Click Remove next to any suspicious startup page.
Reset MS Edge if the above steps did not work:
- Press on Ctrl + Shift + Esc to open Task Manager.
- Click on More details arrow at the bottom of the window.
- Select Details tab.
- Now scroll down and locate every entry with Microsoft Edge name in it. Right-click on each of them and select End Task to stop MS Edge from running.


Instructions for Chromium-based Edge
Delete extensions from MS Edge (Chromium):
- Open Edge and click select Settings > Extensions.
- Delete unwanted extensions by clicking Remove.


Clear cache and site data:
- Click on Menu and go to Settings.
- Select Privacy, search and services.
- Under Clear browsing data, pick Choose what to clear.
- Under Time range, pick All time.
- Select Clear now.


Reset Chromium-based MS Edge:
- Click on Menu and select Settings.
- On the left side, pick Reset settings.
- Select Restore settings to their default values.
- Confirm with Reset.
- This will disable extensions and reset startup pages but will not delete bookmarks, saved passwords, or browsing history.


Remove from Mozilla Firefox (FF)
Remove dangerous extensions:
- Open Mozilla Firefox browser and click on the Menu (three horizontal lines at the top-right of the window).
- Select Add-ons.
- In here, select the unwanted extension and click Remove.


Reset the homepage:
- Click three horizontal lines at the top right corner to open the menu.
- Choose Settings.
- Under Home, set your preferred homepage and new tab settings.
Clear cookies and site data:
- Click Menu and pick Settings.
- Go to Privacy & Security section.
- Scroll down to locate Cookies and Site Data.
- Click on Clear Data...
- Select Cookies and Site Data and Temporary cached files and pages, then click Clear.


Reset Mozilla Firefox
If clearing the browser as explained above did not help, reset Mozilla Firefox:
- Open Mozilla Firefox browser and click the Menu.
- Go to Help and then choose Troubleshooting Information.

- Under Give Firefox a tune up section, click on Refresh Firefox...
- Once the pop-up shows up, confirm the action by pressing on Refresh Firefox.



Remove from Google Chrome
Delete malicious extensions from Google Chrome:
- Open Google Chrome, click on the Menu (three vertical dots at the top-right corner) and select More tools > Extensions.
- In the newly opened window, you will see all the installed extensions. Uninstall all suspicious extensions related to the unwanted program by clicking Remove.


Clear cache and web data from Chrome:
- Click on Menu and pick Settings.
- Under Privacy and security, select Clear browsing data.
- Select Browsing history, Cookies and other site data, as well as Cached images and files.
- Click Clear data.


Change your homepage:
- Click menu and choose Settings.
- Look for a suspicious site in the On startup section.
- Click on Open a specific or set of pages and click on three dots to find the Remove option.
Reset Google Chrome:
If the previous methods did not help you, reset Google Chrome to eliminate all the unwanted components:
- Click on Menu and select Settings.
- In the Settings, scroll down and click Advanced.
- Scroll down and locate Reset and clean up section.
- Now click Restore settings to their original defaults.
- Confirm with Reset settings.


Delete from Safari
Remove dangerous extensions:
- Open Safari, click Safari in the menu at the top-left of the screen, and select Preferences.
- Go to the Extensions tab, look for any suspicious entries, and click Uninstall to remove them.


Clear history and website data:
- Click Safari in the menu and pick Clear History.
- Set Clear to all history and confirm with Clear History.


Reset Safari:
- Click Safari in the menu and select Preferences > Advanced.
- Enable Show Develop menu in menu bar.
- From the menu bar, click Develop and select Empty Caches.


Did this guide help?
Be the first to comment