

Techadm.site is a copy of other pages created to generate passive income for creators
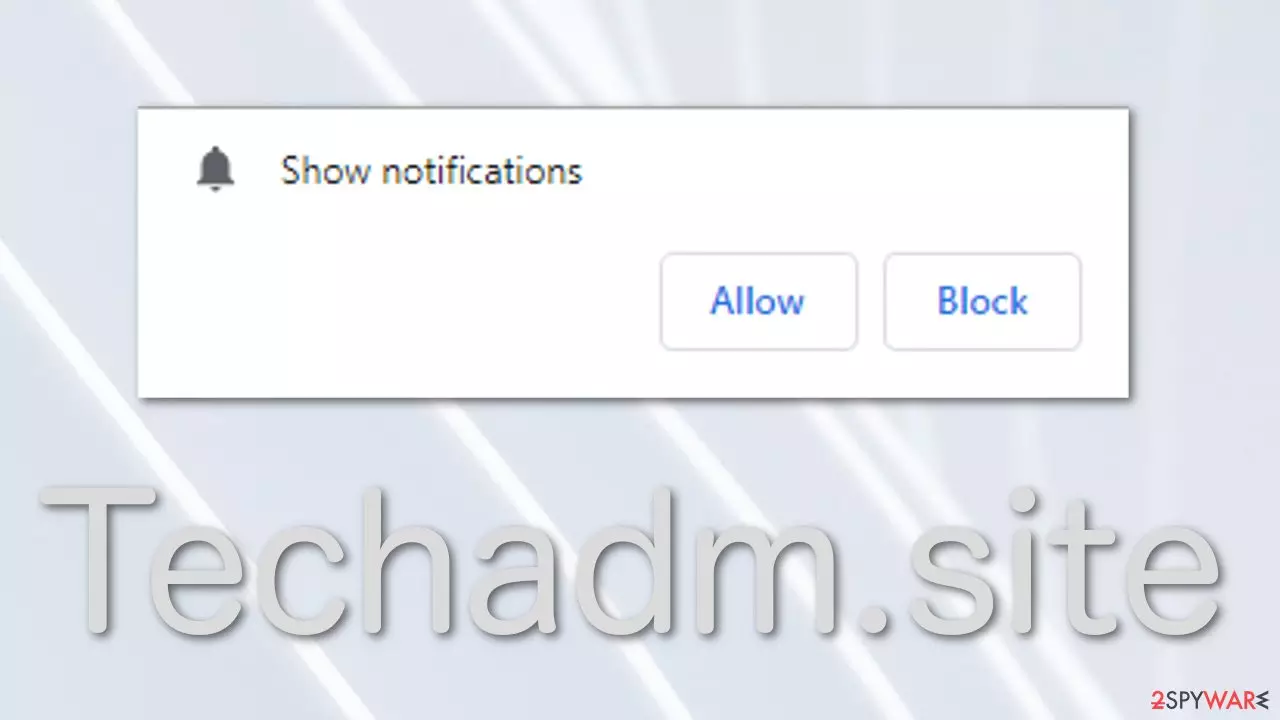
There are thousands of other pages just like Techadm.site that are created for the sole purpose of generating revenue from PPC advertising.[1] It uses various manipulation tactics and displays false messages, images to trick users into allowing push notifications; because they are based on a subscription model, they can only be shown if users agree.
Often this happens suddenly and unexpectedly because users rarely come to pages like this on their own by using the search engine. The website does not have any other content to explore besides the only page telling people to click “Allow.”
The page opens in a new tab seemingly from nowhere when users browse through shady sites that usually engage in illegal activities like illegal streaming platforms.[2] These sites are full of deceptive ads that look like “Download” and “Watch” buttons. When people click on these, they think that the opened page belongs to their site.
Of course, infecting yourself with commercial content like pop-up ads, banners, and others is not only possible through subscribing to push notifications but also by downloading potentially unwanted programs[3] that are created to generate ads and monitor browsing activity.
| NAME | Techadm.site |
| TYPE | Push notification spam; adware |
| SYMPTOMS | Ads start appearing in the corner of the screen, sometimes even when the browser is closed |
| DISTRIBUTION | Shady websites, deceptive ads, freeware installations |
| DANGERS | Links embedded in the push notification windows can lead to scam sites where users risk suffering from monetary losses and virus infections |
| ELIMINATION | Stopping the ads from arriving is possible via browser settings or with the help of security software |
| FURTHER STEPS | A repair tool like FortectIntego should help fix any remaining damage after removal and optimize performance |
There are a couple of different scenarios people can encounter with pages like Techadm.site. Fraudsters re-use the same messages over and over again:
Press Allow to verify your age is 18+
Click Allow to watch the video
Download is ready. Click Allow to download your file
Press Allow to verify that you are not a robot
The scheme works because most people are careless, rush, and the displayed messages look familiar, so they do not cause any suspicion. Of course, the page does not have any videos, files to download, etc. After clicking the “Allow” button, people do not receive anything that they were expecting. The most likely thing to happen is getting redirected to another questionable website.

Digital threats
After giving the site permission, it starts sending pop-up ads straight to users' screens. Because the site developers do not perform background checks on advertisers that get promoted through them, among legitimate ones, you can receive ads created by scammers.
For this reason, it is important to go by the rule “do not believe everything you see” and “if it seems too good to be true, it probably is.” Shady individuals use not only scare tactics but happy events to exploit the human element in us. If you see a window saying that you are the lucky winner of a vacation, new phone, or cash prize, of course, you want to believe it.
Due to the nature of online ads and how they can be set to reflect a particular user's interests, it becomes difficult to avoid checking them out. Always be alert and wary of dubious ads even if they display offers that are relevant to you, and be sure to use security software that can block harmful ads.
Stopping pop-up ads is quick and easy
Besides opening doors to questionable advertisements, your online privacy is also threatened. All the websites you visit can use up to 20 different cookies to track your behavior – websites you visit, links you click, purchases you make, and so on. This information can later be sold to third parties that can use it as they seem fit.
If you do not keep track of pages you visit, and are not careful, and like to go on internet deep-dives, we suggest you use a maintenance tool FortectIntego to automatically clear cache and cookies for you. Doing this should also increase your machine's performance as the software can delete all the junk. If you want to do this manually, you can look for instructions below the post.
If you allowed the ads yourself and this is not an adware infection, all you have to do is go to your browser settings and block the site's permission to send you push notifications:
Google Chrome (desktop):
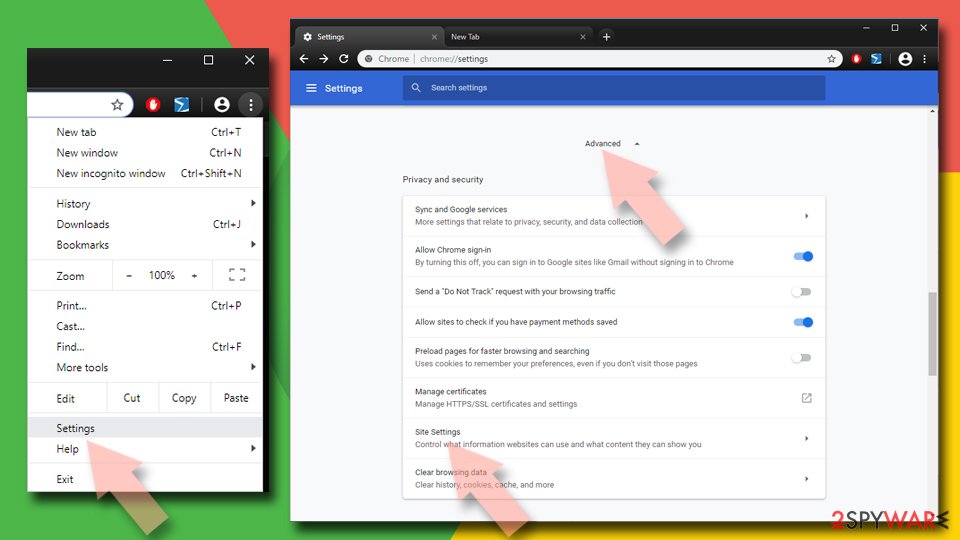
- Open Google Chrome browser and go to Menu > Settings.
- Scroll down and click on Advanced.
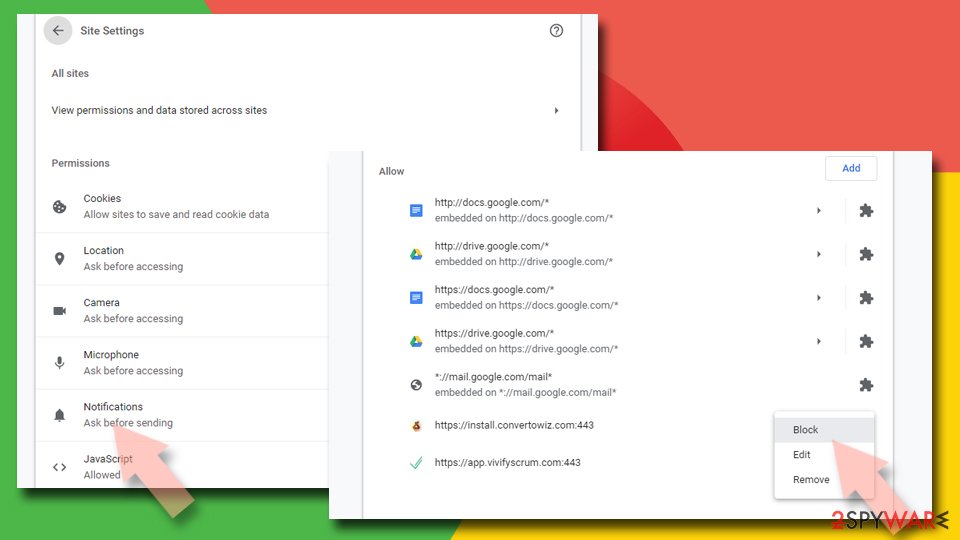
- Locate the Privacy and security section and pick Site Settings > Notifications.
- Look at the Allow section and look for a suspicious URL.
- Click the three vertical dots next to it and pick Block. This should remove unwanted notifications from Google Chrome.


Google Chrome (Android):
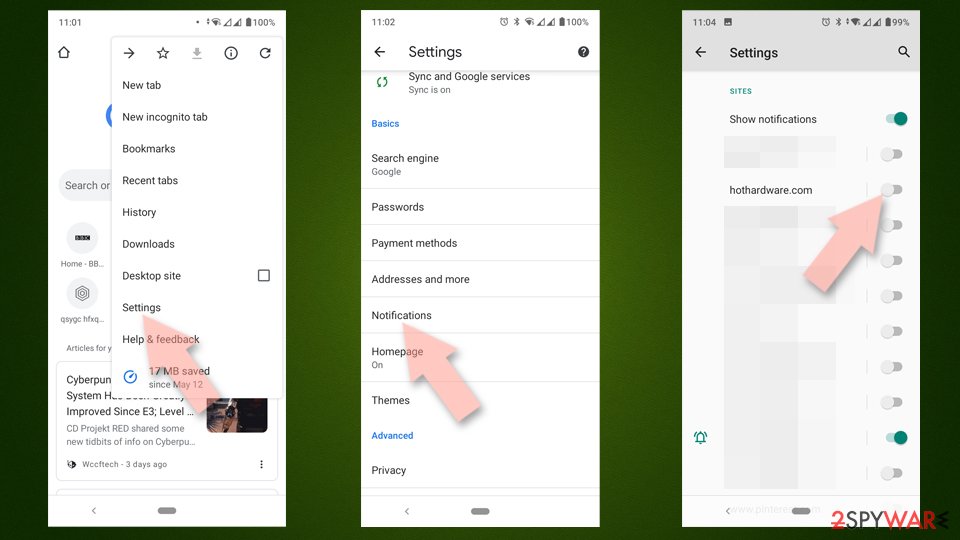
- Open Google Chrome and tap on Settings (three vertical dots).
- Select Notifications.
- Scroll down to Sites section.
- Locate the unwanted URL and toggle the button to the left (Off setting).

Mozilla Firefox:
- Open Mozilla Firefox and go to Menu > Options.
- Click on Privacy & Security section.
- Under Permissions, you should be able to see Notifications. Click Settings button next to it.
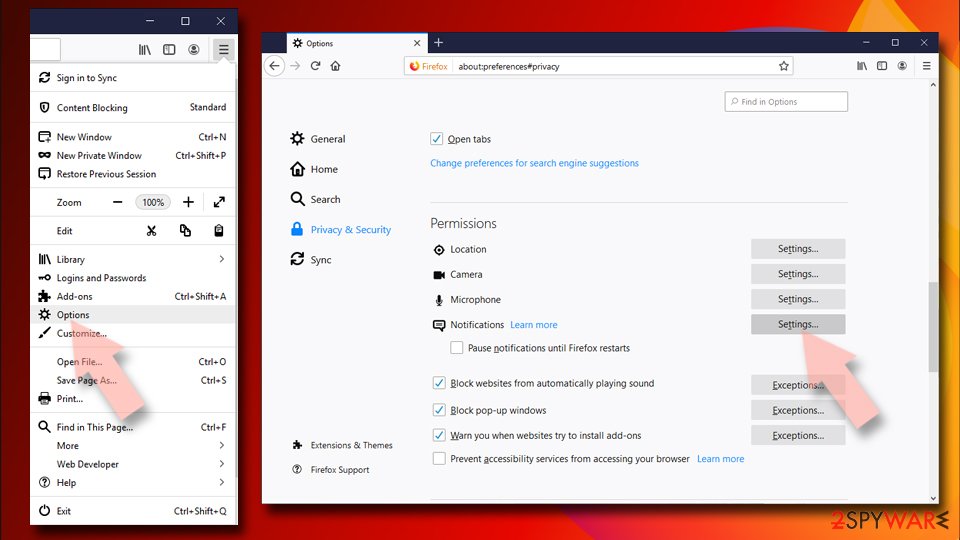
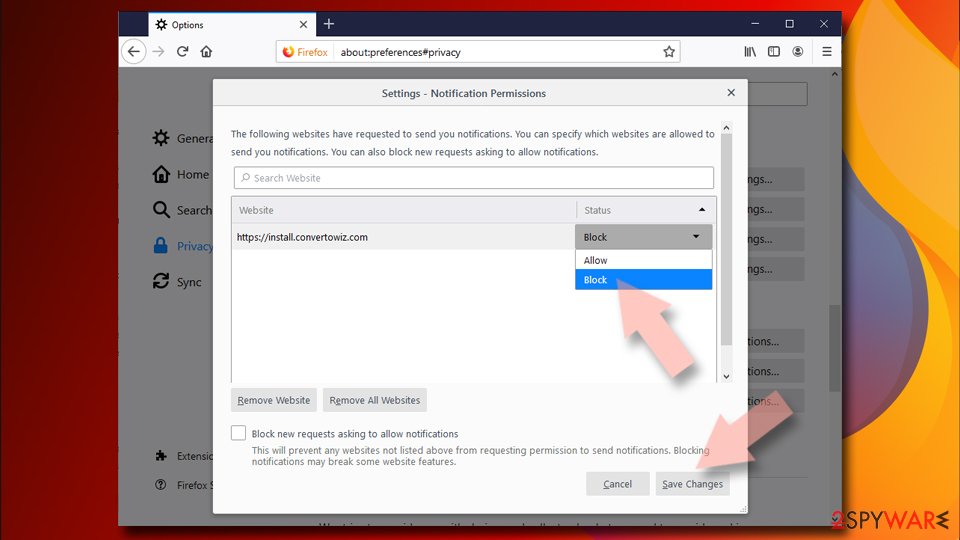
- In the Settings – Notification Permissions window, click on the drop-down menu by the URL in question.
- Select Block and then click on Save Changes. This should remove unwanted notifications from Mozilla Firefox.


Safari:
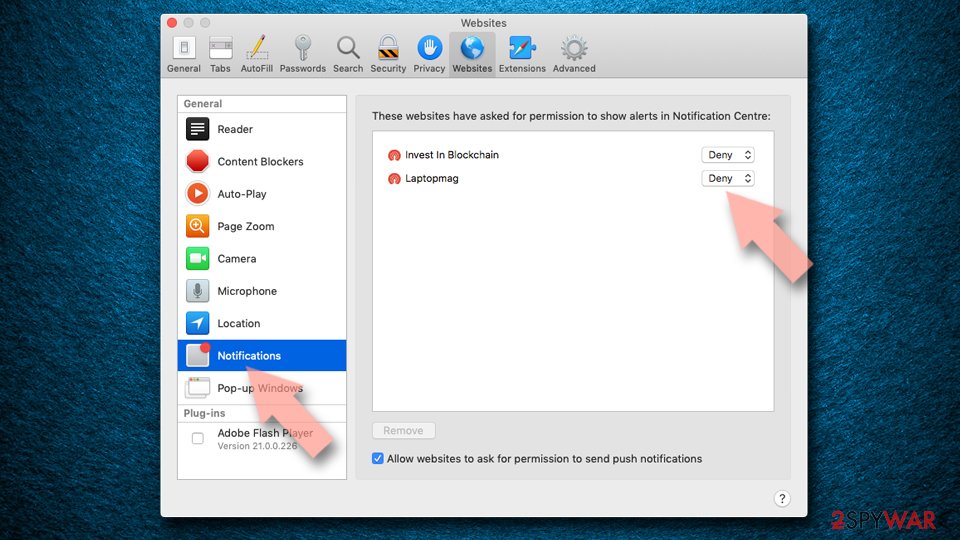
- Click on Safari > Preferences…
- Go to Websites tab and, under General, select Notifications.
- Select the web address in question, click the drop-down menu and select Deny.

MS Edge:
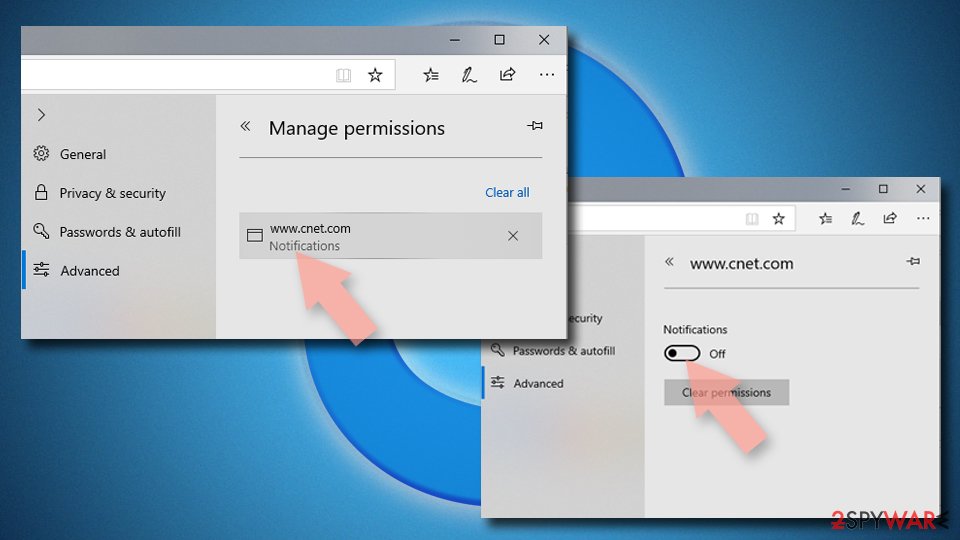
- Open Microsoft Edge, and click the Settings and more button (three horizontal dots) at the top-right of the window.
- Select Settings and then go to Advanced.
- Under Website permissions, pick Manage permissions and select the URL in question.
- Toggle the switch to the left to turn notifications off on Microsoft Edge.

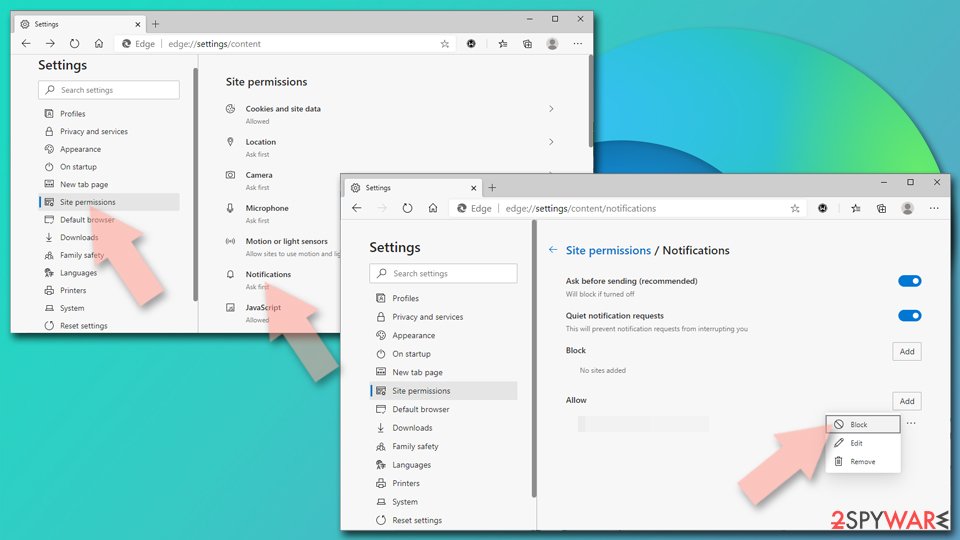
MS Edge (Chromium):
- Open Microsoft Edge, and go to Settings.
- Select Site permissions.
- Go to Notifications on the right.
- Under Allow, you will find the unwanted entry.
- Click on More actions and select Block.

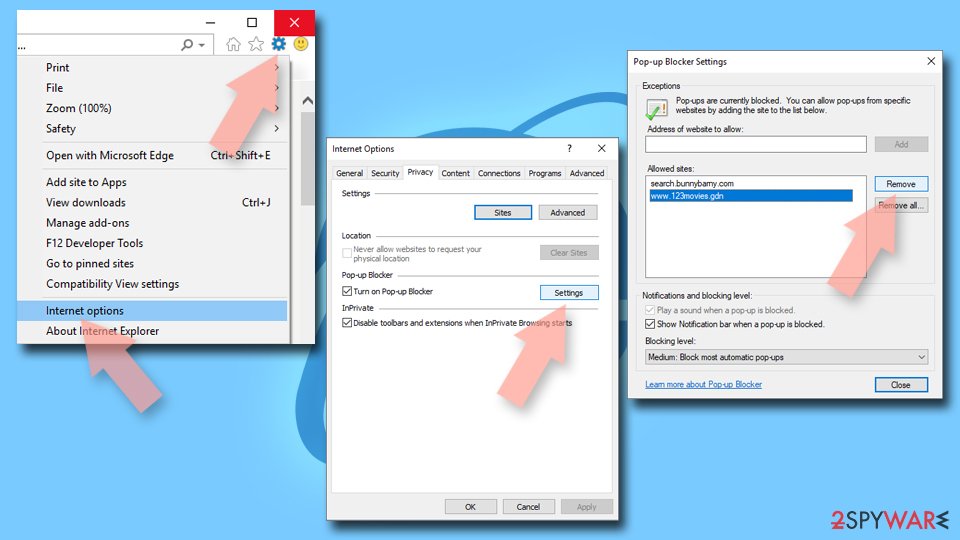
Internet Explorer:
- Open Internet Explorer, and click on the Gear icon at the top-right on the window.
- Select Internet options and go to Privacy tab.
- In the Pop-up Blocker section, click on Settings.
- Locate web address in question under Allowed sites and pick Remove.

Adware is a growing problem
Free programs that are massively available on the Internet are not completely free. They often come bundled with adware. To fund the development and distribution of free programs, their creators must monetize them by adding additional programs to the installation files without users' knowledge.
If you have this kind of PUA installed, you might experience a constant display of ads, banners that appear inside the browser window while searching for some information. Random pages or bookmarks can also open unexpectedly. The adware developers often sell the user’s ad profile that contains browsing history and includes IP address, performed searches, and visited websites.
If the previous removal method did not work for you, and you suspect it may be more serious, you should take immediate action. We recommended using an anti-malware tool like SpyHunterCombo Cleaner or MalwarebytesMalwarebytes to eliminate all the files belonging to it. There are endless possibilities of what the program could be called, but if you know what to do, you can do it manually:
Instructions for Windows 10/8 machines:
- Enter Control Panel into Windows search box and hit Enter or click on the search result.
- Under Programs, select Uninstall a program.

- From the list, find the entry of the suspicious program.
- Right-click on the application and select Uninstall.
- If User Account Control shows up, click Yes.
- Wait till uninstallation process is complete and click OK.



If you are Windows 7/XP user, proceed with the following instructions:
- Click on Windows Start > Control Panel located on the right pane (if you are Windows XP user, click on Add/Remove Programs).
- In Control Panel, select Programs > Uninstall a program.

- Pick the unwanted application by clicking on it once.
- At the top, click Uninstall/Change.
- In the confirmation prompt, pick Yes.
- Click OK once the removal process is finished.

Instructions for macOS are down below.
How to prevent PUPs from infecting devices?
To stop adware from being installed, it is important to exercise caution when visiting websites that look suspicious. Users should also be careful while downloading free software and download all programs only from trusted sources. To avoid being a victim of bundled software you should follow these steps during the installation:
- Choose the “Custom” or “Advanced” method
- Read the Terms of Use and Privacy Policy
- Untick the boxes next to files that seem to be unrelated
In addition to the above tips, users should ensure that their operating system and software are regularly updated. If you fail to do that, it becomes vulnerable to many types of hacker attacks because it does not have the needed patches.
Delete from macOS
Remove the unwanted application:
- From the menu bar, select Go > Applications.
- In the Applications folder, look for any suspicious entries, then drag them to Trash (or right-click and pick Move to Trash).


Delete leftover files and folders:
- Select Go > Go to Folder.
- Enter /Library/Application Support and remove any suspicious folders related to the unwanted program.
- Repeat the same check in the /Library/LaunchAgents and /Library/LaunchDaemons folders, deleting any suspicious entries.

- Finally, empty the Trash to permanently remove the leftovers.

Remove from Microsoft Edge
Delete unwanted extensions from MS Edge:
- Select Menu (three horizontal dots at the top-right of the browser window) and pick Extensions.
- From the list, pick the extension and click on the Gear icon.
- Click Remove.


Clear cookies and other browser data:
- Click on the Menu (three horizontal dots at the top-right of the browser window) and select Settings > Privacy, search, and services..
- Under Clear browsing data, pick Choose what to clear.
- Select Cookies and other site data and Cached images and files. (apart from passwords, although you might want to include Media licenses as well, if applicable) and click on Clear.


Restore new tab and homepage settings:
- Click the menu icon and choose Settings.
- Then find On startup section.
- Click Remove next to any suspicious startup page.
Reset MS Edge if the above steps did not work:
- Press on Ctrl + Shift + Esc to open Task Manager.
- Click on More details arrow at the bottom of the window.
- Select Details tab.
- Now scroll down and locate every entry with Microsoft Edge name in it. Right-click on each of them and select End Task to stop MS Edge from running.


Instructions for Chromium-based Edge
Delete extensions from MS Edge (Chromium):
- Open Edge and click select Settings > Extensions.
- Delete unwanted extensions by clicking Remove.


Clear cache and site data:
- Click on Menu and go to Settings.
- Select Privacy, search and services.
- Under Clear browsing data, pick Choose what to clear.
- Under Time range, pick All time.
- Select Clear now.


Reset Chromium-based MS Edge:
- Click on Menu and select Settings.
- On the left side, pick Reset settings.
- Select Restore settings to their default values.
- Confirm with Reset.
- This will disable extensions and reset startup pages but will not delete bookmarks, saved passwords, or browsing history.


Remove from Mozilla Firefox (FF)
Remove dangerous extensions:
- Open Mozilla Firefox browser and click on the Menu (three horizontal lines at the top-right of the window).
- Select Add-ons.
- In here, select the unwanted extension and click Remove.


Reset the homepage:
- Click three horizontal lines at the top right corner to open the menu.
- Choose Settings.
- Under Home, set your preferred homepage and new tab settings.
Clear cookies and site data:
- Click Menu and pick Settings.
- Go to Privacy & Security section.
- Scroll down to locate Cookies and Site Data.
- Click on Clear Data...
- Select Cookies and Site Data and Temporary cached files and pages, then click Clear.


Reset Mozilla Firefox
If clearing the browser as explained above did not help, reset Mozilla Firefox:
- Open Mozilla Firefox browser and click the Menu.
- Go to Help and then choose Troubleshooting Information.

- Under Give Firefox a tune up section, click on Refresh Firefox...
- Once the pop-up shows up, confirm the action by pressing on Refresh Firefox.



Remove from Google Chrome
Delete malicious extensions from Google Chrome:
- Open Google Chrome, click on the Menu (three vertical dots at the top-right corner) and select More tools > Extensions.
- In the newly opened window, you will see all the installed extensions. Uninstall all suspicious extensions related to the unwanted program by clicking Remove.


Clear cache and web data from Chrome:
- Click on Menu and pick Settings.
- Under Privacy and security, select Clear browsing data.
- Select Browsing history, Cookies and other site data, as well as Cached images and files.
- Click Clear data.


Change your homepage:
- Click menu and choose Settings.
- Look for a suspicious site in the On startup section.
- Click on Open a specific or set of pages and click on three dots to find the Remove option.
Reset Google Chrome:
If the previous methods did not help you, reset Google Chrome to eliminate all the unwanted components:
- Click on Menu and select Settings.
- In the Settings, scroll down and click Advanced.
- Scroll down and locate Reset and clean up section.
- Now click Restore settings to their original defaults.
- Confirm with Reset settings.


Delete from Safari
Remove dangerous extensions:
- Open Safari, click Safari in the menu at the top-left of the screen, and select Preferences.
- Go to the Extensions tab, look for any suspicious entries, and click Uninstall to remove them.


Clear history and website data:
- Click Safari in the menu and pick Clear History.
- Set Clear to all history and confirm with Clear History.


Reset Safari:
- Click Safari in the menu and select Preferences > Advanced.
- Enable Show Develop menu in menu bar.
- From the menu bar, click Develop and select Empty Caches.


Did this guide help?
Be the first to comment