

Goraps.com ads might show links to malicious websites

When scrolling through content on your favorite website or while streaming a video, you might be caught by surprise by Goraps.com notifications. They would show up at the top or bottom right corner of your screen, depending on the operating system. Nonetheless, the pop-up is not triggered by any particular event or user input and rather comes randomly, on top of all the other programs or applications running in the background. This immediately seems suspicious, and users want to find out what this website is and why it is showing ads seemingly out of nowhere.
The truth is that the notifications are initially triggered by a particular event that happened in the past. First of all, users are redirected to Goraps.com while browsing websites of dubious origin, and they usually wouldn't type in this web address into their URL bars intentionally. Even if they would, the outcome would be completely different: it links to what seems to be an advertising network. However, this is not the version of the site that users typically encounter.
Instead, people are shown a weird page where a picture and a message are encouraging them to press the “Allow” button within the notification prompt. This is a typical, recycled, and useless site that does not hold any content in it, and the main purpose of it is to trick users into subscribing to its notifications.
Unfortunately, permission to send information from the site is established once that is done, although this might not be apparent immediately. Instead, after some time passes, only then will people might see the Goraps.com notifications showing up on their desktops. These pop-ups might include all types of misleading and even dangerous content, so clicking the links the site provides is highly discouraged by security experts.[1]
Instead, you should take your time and stop the intrusive activity via browser settings. Also, since browser redirects to suspicious websites might be a sign of adware or malware infection, checking the device thoroughly is also recommended. We provide all the required information below.
| Name | Goraps.com |
| Type | Push notifications, ads, pop-ups |
| Distribution | Intrusive pop-ups can start showing up at some point after the “Allow” button is pressed within the notification prompt |
| Symptoms | Push notifications that include misleading information links would show up on the desktop randomly |
| Risks | If you click on links provided by the website, you might end up infecting your system with malware/PUPs, disclosing your personal information to cybercriminals, or losing money for useless services |
| Removal | Notifications can be disabled via the browser settings; in case you experience more ads and redirects to suspicious sites, you should also get rid of adware – use SpyHunterCombo Cleaner antivirus for quick elimination |
| Additional steps | Cleaning web browsers is just as important when dealing with potentially unwanted programs – you can either employ FortectIntego for to automatic solution or follow the manual steps we provide in the article |
How does Goraps.com scam work?
Initially, push notifications were not designed with an intent to harm users; completely the opposite is true, though, as the notifications are there to make people pay attention to information that is important to them.
First created by Apple back in 2009, they came around to desktops browsers in 2015, and since then have been used by all types of websites – retail, entertainment, software distribution, social media, video streaming, and others. That's why, whenever you open a new website you have never visited before, you are likely to be offered to receive notifications.
Because the message is clear, most people usually decline the offer due to the intrusive nature of this feature. At the same time, some users might find it useful, especially if the website they are subscribing to is legitimate and provides information without spamming the desktop with annoying ads.
However, scammers were quick to realize that the push notifications feature is a great tool to expose people to ads – it can earn a lot of money for them. They often use insecure advertising networks, however, which explains the malicious nature of the messages themselves. Users might be told that their computer is infected with viruses that need removing with special software or that some software (like Flash Player,[2] for example) on the system is out of date.

If we look at how users are convinced to allow these notifications, everything makes much more sense – a bit of social engineering[3] and people who pay less attention or lack knowledge make the scam operate very well. Visitors are often told that the “Allow” button within the prompt is something completely different, e.g., it allegedly helps the website to recognize that the user is not a bot.
You might also encounter notifications that promise you some type of content – a file download, a video, or even mature stuff. These messages are all fake, and you should ignore them in the future. However, if you have been tricked, it is essentially not a big deal, as long as you do not click on the prompted content within the notification prompts.
Check your system for adware
Adare is a type of potentially unwanted software that could be causing redirects and show pop-ups, auto-play, in-text links, and similar types of ads everywhere you go. It might run in the background without you knowing (due to its deceptive distribution tactics) and perform its activities in the background.
This is why it is sometimes difficult to distinguish whether ads are coming from a malicious program installed on the system, a website itself, or push notifications. However, there are several steps you can take in order to distinguish these circumstances. First of all, we strongly recommend you perform a system scan with SpyHunterCombo Cleaner, MalwarebytesMalwarebytes, or another reputable anti-malware to ensure no malicious processes are running in the background. You could also check for PUPs manually – we explain how to do that at the bottom of this post.
Cleaning web browsers is also an undertaking with doing, as, over time, various caches might create issues and put your privacy at risk (cybercriminals might steal them in some cases). Thus, follow our guide at the end of this post or instead use FortectIntego to quicken up this process.
Removal of Goraps.com ads
After you checked your device thoughtfully, there is one important matter to be taken care of – the annoying push notifications. Luckily, if you follow the instructions we provide here, you should have no struggles.
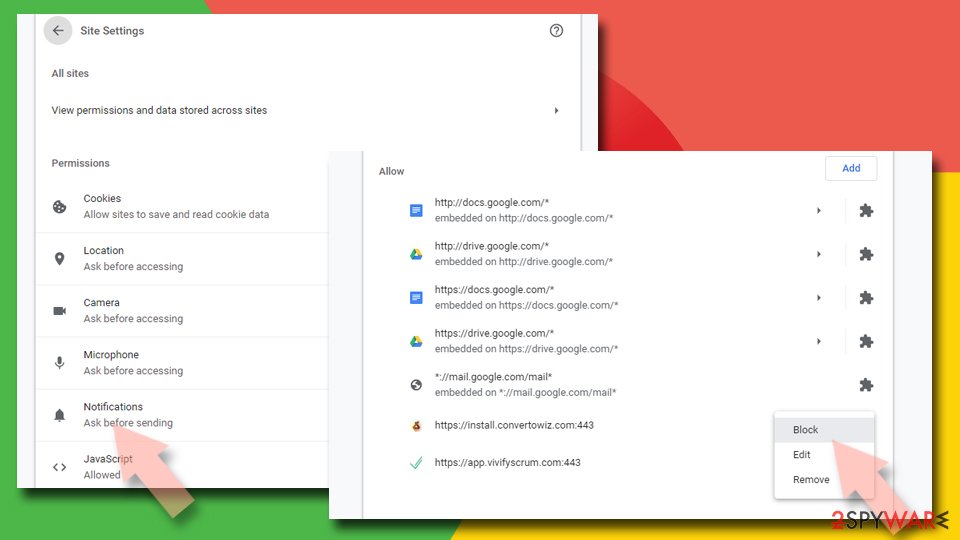
Google Chrome (desktop):
- Open Google Chrome browser and go to Menu > Settings.
- Scroll down and click on Advanced.
- Locate the Privacy and security section and pick Site Settings > Notifications.
- Look at the Allow section and look for a suspicious URL.
- Click the three vertical dots next to it and pick Block. This should remove unwanted notifications from Google Chrome.

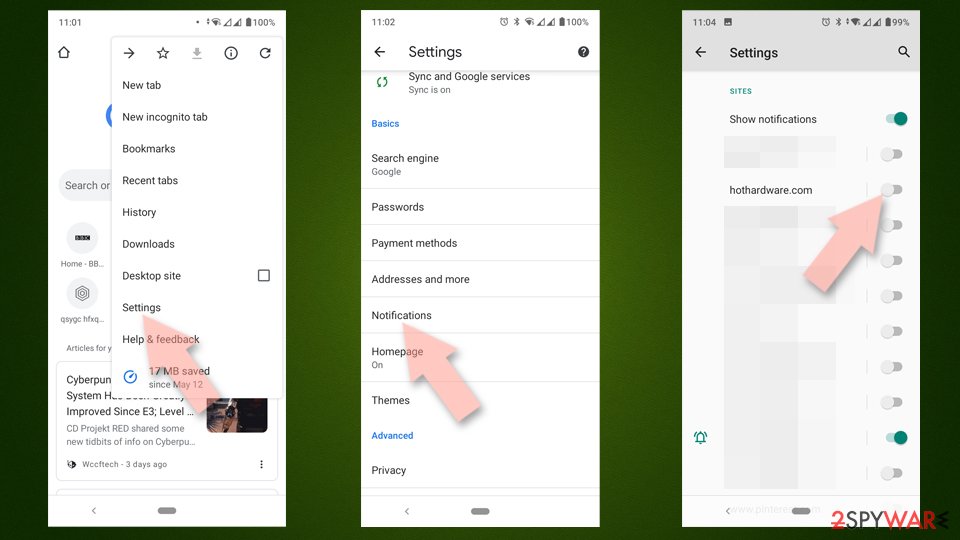
Google Chrome (Android):
- Open Google Chrome and tap on Settings (three vertical dots).
- Select Notifications.
- Scroll down to the Sites section.
- Locate the unwanted URL and toggle the button to the left (Off setting).

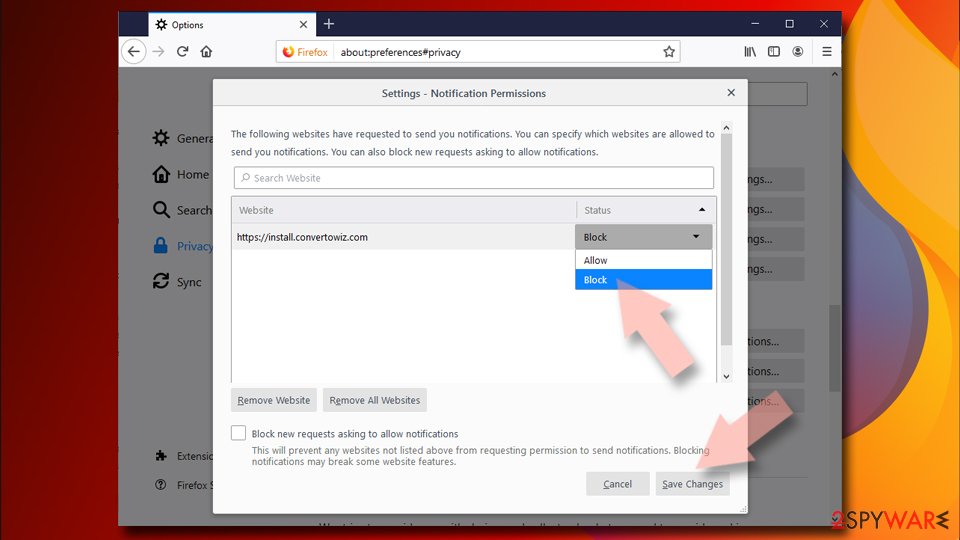
Mozilla Firefox:
- Open Mozilla Firefox and go to Menu > Options.
- Click on Privacy & Security section.
- Under Permissions, you should be able to see Notifications. Click the Settings button next to it.
- In the Settings – Notification Permissions window, click on the drop-down menu by the URL in question.
- Select Block and then click on Save Changes. This should remove unwanted notifications from Mozilla Firefox.

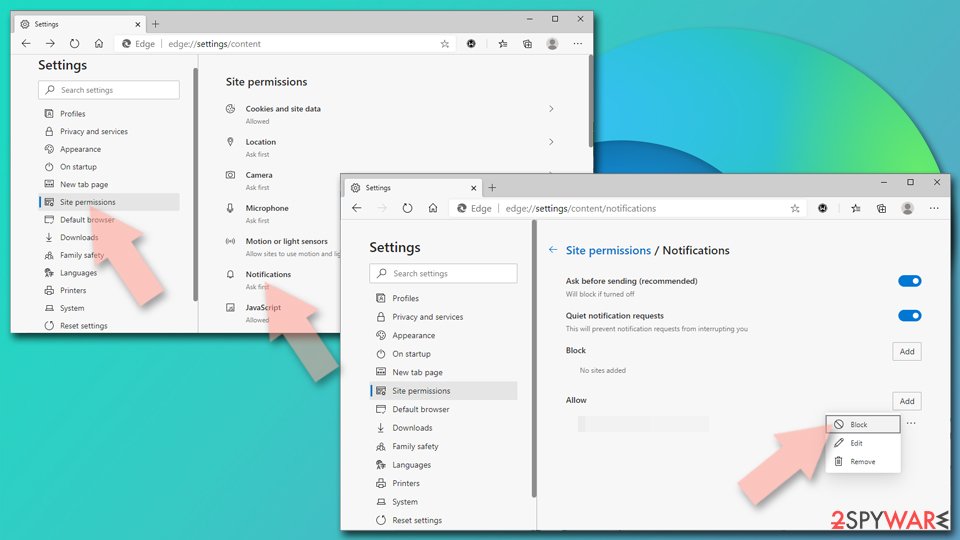
MS Edge (Chromium):
- Open Microsoft Edge, and go to Settings.
- Select Site permissions.
- Go to Notifications on the right.
- Under Allow, you will find the unwanted entry.
- Click on More actions and select Block.

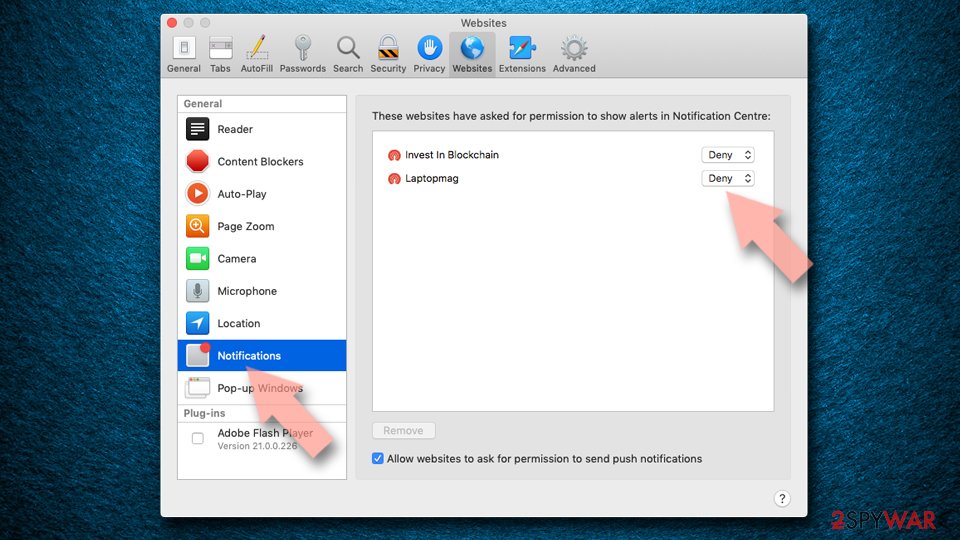
Safari:
- Click on Safari > Preferences…
- Go to the Websites tab and, under General, select Notifications.
- Select the web address in question, click the drop-down menu and select Deny.

How to stay safe online
While ads are a normal phenomenon that helps various websites monetize their content, some might be extremely intrusive and even dangerous. For example, ad space on torrent and similar sites can be bought by cybercriminals, where they could insert malicious scripts and infect visitors with malware – sometimes without them clicking anything. Likewise, websites might get hacked and display malicious content too.
Thus, it is best to protect yourself from malicious ads. First of all, you should not put yourself in danger by deliberately visiting high-risk websites. For example, downloading repacked or pirated programs might result in malware infection such as Utjg ransomware.
In some cases, staying away from all malicious content is not possible. Thus, using anti-malware and ad-blocking software might be a great helper in this regard. And, of course, you should always be wary about clicking random links or trusting suspicious messages which try to intimidate you in one way or another or show fake errors, fake updates, and similar.
Uninstall from Windows
Uninstall from Windows 10/8:
- Type Control Panel into the Windows search box and open the result.
- Under Programs, select Uninstall a program.


Uninstall from Windows 7/XP:
- Click on Windows Start > Control Panel (Windows XP users should click on Add/Remove Programs).
- In Control Panel, select Programs > Uninstall a program.


Remove the unwanted program:
- In the Programs and Features window, look for any recently installed suspicious entries, select them, and click Uninstall.
- If User Account Control appears, click Yes to confirm, then complete the removal.


Delete from macOS
Remove the unwanted application:
- From the menu bar, select Go > Applications.
- In the Applications folder, look for any suspicious entries, then drag them to Trash (or right-click and pick Move to Trash).


Delete leftover files and folders:
- Select Go > Go to Folder.
- Enter /Library/Application Support and remove any suspicious folders related to the unwanted program.
- Repeat the same check in the /Library/LaunchAgents and /Library/LaunchDaemons folders, deleting any suspicious entries.

- Finally, empty the Trash to permanently remove the leftovers.

Remove from Microsoft Edge
Delete unwanted extensions from MS Edge:
- Select Menu (three horizontal dots at the top-right of the browser window) and pick Extensions.
- From the list, pick the extension and click on the Gear icon.
- Click Remove.


Clear cookies and other browser data:
- Click on the Menu (three horizontal dots at the top-right of the browser window) and select Settings > Privacy, search, and services..
- Under Clear browsing data, pick Choose what to clear.
- Select Cookies and other site data and Cached images and files. (apart from passwords, although you might want to include Media licenses as well, if applicable) and click on Clear.


Restore new tab and homepage settings:
- Click the menu icon and choose Settings.
- Then find On startup section.
- Click Remove next to any suspicious startup page.
Reset MS Edge if the above steps did not work:
- Press on Ctrl + Shift + Esc to open Task Manager.
- Click on More details arrow at the bottom of the window.
- Select Details tab.
- Now scroll down and locate every entry with Microsoft Edge name in it. Right-click on each of them and select End Task to stop MS Edge from running.


Instructions for Chromium-based Edge
Delete extensions from MS Edge (Chromium):
- Open Edge and click select Settings > Extensions.
- Delete unwanted extensions by clicking Remove.


Clear cache and site data:
- Click on Menu and go to Settings.
- Select Privacy, search and services.
- Under Clear browsing data, pick Choose what to clear.
- Under Time range, pick All time.
- Select Clear now.


Reset Chromium-based MS Edge:
- Click on Menu and select Settings.
- On the left side, pick Reset settings.
- Select Restore settings to their default values.
- Confirm with Reset.
- This will disable extensions and reset startup pages but will not delete bookmarks, saved passwords, or browsing history.


Remove from Mozilla Firefox (FF)
Remove dangerous extensions:
- Open Mozilla Firefox browser and click on the Menu (three horizontal lines at the top-right of the window).
- Select Add-ons.
- In here, select the unwanted extension and click Remove.


Reset the homepage:
- Click three horizontal lines at the top right corner to open the menu.
- Choose Settings.
- Under Home, set your preferred homepage and new tab settings.
Clear cookies and site data:
- Click Menu and pick Settings.
- Go to Privacy & Security section.
- Scroll down to locate Cookies and Site Data.
- Click on Clear Data...
- Select Cookies and Site Data and Temporary cached files and pages, then click Clear.


Reset Mozilla Firefox
If clearing the browser as explained above did not help, reset Mozilla Firefox:
- Open Mozilla Firefox browser and click the Menu.
- Go to Help and then choose Troubleshooting Information.

- Under Give Firefox a tune up section, click on Refresh Firefox...
- Once the pop-up shows up, confirm the action by pressing on Refresh Firefox.



Remove from Google Chrome
Delete malicious extensions from Google Chrome:
- Open Google Chrome, click on the Menu (three vertical dots at the top-right corner) and select More tools > Extensions.
- In the newly opened window, you will see all the installed extensions. Uninstall all suspicious extensions related to the unwanted program by clicking Remove.


Clear cache and web data from Chrome:
- Click on Menu and pick Settings.
- Under Privacy and security, select Clear browsing data.
- Select Browsing history, Cookies and other site data, as well as Cached images and files.
- Click Clear data.


Change your homepage:
- Click menu and choose Settings.
- Look for a suspicious site in the On startup section.
- Click on Open a specific or set of pages and click on three dots to find the Remove option.
Reset Google Chrome:
If the previous methods did not help you, reset Google Chrome to eliminate all the unwanted components:
- Click on Menu and select Settings.
- In the Settings, scroll down and click Advanced.
- Scroll down and locate Reset and clean up section.
- Now click Restore settings to their original defaults.
- Confirm with Reset settings.


Delete from Safari
Remove dangerous extensions:
- Open Safari, click Safari in the menu at the top-left of the screen, and select Preferences.
- Go to the Extensions tab, look for any suspicious entries, and click Uninstall to remove them.


Clear history and website data:
- Click Safari in the menu and pick Clear History.
- Set Clear to all history and confirm with Clear History.


Reset Safari:
- Click Safari in the menu and select Preferences > Advanced.
- Enable Show Develop menu in menu bar.
- From the menu bar, click Develop and select Empty Caches.


Did this guide help?
Be the first to comment