

Can 9o0gle.com be used instead of Google?
9o0gle.com virus looks like one of the most popular search engines and, if you are not very attentive, you can easily be convinced that you are visiting Google. However, this search engine has nothing in common with this search giant. No matter how useful 9o0gle.com tries to look (the homepage of this website offers you an immediate access to different social media sites, email, e-shopping domains and online games), it shows you sponsored search results, interrupts you with ads and can even track your searches online. Besides, its sudden appearance on your browser signifies that your computer was hijacked by this browser hijacker and that this infiltration was initiated behind your back. If you don’t know what kind of viruses browser hijackers are, you should know that they are potentially unwanted programs that should have no place on your PC, because all they do once they get in, is drive you nuts with tons of sponsored ads and redirects. Keep in mind that these programs are resource drainers as well. Even though browser hijackers try to stay on the infected devices undetected for as long as possible, it will soon come to light after your browser suddenly starts working extremely slow and this website replaces your homepage and default search engine. If this has already happened, do not hesitate and remove 9o0gle.com from your computer immediately. Since this site is an illegal guest on your system, antivirus utilities, such as FortectIntego should be able to detect and eliminate it without any trouble.
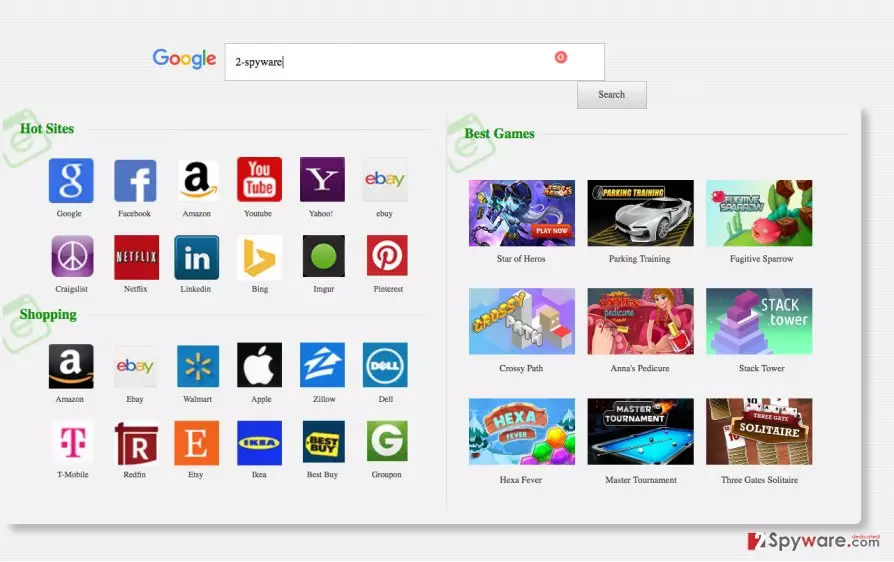
Probably the first thing we tell users who have been infected with this browser hijacker is to beware of the 9o0gle.com redirect issue. The speed-dial options and the search results this site presents are highly unreliable. There is no way of knowing whether you will not end up on some potentially dangerous domain after clicking on them. Even though the sites you try to reach through this suspicious engine are initially legitimate and safe, the virus may fill them with sponsored links and ads, in hopes that you click on them and earn the virus creators some advertising revenue. Differences between search results given by 9o0gle.com virus (on your left) and the real Google search (on your right) are obvious:

Last but not least, just like any other browser hijacker, this PUP does not go about without data tracking. You’d be surprised how much of your data can be accessed by this virus. Although it is not sensitive or personally identifiable, it is still the information you would rather keep to yourself than allow unknown third-parties to mess with. Do you need any more arguments why 9o0gle.com removal is necessary to keep your computer safe?
How can your device can catch this virus?
9o0gle.com is not on your computer yet? You can consider yourself lucky, or you can take measures so that it stays that way. Browser hijackers are not the viruses that need special techniques to get in. They are quite simple and usually travel in free software packages, looking for inattentive users, who download programs and install them on their computers in a rush. Unfortunately, such tendencies are predominant, and the malware creators are well-aware of that. This is primarily why browser hijackers are such common computer infections. To lessen the chance of catching a browser hijacker or an adware app, always double-check what you agree to install on your computer. Opt for the “Advanced” or “Custom” installation settings to disclose software that might be hidden in the software package.
How can I remove 9o0gle.com virus?
Users who have been infected with browser hijackers know how these programs are not difficult to eliminate, but they may as well start struggling on their way out. That is why before you set off to remove 9o0gle.com virus from your computer, you should be acquainted with the most effective techniques to do it. Professional antivirus tools are your best friends when you have to deal with clingy cyber infections. If your software and the virus database is updated, you simply need to run a full system scan and see how potentially unwanted programs, junk files, and viruses get kicked out of your PC. You can also take a little different approach and carry out the 9o0gle.com removal manually. We won’t leave you without some professional help here either – you will find expert-prepared virus removal tutorial at the end of the article.
Uninstall from Windows
Uninstall from Windows 10/8:
- Type Control Panel into the Windows search box and open the result.
- Under Programs, select Uninstall a program.


Uninstall from Windows 7/XP:
- Click on Windows Start > Control Panel (Windows XP users should click on Add/Remove Programs).
- In Control Panel, select Programs > Uninstall a program.


Remove the unwanted program:
- In the Programs and Features window, look for any recently installed suspicious entries, select them, and click Uninstall.
- If User Account Control appears, click Yes to confirm, then complete the removal.


Delete from macOS
Remove the unwanted application:
- From the menu bar, select Go > Applications.
- In the Applications folder, look for any suspicious entries, then drag them to Trash (or right-click and pick Move to Trash).


Delete leftover files and folders:
- Select Go > Go to Folder.
- Enter /Library/Application Support and remove any suspicious folders related to the unwanted program.
- Repeat the same check in the /Library/LaunchAgents and /Library/LaunchDaemons folders, deleting any suspicious entries.

- Finally, empty the Trash to permanently remove the leftovers.

Reset Internet Explorer
Remove dangerous add-ons:
- Open Internet Explorer, click on the Gear icon (IE menu) on the top-right corner of the browser
- Pick Manage Add-ons.
- You will see a Manage Add-ons window. Here, look for suspicious plugins. Click on these entries and select Disable.


Change your homepage if it was altered:
- Open IE and click on the Gear icon.
- Select Internet Options.
- In the General tab, delete the Home page address and replace it by your preferred one (for example, Google.com).
- Click Apply and then select OK.


Delete temporary files:
- Press on the Gear icon and select Internet Options.
- Under Browsing history, click Delete...
- Select relevant fields and press Delete.


Reset Internet Explorer:
- Click on Gear icon > Internet options and select Advanced tab.
- Select Reset.
- In the new window, check Delete personal settings and select Reset.


Remove from Microsoft Edge
Delete unwanted extensions from MS Edge:
- Select Menu (three horizontal dots at the top-right of the browser window) and pick Extensions.
- From the list, pick the extension and click on the Gear icon.
- Click Remove.


Clear cookies and other browser data:
- Click on the Menu (three horizontal dots at the top-right of the browser window) and select Settings > Privacy, search, and services..
- Under Clear browsing data, pick Choose what to clear.
- Select Cookies and other site data and Cached images and files. (apart from passwords, although you might want to include Media licenses as well, if applicable) and click on Clear.


Restore new tab and homepage settings:
- Click the menu icon and choose Settings.
- Then find On startup section.
- Click Remove next to any suspicious startup page.
Reset MS Edge if the above steps did not work:
- Press on Ctrl + Shift + Esc to open Task Manager.
- Click on More details arrow at the bottom of the window.
- Select Details tab.
- Now scroll down and locate every entry with Microsoft Edge name in it. Right-click on each of them and select End Task to stop MS Edge from running.


Instructions for Chromium-based Edge
Delete extensions from MS Edge (Chromium):
- Open Edge and click select Settings > Extensions.
- Delete unwanted extensions by clicking Remove.


Clear cache and site data:
- Click on Menu and go to Settings.
- Select Privacy, search and services.
- Under Clear browsing data, pick Choose what to clear.
- Under Time range, pick All time.
- Select Clear now.


Reset Chromium-based MS Edge:
- Click on Menu and select Settings.
- On the left side, pick Reset settings.
- Select Restore settings to their default values.
- Confirm with Reset.
- This will disable extensions and reset startup pages but will not delete bookmarks, saved passwords, or browsing history.


Remove from Mozilla Firefox (FF)
Remove dangerous extensions:
- Open Mozilla Firefox browser and click on the Menu (three horizontal lines at the top-right of the window).
- Select Add-ons.
- In here, select the unwanted extension and click Remove.


Reset the homepage:
- Click three horizontal lines at the top right corner to open the menu.
- Choose Settings.
- Under Home, set your preferred homepage and new tab settings.
Clear cookies and site data:
- Click Menu and pick Settings.
- Go to Privacy & Security section.
- Scroll down to locate Cookies and Site Data.
- Click on Clear Data...
- Select Cookies and Site Data and Temporary cached files and pages, then click Clear.


Reset Mozilla Firefox
If clearing the browser as explained above did not help, reset Mozilla Firefox:
- Open Mozilla Firefox browser and click the Menu.
- Go to Help and then choose Troubleshooting Information.

- Under Give Firefox a tune up section, click on Refresh Firefox...
- Once the pop-up shows up, confirm the action by pressing on Refresh Firefox.



Remove from Google Chrome
Delete malicious extensions from Google Chrome:
- Open Google Chrome, click on the Menu (three vertical dots at the top-right corner) and select More tools > Extensions.
- In the newly opened window, you will see all the installed extensions. Uninstall all suspicious extensions related to the unwanted program by clicking Remove.


Clear cache and web data from Chrome:
- Click on Menu and pick Settings.
- Under Privacy and security, select Clear browsing data.
- Select Browsing history, Cookies and other site data, as well as Cached images and files.
- Click Clear data.


Change your homepage:
- Click menu and choose Settings.
- Look for a suspicious site in the On startup section.
- Click on Open a specific or set of pages and click on three dots to find the Remove option.
Reset Google Chrome:
If the previous methods did not help you, reset Google Chrome to eliminate all the unwanted components:
- Click on Menu and select Settings.
- In the Settings, scroll down and click Advanced.
- Scroll down and locate Reset and clean up section.
- Now click Restore settings to their original defaults.
- Confirm with Reset settings.


Delete from Safari
Remove dangerous extensions:
- Open Safari, click Safari in the menu at the top-left of the screen, and select Preferences.
- Go to the Extensions tab, look for any suspicious entries, and click Uninstall to remove them.


Clear history and website data:
- Click Safari in the menu and pick Clear History.
- Set Clear to all history and confirm with Clear History.


Reset Safari:
- Click Safari in the menu and select Preferences > Advanced.
- Enable Show Develop menu in menu bar.
- From the menu bar, click Develop and select Empty Caches.


Did this guide help?
2 comments
Britanny
This program is a waste of your time and your computers space.. Id recommend removing it
Engange34
Yes! I did it! no more annoying redirects ! Thanks for the removal instructions!