

What secrets does BackupGenie hide from you?
Though BackupGenie virus is not an actual cyber threat you should worry about, the program creators have been receiving a lot of negative criticism [1] online for supposedly running a deceptive business. Some security blogs deem this program as a nagware [2], because it actively and, sometimes, intrusively pushes its customers into purchasing its weekly, monthly or yearly subscriptions. Nevertheless, the creators promise that the paid service will ensure more advanced backup abilities and increase program’s operation speed. Some of BackupGenie reviews [3] on the web confirm such claims, but there are also other users, who question the program and suggest there might be something off about it. Led by such controversial opinions, 2-spyware team has decided to conduct an analysis and test this program out themselves. Before we get into the analysis, we should emphasize that if you ever feel that the program you have installed works against you, you should scan your device with FortectIntego or similar sophisticated virus detection tool. Even if the program is not malicious and the anti-malware does not detect it, but you still feel dissatisfied with it, you have all the rights to eliminate it. Same goes in case of BackupGenie removal.
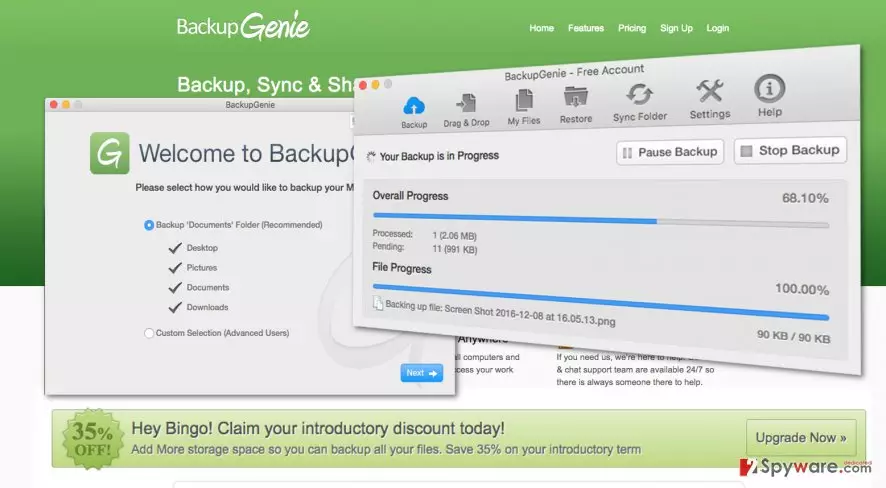
So, what we have found during the supposed “BackupGenie malware” investigation. The free version of the program, as well as its premium version, can be downloaded from the official website BackupGenie.com or its partners’ sites. Nevertheless, this program is also distributed with the help of an online marketing strategy called bundling [4] which means that the user who claim it to have “hijacked” their computers against their will have probably installed it together with other freeware or shareware applications. When it comes to program’s setup on the computer, we should note that before the program can be put to use, you have to sign up on BackupGenie website and bind your device with your online account. The software developers ensure that the program is supported by a wide range of operating systems and devices, including Windows, iOS, OS X, Android, Nokia and even Kindle. Once the program is installed, it allows the user to choose between the “Advanced” or “Custom” backup regimes: allowing the backup of the whole system in the first, and saving copies of manually selected files in the latter. The backup process itself takes some time, but after it is done, you can review the files on BackupGenie cloud online. The program is fully customizable, allows scheduling system backup and a variety of other options. What concerns us the most is the site’s Terms of Use and Privacy settings. After closely investigating these two documents under the Content Review Policy and Procedure section, we have found claims that the BackupGenie staff can review and delete your stored data without previously informing the user about such actions:
Prohibited content
BackupGenie strictly forbids the backing up, storing, and sharing of any prohibited content. […] BackupGenie enforces content recognition and filtering and a manual review of files backed up and stored. [5]
Of course, the cause of such actions is noble, but who can guarantee that your other documents will not be manually reviewed as well? It is a major setback for the privacy-oriented users, so if you are one of those people — we suggest you look for some other backup solution instead.
There are some other features of this program that we have found suspicious, such as user exploitation for the product’s advertising, etc., but as long as this application is not detected by antivirus utilities, we can also regard as a potentially unwanted program, encourage people to be careful using it and remove BackupGenie if needed.
How come I see this program on my PC?
As we have already pointed out, apart from being available to download on its official website, BackupGenie is distributed with the help of shareware and freeware bundles, so it may have entered your PC after you inattentively installed some new video recorder, photo editor, or PDF converter on your computer. When rushing through the software installation, it is difficult to spot additional components that might be added by the bundle creators. Thus, programs like BackupGenie install inadvertently. “Custom” or “Advanced” installation settings, on the other hand, allow going through the installation step-by-step, so we recommend always opting for them when you have that option.
What we suggest for BackupGenie removal?
Luckily, if you want to get rid of this program, you don’t have to remove BackupGenie virus, but simply uninstall a regular application from your PC. You should do that following the typical application elimination procedure which steps depend on the type of your device. Just to be sure your computer is completely safe, we suggest scanning your system with anti-malware after the BackupGenie removal. To wrap this up, we encourage you to be careful and alway do a research before you trust your personal information to some app or program.
Uninstall from Windows
Uninstall from Windows 10/8:
- Type Control Panel into the Windows search box and open the result.
- Under Programs, select Uninstall a program.


Uninstall from Windows 7/XP:
- Click on Windows Start > Control Panel (Windows XP users should click on Add/Remove Programs).
- In Control Panel, select Programs > Uninstall a program.


Remove the unwanted program:
- In the Programs and Features window, look for any recently installed suspicious entries, select them, and click Uninstall.
- If User Account Control appears, click Yes to confirm, then complete the removal.


Delete from macOS
Remove the unwanted application:
- From the menu bar, select Go > Applications.
- In the Applications folder, look for any suspicious entries, then drag them to Trash (or right-click and pick Move to Trash).


Delete leftover files and folders:
- Select Go > Go to Folder.
- Enter /Library/Application Support and remove any suspicious folders related to the unwanted program.
- Repeat the same check in the /Library/LaunchAgents and /Library/LaunchDaemons folders, deleting any suspicious entries.

- Finally, empty the Trash to permanently remove the leftovers.

Reset Internet Explorer
Remove dangerous add-ons:
- Open Internet Explorer, click on the Gear icon (IE menu) on the top-right corner of the browser
- Pick Manage Add-ons.
- You will see a Manage Add-ons window. Here, look for suspicious plugins. Click on these entries and select Disable.


Change your homepage if it was altered:
- Open IE and click on the Gear icon.
- Select Internet Options.
- In the General tab, delete the Home page address and replace it by your preferred one (for example, Google.com).
- Click Apply and then select OK.


Delete temporary files:
- Press on the Gear icon and select Internet Options.
- Under Browsing history, click Delete...
- Select relevant fields and press Delete.


Reset Internet Explorer:
- Click on Gear icon > Internet options and select Advanced tab.
- Select Reset.
- In the new window, check Delete personal settings and select Reset.


Remove from Microsoft Edge
Delete unwanted extensions from MS Edge:
- Select Menu (three horizontal dots at the top-right of the browser window) and pick Extensions.
- From the list, pick the extension and click on the Gear icon.
- Click Remove.


Clear cookies and other browser data:
- Click on the Menu (three horizontal dots at the top-right of the browser window) and select Settings > Privacy, search, and services..
- Under Clear browsing data, pick Choose what to clear.
- Select Cookies and other site data and Cached images and files. (apart from passwords, although you might want to include Media licenses as well, if applicable) and click on Clear.


Restore new tab and homepage settings:
- Click the menu icon and choose Settings.
- Then find On startup section.
- Click Remove next to any suspicious startup page.
Reset MS Edge if the above steps did not work:
- Press on Ctrl + Shift + Esc to open Task Manager.
- Click on More details arrow at the bottom of the window.
- Select Details tab.
- Now scroll down and locate every entry with Microsoft Edge name in it. Right-click on each of them and select End Task to stop MS Edge from running.


Instructions for Chromium-based Edge
Delete extensions from MS Edge (Chromium):
- Open Edge and click select Settings > Extensions.
- Delete unwanted extensions by clicking Remove.


Clear cache and site data:
- Click on Menu and go to Settings.
- Select Privacy, search and services.
- Under Clear browsing data, pick Choose what to clear.
- Under Time range, pick All time.
- Select Clear now.


Reset Chromium-based MS Edge:
- Click on Menu and select Settings.
- On the left side, pick Reset settings.
- Select Restore settings to their default values.
- Confirm with Reset.
- This will disable extensions and reset startup pages but will not delete bookmarks, saved passwords, or browsing history.


Remove from Mozilla Firefox (FF)
Remove dangerous extensions:
- Open Mozilla Firefox browser and click on the Menu (three horizontal lines at the top-right of the window).
- Select Add-ons.
- In here, select the unwanted extension and click Remove.


Reset the homepage:
- Click three horizontal lines at the top right corner to open the menu.
- Choose Settings.
- Under Home, set your preferred homepage and new tab settings.
Clear cookies and site data:
- Click Menu and pick Settings.
- Go to Privacy & Security section.
- Scroll down to locate Cookies and Site Data.
- Click on Clear Data...
- Select Cookies and Site Data and Temporary cached files and pages, then click Clear.


Reset Mozilla Firefox
If clearing the browser as explained above did not help, reset Mozilla Firefox:
- Open Mozilla Firefox browser and click the Menu.
- Go to Help and then choose Troubleshooting Information.

- Under Give Firefox a tune up section, click on Refresh Firefox...
- Once the pop-up shows up, confirm the action by pressing on Refresh Firefox.



Remove from Google Chrome
Delete malicious extensions from Google Chrome:
- Open Google Chrome, click on the Menu (three vertical dots at the top-right corner) and select More tools > Extensions.
- In the newly opened window, you will see all the installed extensions. Uninstall all suspicious extensions related to the unwanted program by clicking Remove.


Clear cache and web data from Chrome:
- Click on Menu and pick Settings.
- Under Privacy and security, select Clear browsing data.
- Select Browsing history, Cookies and other site data, as well as Cached images and files.
- Click Clear data.


Change your homepage:
- Click menu and choose Settings.
- Look for a suspicious site in the On startup section.
- Click on Open a specific or set of pages and click on three dots to find the Remove option.
Reset Google Chrome:
If the previous methods did not help you, reset Google Chrome to eliminate all the unwanted components:
- Click on Menu and select Settings.
- In the Settings, scroll down and click Advanced.
- Scroll down and locate Reset and clean up section.
- Now click Restore settings to their original defaults.
- Confirm with Reset settings.


Delete from Safari
Remove dangerous extensions:
- Open Safari, click Safari in the menu at the top-left of the screen, and select Preferences.
- Go to the Extensions tab, look for any suspicious entries, and click Uninstall to remove them.


Clear history and website data:
- Click Safari in the menu and pick Clear History.
- Set Clear to all history and confirm with Clear History.


Reset Safari:
- Click Safari in the menu and select Preferences > Advanced.
- Enable Show Develop menu in menu bar.
- From the menu bar, click Develop and select Empty Caches.


Did this guide help?
2 comments
anon
Lame and fake
Lobster4
I found it quite decent.. if not for the annoying ads of course.