
Best Price Ninja adware ads: what it is and how to remove it
Best Price Ninja is introduced by its developers as a useful tool designed to enhance the user's shopping experience. It claims to find the best deals similar to the ones you are looking at online.
Facts checked October 7, 2026. Removal steps tested on Windows 11 (26H2) and checked against Microsoft's and the browser makers' current documentation. Sections marked as our earlier report are the original text: they describe the threat as it was then and have not been reviewed since. The 2026 status, the removal steps and the questions are current.
Automatic
Get a free scan and check if your PC is infected.
Fortect finds malware, unwanted programs and the Windows damage they leave behind, and repairs it in one pass.
An automatic scan checks installed programs, startup items and browser extensions for anything that came with Best Price Ninja adware.
Do it yourself · free Remove Best Price Ninja adware ads yourself 4 steps, about 12 minutes, no software needed.
Start the steps
Best Price Ninja adware ads: summary
| Detection names | No Microsoft detection name is known |
|---|---|
| Distribution | Not recorded in the old report |
| Damage | Not recorded in the old report |
| Name | Best Price Ninja adware |
| Type | Adware extension |
| Symptoms | An unknown program in Installed apps |
| Removal | Scan the PC with security software to find and remove the malware and anything installed with it. Fortect scans Windows for malware and repairs the system files and settings it damaged. Remove it nowTo use the full-featured product, you have to purchase a license for Fortect. The scan is free. |
Show 4 more facts
| Evidence | One write-up by a security site; details still limited |
|---|---|
| Program | Best Price Ninja adware |
| First seen | 8 January 2021 |
| Facts checked | 7 October 2026 |
Is Best Price Ninja adware ads dangerous?
From our report of Jan 2021 · not reviewed since
Best Price Ninja is an adware that shows annoying ads for its personal gain
Best Price Ninja is introduced by its developers as a useful tool designed to enhance the user's shopping experience.
It claims to find the best deals similar to the ones you are looking at online. While this seems to be a fine and handy extension for your browser, it actually does not contain the functionality it promises.
On the contrary, Best Price Ninja might be more harmful to your computer than you can imagine. For this reason, it is characterized as an adware and potentially unwanted program (PUP) and you should not have it on your computer.
There are several facts you should know about this application. First of all, it is not surprising if you do not recall installing this program on your computer. It is very likely that it has been done without your permission. Probably this reason is good enough for you to want to delete Best Price Ninja.
Second of all, you might notice that the number of ads on your browser has increased. All of the ads by Best Price Ninja are provided by its sponsors and serve the main aim of the application to generate revenue for its developers.
It is very likely that if you have this extension, you will click on one of the sponsored ads at one time or another because they are displayed in popping-up tabs and windows. While all of the ads by Best Price Ninja, coupons, banners, and price comparison ads might be simply annoying, keep in mind that they can redirect you to bogus websites that might be harmful to your computer.
Last but not least, BestPriceNinja adware collects information about your browsing activities like the websites you visit, IP addresses, the details you enter, your search queries, etc. While the developers deny collecting personally identifiable information, this information can easily contain it.
For this reason, we would highly recommend you to consider the safety of your data and remove BestPriceNinja from your computer as soon as possible as well as to scan it with some reputable anti-spyware like or .

From our report of Jan 2021 · not reviewed since
If you want to avoid adware, try to be more careful while installing free programs
A potentially unwanted program has most likely been installed on your computer with some freeware.
Stealth installation of third party software is called 'bundling', a deceptive technique used to distribute all sorts of potentially unwanted programs.
Therefore, you should always check Custom and Advanced options where these applications are usually hidden. Look at each of the installation steps carefully and deselect all of the unknown programs that you do not want to end up on your computer.
Second of all, avoid downloading programs by using third party software like installers and download managers which are notorious for distributing bundled programs. If possible, download software from official websites.
From our report of Jan 2021 · not reviewed since
More from our earlier report on Best Price Ninja adware
- It employs the pay-per-install principle and the developers of Best Price Ninja receive income every time someone clicks on the link.
How to remove Best Price Ninja adware ads
How to remove the Best Price Ninja adware extension
Do the browser steps in every browser and profile on the PC, then check Windows for the program that installed the extension.
Step 1: Remove extensions you did not add
Best Price Ninja adware often works through an extension, so go through the extension list of each browser:
chrome://extensionsedge://extensions- Extensions and themes in Firefox
Switch suspicious extensions off one at a time and reload the page where the problem shows, then remove the one that stops it, and any other you did not add.
Remember the other browsers and profiles on the PC. If Remove is missing or greyed out, a policy forces the extension, which the policy step deals with. Windows 11 and Windows 10 show the same pages.
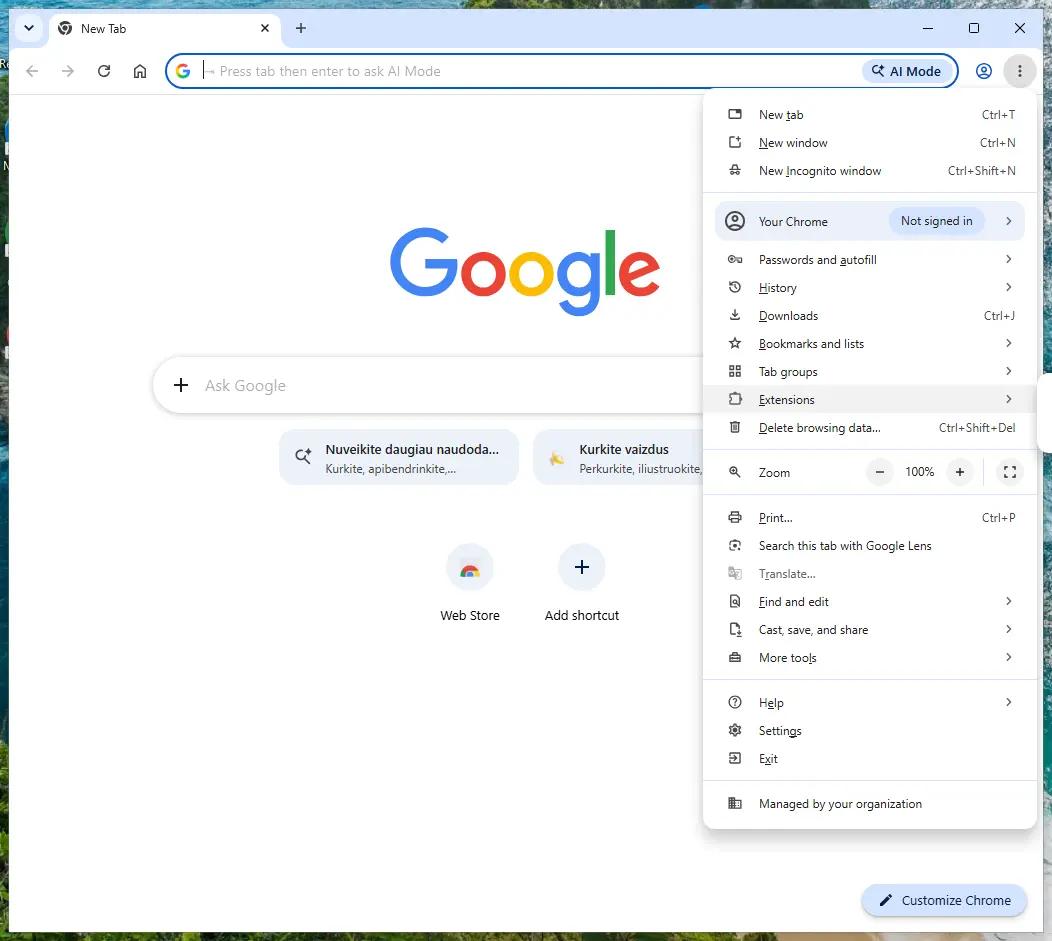
Chrome on Windows 11: More > Extensions > Manage extensions. Full procedure with screenshots: Remove a browser extension
Step 2: Uninstall Best Price Ninja adware
Open Settings > Apps > Installed apps in Windows 11, or Settings > Apps > Apps & features in Windows 10.
Sort the list by install date and find Best Price Ninja adware, then choose Uninstall from the three-dot menu next to it (in Windows 10, click the entry and then Uninstall).
Remove anything else installed on the same day that you do not recognise, because such programs usually arrive together in one installer. If the uninstaller opens a browser page with an offer or a survey, close it: the program is removed either way.
Full procedure with screenshots: Uninstall a program or app in Windows On uGetFix
Step 3: Reset the browser
Finish the browser part with a reset, which puts the search engine, start page, new tab page and site permissions back to their defaults and switches extensions off. Chrome: Settings > Reset settings > Restore settings to their original defaults.
Edge: Settings > Reset settings. Firefox: Help > More troubleshooting information > Refresh Firefox, which also removes its extensions. Your bookmarks and saved passwords are kept, and the menus are the same on Windows 11 and Windows 10.
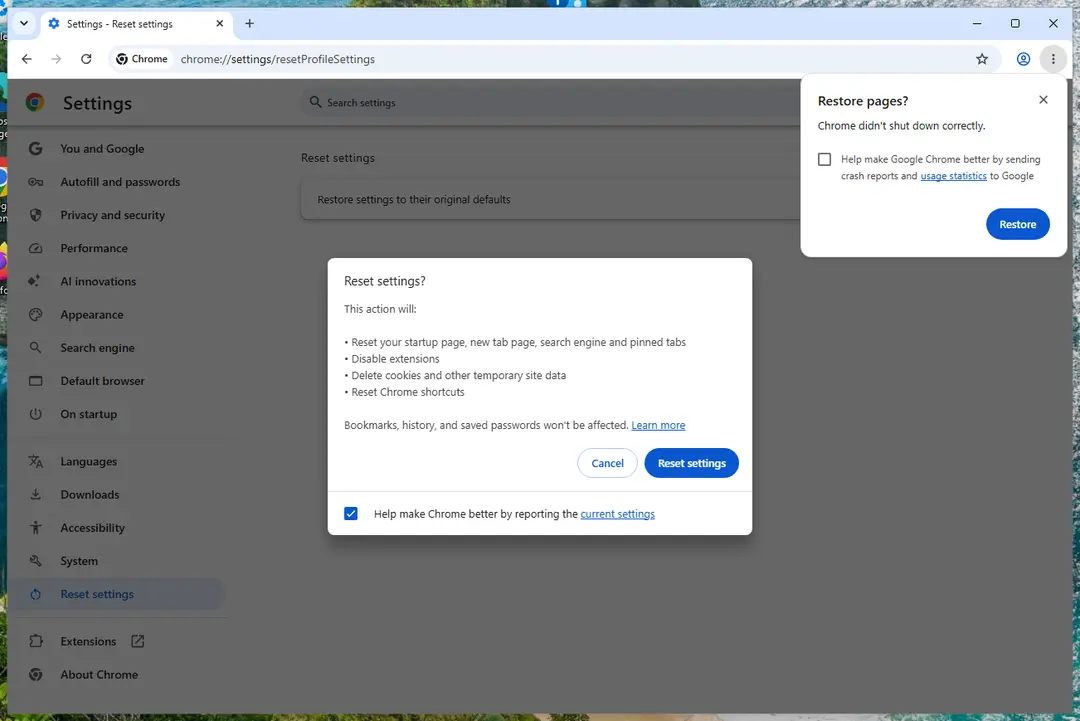
Chrome on Windows 11: Settings > Reset settings. Full procedure with screenshots: Reset a browser and fix a hijacked search engine
Step 4: Scan the PC, then run the offline scan
Open Windows Security > Virus & threat protection > Scan options, run a Full scan and remove everything it finds. Then select Microsoft Defender Antivirus (offline scan) and click Scan now: the PC restarts and scans before Windows loads, which finds files that hide while Windows runs.
Save your work first, because the offline scan takes about 15 minutes. Both scans are built into Windows 11 and Windows 10, and a second scanner from another vendor is a useful extra opinion.
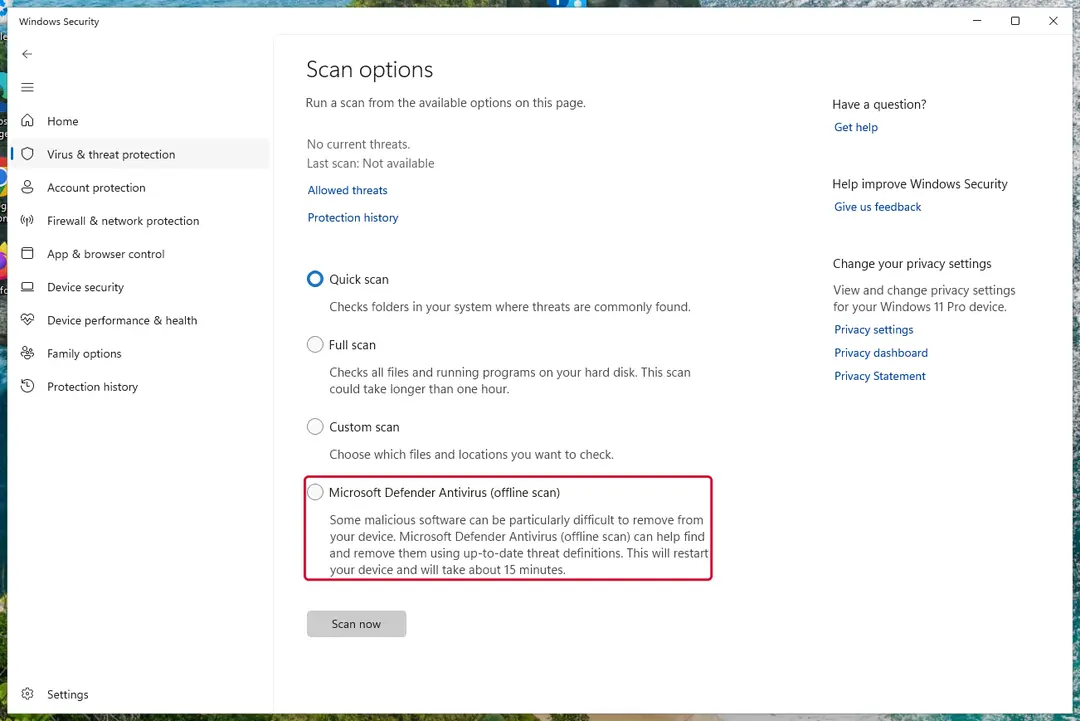
Windows 11: Windows Security > Virus & threat protection > Scan options. Full procedure with screenshots: Run a Microsoft Defender Offline scan
Instructions for each browser and system
The detailed steps for every browser and system this guide covers. Open the one you use.
Uninstall from Windows
Uninstall from Windows 10/8:
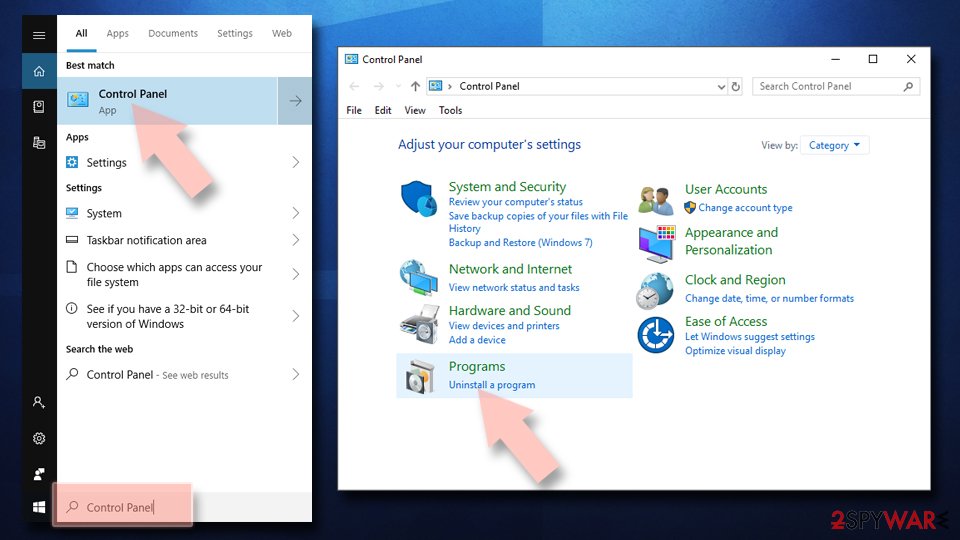
- Type Control Panel into the Windows search box and open the result.
- Under Programs, select Uninstall a program.
Uninstall from Windows 7/XP:
- Click on Windows Start > Control Panel (Windows XP users should click on Add/Remove Programs).
- In Control Panel, select Programs > Uninstall a program.
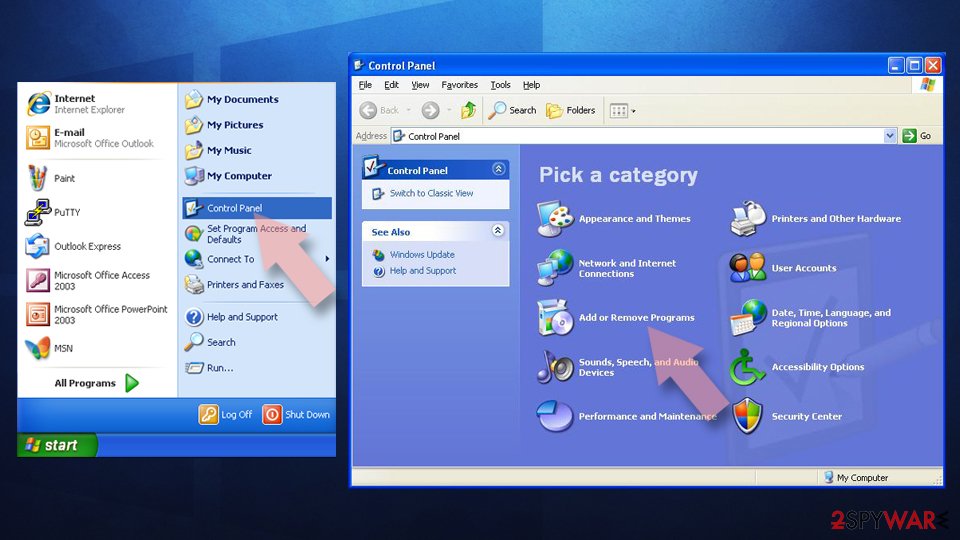
Remove the unwanted program:
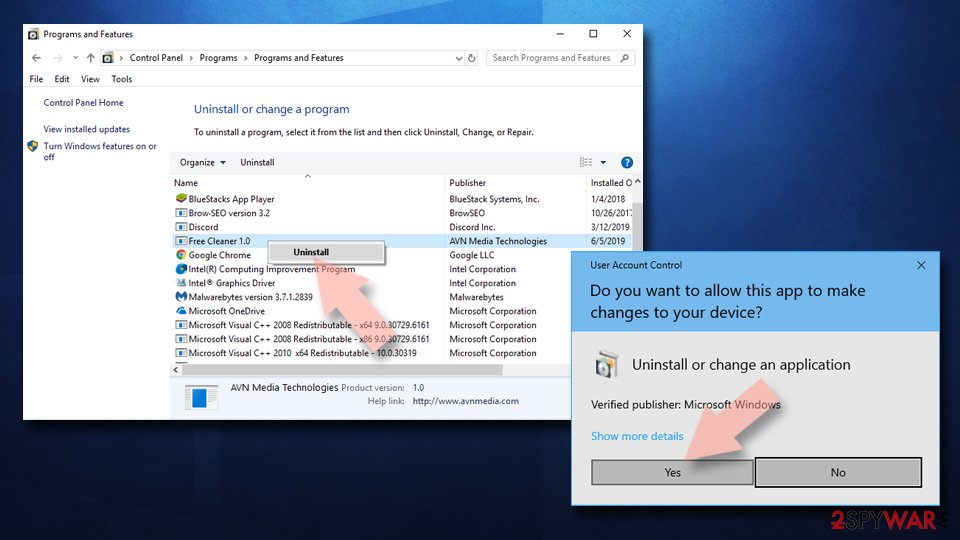
- In the Programs and Features window, look for any recently installed suspicious entries, select them, and click Uninstall.
- If User Account Control appears, click Yes to confirm, then complete the removal.
Remove from Google Chrome
Delete malicious extensions from Google Chrome:
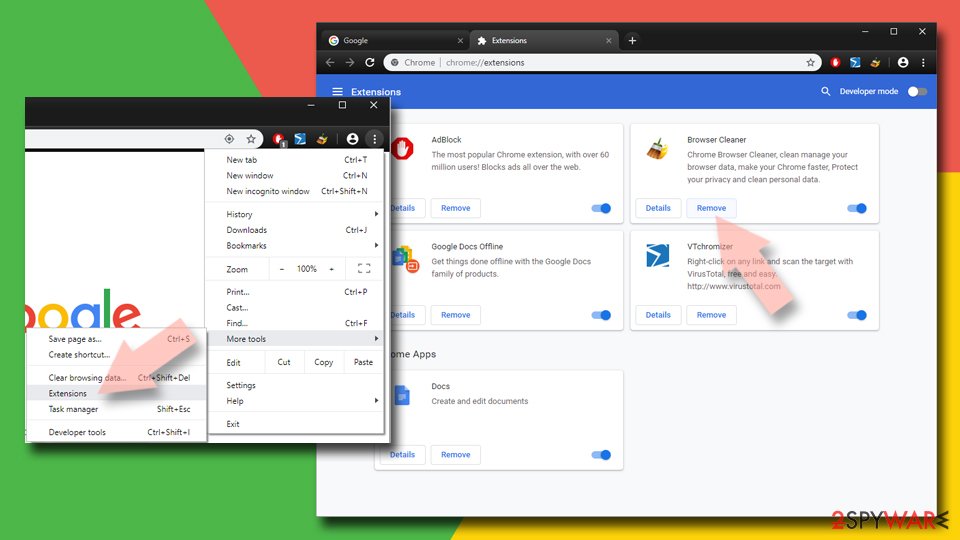
- Open Google Chrome, click on the Menu (three vertical dots at the top-right corner) and select More tools > Extensions.
- In the newly opened window, you will see all the installed extensions. Uninstall all suspicious extensions related to the unwanted program by clicking Remove.
Clear cache and web data from Chrome:
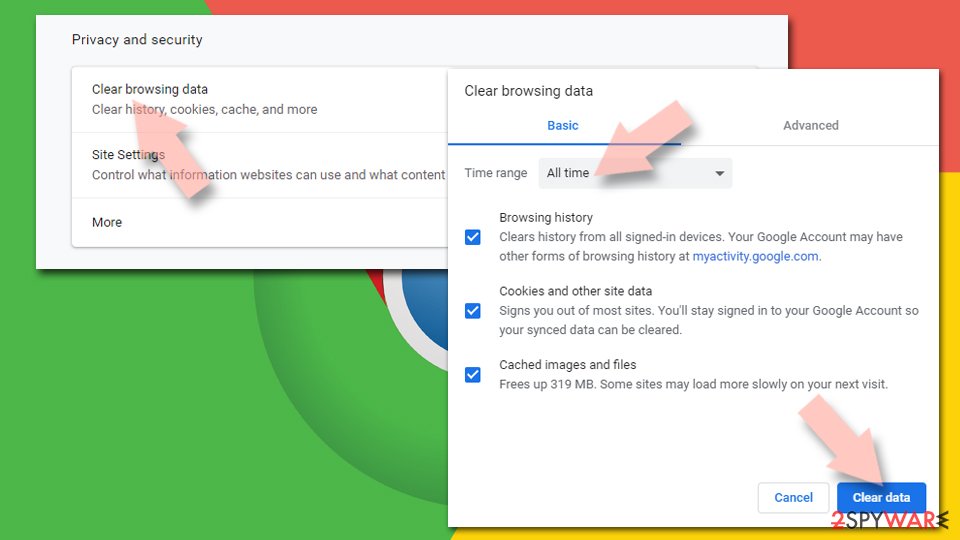
- Click on Menu and pick Settings.
- Under Privacy and security, select Clear browsing data.
- Select Browsing history, Cookies and other site data, as well as Cached images and files.
- Click Clear data.
Change your homepage:
- Click menu and choose Settings.
- Look for a suspicious site in the On startup section.
- Click on Open a specific or set of pages and click on three dots to find the Remove option.
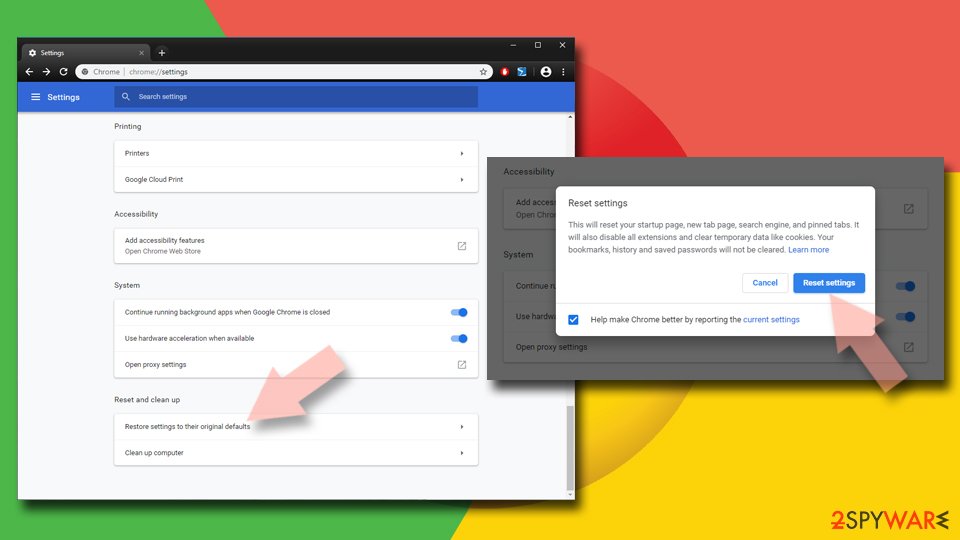
Reset Google Chrome:
If the previous methods did not help you, reset Google Chrome to eliminate all the unwanted components:
- Click on Menu and select Settings.
- In the Settings, scroll down and click Advanced.
- Scroll down and locate Reset and clean up section.
- Now click Restore settings to their original defaults.
- Confirm with Reset settings.
Remove from Microsoft Edge
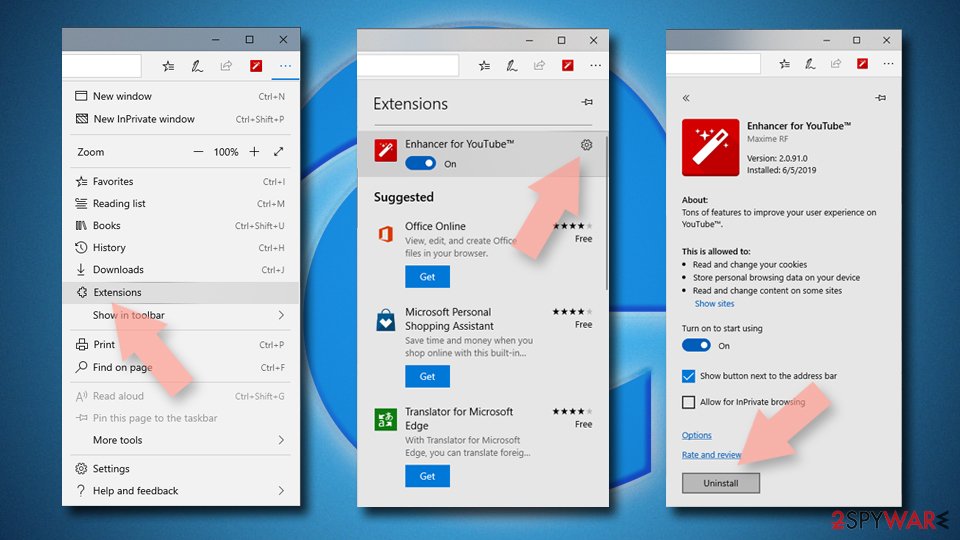
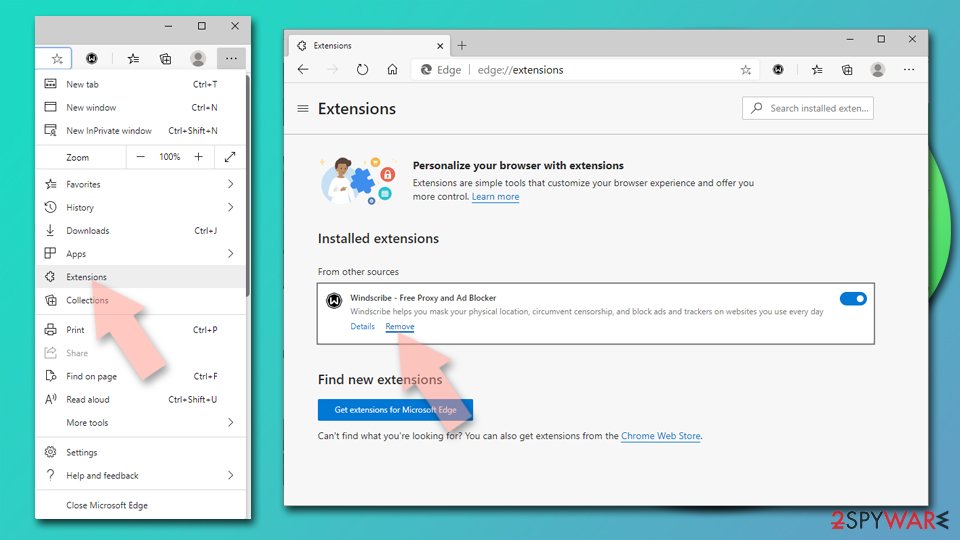
Delete unwanted extensions from MS Edge:
- Select Menu (three horizontal dots at the top-right of the browser window) and pick Extensions.
- From the list, pick the extension and click on the Gear icon.
- Click Remove.
Clear cookies and other browser data:
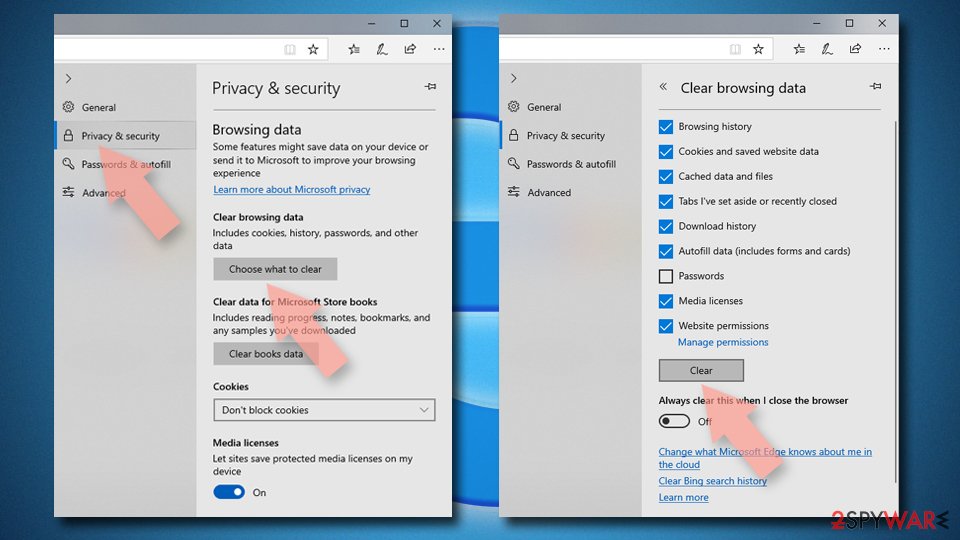
- Click on the Menu (three horizontal dots at the top-right of the browser window) and select Settings > Privacy, search, and services..
- Under Clear browsing data, pick Choose what to clear.
- Select Cookies and other site data and Cached images and files. (apart from passwords, although you might want to include Media licenses as well, if applicable) and click on Clear.
Restore new tab and homepage settings:
- Click the menu icon and choose Settings.
- Then find On startup section.
- Click Remove next to any suspicious startup page.
Reset MS Edge if the above steps did not work:
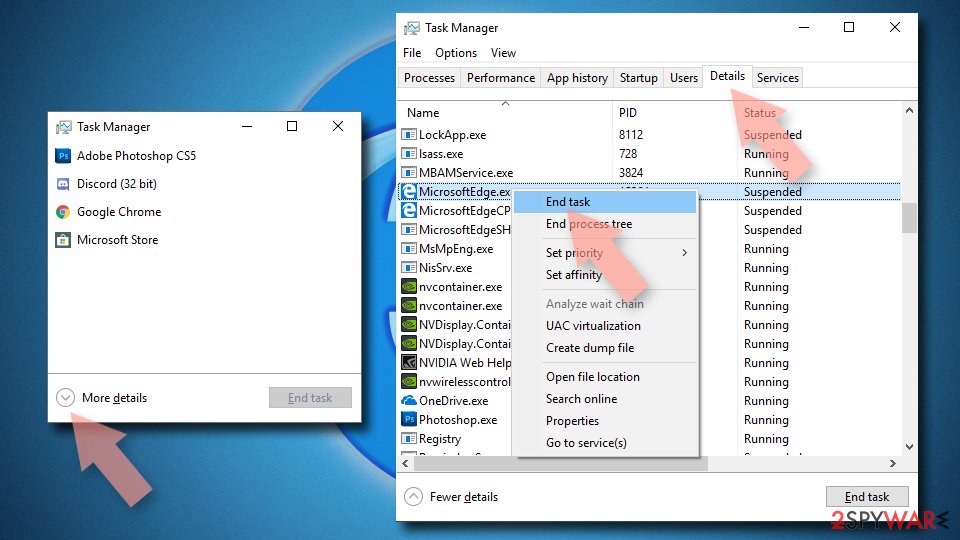
- Press on Ctrl + Shift + Esc to open Task Manager.
- Click on More details arrow at the bottom of the window.
- Select Details tab.
- Now scroll down and locate every entry with Microsoft Edge name in it. Right-click on each of them and select End Task to stop MS Edge from running.
Delete extensions from MS Edge (Chromium):
- Open Edge and click select Settings > Extensions.
- Delete unwanted extensions by clicking Remove.
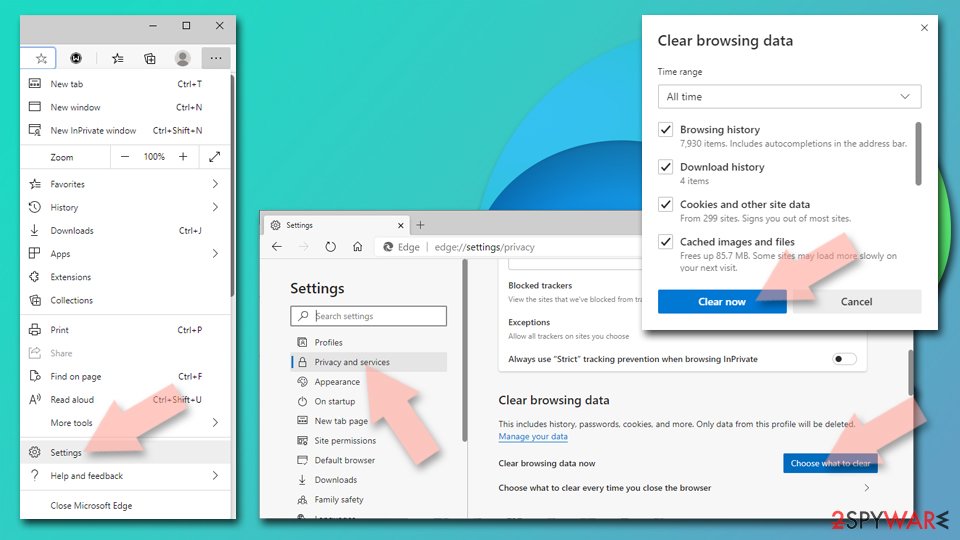
Clear cache and site data:
- Click on Menu and go to Settings.
- Select Privacy, search and services.
- Under Clear browsing data, pick Choose what to clear.
- Under Time range, pick All time.
- Select Clear now.
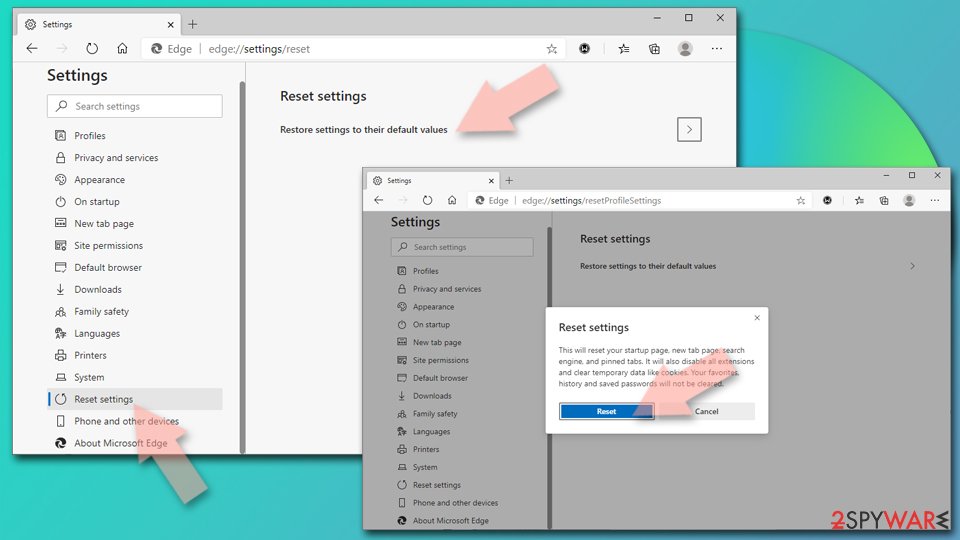
Reset Chromium-based MS Edge:
- Click on Menu and select Settings.
- On the left side, pick Reset settings.
- Select Restore settings to their default values.
- Confirm with Reset.
- This will disable extensions and reset startup pages but will not delete bookmarks, saved passwords, or browsing history.
Remove from Mozilla Firefox (FF)
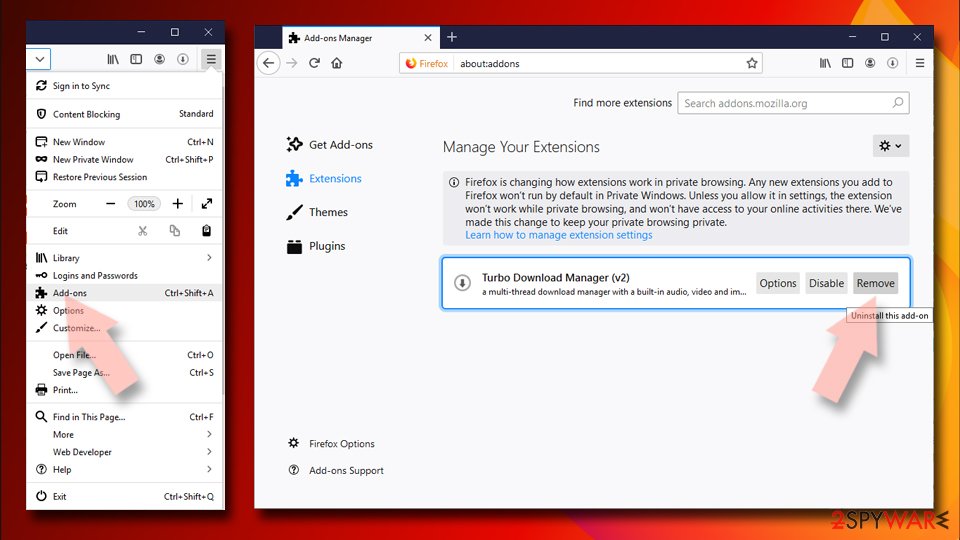
Remove dangerous extensions:
- Open Mozilla Firefox browser and click on the Menu (three horizontal lines at the top-right of the window).
- Select Add-ons.
- In here, select the unwanted extension and click Remove.
Reset the homepage:
- Click three horizontal lines at the top right corner to open the menu.
- Choose Settings.
- Under Home, set your preferred homepage and new tab settings.
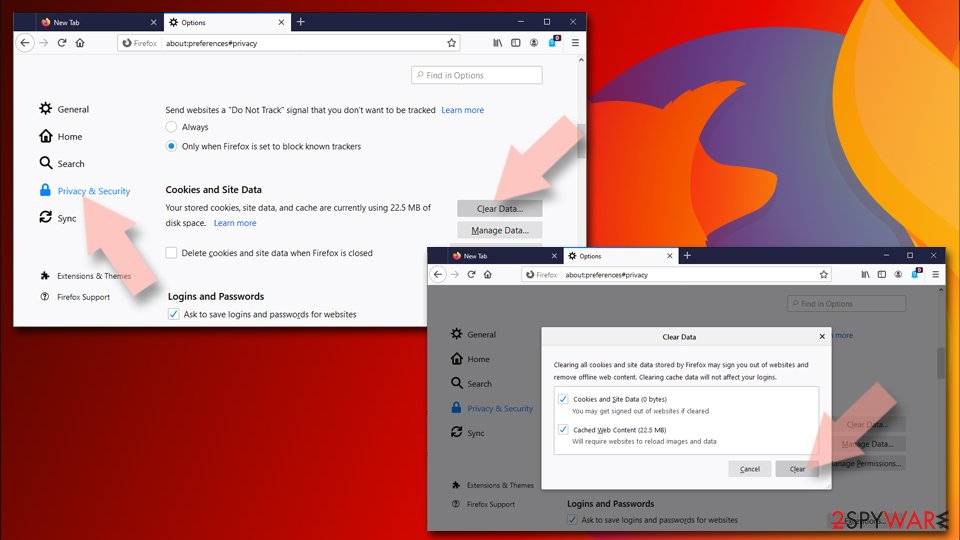
Clear cookies and site data:
- Click Menu and pick Settings.
- Go to Privacy & Security section.
- Scroll down to locate Cookies and Site Data.
- Click on Clear Data...
- Select Cookies and Site Data and Temporary cached files and pages, then click Clear.
Reset Mozilla Firefox
If clearing the browser as explained above did not help, reset Mozilla Firefox:
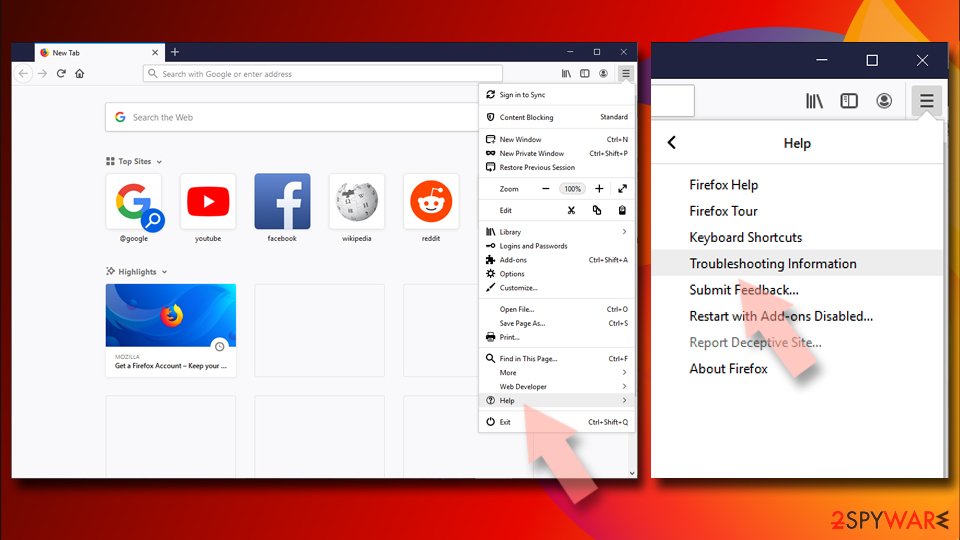
- Open Mozilla Firefox browser and click the Menu.
- Go to Help and then choose Troubleshooting Information.
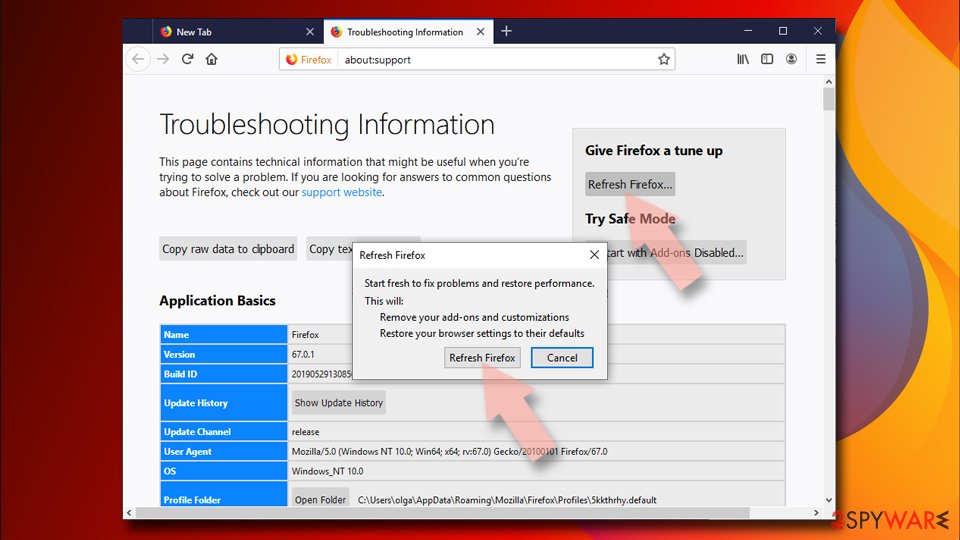
- Under Give Firefox a tune up section, click on Refresh Firefox...
- Once the pop-up shows up, confirm the action by pressing on Refresh Firefox.
Delete from Safari
Remove dangerous extensions:
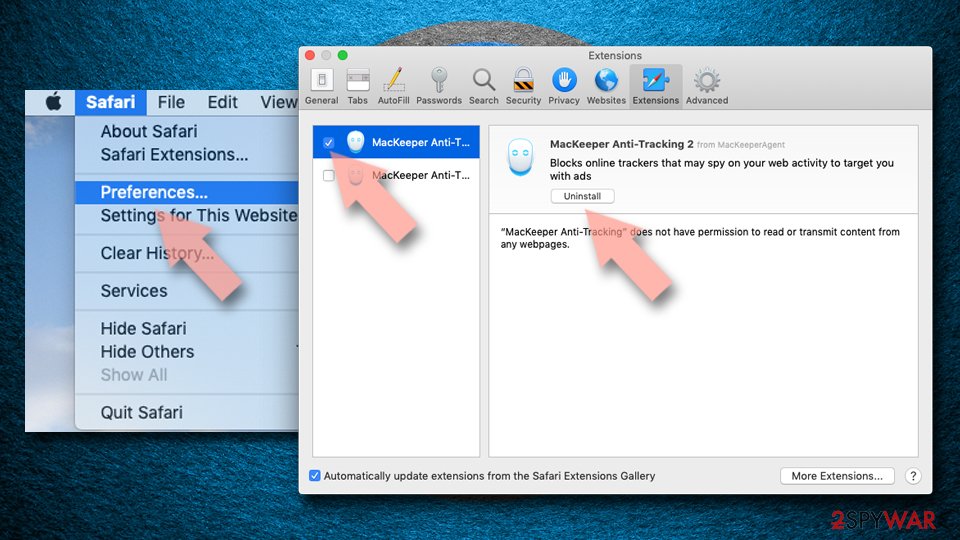
- Open Safari, click Safari in the menu at the top-left of the screen, and select Preferences.
- Go to the Extensions tab, look for any suspicious entries, and click Uninstall to remove them.
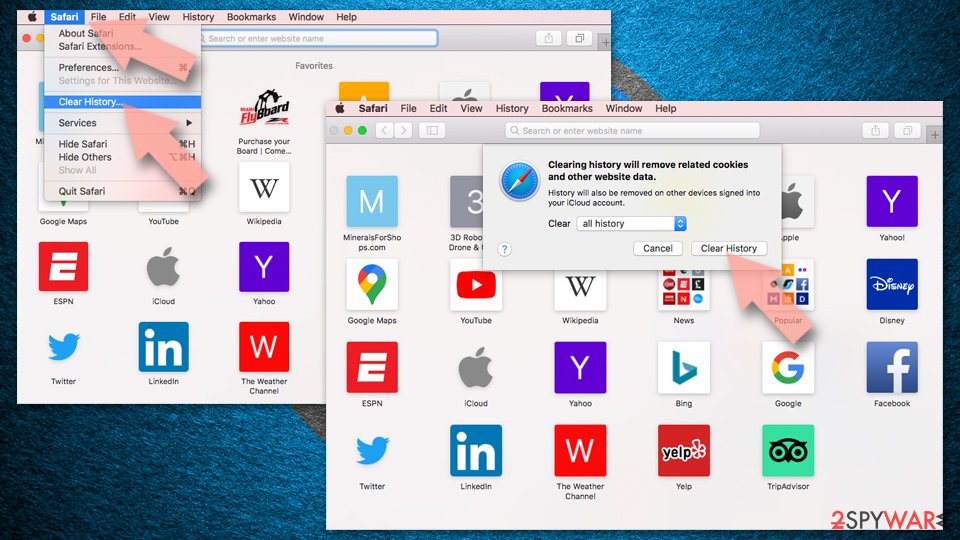
Clear history and website data:
- Click Safari in the menu and pick Clear History.
- Set Clear to all history and confirm with Clear History.
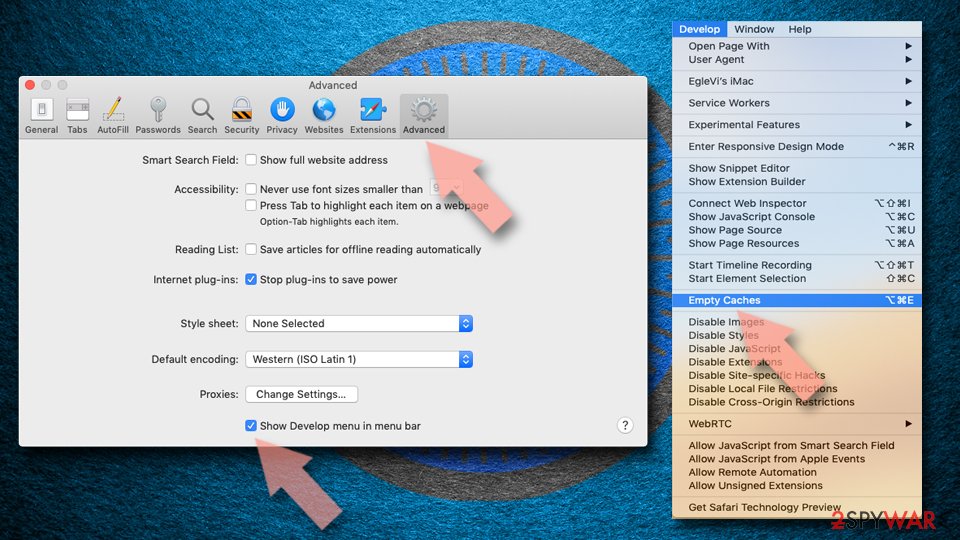
Reset Safari:
- Click Safari in the menu and select Preferences > Advanced.
- Enable Show Develop menu in menu bar.
- From the menu bar, click Develop and select Empty Caches.
Delete from macOS
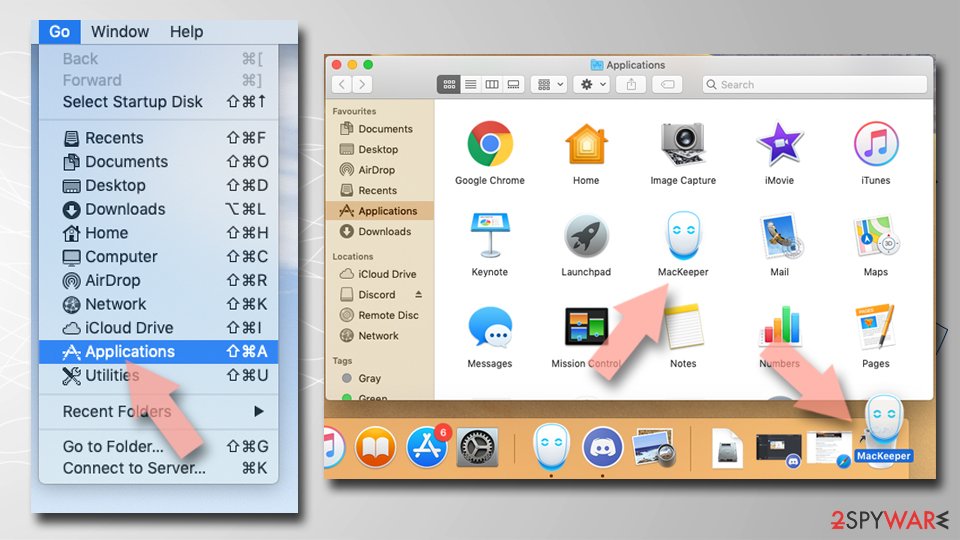
Remove the unwanted application:
- From the menu bar, select Go > Applications.
- In the Applications folder, look for any suspicious entries, then drag them to Trash (or right-click and pick Move to Trash).
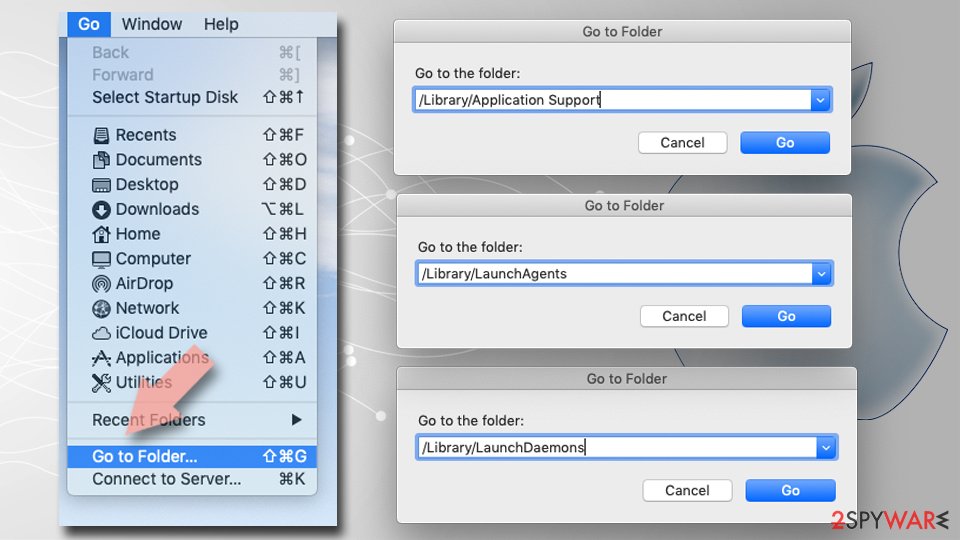
Delete leftover files and folders:
- Select Go > Go to Folder.
- Enter /Library/Application Support and remove any suspicious folders related to the unwanted program.
- Repeat the same check in the /Library/LaunchAgents and /Library/LaunchDaemons folders, deleting any suspicious entries.
- Finally, empty the Trash to permanently remove the leftovers.
Reset Internet Explorer
Remove dangerous add-ons:
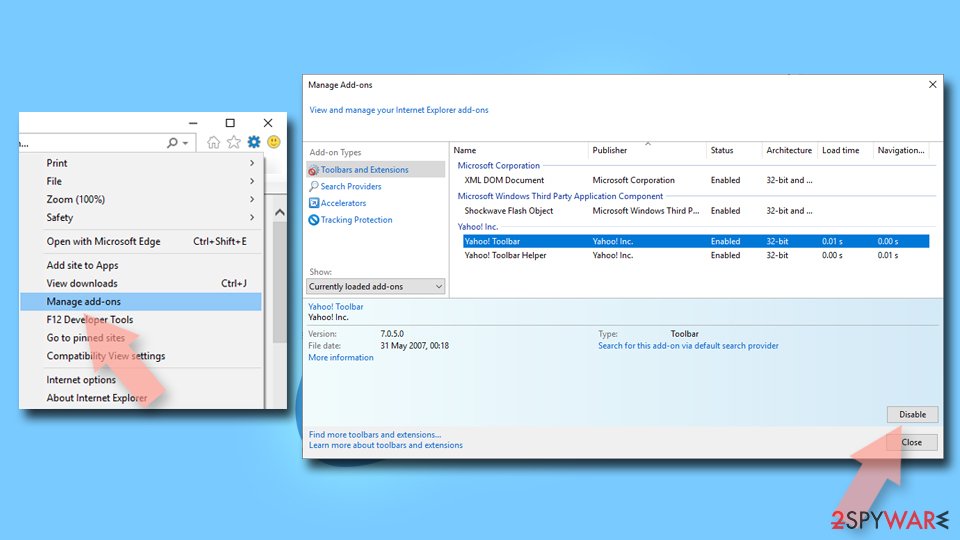
- Open Internet Explorer, click on the Gear icon (IE menu) on the top-right corner of the browser
- Pick Manage Add-ons.
- You will see a Manage Add-ons window. Here, look for suspicious plugins. Click on these entries and select Disable.
Change your homepage if it was altered:
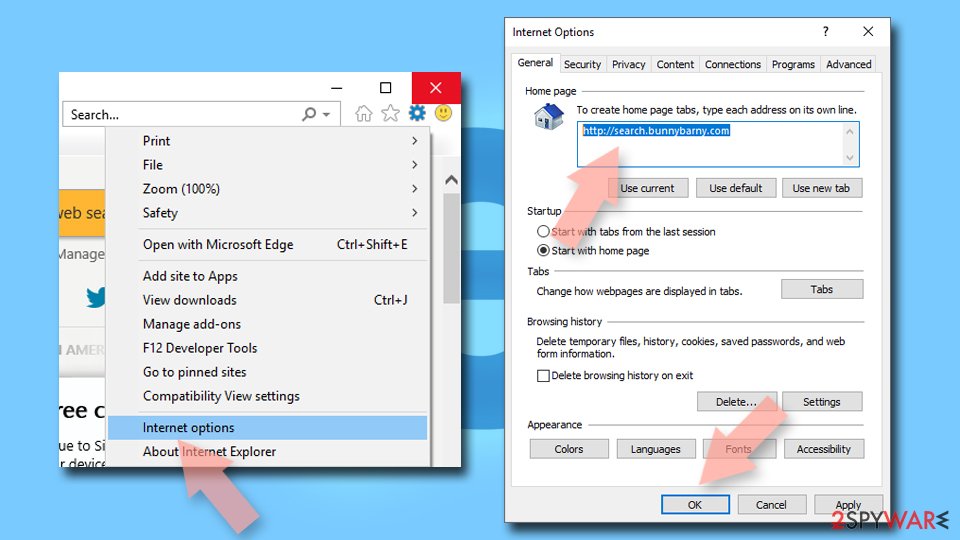
- Open IE and click on the Gear icon.
- Select Internet Options.
- In the General tab, delete the Home page address and replace it by your preferred one (for example, Google.com).
- Click Apply and then select OK.
Delete temporary files:
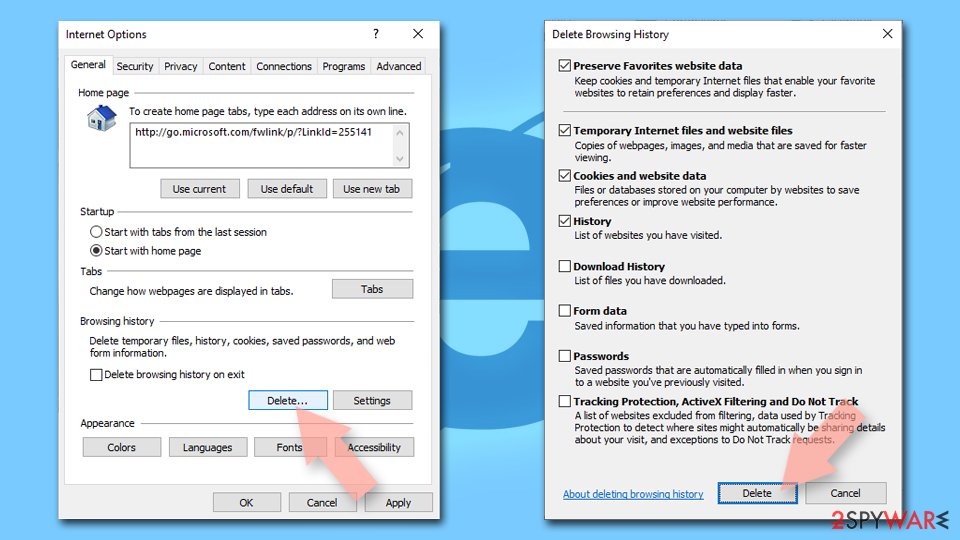
- Press on the Gear icon and select Internet Options.
- Under Browsing history, click Delete...
- Select relevant fields and press Delete.
Reset Internet Explorer:
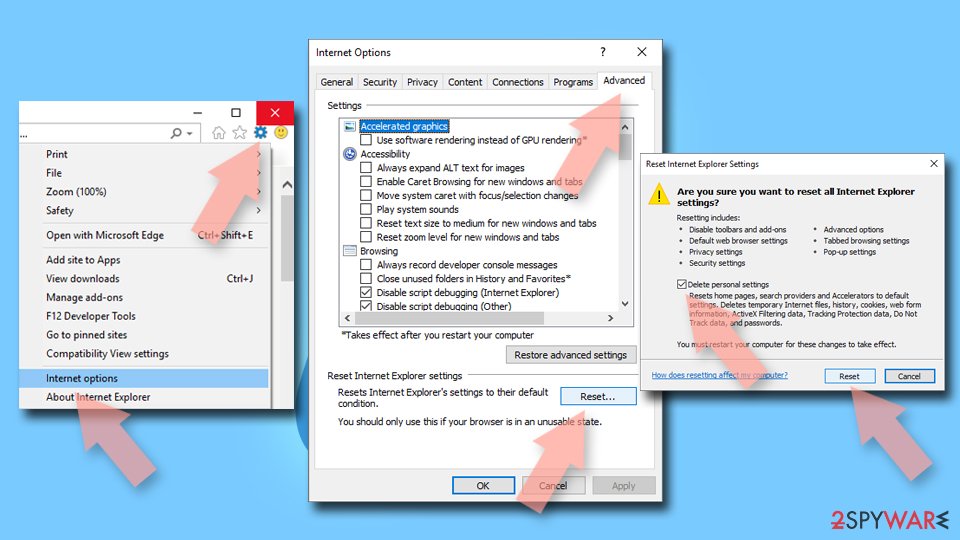
- Click on Gear icon > Internet options and select Advanced tab.
- Select Reset.
- In the new window, check Delete personal settings and select Reset.
Stream videos without limitations, no matter where you are
There are multiple parties that could find out almost anything about you by checking your online activity.
While this is highly unlikely, advertisers and tech companies are constantly tracking you online. The first step to privacy should be a secure browser that focuses on tracker reduction to a minimum.
Even if you employ a secure browser, you will not be able to access websites that are restricted due to local government laws or other reasons. In other words, you may not be able to stream Disney+ or US-based Netflix in some countries. To bypass these restrictions, you can employ a powerful VPN, which provides dedicated servers for torrenting and streaming, not slowing you down in the process.
Data backups are important - recover your lost files
Ransomware is one of the biggest threats to personal data.
Once it is executed on a machine, it launches a sophisticated encryption algorithm that locks all your files, although it does not destroy them. The most common misconception is that anti-malware software can return files to their previous states. This is not true, however, and data remains locked after the malicious payload is deleted.
While regular data backups are the only secure method to recover your files after a ransomware attack, tools such as can also be effective and restore at least some of your lost data.
From our report of Jan 2021 · not reviewed since
Remove Best Price Ninja virus from the computer if you want to avoid ads
Performing a full system scan will ensure that your computer has not been further infected if you have actually clicked on some of the sponsored ads.
It will take only several steps in order for you to get rid of Best Price Ninja. However, keep in mind that it is worth installing new applications very carefully in the future. Use a custom/advanced installation and you should avoid additional potentially unwanted programs.
Questions about Best Price Ninja adware ads
Is Best Price Ninja adware a virus?
Most programs that appear the way Best Price Ninja adware did are not viruses in the strict sense. They are potentially unwanted programs:
- real software that arrives bundled with other downloads and then shows offers
- changes browser settings
- starts with Windows
Some are harmless, some are annoying and a few carry adware. What makes it worth removing is that you did not choose it.
Uninstall it from Installed apps and check the startup list and the browsers for anything added the same day. If it refuses to uninstall or returns after a restart, treat it as more serious and run a Microsoft Defender offline scan.
How do I stop programs like Best Price Ninja adware from being installed again?
Most unwanted programs arrive through installers, so the fix is in how you install software. Download programs from their official sites or the Microsoft Store, not from download portals or ads above search results. During setup, choose Custom or Advanced installation and untick every extra offer, including browsers, toolbars and optimizers.
Decline update prompts that appear inside other programs unless you know them. In Windows Security, turn on reputation-based protection and potentially unwanted app blocking. These steps would most likely have stopped Best Price Ninja adware before it reached the app list.
Can an adware pop-up infect my PC just by appearing?
No. A pop-up, a notification or a new tab is only a web page or a message. It cannot run programs on Windows by itself, provided the browser and Windows are up to date. Infection needs a step from you:
- running a downloaded file
- installing an extension
- giving a stranger remote access
That is why scam pages work so hard to make you click. Close such pages with the tab's X or by closing the browser, not with buttons inside the page, which may start a download.
Did Best Price Ninja adware collect my data?
Adware typically collects what it needs to choose ads:
- the sites you visit
- search terms
- approximate location
- browser and system details
Extensions with permission to read and change data on all websites can technically see everything on those pages, including forms. That is a privacy problem rather than proof of theft.
If you typed card details or passwords while it was active, changing the most important passwords is a reasonable precaution. Clearing cookies after removal ends the tracking sessions it may have started.
My scan found nothing, but the ads continue. Why?
Because the source may not be a file a scanner looks for. Browser notifications are a permission stored in the browser, and many adware extensions are not flagged because they come from an official store.
Some ad-supported programs are only reported if you enable detection of potentially unwanted apps. So a clean scan does not mean the job is done. Check each browser's notification permissions and extension list by hand, and turn on Potentially unwanted app blocking in Windows Security before scanning again.
I let a "support technician" from an ad connect to my PC. What should I do?
Act quickly but calmly. Disconnect the PC from the internet first, so the connection ends. Uninstall the remote access tool they asked you to install and check Installed apps for anything else added during the call.
Run a Microsoft Defender full scan and offline scan. From another device, change your e-mail and banking passwords and sign out of all sessions.
If you paid by card, bank transfer or gift card, contact your bank or the card issuer immediately, and report the scam to the police. Do not answer if they call back.
Why is my browser so slow since the ads started?
Each page now does extra work. An adware extension reads the page, decides where to put ads, loads them from ad servers and reports your visit, and that happens on every tab. Ad-supported programs add their own background activity.
Removing the extension or program usually makes the browser fast again at once. If it stays slow, open the browser's own task manager with Shift+Esc in Chrome or Edge and look for extensions using a lot of memory or processor time.
Do I need to reset my browser after removing Best Price Ninja?
A reset is a good last step, because it undoes settings that the program changed. A reset restores the home page, new tab page and default search engine, and turns off extensions.
It does not delete your bookmarks or saved passwords in the main browsers. Add back only the extensions you trust, one at a time.
Will Fortect remove Best Price Ninja adware?
Fortect scans Windows for malware and unwanted programs and repairs the system files and settings they change, and its free scan shows what it finds on your PC before you decide anything.
For Best Price Ninja adware, follow the plan above as well: the browser steps take back permissions and settings that no scanner treats as a threat, and uninstalling the program that brought it removes the source.
Run Microsoft Defender's full scan and, if anything was found, its offline scan as a second opinion. If the symptoms are gone after the plan and both scans are clean, there is nothing more to do.
Sources
- Google Chrome Help: Use notifications to get alerts (no longer online) (read October 7, 2026)
- FTC: How to recognize, remove and avoid malware (read October 7, 2026)
- Microsoft Learn: Microsoft Defender Offline (read October 7, 2026)
- Microsoft Learn: How Microsoft names malware (read October 7, 2026)