

What should you keep in mind about the “BLOCK due to Suspicious Activities” virus?
BLOCK due to Suspicious Activities virus is known to be a part of an adware-type infection which aims at making a profit out of the affiliate advertising. Though adware programs can collaborate with completely legitimate parties, they may have some shady advertising partners, too. The scammers behind BLOCK due to Suspicious Activities ads are precisely what we are talking about. But what are these ads, exactly? Firstly, we should point out that they are not your regular pop-ups or banners that you seen on your favorite news pages or social media sites. They do not offer any bargain deals or advertise events or merchandise. Instead, they attempt to frighten you into thinking that your computer has been infected with an especially dangerous malware, and you must call for tech support to remove it. In these ads, the scammers indicate a telephone number (+1-888-306-5168) by which the victim can supposedly call the remote technician and receive further instructions. As you can probably suspect, the scammers are only waiting for this call. In truth, they have nothing to offer apart from the fake support subscriptions or questionable security products. So if you do not want to let your money go to waste, ignore these ads and remove BLOCK due to Suspicious Activities virus from your device without any fear. We highly recommend scanning your computer with FortectIntego. We have already tested this program and can assure you that it will eliminate the infection successfully.
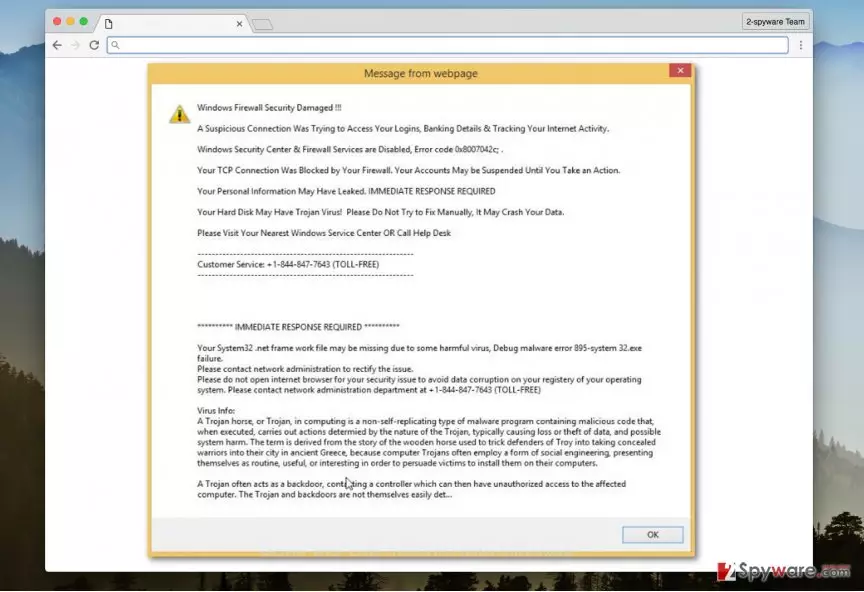
BLOCK due to Suspicious Activities hijack manifests not only in the unexpected redirects to potential tech-scam sites but also in the number of other questionable content that you might be offered online. For instance, you may be urged to complete some suspicious surveys, register for shady lotteries or be offered to claim prizes without having participated in any online games. That is typically what an adware program does on your the infected computer. If you still believe that you might just got lucky, just look at your browser performance. Does it freeze more frequently? Do you have to reinitiate it more often after it crashes unexpectedly? It’s all because of the additional activity that is being carried out by an adware virus on your computer. But there are much more concerning features that do not even reach the surface. For instance, BLOCK due to Suspicious Activities malware may track your browsing patterns and generate related ads. The same information it collects may also be shared with third-parties. Think about it. Do you value your privacy? If you, there should be no reason to hesitate with the BLOCK due to Suspicious Activities removal any longer.
How can these fraudulent notifications appear on my browser?
We have already pointed out that the BLOCK due to Suspicious Activities notifications are an evidence of an ad-based malware operating on your PC. It is not known what specific PUP is causing these deceptive ads, and this may be quite troublesome if you try to eliminate the infection from your computer manually. However, if you are not infected, you can avoid and adware even if you do not know its name. All of these potentially unwanted programs spread virtually the same. They hide in software bundles, and their installation is concealed by other popular freeware or shareware which the users initially download on their computers. You can disclose these additional components via “Advanced” or “Custom” installation settings. It’s that simple. Just opt for the mentioned modes and pick out unnecessary components.
How to deal with BLOCK due to Suspicious Activities removal?
Involuntarily participating in a pay-per-click business as well as getting redirected to malicious tech support scam sites is far from what we imagine a normal browsing experience should be. Luckily, you do not have to suffer these inconveniences any longer. Our team has been analyzing adware viruses for quite some time and have come up with the best ways to eliminate them from the infected devices. Below you can find free BLOCK due to Suspicious Activities removal instructions, though experience with virus elimination is highly advisable. Otherwise, you should not risk it and use automatic tools instead. You will be able to remove BLOCK due to Suspicious Activities malware without spending time looking for it in the first place.
Uninstall from Windows
Uninstall from Windows 10/8:
- Type Control Panel into the Windows search box and open the result.
- Under Programs, select Uninstall a program.


Uninstall from Windows 7/XP:
- Click on Windows Start > Control Panel (Windows XP users should click on Add/Remove Programs).
- In Control Panel, select Programs > Uninstall a program.


Remove the unwanted program:
- In the Programs and Features window, look for any recently installed suspicious entries, select them, and click Uninstall.
- If User Account Control appears, click Yes to confirm, then complete the removal.


Delete from macOS
Remove the unwanted application:
- From the menu bar, select Go > Applications.
- In the Applications folder, look for any suspicious entries, then drag them to Trash (or right-click and pick Move to Trash).


Delete leftover files and folders:
- Select Go > Go to Folder.
- Enter /Library/Application Support and remove any suspicious folders related to the unwanted program.
- Repeat the same check in the /Library/LaunchAgents and /Library/LaunchDaemons folders, deleting any suspicious entries.

- Finally, empty the Trash to permanently remove the leftovers.

Remove from Microsoft Edge
Delete unwanted extensions from MS Edge:
- Select Menu (three horizontal dots at the top-right of the browser window) and pick Extensions.
- From the list, pick the extension and click on the Gear icon.
- Click Remove.


Clear cookies and other browser data:
- Click on the Menu (three horizontal dots at the top-right of the browser window) and select Settings > Privacy, search, and services..
- Under Clear browsing data, pick Choose what to clear.
- Select Cookies and other site data and Cached images and files. (apart from passwords, although you might want to include Media licenses as well, if applicable) and click on Clear.


Restore new tab and homepage settings:
- Click the menu icon and choose Settings.
- Then find On startup section.
- Click Remove next to any suspicious startup page.
Reset MS Edge if the above steps did not work:
- Press on Ctrl + Shift + Esc to open Task Manager.
- Click on More details arrow at the bottom of the window.
- Select Details tab.
- Now scroll down and locate every entry with Microsoft Edge name in it. Right-click on each of them and select End Task to stop MS Edge from running.


Instructions for Chromium-based Edge
Delete extensions from MS Edge (Chromium):
- Open Edge and click select Settings > Extensions.
- Delete unwanted extensions by clicking Remove.


Clear cache and site data:
- Click on Menu and go to Settings.
- Select Privacy, search and services.
- Under Clear browsing data, pick Choose what to clear.
- Under Time range, pick All time.
- Select Clear now.


Reset Chromium-based MS Edge:
- Click on Menu and select Settings.
- On the left side, pick Reset settings.
- Select Restore settings to their default values.
- Confirm with Reset.
- This will disable extensions and reset startup pages but will not delete bookmarks, saved passwords, or browsing history.


Remove from Mozilla Firefox (FF)
Remove dangerous extensions:
- Open Mozilla Firefox browser and click on the Menu (three horizontal lines at the top-right of the window).
- Select Add-ons.
- In here, select the unwanted extension and click Remove.


Reset the homepage:
- Click three horizontal lines at the top right corner to open the menu.
- Choose Settings.
- Under Home, set your preferred homepage and new tab settings.
Clear cookies and site data:
- Click Menu and pick Settings.
- Go to Privacy & Security section.
- Scroll down to locate Cookies and Site Data.
- Click on Clear Data...
- Select Cookies and Site Data and Temporary cached files and pages, then click Clear.


Reset Mozilla Firefox
If clearing the browser as explained above did not help, reset Mozilla Firefox:
- Open Mozilla Firefox browser and click the Menu.
- Go to Help and then choose Troubleshooting Information.

- Under Give Firefox a tune up section, click on Refresh Firefox...
- Once the pop-up shows up, confirm the action by pressing on Refresh Firefox.



Remove from Google Chrome
Delete malicious extensions from Google Chrome:
- Open Google Chrome, click on the Menu (three vertical dots at the top-right corner) and select More tools > Extensions.
- In the newly opened window, you will see all the installed extensions. Uninstall all suspicious extensions related to the unwanted program by clicking Remove.


Clear cache and web data from Chrome:
- Click on Menu and pick Settings.
- Under Privacy and security, select Clear browsing data.
- Select Browsing history, Cookies and other site data, as well as Cached images and files.
- Click Clear data.


Change your homepage:
- Click menu and choose Settings.
- Look for a suspicious site in the On startup section.
- Click on Open a specific or set of pages and click on three dots to find the Remove option.
Reset Google Chrome:
If the previous methods did not help you, reset Google Chrome to eliminate all the unwanted components:
- Click on Menu and select Settings.
- In the Settings, scroll down and click Advanced.
- Scroll down and locate Reset and clean up section.
- Now click Restore settings to their original defaults.
- Confirm with Reset settings.


Delete from Safari
Remove dangerous extensions:
- Open Safari, click Safari in the menu at the top-left of the screen, and select Preferences.
- Go to the Extensions tab, look for any suspicious entries, and click Uninstall to remove them.


Clear history and website data:
- Click Safari in the menu and pick Clear History.
- Set Clear to all history and confirm with Clear History.


Reset Safari:
- Click Safari in the menu and select Preferences > Advanced.
- Enable Show Develop menu in menu bar.
- From the menu bar, click Develop and select Empty Caches.


Did this guide help?
Be the first to comment