

Is Chinimplants.website virus a destructive threat?
Chinimplants.website virus happens to a browser hijacker which bombards you with ads suggesting to improve your facial looks. This PUP mainly targets male audience which is concerned about their looks. However, any user may unexpectedly find this hijacker on his or her computer, as a result, of paying little attention to the installation instructions. If you notice that your search engine is replaced with this search engine, remove Chinimplants.website right away. It creates a lot of browsing trouble, such as redirects to suspicious domains and fills up your screen with annoying ads suggesting modify your chin. Explicit Chinimplants.website removal might be found below. One of the ways to do that is to employ FortectIntego.
Firstly, when the hijacker slips into the system, it changes the browser settings. As a result, you are getting redirected to http://chinimplants.website/in/?vidba. Despite the title of this PUP, some users might even think that this search engine is a reliable tool helping to acquire necessary information quickly. However, in reality, this browser hijacker fails to meet expectations as it might, in fact, slow down the whole browsing process by displaying frustrating ads. Do not fall for a custom trick thinking that this search tool is affiliated with Google. In fact, you might distinguish a browser hijacker from the legitimate search engine by looking at what database it uses. It is common for hijackers to include Google custom search logo to their engines to create the sense of credibility and attract more users. However, in reality, these hijackers are not related with the mentioned search engine. Likewise, do not expect quality services from the hijacker.
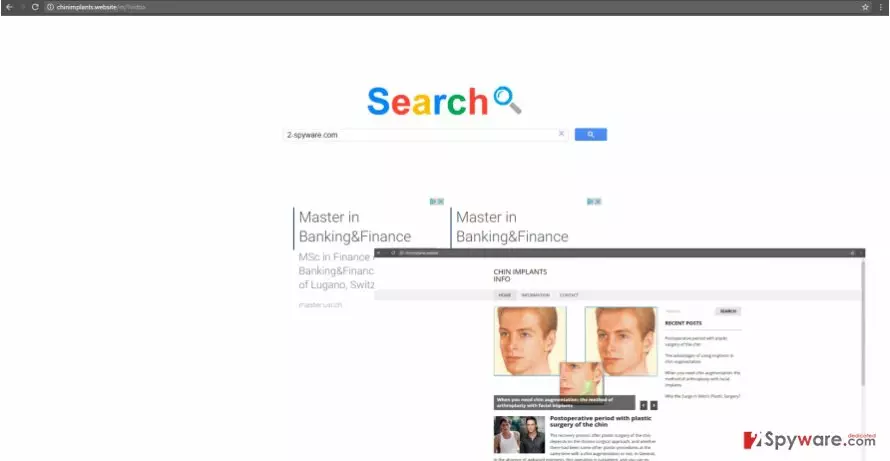
Furthermore, these pop-ups showing off chins might facilitate Chinimplants.website redirect. In short, you may find yourself in different domains than you expected. Unfortunately, the redirect web pages may not always be secure. Taking too long there, you might catch a virus or two which are lurking there. Though browser hijackers are not associated with severe cyber threats, system interferences are surely bothersome. You might hurry up with the elimination because Chinimplants imprints its “helper elements” on the system. Due to their activity, you might notice not only additional applications attached to the browser but encounter elimination problems.
The transmission tendencies of the PUP
It spreads in the disguise under free applications. Surprisingly, though this technique is quite old and users are warned about it, it is still profitable and facilitates the transmission of various PUPs. Likewise, adware, browser hijackers sneak into the systems. Chinimplants.website hijack is no exception. You might have accidentally enabled it while installing a newly installed audio editor or media player. Rushing through the stages deprives you of the ability to spot potentially unwanted applications. Next time you are about to install a new program, select “Custom” settings. Likewise, you will be able to detect and unmark any suspicious programs before they occupy the device.
How quickly can I get rid of Chinimplants.website?
Though at first, it may look troublesome, in fact, it does not require any specific preparations to finish Chinimplants.website removal. You can either choose an anti-spyware application to speed up the process and exterminate the Pup or do the process manually by yourself. However, choosing the latter mode you need to exercise utmost attention not to miss any essential detail. Otherwise, the PUP might show up in the browser again. Lastly, do not forget to take a look at the privacy policy of the website or the app which you ae about to install. Other users‘ reviews come in handy as well.
Uninstall from Windows
Uninstall from Windows 10/8:
- Type Control Panel into the Windows search box and open the result.
- Under Programs, select Uninstall a program.


Uninstall from Windows 7/XP:
- Click on Windows Start > Control Panel (Windows XP users should click on Add/Remove Programs).
- In Control Panel, select Programs > Uninstall a program.


Remove the unwanted program:
- In the Programs and Features window, look for any recently installed suspicious entries, select them, and click Uninstall.
- If User Account Control appears, click Yes to confirm, then complete the removal.


Delete from macOS
Remove the unwanted application:
- From the menu bar, select Go > Applications.
- In the Applications folder, look for any suspicious entries, then drag them to Trash (or right-click and pick Move to Trash).


Delete leftover files and folders:
- Select Go > Go to Folder.
- Enter /Library/Application Support and remove any suspicious folders related to the unwanted program.
- Repeat the same check in the /Library/LaunchAgents and /Library/LaunchDaemons folders, deleting any suspicious entries.

- Finally, empty the Trash to permanently remove the leftovers.

Reset Internet Explorer
Remove dangerous add-ons:
- Open Internet Explorer, click on the Gear icon (IE menu) on the top-right corner of the browser
- Pick Manage Add-ons.
- You will see a Manage Add-ons window. Here, look for suspicious plugins. Click on these entries and select Disable.


Change your homepage if it was altered:
- Open IE and click on the Gear icon.
- Select Internet Options.
- In the General tab, delete the Home page address and replace it by your preferred one (for example, Google.com).
- Click Apply and then select OK.


Delete temporary files:
- Press on the Gear icon and select Internet Options.
- Under Browsing history, click Delete...
- Select relevant fields and press Delete.


Reset Internet Explorer:
- Click on Gear icon > Internet options and select Advanced tab.
- Select Reset.
- In the new window, check Delete personal settings and select Reset.


Remove from Microsoft Edge
Delete unwanted extensions from MS Edge:
- Select Menu (three horizontal dots at the top-right of the browser window) and pick Extensions.
- From the list, pick the extension and click on the Gear icon.
- Click Remove.


Clear cookies and other browser data:
- Click on the Menu (three horizontal dots at the top-right of the browser window) and select Settings > Privacy, search, and services..
- Under Clear browsing data, pick Choose what to clear.
- Select Cookies and other site data and Cached images and files. (apart from passwords, although you might want to include Media licenses as well, if applicable) and click on Clear.


Restore new tab and homepage settings:
- Click the menu icon and choose Settings.
- Then find On startup section.
- Click Remove next to any suspicious startup page.
Reset MS Edge if the above steps did not work:
- Press on Ctrl + Shift + Esc to open Task Manager.
- Click on More details arrow at the bottom of the window.
- Select Details tab.
- Now scroll down and locate every entry with Microsoft Edge name in it. Right-click on each of them and select End Task to stop MS Edge from running.


Instructions for Chromium-based Edge
Delete extensions from MS Edge (Chromium):
- Open Edge and click select Settings > Extensions.
- Delete unwanted extensions by clicking Remove.


Clear cache and site data:
- Click on Menu and go to Settings.
- Select Privacy, search and services.
- Under Clear browsing data, pick Choose what to clear.
- Under Time range, pick All time.
- Select Clear now.


Reset Chromium-based MS Edge:
- Click on Menu and select Settings.
- On the left side, pick Reset settings.
- Select Restore settings to their default values.
- Confirm with Reset.
- This will disable extensions and reset startup pages but will not delete bookmarks, saved passwords, or browsing history.


Remove from Mozilla Firefox (FF)
Remove dangerous extensions:
- Open Mozilla Firefox browser and click on the Menu (three horizontal lines at the top-right of the window).
- Select Add-ons.
- In here, select the unwanted extension and click Remove.


Reset the homepage:
- Click three horizontal lines at the top right corner to open the menu.
- Choose Settings.
- Under Home, set your preferred homepage and new tab settings.
Clear cookies and site data:
- Click Menu and pick Settings.
- Go to Privacy & Security section.
- Scroll down to locate Cookies and Site Data.
- Click on Clear Data...
- Select Cookies and Site Data and Temporary cached files and pages, then click Clear.


Reset Mozilla Firefox
If clearing the browser as explained above did not help, reset Mozilla Firefox:
- Open Mozilla Firefox browser and click the Menu.
- Go to Help and then choose Troubleshooting Information.

- Under Give Firefox a tune up section, click on Refresh Firefox...
- Once the pop-up shows up, confirm the action by pressing on Refresh Firefox.



Remove from Google Chrome
Delete malicious extensions from Google Chrome:
- Open Google Chrome, click on the Menu (three vertical dots at the top-right corner) and select More tools > Extensions.
- In the newly opened window, you will see all the installed extensions. Uninstall all suspicious extensions related to the unwanted program by clicking Remove.


Clear cache and web data from Chrome:
- Click on Menu and pick Settings.
- Under Privacy and security, select Clear browsing data.
- Select Browsing history, Cookies and other site data, as well as Cached images and files.
- Click Clear data.


Change your homepage:
- Click menu and choose Settings.
- Look for a suspicious site in the On startup section.
- Click on Open a specific or set of pages and click on three dots to find the Remove option.
Reset Google Chrome:
If the previous methods did not help you, reset Google Chrome to eliminate all the unwanted components:
- Click on Menu and select Settings.
- In the Settings, scroll down and click Advanced.
- Scroll down and locate Reset and clean up section.
- Now click Restore settings to their original defaults.
- Confirm with Reset settings.


Delete from Safari
Remove dangerous extensions:
- Open Safari, click Safari in the menu at the top-left of the screen, and select Preferences.
- Go to the Extensions tab, look for any suspicious entries, and click Uninstall to remove them.


Clear history and website data:
- Click Safari in the menu and pick Clear History.
- Set Clear to all history and confirm with Clear History.


Reset Safari:
- Click Safari in the menu and select Preferences > Advanced.
- Enable Show Develop menu in menu bar.
- From the menu bar, click Develop and select Empty Caches.


Did this guide help?
2 comments
hugoOuch
They cant get more ridiculous...
luxury5stars
No idea how it got into the PC but removed it quickly. Thanks.