

DirectionsBuilder Toolbar: a useful tool or a potentially unwanted program?
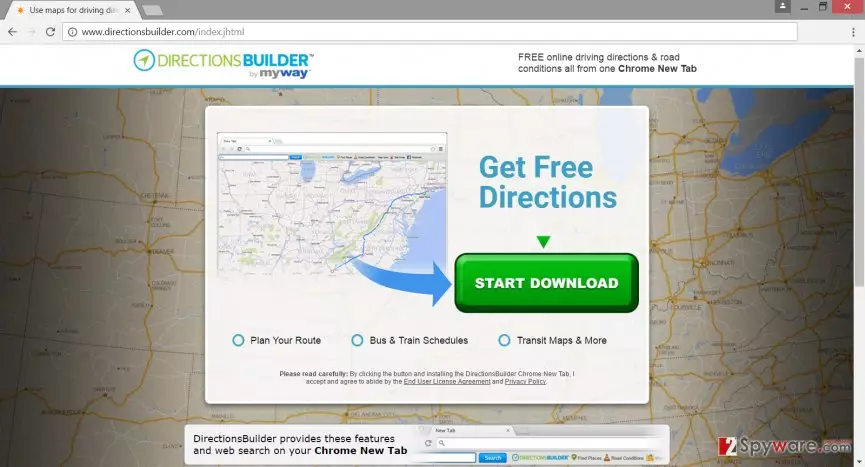
DirectionsBuilder Toolbar is a classified as a browser hijacker[1]. However, the developers, Mindspark Interactive Network, Inc., would not agree with this classification. In the official website, they present this app as a useful tool that gives free directions, allows planning the route, provides bus and train schedules, transit maps and lots of other features that might attract many travel enthusiasts or people who want to plan their journeys. However, downloading this app from the official website is not recommended because some of its features worry cyber security specialists. One of those features is questionable distribution strategy. So-called DirectionsBuilder Toolbar virus spreads bundled with free programs as an additional component. When users make a mistake by choosing wrong installation setup, it gets inside the system and might cause several issues. It might replace current browser’s homepage and default search engine and might provide lots of advertisements. These problems are unbearable, and users have to look for DirectionsBuilder Toolbar removal solutions. We recommend choosing the easiest way to get rid of the browser hijacker – to run a full system scan with anti-malware/anti-spyware software, for example, FortectIntego or MalwarebytesMalwarebytes. However, if you preferred removing this bogus program manually, scroll down to the end of this article. There you will find detailed and illustrated instructions how to do it.
After infiltration (or installation) users might be offered or forced to use a suspicious search engine that has quick access to all DirectionsBuilder Toolbar’s features. However, using this engine might be dangerous[2]. Usually, search engines provided by the browser hijackers deliver altered search results. In other words, some of the real search results might be replaced with sponsored links. The problem is that these links might redirect to the potentially dangerous websites. The same issue exists with ads delivered by DirectionsBuilder Toolbar virus. This program might provide and an excessive amount of ads that makes browser crash or freeze frequently. Moreover, some of them might be malware-laden[3]. That means after clicking on them, you might be redirected to the infected website[4] or install Trojan[5]. Remove DirectionsBuilder Toolbar from the computer and avoid malware attack. Immediate removal is especially recommended for those who has no idea how this app appeared on their computers.
How does browser hijacker spread?
Previously we have mentioned that users can download Directions Builder Toolbar straight from the official website; however, it rarely happens. This app is being distributed mostly using deceptive software marketing strategy known as bundling. This technique allows adding PUP as optional download and spreading it in a software bundle. This hijacker’s distribution method is quite successful because lots of computer users still install new programs using Quick or Standard setup. These settings do not inform about optional applications; they are simply installed by default. That’s how DirectionsBuilder Toolbar hijack can occur. However, the only way to avoid PUPs while installing new software is to opt for Custom or Advanced mode. It allows monitoring the process and adjusting the installation of additional components.
Tips and tricks for DirectionsBuilder Toolbar removal
Browser hijack is not a hazardous or complex computer infection, so you can get rid of it manually. We won’t lie and tell the truth – manual DirectionsBuilder Toolbar removal might be a challenge because it is capable of installing other tools and helper objects that might be hard to find on the system. However, if difficulties do not scare you, have a look at manual removal guidelines below. For those who do not want to dedicate an hour of their free time for hijacker’s removal, we have an alternative option. You can remove DirectionsBuilder Toolbar automatically with the help of malware removal programs. Install one of the suggested tools below, update it and run a full system scan.
Uninstall from Windows
Uninstall from Windows 10/8:
- Type Control Panel into the Windows search box and open the result.
- Under Programs, select Uninstall a program.


Uninstall from Windows 7/XP:
- Click on Windows Start > Control Panel (Windows XP users should click on Add/Remove Programs).
- In Control Panel, select Programs > Uninstall a program.


Remove the unwanted program:
- In the Programs and Features window, look for any recently installed suspicious entries, select them, and click Uninstall.
- If User Account Control appears, click Yes to confirm, then complete the removal.


Delete from macOS
Remove the unwanted application:
- From the menu bar, select Go > Applications.
- In the Applications folder, look for any suspicious entries, then drag them to Trash (or right-click and pick Move to Trash).


Delete leftover files and folders:
- Select Go > Go to Folder.
- Enter /Library/Application Support and remove any suspicious folders related to the unwanted program.
- Repeat the same check in the /Library/LaunchAgents and /Library/LaunchDaemons folders, deleting any suspicious entries.

- Finally, empty the Trash to permanently remove the leftovers.

Reset Internet Explorer
Remove dangerous add-ons:
- Open Internet Explorer, click on the Gear icon (IE menu) on the top-right corner of the browser
- Pick Manage Add-ons.
- You will see a Manage Add-ons window. Here, look for suspicious plugins. Click on these entries and select Disable.


Change your homepage if it was altered:
- Open IE and click on the Gear icon.
- Select Internet Options.
- In the General tab, delete the Home page address and replace it by your preferred one (for example, Google.com).
- Click Apply and then select OK.


Delete temporary files:
- Press on the Gear icon and select Internet Options.
- Under Browsing history, click Delete...
- Select relevant fields and press Delete.


Reset Internet Explorer:
- Click on Gear icon > Internet options and select Advanced tab.
- Select Reset.
- In the new window, check Delete personal settings and select Reset.


Remove from Microsoft Edge
Delete unwanted extensions from MS Edge:
- Select Menu (three horizontal dots at the top-right of the browser window) and pick Extensions.
- From the list, pick the extension and click on the Gear icon.
- Click Remove.


Clear cookies and other browser data:
- Click on the Menu (three horizontal dots at the top-right of the browser window) and select Settings > Privacy, search, and services..
- Under Clear browsing data, pick Choose what to clear.
- Select Cookies and other site data and Cached images and files. (apart from passwords, although you might want to include Media licenses as well, if applicable) and click on Clear.


Restore new tab and homepage settings:
- Click the menu icon and choose Settings.
- Then find On startup section.
- Click Remove next to any suspicious startup page.
Reset MS Edge if the above steps did not work:
- Press on Ctrl + Shift + Esc to open Task Manager.
- Click on More details arrow at the bottom of the window.
- Select Details tab.
- Now scroll down and locate every entry with Microsoft Edge name in it. Right-click on each of them and select End Task to stop MS Edge from running.


Instructions for Chromium-based Edge
Delete extensions from MS Edge (Chromium):
- Open Edge and click select Settings > Extensions.
- Delete unwanted extensions by clicking Remove.


Clear cache and site data:
- Click on Menu and go to Settings.
- Select Privacy, search and services.
- Under Clear browsing data, pick Choose what to clear.
- Under Time range, pick All time.
- Select Clear now.


Reset Chromium-based MS Edge:
- Click on Menu and select Settings.
- On the left side, pick Reset settings.
- Select Restore settings to their default values.
- Confirm with Reset.
- This will disable extensions and reset startup pages but will not delete bookmarks, saved passwords, or browsing history.


Remove from Mozilla Firefox (FF)
Remove dangerous extensions:
- Open Mozilla Firefox browser and click on the Menu (three horizontal lines at the top-right of the window).
- Select Add-ons.
- In here, select the unwanted extension and click Remove.


Reset the homepage:
- Click three horizontal lines at the top right corner to open the menu.
- Choose Settings.
- Under Home, set your preferred homepage and new tab settings.
Clear cookies and site data:
- Click Menu and pick Settings.
- Go to Privacy & Security section.
- Scroll down to locate Cookies and Site Data.
- Click on Clear Data...
- Select Cookies and Site Data and Temporary cached files and pages, then click Clear.


Reset Mozilla Firefox
If clearing the browser as explained above did not help, reset Mozilla Firefox:
- Open Mozilla Firefox browser and click the Menu.
- Go to Help and then choose Troubleshooting Information.

- Under Give Firefox a tune up section, click on Refresh Firefox...
- Once the pop-up shows up, confirm the action by pressing on Refresh Firefox.



Remove from Google Chrome
Delete malicious extensions from Google Chrome:
- Open Google Chrome, click on the Menu (three vertical dots at the top-right corner) and select More tools > Extensions.
- In the newly opened window, you will see all the installed extensions. Uninstall all suspicious extensions related to the unwanted program by clicking Remove.


Clear cache and web data from Chrome:
- Click on Menu and pick Settings.
- Under Privacy and security, select Clear browsing data.
- Select Browsing history, Cookies and other site data, as well as Cached images and files.
- Click Clear data.


Change your homepage:
- Click menu and choose Settings.
- Look for a suspicious site in the On startup section.
- Click on Open a specific or set of pages and click on three dots to find the Remove option.
Reset Google Chrome:
If the previous methods did not help you, reset Google Chrome to eliminate all the unwanted components:
- Click on Menu and select Settings.
- In the Settings, scroll down and click Advanced.
- Scroll down and locate Reset and clean up section.
- Now click Restore settings to their original defaults.
- Confirm with Reset settings.


Delete from Safari
Remove dangerous extensions:
- Open Safari, click Safari in the menu at the top-left of the screen, and select Preferences.
- Go to the Extensions tab, look for any suspicious entries, and click Uninstall to remove them.


Clear history and website data:
- Click Safari in the menu and pick Clear History.
- Set Clear to all history and confirm with Clear History.


Reset Safari:
- Click Safari in the menu and select Preferences > Advanced.
- Enable Show Develop menu in menu bar.
- From the menu bar, click Develop and select Empty Caches.


Did this guide help?
2 comments
Sad user
You have disappointed me... I have already isntalled this program and it looked so good for me...
Teodora
I have accidentally installed with some software package I guess. Fortunately, it was not hard to remove :)