

Should you be concerned about evlamni.ru virus?
Among the cyber threats, evlamni.ru virus takes a low position since it is not regarded as a high-scale malware. Nonetheless, its tendency to hijack users’ browsers should not be tolerated. Most likely, you have visited our website after searching for an effective evlamni.ru removal method. Before we move on the latter section, it is necessary to find out how the hijacker works and whether it threatens the security of your operating system. Though this search engine alternative is troublesome in nature, it is not regarded as a real computer virus. Nevertheless, its peculiarity to mislead you to the websites of pornographic origin or to the domains suggesting to lose weight might cause trouble. After keeping this substitute for a longer time, you may notice additional toolbars and browser plug-ins attached to the browser. In additional, unknown programs or download accelerators might pave the way into your computer as well. Therefore, the quicker you remove evlamni.ru virus, the better.
Once you enter evlamni.ru in into the search bar, you instantly get redirected to another web page 12kotov.ru offering browsing services. Regarding its front page and overall content, the latter should not be mistaken for a reliable search engine. A legitimate browsing tool does not suggest to visit questionable websites offering 3-day diets or other weight losing techniques. Though this website is oriented at Russian speakers, it does not mean that residents of other countries might escape the attention of this hijacker. If you happen to be one of them, make sure you delete evlamni.ru with the help of a reliable anti-spyware software. You can use FortectIntego for that purpose.
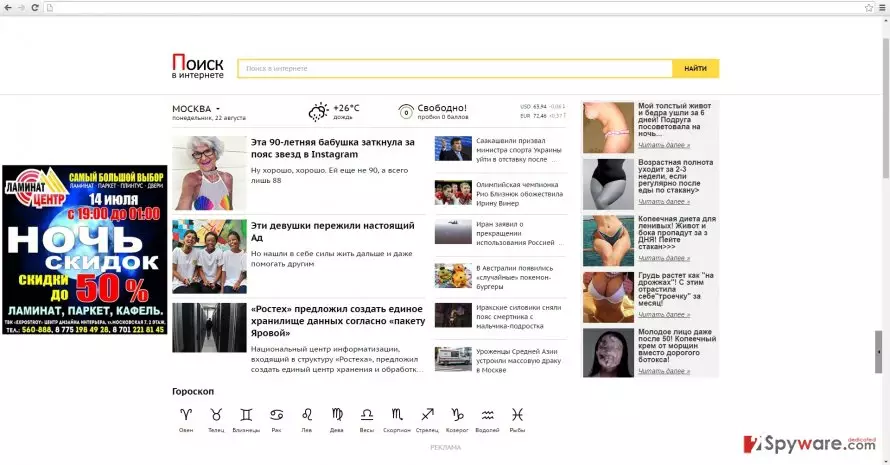
If you still consider using this search engine, soon enough you may encounter evlamni.ru redirect problem. Even if you avoid in-text links to visit suspicious domains, you may get mislead into one of them after researching your topic of interest. Be aware that you may get mislead into the domains which might disguise malware. Thus, if you carelessly click on every link or stay too long in the mentioned redirect domain, you may accidentally invite a virus into the system. Thus, you should consider whether keeping evlamni is worth the risk.
When does this browsing tool infect PCs?
You may have accidentally installed it while performing the installation of a free application. Unfortunately, it is common tendency not to pay attention to the installation wizards. Thus, the developers of this browser hijacker are aware of this vice and attach similar PUPs to the freeware. After rushing through the installation process and clicking “Next” button deprive the user of detecting the add-ons on time. As a result, perfect conditions are created for evlamni.ru hijack. Luckily, you can avoid such infiltration by following these steps. Prior to the installation of any new application, ensure that unnecessary and potentially malignant add-ons are unmarked.
Properly remove the hijacker
We advise opting for automatic evlamni.ru removal method. Install the security application. It is able to detect this PUP and all its related files within a short while. The hijacker may employ certain file-assistants. Thence, eliminating them is of importance as well. Alternatively, there is a way to remove evlamni.ru manually. Follow the guidelines carefully not to miss any essential detail. Otherwise, remaining files might create more system vulnerabilities or loopholes which enable evlamni.ru virus or similar PUP to infect the system again.
Uninstall from Windows
Uninstall from Windows 10/8:
- Type Control Panel into the Windows search box and open the result.
- Under Programs, select Uninstall a program.


Uninstall from Windows 7/XP:
- Click on Windows Start > Control Panel (Windows XP users should click on Add/Remove Programs).
- In Control Panel, select Programs > Uninstall a program.


Remove the unwanted program:
- In the Programs and Features window, look for any recently installed suspicious entries, select them, and click Uninstall.
- If User Account Control appears, click Yes to confirm, then complete the removal.


Delete from macOS
Remove the unwanted application:
- From the menu bar, select Go > Applications.
- In the Applications folder, look for any suspicious entries, then drag them to Trash (or right-click and pick Move to Trash).


Delete leftover files and folders:
- Select Go > Go to Folder.
- Enter /Library/Application Support and remove any suspicious folders related to the unwanted program.
- Repeat the same check in the /Library/LaunchAgents and /Library/LaunchDaemons folders, deleting any suspicious entries.

- Finally, empty the Trash to permanently remove the leftovers.

Remove from Microsoft Edge
Delete unwanted extensions from MS Edge:
- Select Menu (three horizontal dots at the top-right of the browser window) and pick Extensions.
- From the list, pick the extension and click on the Gear icon.
- Click Remove.


Clear cookies and other browser data:
- Click on the Menu (three horizontal dots at the top-right of the browser window) and select Settings > Privacy, search, and services..
- Under Clear browsing data, pick Choose what to clear.
- Select Cookies and other site data and Cached images and files. (apart from passwords, although you might want to include Media licenses as well, if applicable) and click on Clear.


Restore new tab and homepage settings:
- Click the menu icon and choose Settings.
- Then find On startup section.
- Click Remove next to any suspicious startup page.
Reset MS Edge if the above steps did not work:
- Press on Ctrl + Shift + Esc to open Task Manager.
- Click on More details arrow at the bottom of the window.
- Select Details tab.
- Now scroll down and locate every entry with Microsoft Edge name in it. Right-click on each of them and select End Task to stop MS Edge from running.


Instructions for Chromium-based Edge
Delete extensions from MS Edge (Chromium):
- Open Edge and click select Settings > Extensions.
- Delete unwanted extensions by clicking Remove.


Clear cache and site data:
- Click on Menu and go to Settings.
- Select Privacy, search and services.
- Under Clear browsing data, pick Choose what to clear.
- Under Time range, pick All time.
- Select Clear now.


Reset Chromium-based MS Edge:
- Click on Menu and select Settings.
- On the left side, pick Reset settings.
- Select Restore settings to their default values.
- Confirm with Reset.
- This will disable extensions and reset startup pages but will not delete bookmarks, saved passwords, or browsing history.


Remove from Mozilla Firefox (FF)
Remove dangerous extensions:
- Open Mozilla Firefox browser and click on the Menu (three horizontal lines at the top-right of the window).
- Select Add-ons.
- In here, select the unwanted extension and click Remove.


Reset the homepage:
- Click three horizontal lines at the top right corner to open the menu.
- Choose Settings.
- Under Home, set your preferred homepage and new tab settings.
Clear cookies and site data:
- Click Menu and pick Settings.
- Go to Privacy & Security section.
- Scroll down to locate Cookies and Site Data.
- Click on Clear Data...
- Select Cookies and Site Data and Temporary cached files and pages, then click Clear.


Reset Mozilla Firefox
If clearing the browser as explained above did not help, reset Mozilla Firefox:
- Open Mozilla Firefox browser and click the Menu.
- Go to Help and then choose Troubleshooting Information.

- Under Give Firefox a tune up section, click on Refresh Firefox...
- Once the pop-up shows up, confirm the action by pressing on Refresh Firefox.



Remove from Google Chrome
Delete malicious extensions from Google Chrome:
- Open Google Chrome, click on the Menu (three vertical dots at the top-right corner) and select More tools > Extensions.
- In the newly opened window, you will see all the installed extensions. Uninstall all suspicious extensions related to the unwanted program by clicking Remove.


Clear cache and web data from Chrome:
- Click on Menu and pick Settings.
- Under Privacy and security, select Clear browsing data.
- Select Browsing history, Cookies and other site data, as well as Cached images and files.
- Click Clear data.


Change your homepage:
- Click menu and choose Settings.
- Look for a suspicious site in the On startup section.
- Click on Open a specific or set of pages and click on three dots to find the Remove option.
Reset Google Chrome:
If the previous methods did not help you, reset Google Chrome to eliminate all the unwanted components:
- Click on Menu and select Settings.
- In the Settings, scroll down and click Advanced.
- Scroll down and locate Reset and clean up section.
- Now click Restore settings to their original defaults.
- Confirm with Reset settings.


Delete from Safari
Remove dangerous extensions:
- Open Safari, click Safari in the menu at the top-left of the screen, and select Preferences.
- Go to the Extensions tab, look for any suspicious entries, and click Uninstall to remove them.


Clear history and website data:
- Click Safari in the menu and pick Clear History.
- Set Clear to all history and confirm with Clear History.


Reset Safari:
- Click Safari in the menu and select Preferences > Advanced.
- Enable Show Develop menu in menu bar.
- From the menu bar, click Develop and select Empty Caches.


Did this guide help?
3 comments
betty
these hijackers are so persistent!
Kylie
Luckily, it s not so troublesome to remove it.
Jamie
Who would even use that website?