

Flare Search – a browser hijacking extension that enabled “Managed by your organization” feature to prevent removal
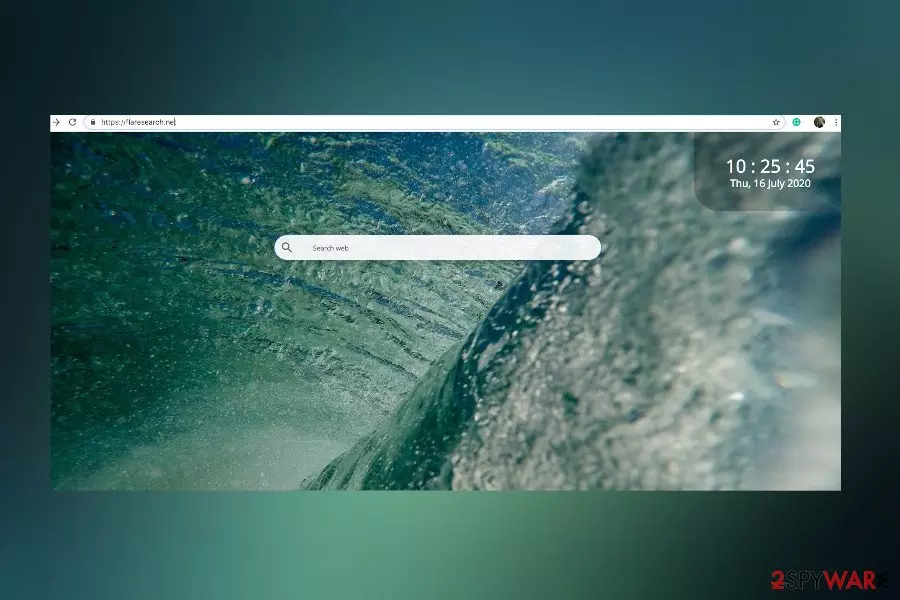
Flare Search is a potentially dangerous search site that spreads bundled with freeware and pretends to display the most accurate search results. However, it is considered to be a browser hijacker or a redirect virus, which is extremely persistent due to the in-built “Managed by your organization” feature.
The so-called Flare Search virus exhibits high activity at the moment, so users should take precautionary measures during the installation of freeware. According to NoVirus.uk[1] cybersecurity experts, this browser-based extension is spread as a pre-selected component of applications like converters, download managers, and similar. If the user accepts its install, the application automatically gets permission to replace a default start page and search provider with flaresearch.com or find.flaresearch.net and enables the mentioned Managed by your organization feature.
Browser hijackers work in such a way for several reasons. First of all, they seek to inject sponsored content among regular search results. Consequently, the web browser displays intrusive pop-ups, ads, and triggers unexpected redirects to third-party sites. Aside from unwanted content, it is used for statistics. It renders tracking cookies and web beacons to harvest browsing history and share it with third parties. Last, but not least, Flare Search removal becomes a tough nut to crack due to the organization management[2].
| Name | Flare Search |
| Type | Browser hijacker / Potentially Unwanted Program (PUP) |
| Related | Sets “Managed by your organization” feature to make itself difficult to remove |
| Distribution | It spreads bundled with freeware/shareware as an additional component |
| Symptoms | Altered start page, search provider, new tab URL, and other web browser's settings Uncontrollable web browser's redirects to suspicious domains (many of them ask to enable Push Notifications) Commercial ads placed on random websites (usually corresponding to user's latest search queries) Inability to reset the web browser's settings |
| Danger | The search is not dangerous on its own. However, the content that it displays is potentially dangerous as it is prepared by suspicious third parties |
| Removal | The best way to get rid of this hijacker is to run a scan with a professional anti-malware. Nevertheless, you may have to change the settings of the web browser manually (a full elimination guide is provided below) |
| System damage | Malware like this can inject multiple entries on random locations, including Windows Registry or Temp folder. To fix deleted, replaced, or corrupted system files, use FortectIntego tool |
Flare Search extension seems to be a reliable tool that may improve the web browsing experience. Its start page demonstrates a nature-related colorful background and a simple search bar. There's nothing suspicious, for instance, ads or links positioned there. However, the feeling of untrustworthy arises right after a failure to remove the flaresearch.com start or search.
Upon the infiltration of this search hijacker, users are restricted from using Google or another preferable search. Instead, the results are always loaded from the sponsored search.yahoo.com engine. The search results contain banner ads on the top-right corner of the screen, which redirects to online shops or download websites.
The biggest problem with the Flare Search redirects is that users can never know if the end-site is reliable. This search hijacker is basically used for affiliate marketing, but it does not monitor or control the content that its affiliates generate. Thus, there's a risk of being exposed to porn sites, malware-laden domains, or phishing/scam sites.
People keep reporting that unsuccessful Flare Search removal and, therefore, equate the search to a virus. The reason why the hijacker cannot be eliminated in a regular way is “Managed by your organization” feature. Developers of this malware-type extension managed to take advantage of a legitimate Chrome's feature, which is typically used by corporations to establish unified Chrome's settings and ensure that employees use/not use certain functions.
Even if the user tries to remove Flare Search virus from Chrome, the browser displays a notification saying that it's impossible to remove the extension because it is managed by the organization. If you are not a part of the organization, but a home user, all you have to do is to eliminate malware and alter the registry.
Disable Managed by your organization to regain permission to remove Flare Search hijacker

As long as the management settings on Chrome will be enabled, you won't be allowed to remove Flare Search redirect virus. Nevertheless, the protection can be disabled by initiating a registry tweak, but before that, we recommend running a scan with a professional anti-malware program to get rid of all unwanted applications. Then perform the following setting changes:
- Open the Registry Editor. For that, press Windows key + R simultaneously.
- When the run dialog box opens, type regedit in it, and hit Enter to run the command.
- Then navigate to the below-given directory using the left pane:
-
HKEY_LOCAL_MACHINE\SOFTWARE\Policies\Google\Chrome
- Remove the Extensions section is there is such.
- Eliminate all non-default entries installed by third-parties.
- Close the Registry Editor and reset Chrome's settings.
Freeware and shareware installation risks
Browser hijackers, adware, and potentially unwanted programs usually enter PCs without being noticed. Although they cannot misuse vulnerabilities, exploits, or other insecurities, malware developers take advantage of a legitimate software distribution method called bundling.
That's a controversial method allowing freeware and shareware distributors to pack their products with additional programs. While those additions can sometimes be useful, most of them are ad-supposed[3] tools used by third parties to promote their services and sponsored content.
That's why every time you download an application from websites like soft32, softpedia, brothersoft, cnet, download, and others, make sure to pay close attention to the freeware installation setup as you may be negatively surprised finding a bunch of preselected additional components.
To unpack the bundle and install only the application that you want, opt for Advanced or Custom installation technique and remove the checkmarks saying that you give your consent to install add-ons, toolbars, extensions, and other suspicious applications. We highly do not recommend using them as most of the browser-based apps initiate intrusive activities during web browsing.

Tips on how to uninstall Flare Search from Chrome
Flare Search removal is a thing that may continuously end up with failure if you perform the process incorrectly. As it is capable of altering the web browser's settings in an aggressive manner, you may encounter difficulties and restrictions to reset the changes.
Thus, we'll help you to remove Flare Search successfully. First of all, you should perform a full system scan to delete all PUPs or virus that might have entered the system during freeware installation. After that, alter the Windows registry entries as explained above. Finally, reset Google Chrome's settings ( a full reset guide is given below). The last thing that you should do – optimize the system with FortectIntego repair tool that is may recover the system's performance after a malware attack.
Uninstall from Windows
Uninstall from Windows 10/8:
- Type Control Panel into the Windows search box and open the result.
- Under Programs, select Uninstall a program.


Uninstall from Windows 7/XP:
- Click on Windows Start > Control Panel (Windows XP users should click on Add/Remove Programs).
- In Control Panel, select Programs > Uninstall a program.


Remove the unwanted program:
- In the Programs and Features window, look for any recently installed suspicious entries, select them, and click Uninstall.
- If User Account Control appears, click Yes to confirm, then complete the removal.


Delete from macOS
Remove the unwanted application:
- From the menu bar, select Go > Applications.
- In the Applications folder, look for any suspicious entries, then drag them to Trash (or right-click and pick Move to Trash).


Delete leftover files and folders:
- Select Go > Go to Folder.
- Enter /Library/Application Support and remove any suspicious folders related to the unwanted program.
- Repeat the same check in the /Library/LaunchAgents and /Library/LaunchDaemons folders, deleting any suspicious entries.

- Finally, empty the Trash to permanently remove the leftovers.

Reset Internet Explorer
Remove dangerous add-ons:
- Open Internet Explorer, click on the Gear icon (IE menu) on the top-right corner of the browser
- Pick Manage Add-ons.
- You will see a Manage Add-ons window. Here, look for suspicious plugins. Click on these entries and select Disable.


Change your homepage if it was altered:
- Open IE and click on the Gear icon.
- Select Internet Options.
- In the General tab, delete the Home page address and replace it by your preferred one (for example, Google.com).
- Click Apply and then select OK.


Delete temporary files:
- Press on the Gear icon and select Internet Options.
- Under Browsing history, click Delete...
- Select relevant fields and press Delete.


Reset Internet Explorer:
- Click on Gear icon > Internet options and select Advanced tab.
- Select Reset.
- In the new window, check Delete personal settings and select Reset.


Remove from Microsoft Edge
Delete unwanted extensions from MS Edge:
- Select Menu (three horizontal dots at the top-right of the browser window) and pick Extensions.
- From the list, pick the extension and click on the Gear icon.
- Click Remove.


Clear cookies and other browser data:
- Click on the Menu (three horizontal dots at the top-right of the browser window) and select Settings > Privacy, search, and services..
- Under Clear browsing data, pick Choose what to clear.
- Select Cookies and other site data and Cached images and files. (apart from passwords, although you might want to include Media licenses as well, if applicable) and click on Clear.


Restore new tab and homepage settings:
- Click the menu icon and choose Settings.
- Then find On startup section.
- Click Remove next to any suspicious startup page.
Reset MS Edge if the above steps did not work:
- Press on Ctrl + Shift + Esc to open Task Manager.
- Click on More details arrow at the bottom of the window.
- Select Details tab.
- Now scroll down and locate every entry with Microsoft Edge name in it. Right-click on each of them and select End Task to stop MS Edge from running.


Instructions for Chromium-based Edge
Delete extensions from MS Edge (Chromium):
- Open Edge and click select Settings > Extensions.
- Delete unwanted extensions by clicking Remove.


Clear cache and site data:
- Click on Menu and go to Settings.
- Select Privacy, search and services.
- Under Clear browsing data, pick Choose what to clear.
- Under Time range, pick All time.
- Select Clear now.


Reset Chromium-based MS Edge:
- Click on Menu and select Settings.
- On the left side, pick Reset settings.
- Select Restore settings to their default values.
- Confirm with Reset.
- This will disable extensions and reset startup pages but will not delete bookmarks, saved passwords, or browsing history.


Remove from Mozilla Firefox (FF)
Remove dangerous extensions:
- Open Mozilla Firefox browser and click on the Menu (three horizontal lines at the top-right of the window).
- Select Add-ons.
- In here, select the unwanted extension and click Remove.


Reset the homepage:
- Click three horizontal lines at the top right corner to open the menu.
- Choose Settings.
- Under Home, set your preferred homepage and new tab settings.
Clear cookies and site data:
- Click Menu and pick Settings.
- Go to Privacy & Security section.
- Scroll down to locate Cookies and Site Data.
- Click on Clear Data...
- Select Cookies and Site Data and Temporary cached files and pages, then click Clear.


Reset Mozilla Firefox
If clearing the browser as explained above did not help, reset Mozilla Firefox:
- Open Mozilla Firefox browser and click the Menu.
- Go to Help and then choose Troubleshooting Information.

- Under Give Firefox a tune up section, click on Refresh Firefox...
- Once the pop-up shows up, confirm the action by pressing on Refresh Firefox.



Remove from Google Chrome
Delete malicious extensions from Google Chrome:
- Open Google Chrome, click on the Menu (three vertical dots at the top-right corner) and select More tools > Extensions.
- In the newly opened window, you will see all the installed extensions. Uninstall all suspicious extensions related to the unwanted program by clicking Remove.


Clear cache and web data from Chrome:
- Click on Menu and pick Settings.
- Under Privacy and security, select Clear browsing data.
- Select Browsing history, Cookies and other site data, as well as Cached images and files.
- Click Clear data.


Change your homepage:
- Click menu and choose Settings.
- Look for a suspicious site in the On startup section.
- Click on Open a specific or set of pages and click on three dots to find the Remove option.
Reset Google Chrome:
If the previous methods did not help you, reset Google Chrome to eliminate all the unwanted components:
- Click on Menu and select Settings.
- In the Settings, scroll down and click Advanced.
- Scroll down and locate Reset and clean up section.
- Now click Restore settings to their original defaults.
- Confirm with Reset settings.


Delete from Safari
Remove dangerous extensions:
- Open Safari, click Safari in the menu at the top-left of the screen, and select Preferences.
- Go to the Extensions tab, look for any suspicious entries, and click Uninstall to remove them.


Clear history and website data:
- Click Safari in the menu and pick Clear History.
- Set Clear to all history and confirm with Clear History.


Reset Safari:
- Click Safari in the menu and select Preferences > Advanced.
- Enable Show Develop menu in menu bar.
- From the menu bar, click Develop and select Empty Caches.


Did this guide help?
Be the first to comment