

Is Search Assistant a reliable search provider?
Search Assistant virus may look attractive for users who are looking for additional tools to speed up their browsers and find the required information more easily. It might seem fine and dandy at first, but, in fact, this hijacker is classified as a browser hijacker. Moreover, it also works as adware since its excessive advertising turns out into the highly disturbing issue. This is one of the main flaws which might force you to remove Search Assistant. Furthermore, the browser hijacker wasn’t classified as such if not for its peculiarity to meddle with the browser settings. It has been observed that it changes users’ previous search engines into searchassistant.co. Unfortunately, it happens to be a browser hijacker as well. All in all, make Search Assistant removal your top priority.
Speaking of browser hijackers as a general entity, there are millions of identical and barely distinguishable search engines. However, occasionally, the crooks develop more exceptional PUPs. Likewise, Search Assistant might is an interesting sample because it possesses the features of both, browser hijacker and adware. Regarding the former qualities, it may convince you to install searchassitant.co virus. It pretends to be the browsing tool which speeds up the browser. As a matter of fact, it might slow down it with optional toolbars.
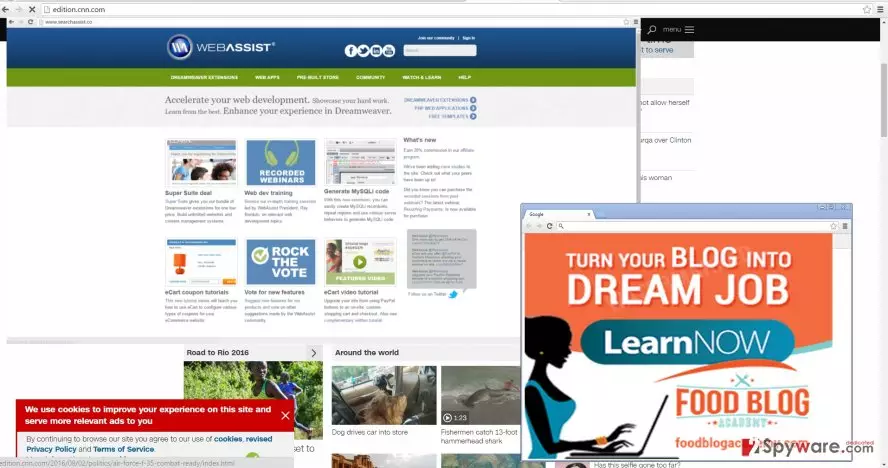
If we talk about its tendency to operate as adware, you might notice that, once the hijacker takes control of the computer, more and more various ads might show up on the screen. In addition, it does not take long until you get bothered by Search Assistant redirect. This phenomenon becomes visible when you click on the ads with the intention to cancel them. Therefore, within milliseconds, you are carried away to affiliate domain. We suggest you to cancel such redirect windows as soon as possible because they might disguise more or less bothersome malware. In addition, if you decide to uninstall the hijacker, you might struggle to do it, because the PUP might lurk on the system under an alternative title. Thus, some users might overlook and ignore this hijacker. Nonetheless, ignoring this PUP may lead to disturbing outcomes. Terminate it with FortectIntego.
The transmission of the PUP
This browsing tool prefers using freeware and shareware as a disguise. Unfortunately, free applications prove to be a profitable and efficient cover. Moreover, users’ inattentiveness and naivety that they are safe from encountering potentially malicious programs encourage crooks to continue with their misdeeds. Specifically, few realize that downloading the program from its official website does not guarantee the fact that it might come with bothersome “tricks.” Therefore, it is not surprising how many users fall into the trap set by the developers of the PUPs. That is why we advise you to take these precaution measures to lower the risk of Search Assistant hijack in the future. When you are about to install a new program, choose “Custom” settings. Later on, unmark all optional programs which might be of malignant origin.
Search Assistant elimination methods
You might opt either for automatic or manual Search Assistant removal. In case you choose the latter option, we would like to remind you that precision and attention are essential to exterminate the hijacker properly. Thus, no detail should be overlooked while going through the steps. Likewise, this method may not be convenient for all the victims of Search Assistant virus. The anti-spyware program might be a more efficient solution since it is specifically programmed to locate and exterminate similar virtual pests. Therefore, it is important to update the application for it to remove Search Assistant shortly. After that, you might take a look at manual instructions if you want to reset your former browsing tool.
Uninstall from Windows
Uninstall from Windows 10/8:
- Type Control Panel into the Windows search box and open the result.
- Under Programs, select Uninstall a program.


Uninstall from Windows 7/XP:
- Click on Windows Start > Control Panel (Windows XP users should click on Add/Remove Programs).
- In Control Panel, select Programs > Uninstall a program.


Remove the unwanted program:
- In the Programs and Features window, look for any recently installed suspicious entries, select them, and click Uninstall.
- If User Account Control appears, click Yes to confirm, then complete the removal.


Delete from macOS
Remove the unwanted application:
- From the menu bar, select Go > Applications.
- In the Applications folder, look for any suspicious entries, then drag them to Trash (or right-click and pick Move to Trash).


Delete leftover files and folders:
- Select Go > Go to Folder.
- Enter /Library/Application Support and remove any suspicious folders related to the unwanted program.
- Repeat the same check in the /Library/LaunchAgents and /Library/LaunchDaemons folders, deleting any suspicious entries.

- Finally, empty the Trash to permanently remove the leftovers.

Remove from Microsoft Edge
Delete unwanted extensions from MS Edge:
- Select Menu (three horizontal dots at the top-right of the browser window) and pick Extensions.
- From the list, pick the extension and click on the Gear icon.
- Click Remove.


Clear cookies and other browser data:
- Click on the Menu (three horizontal dots at the top-right of the browser window) and select Settings > Privacy, search, and services..
- Under Clear browsing data, pick Choose what to clear.
- Select Cookies and other site data and Cached images and files. (apart from passwords, although you might want to include Media licenses as well, if applicable) and click on Clear.


Restore new tab and homepage settings:
- Click the menu icon and choose Settings.
- Then find On startup section.
- Click Remove next to any suspicious startup page.
Reset MS Edge if the above steps did not work:
- Press on Ctrl + Shift + Esc to open Task Manager.
- Click on More details arrow at the bottom of the window.
- Select Details tab.
- Now scroll down and locate every entry with Microsoft Edge name in it. Right-click on each of them and select End Task to stop MS Edge from running.


Instructions for Chromium-based Edge
Delete extensions from MS Edge (Chromium):
- Open Edge and click select Settings > Extensions.
- Delete unwanted extensions by clicking Remove.


Clear cache and site data:
- Click on Menu and go to Settings.
- Select Privacy, search and services.
- Under Clear browsing data, pick Choose what to clear.
- Under Time range, pick All time.
- Select Clear now.


Reset Chromium-based MS Edge:
- Click on Menu and select Settings.
- On the left side, pick Reset settings.
- Select Restore settings to their default values.
- Confirm with Reset.
- This will disable extensions and reset startup pages but will not delete bookmarks, saved passwords, or browsing history.


Remove from Mozilla Firefox (FF)
Remove dangerous extensions:
- Open Mozilla Firefox browser and click on the Menu (three horizontal lines at the top-right of the window).
- Select Add-ons.
- In here, select the unwanted extension and click Remove.


Reset the homepage:
- Click three horizontal lines at the top right corner to open the menu.
- Choose Settings.
- Under Home, set your preferred homepage and new tab settings.
Clear cookies and site data:
- Click Menu and pick Settings.
- Go to Privacy & Security section.
- Scroll down to locate Cookies and Site Data.
- Click on Clear Data...
- Select Cookies and Site Data and Temporary cached files and pages, then click Clear.


Reset Mozilla Firefox
If clearing the browser as explained above did not help, reset Mozilla Firefox:
- Open Mozilla Firefox browser and click the Menu.
- Go to Help and then choose Troubleshooting Information.

- Under Give Firefox a tune up section, click on Refresh Firefox...
- Once the pop-up shows up, confirm the action by pressing on Refresh Firefox.



Remove from Google Chrome
Delete malicious extensions from Google Chrome:
- Open Google Chrome, click on the Menu (three vertical dots at the top-right corner) and select More tools > Extensions.
- In the newly opened window, you will see all the installed extensions. Uninstall all suspicious extensions related to the unwanted program by clicking Remove.


Clear cache and web data from Chrome:
- Click on Menu and pick Settings.
- Under Privacy and security, select Clear browsing data.
- Select Browsing history, Cookies and other site data, as well as Cached images and files.
- Click Clear data.


Change your homepage:
- Click menu and choose Settings.
- Look for a suspicious site in the On startup section.
- Click on Open a specific or set of pages and click on three dots to find the Remove option.
Reset Google Chrome:
If the previous methods did not help you, reset Google Chrome to eliminate all the unwanted components:
- Click on Menu and select Settings.
- In the Settings, scroll down and click Advanced.
- Scroll down and locate Reset and clean up section.
- Now click Restore settings to their original defaults.
- Confirm with Reset settings.


Delete from Safari
Remove dangerous extensions:
- Open Safari, click Safari in the menu at the top-left of the screen, and select Preferences.
- Go to the Extensions tab, look for any suspicious entries, and click Uninstall to remove them.


Clear history and website data:
- Click Safari in the menu and pick Clear History.
- Set Clear to all history and confirm with Clear History.


Reset Safari:
- Click Safari in the menu and select Preferences > Advanced.
- Enable Show Develop menu in menu bar.
- From the menu bar, click Develop and select Empty Caches.


Did this guide help?
4 comments
Freddie
This questionable tool got into my computer as well. Removed it manually, though Im considering to install the anti-spyware app. There have been so many ransomware threats lately...
Linda
It seems that all those virtual search assistants are simply useless apps and websites.
Belles
Search Assistant advertises weird pages. I dont tink i will ever need help of this tool again, so I just gotta remove it, I guess.
Hashtag
Thanks for recommending Reimage. It removed this threat from my computer.