

What is there to know about searchgle.com virus?
Thinking about setting searchgle.com virus as your main search engine? Do not rush to do it. You should know that this search provider belongs to the browser hijacker category. Thus, it will irritate you more with its negative features rather than bring benefits. Likewise, you will need to cancel occasional redirects to enter the wanted website. Excessive advertising is another drawback of this PUP. A variety of banners, commercial offers will flood your browser. While the hijacker resides on your computer, you may run into the websites which contain potentially malignant files as well. The PUP looks like to be sponsored by Google, but you should not fall into the deception. Even if it says Google custom search, do not get mislead. All in all, remove searchgle.com from the device. FortectIntego will ensure that the elimination runs smoothly without any disturbances.
Every one of us is used to finding necessary information quickly. In contrast to the original Google search provider, the browser hijacker delivers slightly different search results despite its claims to be affiliated with Google. The search results are supplemented with the links to advertising websites. What is more, they are provided in the initial positions while the website you are looking for is pushed below. Therefore, soon enough you will also encounter searchgle.com redirect. When you attempt to enter a certain domain, you may be redirected to some unknown websites. To your bewilderment, it becomes a bothersome activity to ward off those redirects. However, gaming or pornographic redirects might attract the attention of quite a handful of users. They should remember that after such visit their computers might get assaulted by various malware lurking in those questionable domains. Thus, it is of utmost importance to initiate searchgle.com removal as soon as possible.
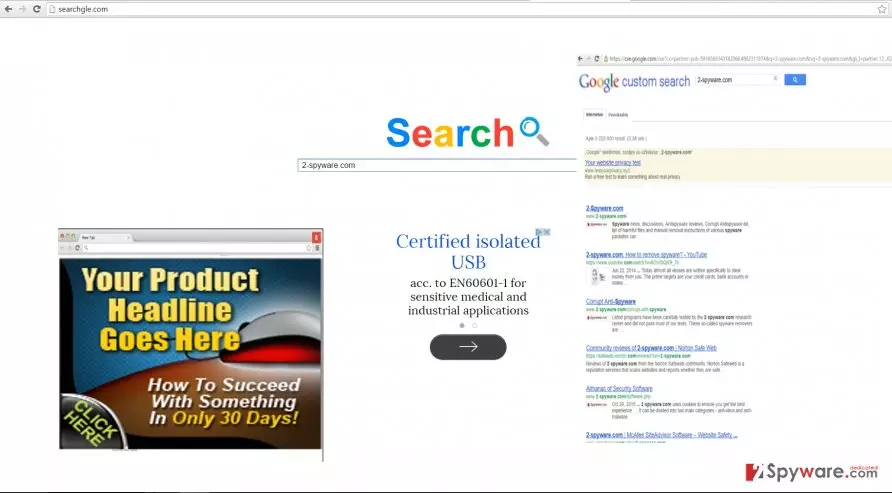
In addition, the hijacker seems to spy on your online activities. Like the majority of Internet websites, it keeps a record of a number of users visiting their website. It collects information about their other visited web pages as well. Browsing frequency and search entries might become valuable information helping the owners of Searchgle not only to “maintain Services” but to create more appealing browser hijackers and adware programs. Such activity earns income for the online advertising companies depending on the number of clicks and views of their commercial offers, while you get nothing except a stream of vivid and annoying advertisements. Lastly, this hijacker disables the security browser extensions of specific security applications. As a consequence, you might struggle to identify which website is secure and which is potentially malignant.
The distribution ways of the PUP
Most likely, your computer has been taken over by searchgle.com hijack at the moment when you were installing a free program. Due to common mistake to avoid reading installation instructions, the PUP successfully entered your system. In order to prevent the re-hijack again, you should keep in mind a few important tips. Usually, adware, browser hijackers, and other unwanted applications are attached to free programs under “Basic” settings. Thus, when you are about to install a new application, select “Advanced” settings. After that, go through each stage carefully to spot any pre-marked add-ons and uncheck them.
Quick searchgle.com removal
We recommend downloading a malware removal tool to help you to eliminate searchgle.com. It will locate and delete all related files quickly as well. If you have such program, you can surf without any worries that any malware infects your computer. Certainly, in order for the program to work properly, it is necessary to renew it regularly. Alternatively, you can remove searchgle.com manually. Remain vigilant and do not miss any detail while following the elimination guidelines. Lastly, downloading the applications from their official domains and checking the reviews of the software you are about to use might also contribute to the overall protection of your computer.
Uninstall from Windows
Uninstall from Windows 10/8:
- Type Control Panel into the Windows search box and open the result.
- Under Programs, select Uninstall a program.


Uninstall from Windows 7/XP:
- Click on Windows Start > Control Panel (Windows XP users should click on Add/Remove Programs).
- In Control Panel, select Programs > Uninstall a program.


Remove the unwanted program:
- In the Programs and Features window, look for any recently installed suspicious entries, select them, and click Uninstall.
- If User Account Control appears, click Yes to confirm, then complete the removal.


Delete from macOS
Remove the unwanted application:
- From the menu bar, select Go > Applications.
- In the Applications folder, look for any suspicious entries, then drag them to Trash (or right-click and pick Move to Trash).


Delete leftover files and folders:
- Select Go > Go to Folder.
- Enter /Library/Application Support and remove any suspicious folders related to the unwanted program.
- Repeat the same check in the /Library/LaunchAgents and /Library/LaunchDaemons folders, deleting any suspicious entries.

- Finally, empty the Trash to permanently remove the leftovers.

Remove from Microsoft Edge
Delete unwanted extensions from MS Edge:
- Select Menu (three horizontal dots at the top-right of the browser window) and pick Extensions.
- From the list, pick the extension and click on the Gear icon.
- Click Remove.


Clear cookies and other browser data:
- Click on the Menu (three horizontal dots at the top-right of the browser window) and select Settings > Privacy, search, and services..
- Under Clear browsing data, pick Choose what to clear.
- Select Cookies and other site data and Cached images and files. (apart from passwords, although you might want to include Media licenses as well, if applicable) and click on Clear.


Restore new tab and homepage settings:
- Click the menu icon and choose Settings.
- Then find On startup section.
- Click Remove next to any suspicious startup page.
Reset MS Edge if the above steps did not work:
- Press on Ctrl + Shift + Esc to open Task Manager.
- Click on More details arrow at the bottom of the window.
- Select Details tab.
- Now scroll down and locate every entry with Microsoft Edge name in it. Right-click on each of them and select End Task to stop MS Edge from running.


Instructions for Chromium-based Edge
Delete extensions from MS Edge (Chromium):
- Open Edge and click select Settings > Extensions.
- Delete unwanted extensions by clicking Remove.


Clear cache and site data:
- Click on Menu and go to Settings.
- Select Privacy, search and services.
- Under Clear browsing data, pick Choose what to clear.
- Under Time range, pick All time.
- Select Clear now.


Reset Chromium-based MS Edge:
- Click on Menu and select Settings.
- On the left side, pick Reset settings.
- Select Restore settings to their default values.
- Confirm with Reset.
- This will disable extensions and reset startup pages but will not delete bookmarks, saved passwords, or browsing history.


Remove from Mozilla Firefox (FF)
Remove dangerous extensions:
- Open Mozilla Firefox browser and click on the Menu (three horizontal lines at the top-right of the window).
- Select Add-ons.
- In here, select the unwanted extension and click Remove.


Reset the homepage:
- Click three horizontal lines at the top right corner to open the menu.
- Choose Settings.
- Under Home, set your preferred homepage and new tab settings.
Clear cookies and site data:
- Click Menu and pick Settings.
- Go to Privacy & Security section.
- Scroll down to locate Cookies and Site Data.
- Click on Clear Data...
- Select Cookies and Site Data and Temporary cached files and pages, then click Clear.


Reset Mozilla Firefox
If clearing the browser as explained above did not help, reset Mozilla Firefox:
- Open Mozilla Firefox browser and click the Menu.
- Go to Help and then choose Troubleshooting Information.

- Under Give Firefox a tune up section, click on Refresh Firefox...
- Once the pop-up shows up, confirm the action by pressing on Refresh Firefox.



Remove from Google Chrome
Delete malicious extensions from Google Chrome:
- Open Google Chrome, click on the Menu (three vertical dots at the top-right corner) and select More tools > Extensions.
- In the newly opened window, you will see all the installed extensions. Uninstall all suspicious extensions related to the unwanted program by clicking Remove.


Clear cache and web data from Chrome:
- Click on Menu and pick Settings.
- Under Privacy and security, select Clear browsing data.
- Select Browsing history, Cookies and other site data, as well as Cached images and files.
- Click Clear data.


Change your homepage:
- Click menu and choose Settings.
- Look for a suspicious site in the On startup section.
- Click on Open a specific or set of pages and click on three dots to find the Remove option.
Reset Google Chrome:
If the previous methods did not help you, reset Google Chrome to eliminate all the unwanted components:
- Click on Menu and select Settings.
- In the Settings, scroll down and click Advanced.
- Scroll down and locate Reset and clean up section.
- Now click Restore settings to their original defaults.
- Confirm with Reset settings.


Delete from Safari
Remove dangerous extensions:
- Open Safari, click Safari in the menu at the top-left of the screen, and select Preferences.
- Go to the Extensions tab, look for any suspicious entries, and click Uninstall to remove them.


Clear history and website data:
- Click Safari in the menu and pick Clear History.
- Set Clear to all history and confirm with Clear History.


Reset Safari:
- Click Safari in the menu and select Preferences > Advanced.
- Enable Show Develop menu in menu bar.
- From the menu bar, click Develop and select Empty Caches.


Did this guide help?
2 comments
Willy
This one can be mistaken for a legitimate search engine.
Robert
I guess, its time I installed an anti-malware application already...