

Servicaetod.top ads might destroy your enjoyment of browsing the web
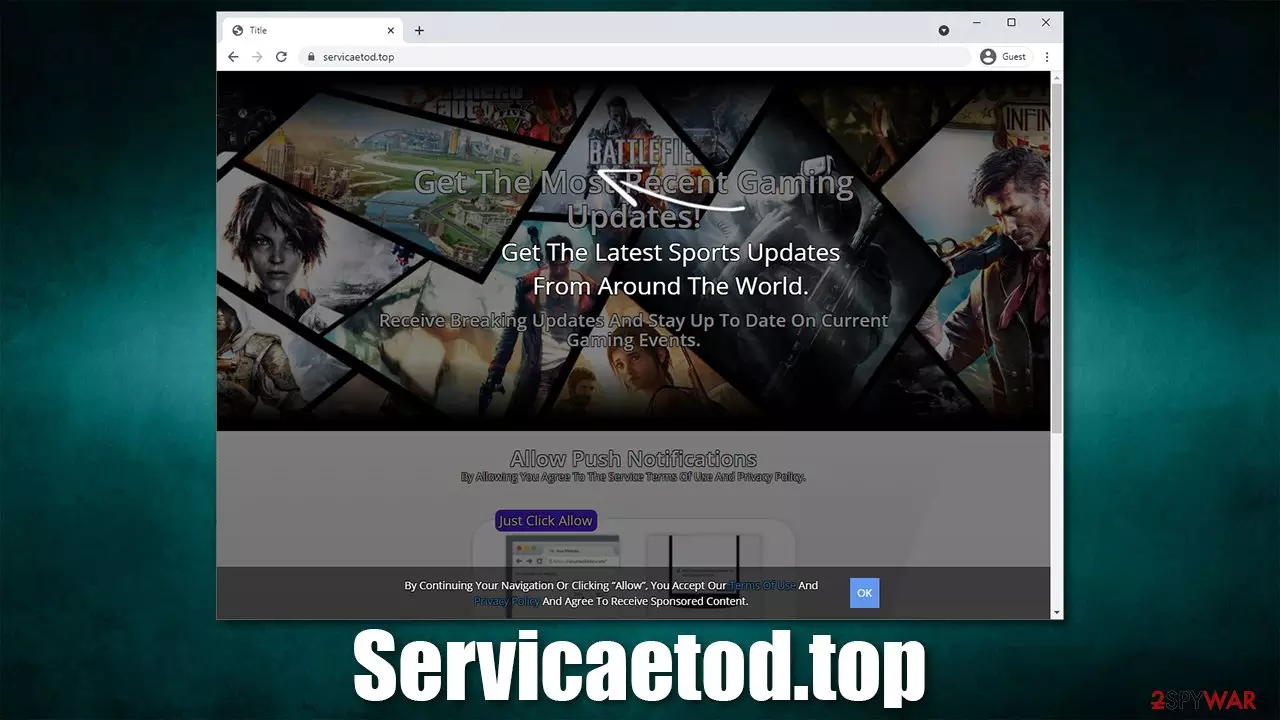
One of the reasons why you get redirected to Servicaetod.top or another suspicious site is adware. These potentially unwanted programs typically get installed without asking users for direct permissions and can cause browser redirects. Therefore you should definitely check your system for infections and remove them at once.
If you are here because you are constantly seeing notifications at the bottom-right corner of your screen, you have been tricked into allowing them in the first place. Servicaetod.top uses various social engineering[1] and scam techniques to make users click the “Allow” button upon entry of the side.
Once this is done, the website is allowed to deliver notifications directly to your screen without asking for permission. These pop-ups often include various unsafe and fraudulent content that should never be trusted. To find out how to stop the notifications and browser redirects, check the information provided below.
| Name | Servicaetod.top |
|---|---|
| Type | Push notifications, scam, ads |
| IP address | 44.198.9.0 |
| Distribution | The injection of intrusive notifications starts as soon as users are tricked into pressing the “Allow” button |
| Symptoms | Users start seeing popups on their desktops at any time when the machine is turned on |
| Dangers | Clicking on links that are embedded within the notification prompt, exploring the sites these links bring to or downloading files can be particularly dangerous – users can get infected with malware, suffer from financial losses or privacy issues |
| Elimination | To prevent the site from displaying notifications to you, access the site permission section via your web browser settings – you can find more details below |
| Further steps | Redirects and ads might indicate adware infection, so you should check your system with anti-malware, clean your browsers, and attempt to fix virus damage with a repair tool FortectIntego |
Push notifications were intended to be a useful feature
Push notifications are not a malicious feature in itself, although many security experts predicted that it could be easily abused – and it did not take long. For several years now, push notification scams to keep popping up, as should be obvious be previously described Hurirk.net, Captchacheckout.top, 1stepdownload.com, and many other malicious websites.
Initially, users can choose to decline or allow notifications to be shown from a website that they visit. When used properly, the feature can be particularly useful – users can receive relevant information directly on their screens. However, they can also bring in spam, malicious links, and other unwanted content as well.
All scammers need to do is convince users that what they are clicking is something completely different – and that's what they are trying to do. While many users recognize deception and leave the site immediately, others might not be that lucky and get tricked by a fake notification.
Upon site entry, users are typically shown a relatively blank page that includes a brief message, such as:
Prepare to download!
You need to enable browser notifications to start downloading
ENABLE AND DOWNLOAD
Crooks are claiming that there is something to be downloaded, and, in order for it to begin, users need to enable notifications. However, this makes no sense at all because you do not need to enable notifications to begin downloading files; it is simply not how it works. Besides, downloading random files from the internet is very risky, and you should never do that.

However, this is just one of the examples. In order cases, website authors often use a well-known scam technique that portrays the process as a verification. Visitors are shown a picture of a robot and then asked to press allow to “continue.” Crooks are clearly referring to the bot and DDoS[2] attack protection that many websites use (captcha images or phrases are great examples).
Because users are so used to these verifications, they might believe that the request is valid and click the “Allow” button after all. After this, however, there is no file to be downloaded, no video to watch, and no further content to explore. They are instead to be redirected to other websites that ask for exactly the same thing or, even worse, asked to download malicious programs or provide their personal information.
Notification removal instructions
If you are here, you probably already scanned your system, with anti-malware and nothing came up, although you keep receiving those pesky Servicaetod.top notifications that show up at random times. You are not alone, and thousands of users experienced the same thing.
This is because, technically, notifications are not a virus, it is simply a legitimate feature used by malicious actors to deliver less than desirable content. In order to stop the notifications from being shown, all you have to do is access your web browser's settings and deny the permission.
Chrome
- Open Google Chrome browser and go to Menu > Settings.
- Scroll down and click on Advanced.
- Locate Privacy and security section and pick Site Settings > Notifications.
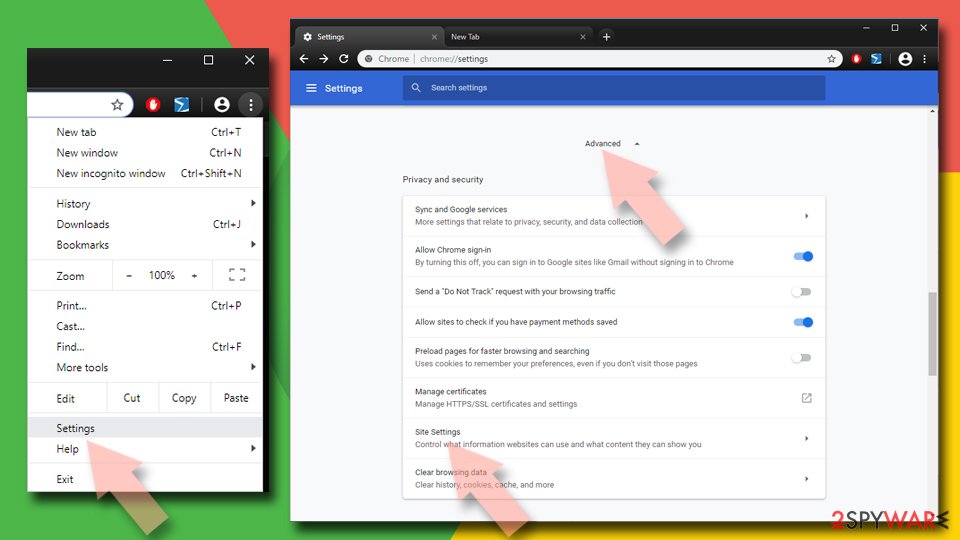

- Look at the Allow section and look for a suspicious URL.
- Click the three vertical dots next to it and pick Block. This should remove unwanted notifications from Google Chrome.
Mozilla Firefox
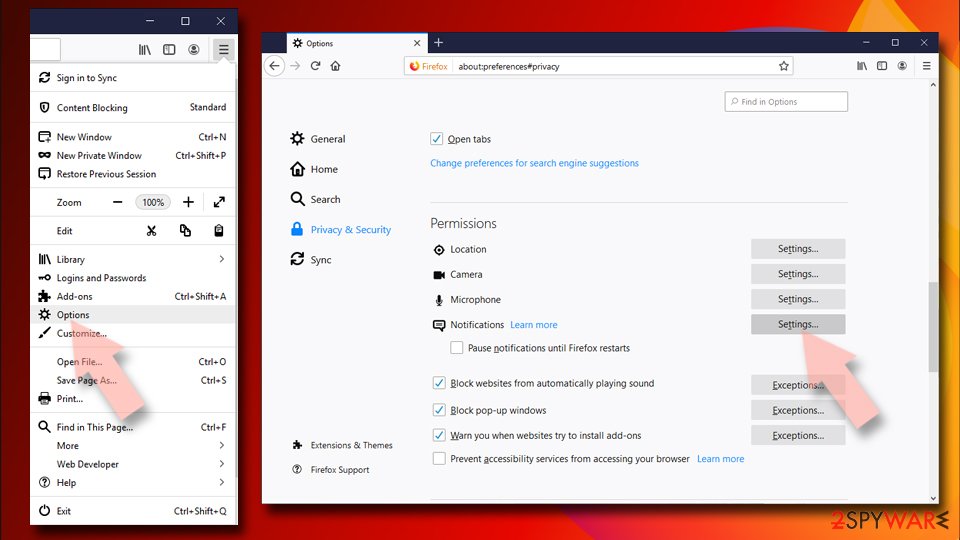
- Open Mozilla Firefox and go to Menu > Options.
- Click on Privacy & Security section.
- Under Permissions, you should be able to see Notifications. Click Settings button next to it.
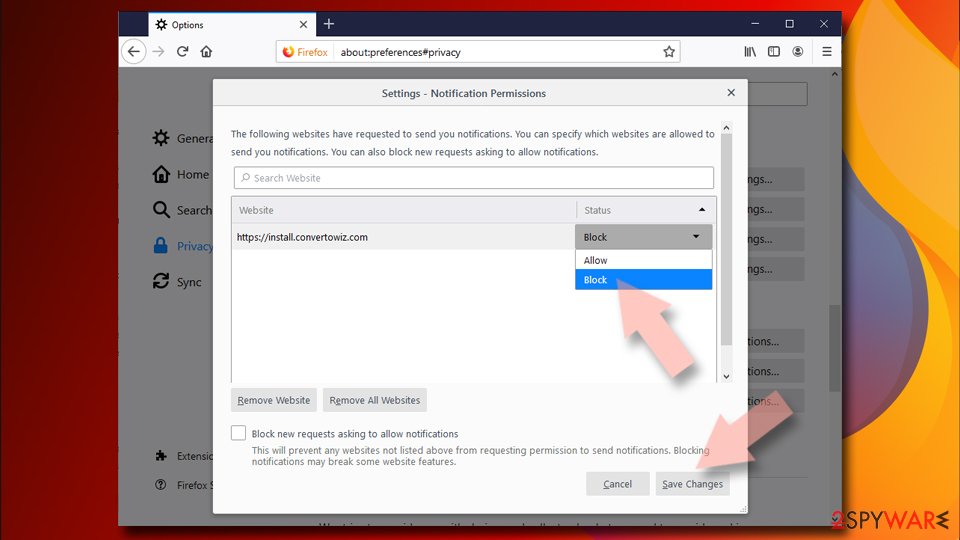
- In the Settings – Notification Permissions window, click on the drop-down menu by the URL in question.
- Select Block and then click on Save Changes. This should remove unwanted notifications from Mozilla Firefox.


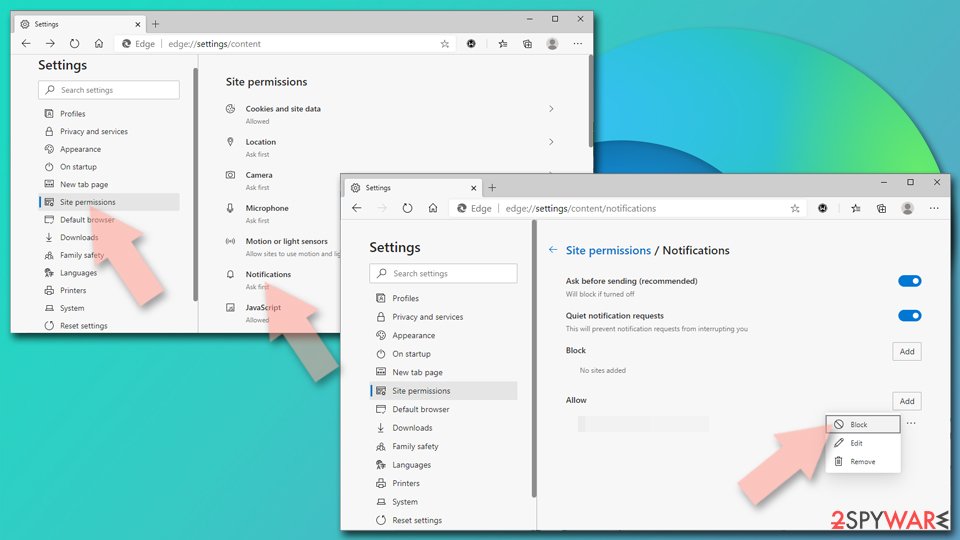
MS Edge (Chromium)
- Open Microsoft Edge, and go to Settings.
- Select Site permissions.
- Go to Notifications on the right.
- Under Allow, you will find the unwanted entry.
- Click on More actions and select Block.

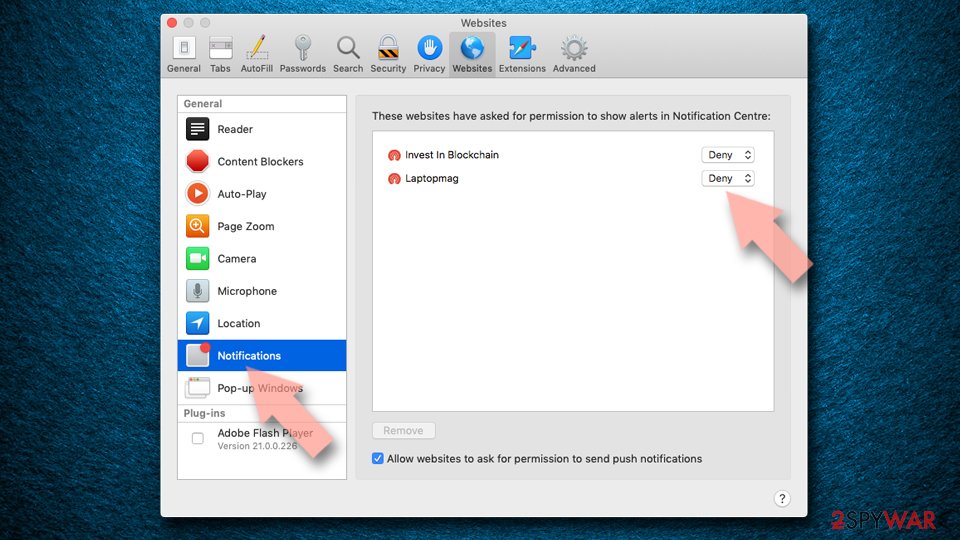
Safari
- Click on Safari > Preferences…
- Go to Websites tab and, under General, select Notifications.
- Select the web address in question, click the drop-down menu and select Deny.

In order to prevent being scammed in the future, you should be more careful when dealing with a computer connected to the internet. Here are a few tips from novirus.uk[3] experts:
- No matter which message you receive, the notification prompt always results in you allowing that particular website to allow notifications to be shown – these can be malicious;
- Never trust messages which claim that it has been found that your system is infected and needs cleaning;
- Flash Player update prompts are most certainly fake, as the plugin is now discontinued and relatively obsolete;
- Always check the URL of the website that is asking you to provide sensitive information or download some type of software (for example, updates for Windows or any other program);
- Employ your system with powerful anti-malware tools – we recommend using SpyHunterCombo Cleaner or MalwarebytesMalwarebytes.
How to deal with adware
If you have performed the above actions to stop notifications from being shown, your problem should have gone away. However, it is important to note that intrusive browser behavior (aggressive ads, redirects, etc.) might be a sign of adware infection.
Thus, if you are commonly redirected to suspicious websites, you should definitely check your system for potentially unwanted programs and malware. The easiest way of doing so is by using antivirus software, although manual elimination is also possible (if you are IT-savvy enough).
Regardless if you choose a manual or automatic removal method, you should always clean your web browsers from cookies and delete the web data; otherwise, the ads and other unwanted behavior might continue. Besides, cookies are used to track user data – they are in use even after removing adware from your device.
This is why it is so vital to clean your web browser correctly. To save time, you can always rely on automatic tools such as FortectIntego. Otherwise, use the instructions we provide for each of the most popular web browsers below.
Remove from Microsoft Edge
Delete unwanted extensions from MS Edge:
- Select Menu (three horizontal dots at the top-right of the browser window) and pick Extensions.
- From the list, pick the extension and click on the Gear icon.
- Click Remove.


Clear cookies and other browser data:
- Click on the Menu (three horizontal dots at the top-right of the browser window) and select Settings > Privacy, search, and services..
- Under Clear browsing data, pick Choose what to clear.
- Select Cookies and other site data and Cached images and files. (apart from passwords, although you might want to include Media licenses as well, if applicable) and click on Clear.


Restore new tab and homepage settings:
- Click the menu icon and choose Settings.
- Then find On startup section.
- Click Remove next to any suspicious startup page.
Reset MS Edge if the above steps did not work:
- Press on Ctrl + Shift + Esc to open Task Manager.
- Click on More details arrow at the bottom of the window.
- Select Details tab.
- Now scroll down and locate every entry with Microsoft Edge name in it. Right-click on each of them and select End Task to stop MS Edge from running.


Instructions for Chromium-based Edge
Delete extensions from MS Edge (Chromium):
- Open Edge and click select Settings > Extensions.
- Delete unwanted extensions by clicking Remove.


Clear cache and site data:
- Click on Menu and go to Settings.
- Select Privacy, search and services.
- Under Clear browsing data, pick Choose what to clear.
- Under Time range, pick All time.
- Select Clear now.


Reset Chromium-based MS Edge:
- Click on Menu and select Settings.
- On the left side, pick Reset settings.
- Select Restore settings to their default values.
- Confirm with Reset.
- This will disable extensions and reset startup pages but will not delete bookmarks, saved passwords, or browsing history.


Remove from Mozilla Firefox (FF)
Remove dangerous extensions:
- Open Mozilla Firefox browser and click on the Menu (three horizontal lines at the top-right of the window).
- Select Add-ons.
- In here, select the unwanted extension and click Remove.


Reset the homepage:
- Click three horizontal lines at the top right corner to open the menu.
- Choose Settings.
- Under Home, set your preferred homepage and new tab settings.
Clear cookies and site data:
- Click Menu and pick Settings.
- Go to Privacy & Security section.
- Scroll down to locate Cookies and Site Data.
- Click on Clear Data...
- Select Cookies and Site Data and Temporary cached files and pages, then click Clear.


Reset Mozilla Firefox
If clearing the browser as explained above did not help, reset Mozilla Firefox:
- Open Mozilla Firefox browser and click the Menu.
- Go to Help and then choose Troubleshooting Information.

- Under Give Firefox a tune up section, click on Refresh Firefox...
- Once the pop-up shows up, confirm the action by pressing on Refresh Firefox.



Remove from Google Chrome
Delete malicious extensions from Google Chrome:
- Open Google Chrome, click on the Menu (three vertical dots at the top-right corner) and select More tools > Extensions.
- In the newly opened window, you will see all the installed extensions. Uninstall all suspicious extensions related to the unwanted program by clicking Remove.


Clear cache and web data from Chrome:
- Click on Menu and pick Settings.
- Under Privacy and security, select Clear browsing data.
- Select Browsing history, Cookies and other site data, as well as Cached images and files.
- Click Clear data.


Change your homepage:
- Click menu and choose Settings.
- Look for a suspicious site in the On startup section.
- Click on Open a specific or set of pages and click on three dots to find the Remove option.
Reset Google Chrome:
If the previous methods did not help you, reset Google Chrome to eliminate all the unwanted components:
- Click on Menu and select Settings.
- In the Settings, scroll down and click Advanced.
- Scroll down and locate Reset and clean up section.
- Now click Restore settings to their original defaults.
- Confirm with Reset settings.


Delete from Safari
Remove dangerous extensions:
- Open Safari, click Safari in the menu at the top-left of the screen, and select Preferences.
- Go to the Extensions tab, look for any suspicious entries, and click Uninstall to remove them.


Clear history and website data:
- Click Safari in the menu and pick Clear History.
- Set Clear to all history and confirm with Clear History.


Reset Safari:
- Click Safari in the menu and select Preferences > Advanced.
- Enable Show Develop menu in menu bar.
- From the menu bar, click Develop and select Empty Caches.


Did this guide help?
Be the first to comment