

Uchadmir.buzz ads can expose users to malicious pages just to keep collecting views and clicks on sites

Uchadmir.buzz is the adware-type program that tries to show content on the screen that can trick users into subscribing to push notifications. This way, the program can ensure that notification spam is directly sent to the screen when the web browser is even closed. This is the worst about the potentially unwanted programs.
The particular issue with these intruders is that the application is unnoticed and spreads silently around to affect the behavior of the infected machine. Uchadmir.buzz ads and notifications appear out of nowhere, but the intruder is the one that controls this behavior and processes on the computer.
| Name | Uchadmir.buzz |
|---|---|
| Type | Adware, push notifications, redirect |
| Category | Potentially unwanted program |
| Serving IP | 107.22.28.167 |
| Distribution | Freeware installations, other infections, deceptive pages |
| Issues | The program is related to other advertisers and PUP distributors. It can lead to privacy issues |
| Removal | Threats can be removed using anti-malware tools |
| Repair | FortectIntego can help with the leftovers of the PUP |
These browser-based programs like adware[1] or the browser hijacker, other PUPs, toolbars, and browser extensions can inject other tools into the machine too. The infection can display various fake messages and try to trick you into believing that the machine is affected by threats.
Those errors and security alerts that Uchadmir.buzz shows are not related to the computer you see constantly on. The infection can show various deceptive content just to trick people into interacting with online content and allowing installations or even purchases of fake security tools.
Stop intrusive notifications
Uchadmir.buzz causes push notifications that either trigger direct desktop redirects or those scam messages.[2] The infection has a strategy to show deceptive materials so users interact with the pop-up and allows additional content from this or other pages.
Content like this is closely related to third-party advertisers, scammers, other infection spreading platforms, and pages that create issues with the machine further. You need to stop those notifications from coming and the particular Uchadmir.buzz site from triggering changes and the appearance of the unwanted content on the screen. Try to do that manually.
Remove unwanted notifications from Google Chrome (desktop):
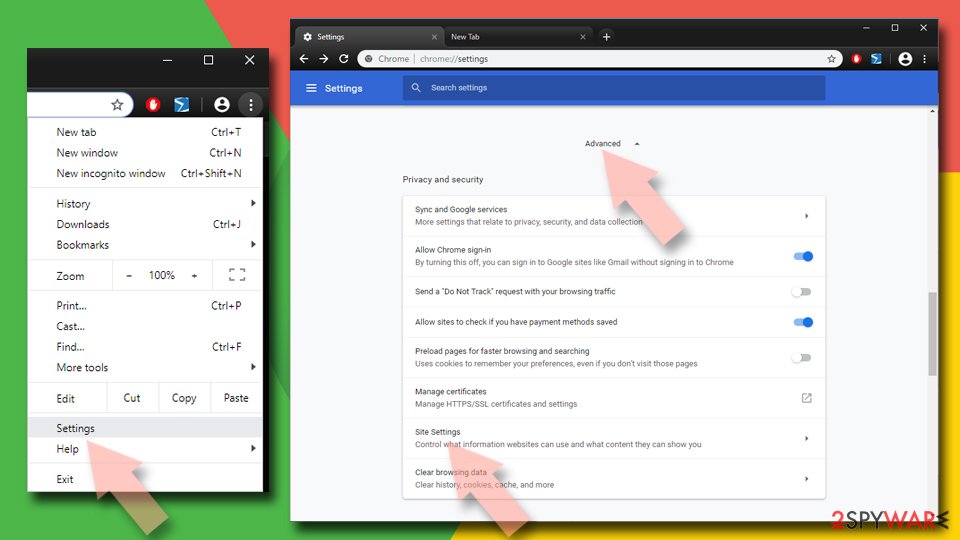
- Open Google Chrome browser and go to Menu > Settings.
- Scroll down and click on Advanced.
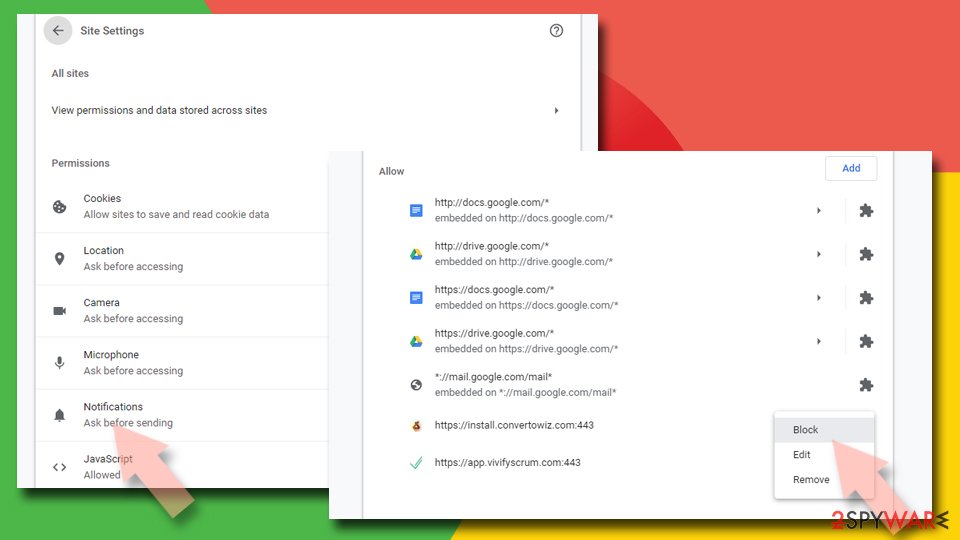
- Locate Privacy and security section and pick Site Settings > Notifications.
- Look at the Allow section and look for a suspicious URL.
- Click the three vertical dots next to it and pick Block. This should remove unwanted notifications from Google Chrome.


Remove unwanted notifications from Google Chrome (Android):
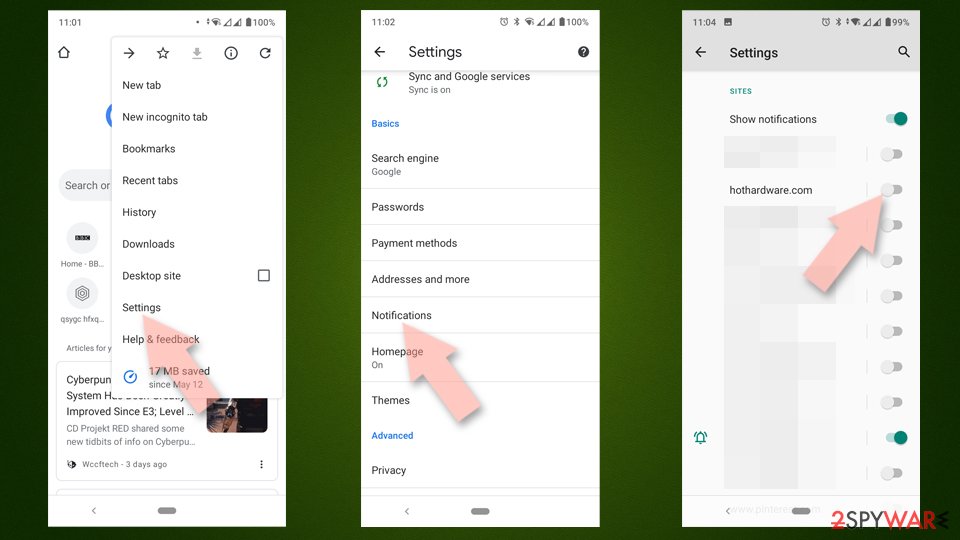
- Open Google Chrome and tap on Settings (three vertical dots).
- Select Notifications.
- Scroll down to the Sites section.
- Locate the unwanted URL and toggle the button to the left (Off setting).

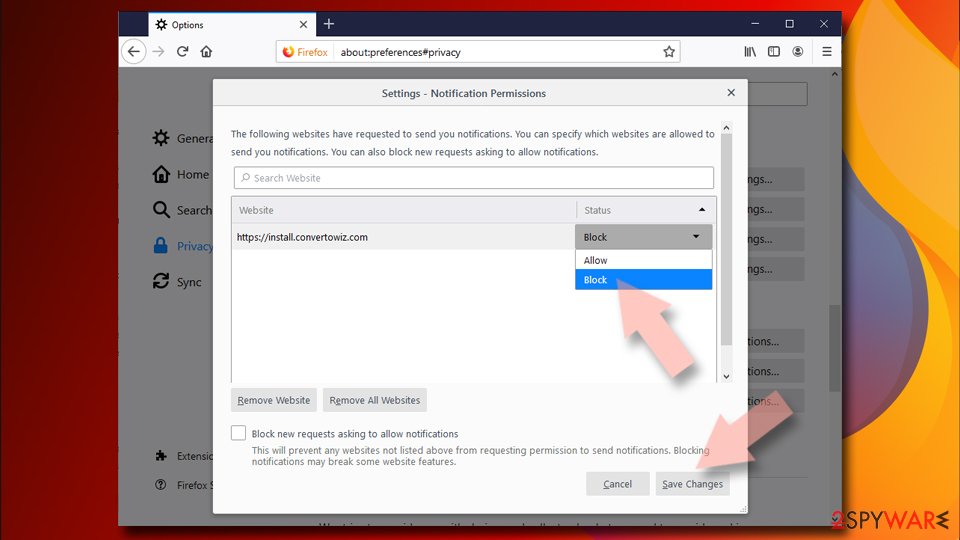
Remove unwanted notifications from Mozilla Firefox:
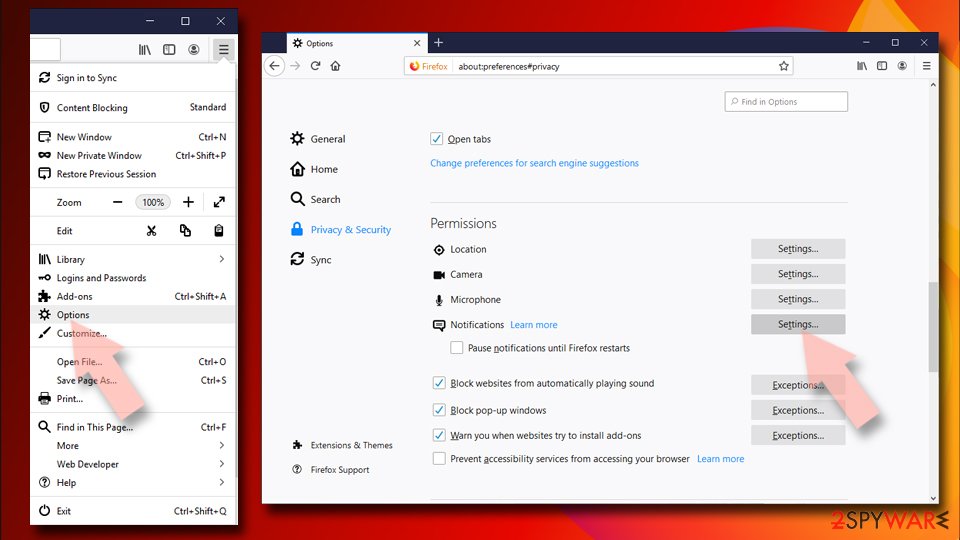
- Open Mozilla Firefox and go to Menu > Options.
- Click on Privacy & Security section.
- Under Permissions, you should be able to see Notifications. Click the Settings button next to it.
- In the Settings – Notification Permissions window, click on the drop-down menu by the URL in question.
- Select Block and then click on Save Changes. This should remove unwanted notifications from Mozilla Firefox.


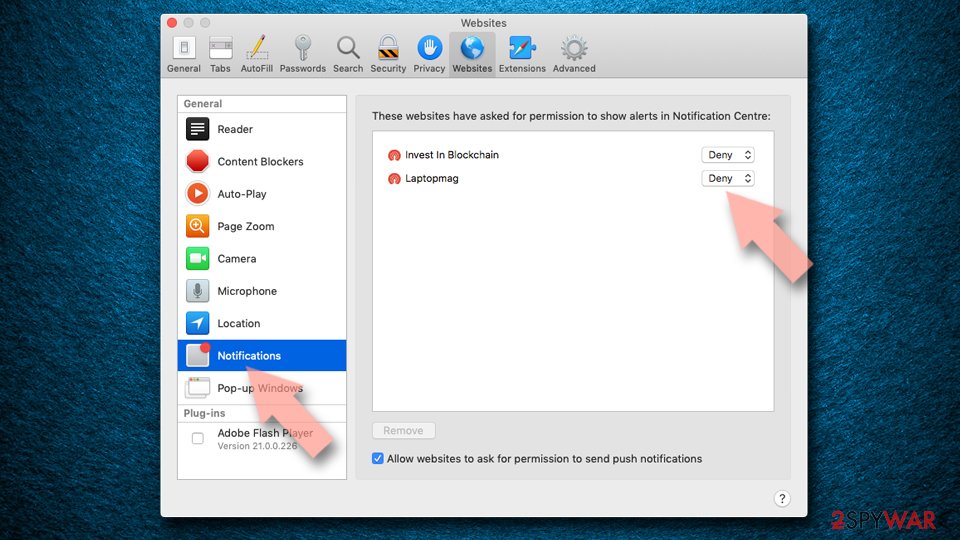
Remove unwanted notifications from Safari:
- Click on Safari > Preferences…
- Go to the Websites tab and, under General, select Notifications.
- Select the web address in question, click the drop-down menu and select Deny.

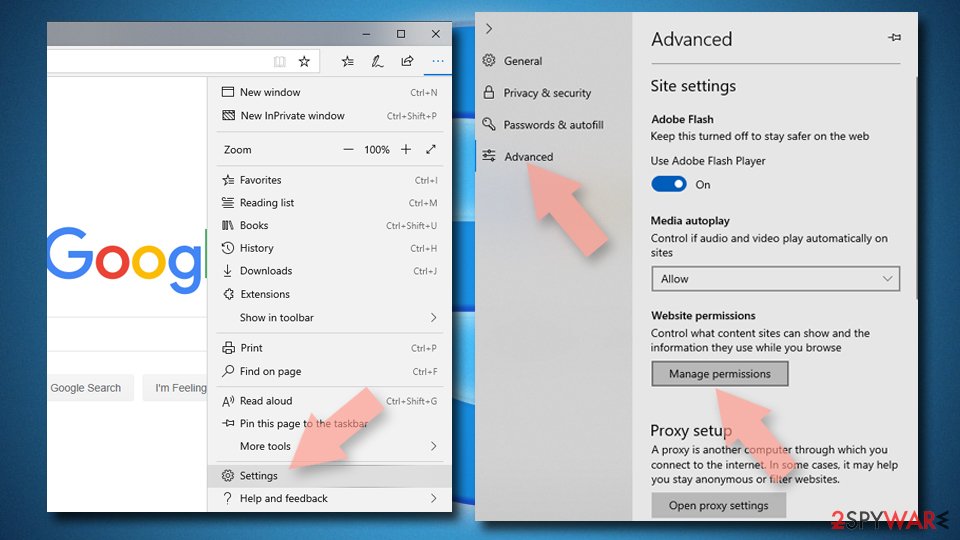
Remove unwanted notifications from MS Edge:
- Open Microsoft Edge, and click the Settings and more button (three horizontal dots) at the top-right of the window.
- Select Settings and then go to Advanced.
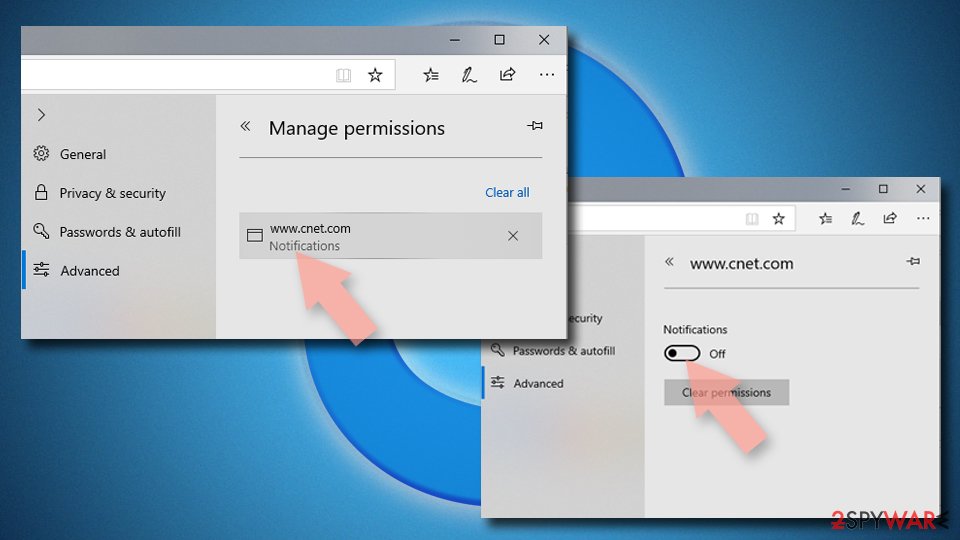
- Under Website permissions, pick Manage permissions and select the URL in question.
- Toggle the switch to the left to turn notifications off on Microsoft Edge.


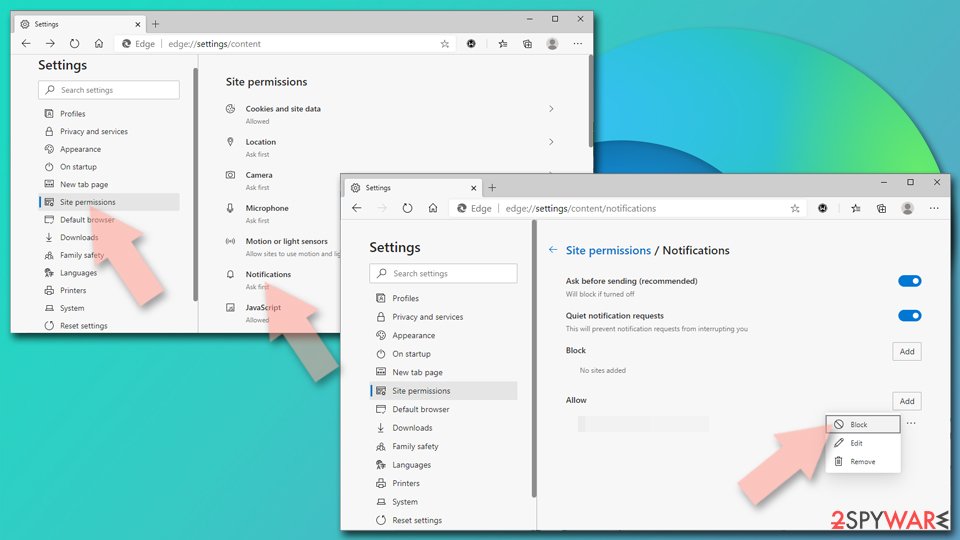
Remove unwanted notifications from MS Edge (Chromium):
- Open Microsoft Edge, and go to Settings.
- Select Site permissions.
- Go to Notifications on the right.
- Under Allow, you will find the unwanted entry.
- Click on More actions and select Block.

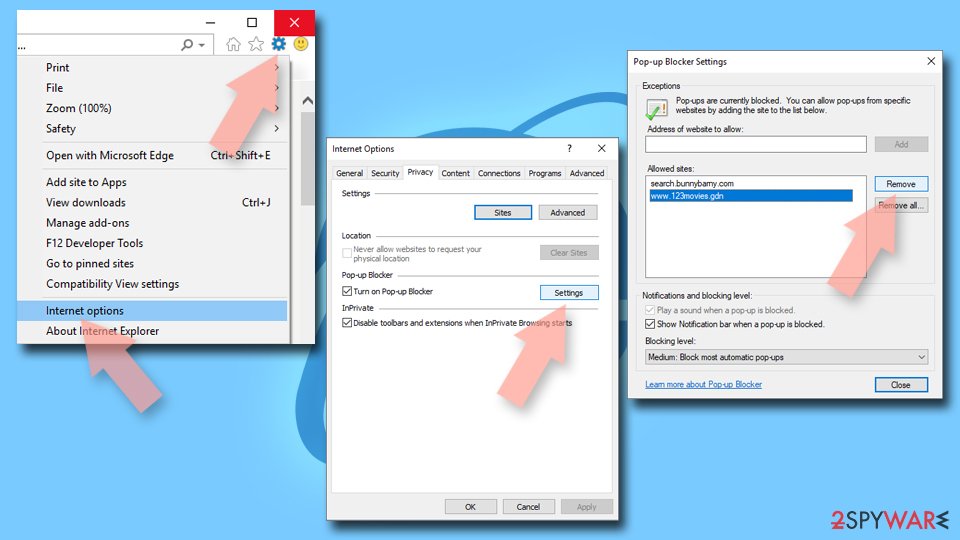
Remove unwanted notifications from Internet Explorer:
- Open Internet Explorer, and click on the Gear icon at the top-right of the window.
- Select Internet options and go to the Privacy tab.
- In the Pop-up Blocker section, click on Settings.
- Locate web address in question under Allowed sites and pick Remove.

Remove the infection
Generally, all these issues with the browsing performance and behavior of the adware are caused by the app that runs in the background. Uchadmir.buzz adware can be removed using SpyHunterCombo Cleaner or MalwarebytesMalwarebytes because these tools are based on powerful detection engines and can indicate all infections that create issues with the machine.
You can see notifications and ads randomly, but there are symptoms that indicate PUP installations:
- redirects to ransom pages;
- personalized ads on sites that do not show ads;
- speed issues;
- other installed apps;
- in-text links, banners, and pop-ups.
Potentially unwanted programs can damage the machine further and do that by running in the background and not causing any of the symptoms. The silent intruder can get injected by other threats, so you are puzzled when those notifications and Uchadmir.buzz ads appear on the screen.
The AV tools can check various parts of the machine and remove all infection pieces that can be considered potentially malicious or dangerous to the computer. Scanning the machine with such a program can be helpful at any point because tools can indicate active but hidden infections and help you remove Uchadmir.buzz before it triggers more issues. This is what experts[3] recommend.

Avoiding PUPs in the first place
Many websites like Uchadmir.buzz are created to trick people online with promotional advertisements and other content that push useless tools and browser-based applications. This is how the infection can be distributed, and there are various platforms like this that can lead to freeware installations.
Uchadmir.buzz ads and push notifications to appear when the application is installed on the machine. That can be affected when freeware installations are chosen to be quick or with recommended options during the procedure. You should rely on Advanced or Custom methods instead.
This way, the threat can be avoided and de-selected from the download list, and all the things that get installed are wanted and needed. Software bundling methods can be used by other pirating sites and torrent services, so make sure to avoid any of these sites to keep the Uchadmir.buzz and other adware off of the machine.
Uninstall from Windows
Uninstall from Windows 10/8:
- Type Control Panel into the Windows search box and open the result.
- Under Programs, select Uninstall a program.


Uninstall from Windows 7/XP:
- Click on Windows Start > Control Panel (Windows XP users should click on Add/Remove Programs).
- In Control Panel, select Programs > Uninstall a program.


Remove the unwanted program:
- In the Programs and Features window, look for any recently installed suspicious entries, select them, and click Uninstall.
- If User Account Control appears, click Yes to confirm, then complete the removal.


Delete from macOS
Remove the unwanted application:
- From the menu bar, select Go > Applications.
- In the Applications folder, look for any suspicious entries, then drag them to Trash (or right-click and pick Move to Trash).


Delete leftover files and folders:
- Select Go > Go to Folder.
- Enter /Library/Application Support and remove any suspicious folders related to the unwanted program.
- Repeat the same check in the /Library/LaunchAgents and /Library/LaunchDaemons folders, deleting any suspicious entries.

- Finally, empty the Trash to permanently remove the leftovers.

Remove from Microsoft Edge
Delete unwanted extensions from MS Edge:
- Select Menu (three horizontal dots at the top-right of the browser window) and pick Extensions.
- From the list, pick the extension and click on the Gear icon.
- Click Remove.


Clear cookies and other browser data:
- Click on the Menu (three horizontal dots at the top-right of the browser window) and select Settings > Privacy, search, and services..
- Under Clear browsing data, pick Choose what to clear.
- Select Cookies and other site data and Cached images and files. (apart from passwords, although you might want to include Media licenses as well, if applicable) and click on Clear.


Restore new tab and homepage settings:
- Click the menu icon and choose Settings.
- Then find On startup section.
- Click Remove next to any suspicious startup page.
Reset MS Edge if the above steps did not work:
- Press on Ctrl + Shift + Esc to open Task Manager.
- Click on More details arrow at the bottom of the window.
- Select Details tab.
- Now scroll down and locate every entry with Microsoft Edge name in it. Right-click on each of them and select End Task to stop MS Edge from running.


Instructions for Chromium-based Edge
Delete extensions from MS Edge (Chromium):
- Open Edge and click select Settings > Extensions.
- Delete unwanted extensions by clicking Remove.


Clear cache and site data:
- Click on Menu and go to Settings.
- Select Privacy, search and services.
- Under Clear browsing data, pick Choose what to clear.
- Under Time range, pick All time.
- Select Clear now.


Reset Chromium-based MS Edge:
- Click on Menu and select Settings.
- On the left side, pick Reset settings.
- Select Restore settings to their default values.
- Confirm with Reset.
- This will disable extensions and reset startup pages but will not delete bookmarks, saved passwords, or browsing history.


Remove from Mozilla Firefox (FF)
Remove dangerous extensions:
- Open Mozilla Firefox browser and click on the Menu (three horizontal lines at the top-right of the window).
- Select Add-ons.
- In here, select the unwanted extension and click Remove.


Reset the homepage:
- Click three horizontal lines at the top right corner to open the menu.
- Choose Settings.
- Under Home, set your preferred homepage and new tab settings.
Clear cookies and site data:
- Click Menu and pick Settings.
- Go to Privacy & Security section.
- Scroll down to locate Cookies and Site Data.
- Click on Clear Data...
- Select Cookies and Site Data and Temporary cached files and pages, then click Clear.


Reset Mozilla Firefox
If clearing the browser as explained above did not help, reset Mozilla Firefox:
- Open Mozilla Firefox browser and click the Menu.
- Go to Help and then choose Troubleshooting Information.

- Under Give Firefox a tune up section, click on Refresh Firefox...
- Once the pop-up shows up, confirm the action by pressing on Refresh Firefox.



Remove from Google Chrome
Delete malicious extensions from Google Chrome:
- Open Google Chrome, click on the Menu (three vertical dots at the top-right corner) and select More tools > Extensions.
- In the newly opened window, you will see all the installed extensions. Uninstall all suspicious extensions related to the unwanted program by clicking Remove.


Clear cache and web data from Chrome:
- Click on Menu and pick Settings.
- Under Privacy and security, select Clear browsing data.
- Select Browsing history, Cookies and other site data, as well as Cached images and files.
- Click Clear data.


Change your homepage:
- Click menu and choose Settings.
- Look for a suspicious site in the On startup section.
- Click on Open a specific or set of pages and click on three dots to find the Remove option.
Reset Google Chrome:
If the previous methods did not help you, reset Google Chrome to eliminate all the unwanted components:
- Click on Menu and select Settings.
- In the Settings, scroll down and click Advanced.
- Scroll down and locate Reset and clean up section.
- Now click Restore settings to their original defaults.
- Confirm with Reset settings.


Delete from Safari
Remove dangerous extensions:
- Open Safari, click Safari in the menu at the top-left of the screen, and select Preferences.
- Go to the Extensions tab, look for any suspicious entries, and click Uninstall to remove them.


Clear history and website data:
- Click Safari in the menu and pick Clear History.
- Set Clear to all history and confirm with Clear History.


Reset Safari:
- Click Safari in the menu and select Preferences > Advanced.
- Enable Show Develop menu in menu bar.
- From the menu bar, click Develop and select Empty Caches.


Did this guide help?
Be the first to comment