
Web.bwanet.ca: what it is and how to remove it
Web.bwanet.ca hijacks browser settings to display ads and redirect searches. Stealth installation makes it difficult to remove without specialized tools.
Facts checked October 8, 2026. Removal steps tested on Windows 11 (26H2) and checked against Microsoft's and the browser makers' current documentation. Sections marked as our earlier report are the original text: they describe the threat as it was then and have not been reviewed since. The 2026 status, the removal steps and the questions are current.
Automatic
Get a free scan and check if your PC is infected.
Fortect finds malware, unwanted programs and the Windows damage they leave behind, and repairs it in one pass.
A quick scan confirms nothing else was installed alongside the cnet.com search hijacker.
Do it yourself · free Remove Web.bwanet.ca yourself 5 steps, about 15 minutes, no software needed.
Start the steps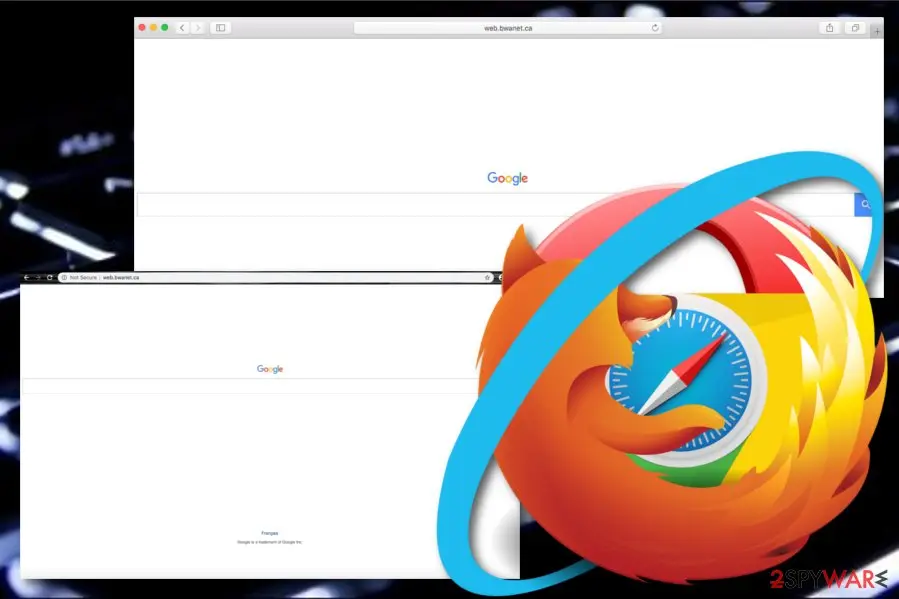
Web.bwanet.ca: summary
| Name | Web.bwanet.ca |
|---|---|
| Type | Browser hijacker/PUP |
| Purpose | To infect a big number of users, alter their search providers, deliver intrusive ads for income, redirect to affiliate sources and provide bogus offers |
| Target(s) | The main target of this adware supposedly is Google Chrome but the bogus product can still appear on other browser apps such as Mozilla Firefox, Internet Explorer, Microsoft Edge, and Safari |
| Distributed | "Software bundling" is one of the main techniques used for delivering this third-party application to computers and browser apps |
| Delete it | You can employ reliable automatical software to get rid of the browser hijacker or try using the step-by-step guidelines that are added to the end of this article |
| Removal | Scan the PC with security software to find and remove the malware and anything installed with it. Fortect scans Windows for malware and repairs the system files and settings it damaged. Remove it nowTo use the full-featured product, you have to purchase a license for Fortect. The scan is free. |
Show 9 more facts
| Detection names | No Microsoft detection name is known |
|---|---|
| Distribution | Not recorded in the old report |
| Damage | Not recorded in the old report |
| Symptoms | A changed search engine |
| Evidence | 5 write-ups by security sites; details still limited |
| Search page | cnet.com |
| Browsers | Chrome, Edge and Firefox |
| First seen | 6 January 2021 |
| Facts checked | 5 October 2026 |
Is Web.bwanet.ca dangerous? What it collects
Mobilebrowser.bwanet.ca and removing bwanet from an Android phone
Mobilebrowser.bwanet.ca appears in searches as the mobile form of the same name.
We found no reliable source that explains how the mobile address is reached, so we treat it as the phone side of the same browser hijack. That is our reading, not a confirmed fact.
On Android, start with the browser. Open Chrome settings, check the default search engine and the site notification list, and remove anything you did not add. Then open the phone's app list and uninstall any app you do not recognize, especially one installed around the time the redirects began.
If the redirects stay, run a Google Play Protect scan and restart the phone in Safe mode to see whether a downloaded app is the cause. Do not install a cleaner that an ad recommends, because that is often the next trap.
What mobilebrowser.bwanet.ca/hpr/ is and how to remove bwanet from an Android phone
Mobilebrowser.bwanet.ca/hpr/ is an address on the same bwanet.ca domain as Web.bwanet.ca, opened in a phone browser instead of a desktop one.
We found no reliable source that explains the /hpr/ path or names the company behind it. Our reading is that it is the mobile landing page of the same search and redirect setup this guide describes.
Warning: Treat it the same way and never allow notifications from it.
Do not install anything it offers.
Mobile browser bwanet means the same thing as the search above: a phone browser that opens a bwanet.ca page by itself or uses it as its home page. We found no official vendor or carrier page about it.
User reports on phone forums link it to a browser or home page setting on the device rather than to a known app, but those reports are not confirmed. So first check what your own browser is set to open.
To remove bwanet from an Android phone, start with Chrome. Open Chrome, tap the three dot More menu and open Settings. Under Advanced tap Homepage and choose Chrome's default or a page you trust.
Then open the Google Play Store and tap your profile icon. Go to Manage apps & devices and then Manage, and uninstall any app you do not recognise. Google notes some of these steps work only on Android 13 and up.
If bwanet.ca still opens after that, the setting may come from an app that shipped with the phone. Google says preinstalled apps cannot be deleted, and on some phones they can only be disabled, so ask the phone maker or your mobile carrier which app sets the start page.
On an iPhone, check the home page of the browser you use the same way. A quiet day does not prove the redirect is gone.
From our report of Jan 2021 · not reviewed since
More from our earlier report on Web.bwanet.ca
- If you have found out that the browser hijacker has made a negative effect on some of your system files, try employing and repairing the system components with this tool as it might help
Check your browser and PC
- Address:
cnet.com
How to remove Web.bwanet.ca
How to remove Web.bwanet.ca and get your search engine back
Remove the extension first.
The search settings only stay fixed once nothing on the PC can change them again.
Step 1: Remove extensions you did not add
In Chrome open
chrome://extensions, in Edgeedge://extensions, and in Firefox the menu > Extensions and themes.Remove every extension you do not remember adding, especially search, new tab, coupon, PDF, weather or video downloader add-ons. Check every browser and every profile, because each keeps its own list.
If an extension has no Remove button or comes back, a browser policy holds it (see "Managed by your organization" in the procedure below). The pages are the same on Windows 11 and Windows 10.
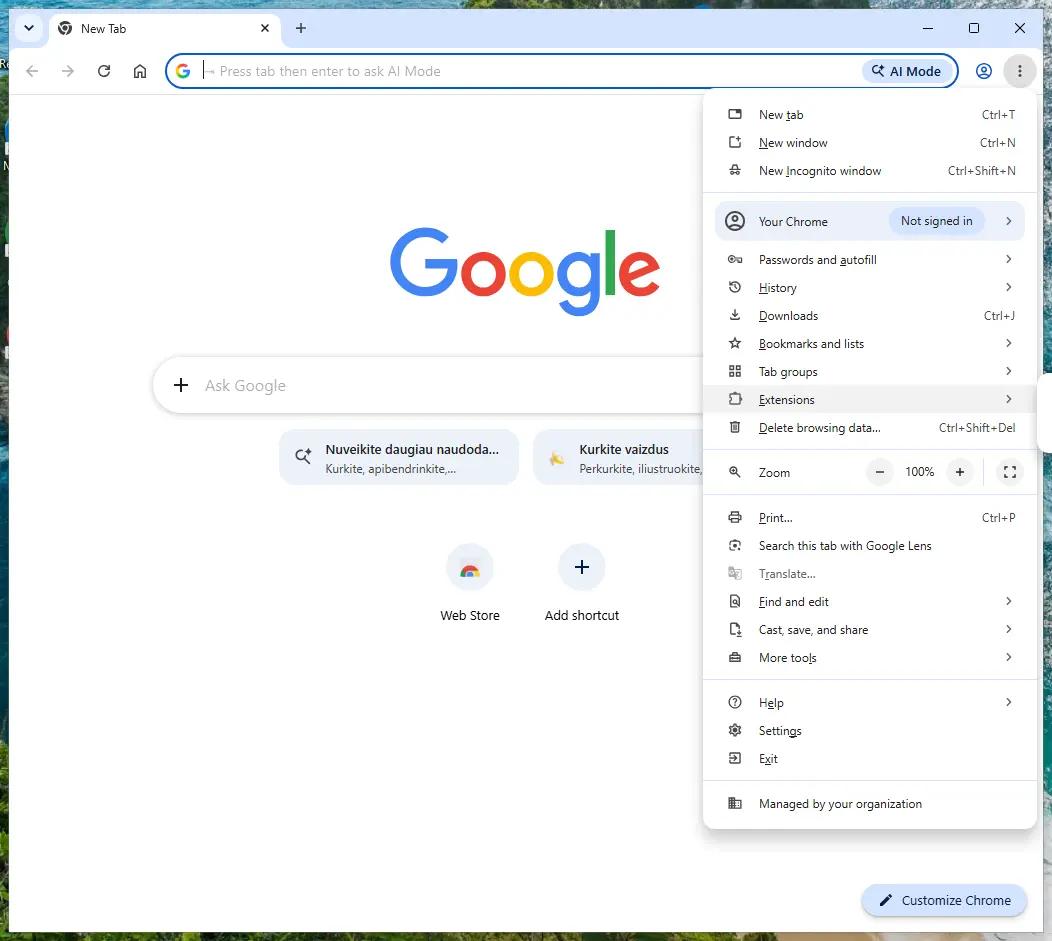
Chrome on Windows 11: More > Extensions > Manage extensions. Full procedure with screenshots: Remove a browser extension
Step 2: Put the search engine back and delete cnet.com
In Chrome open Settings > Search engine > Manage search engines and site search, make an engine you trust the default, and delete
cnet.comfrom the list.In Edge type
search engineinto the search box at the top of Settings and open Manage search engines; in Firefox use Settings > Search. Then check the homepage and the new tab page in the same settings, because hijackers change all three.If cnet.com is back after a restart, an extension, a program or a policy still sets it, so finish the other steps and check again. The settings are the same on Windows 11 and Windows 10.
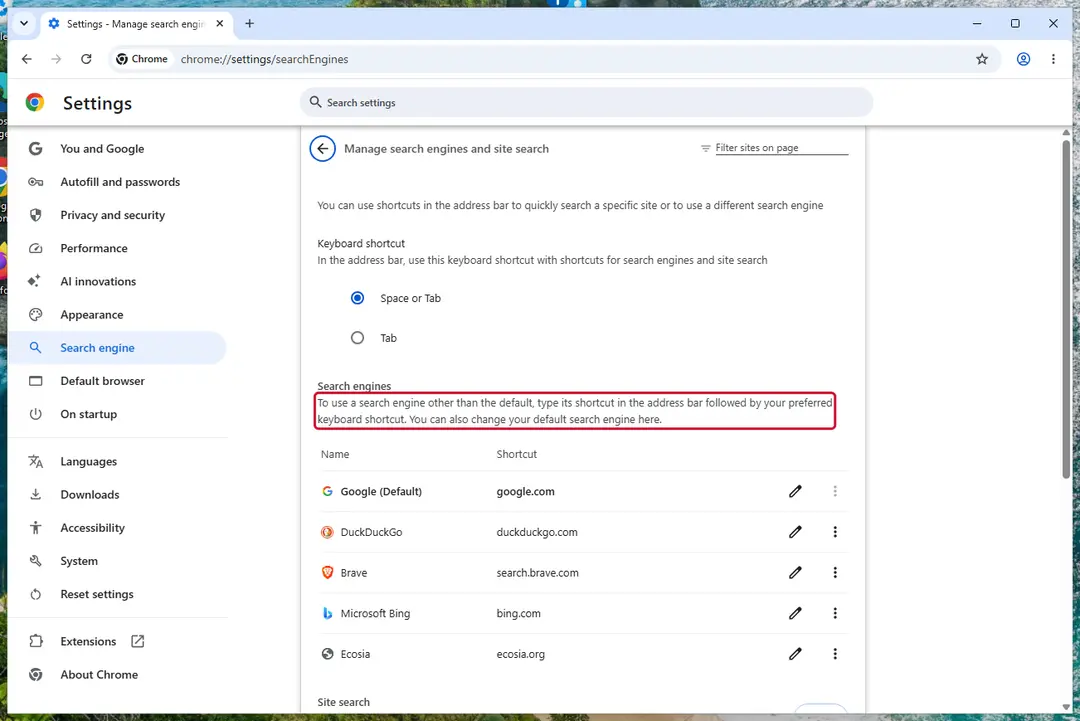
Chrome on Windows 11: check Search engine and On startup. Full procedure with screenshots: Reset a browser and fix a hijacked search engine
Step 3: Uninstall programs you did not mean to install
Web.bwanet.ca rarely comes alone: it is usually installed by, or together with, a free program. In Windows 11 open Settings > Apps > Installed apps, in Windows 10 Settings > Apps > Apps & features, and sort by install date.
Uninstall every entry from the day the trouble began that you did not install on purpose, for example a download manager, a converter or a browser you never chose.
Keep drivers and entries from Microsoft, Intel, AMD, NVIDIA or your PC's maker unless you are sure.
Full procedure with screenshots: Uninstall a program or app in Windows On uGetFix
Step 4: Reset the browser
A reset removes what the steps above could miss:
- changed start pages
- site permissions
- hidden settings
In Chrome open Settings > Reset settings > Restore settings to their original defaults; in Edge Settings > Reset settings; in Firefox Help > More troubleshooting information > Refresh Firefox.
Tip: Bookmarks and saved passwords stay, while extensions are turned off and the search engine and start page return to the defaults.
Reset every browser on the PC, including Edge, which Windows 11 and Windows 10 always have.
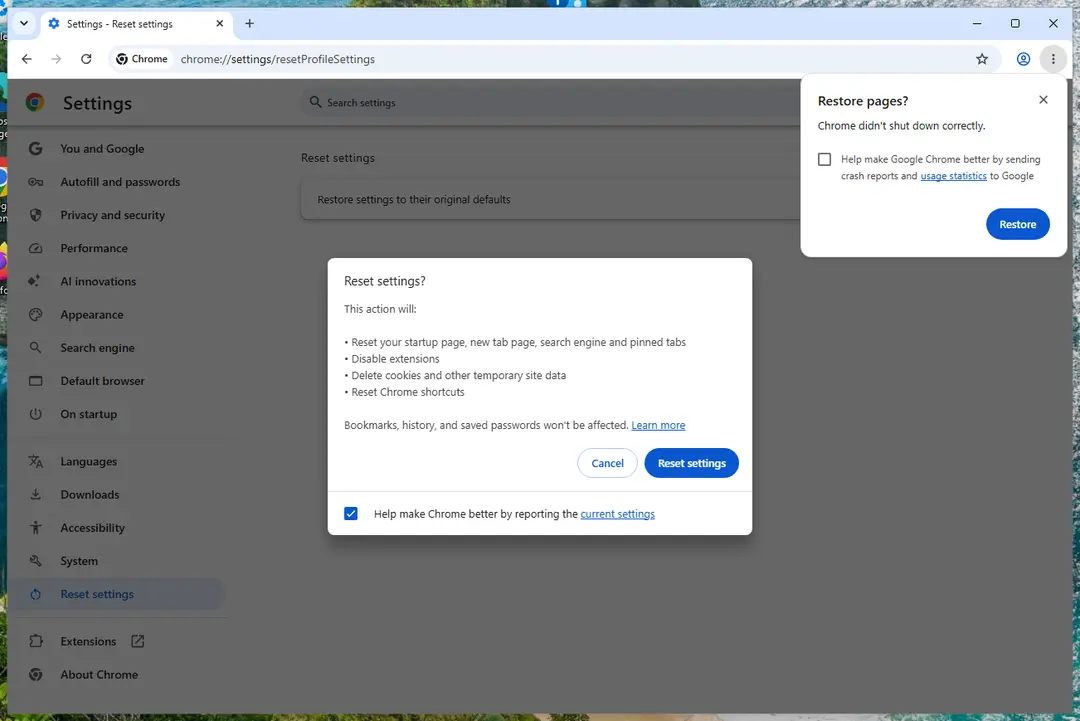
Chrome on Windows 11: Settings > Reset settings. Full procedure with screenshots: Reset a browser and fix a hijacked search engine
Step 5: Scan the PC, then run the offline scan
A scan finds the parts of Web.bwanet.ca that the manual steps cannot see. In Windows Security > Virus & threat protection > Scan options, start a Full scan and quarantine what it reports.
Follow it with Microsoft Defender Antivirus (offline scan) > Scan now, which restarts the PC and checks the disk while Windows and the malware are not running.
It takes about 15 minutes and works the same in Windows 11 and Windows 10. If either scan finds something, run the full scan again after removal until it comes back clean.
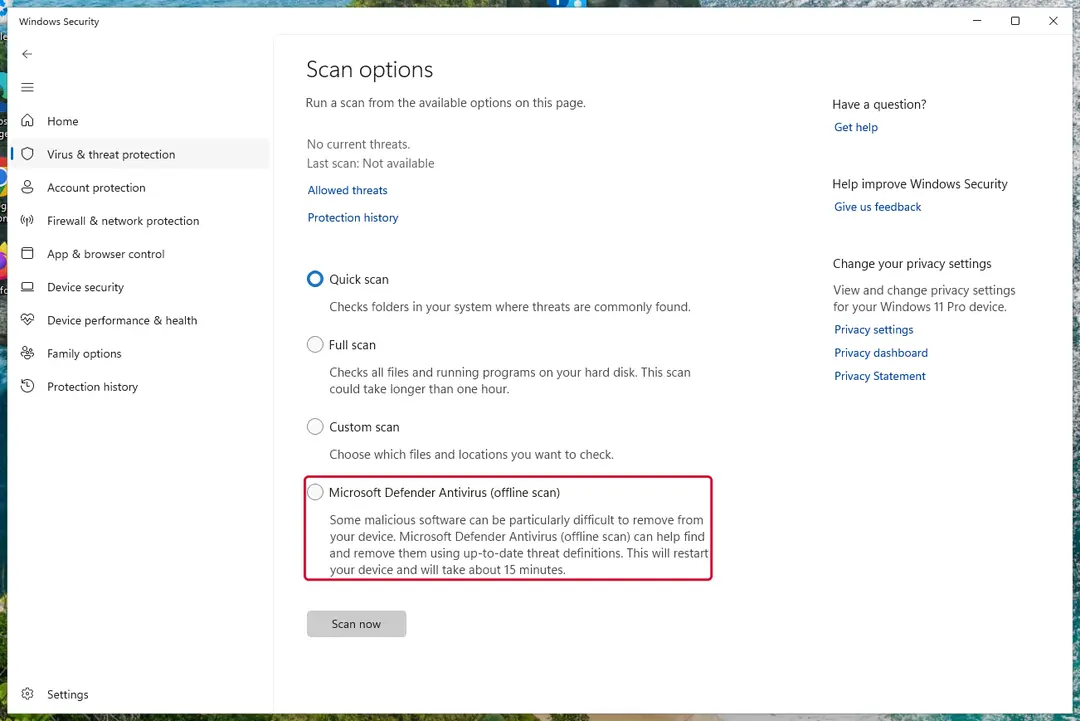
Windows 11: Windows Security > Virus & threat protection > Scan options. Full procedure with screenshots: Run a Microsoft Defender Offline scan
Instructions for each browser and system
The detailed steps for every browser and system this guide covers. Open the one you use.
Uninstall from Windows
To eliminate the browser hijacker from your Windows computer system, apply the following steps
Uninstall from Windows 10/8:
- Type Control Panel into the Windows search box and open the result.
- Under Programs, select Uninstall a program.
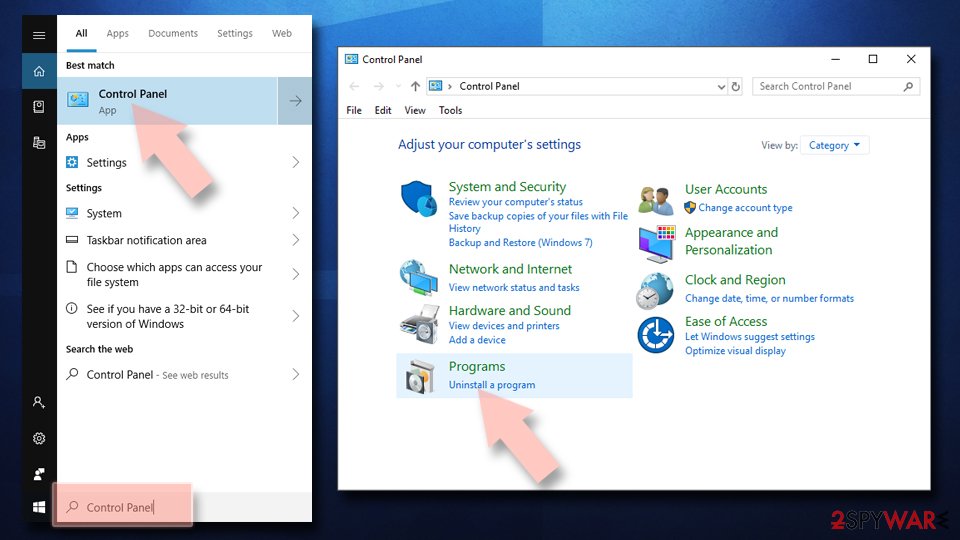
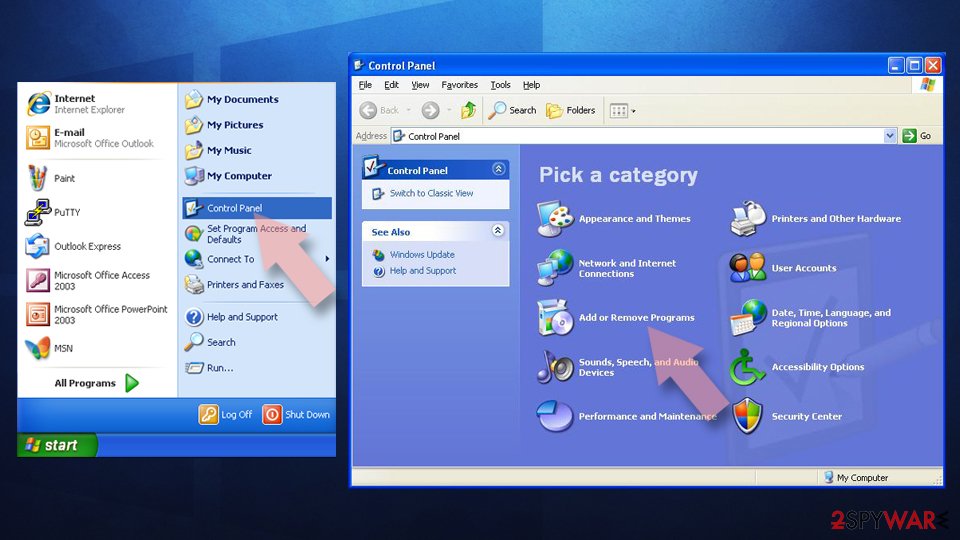
Uninstall from Windows 7/XP:
- Click on Windows Start > Control Panel (Windows XP users should click on Add/Remove Programs).
- In Control Panel, select Programs > Uninstall a program.
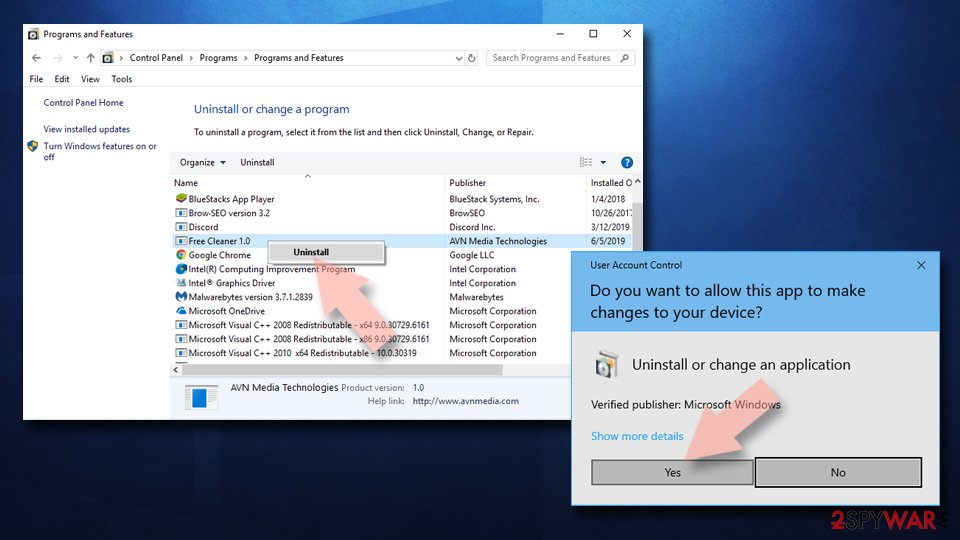
Remove the unwanted program:
- In the Programs and Features window, look for any recently installed suspicious entries, select them, and click Uninstall.
- If User Account Control appears, click Yes to confirm, then complete the removal.
Remove from Google Chrome
To clean Google Chrome from suspicious products, complete these guidelines
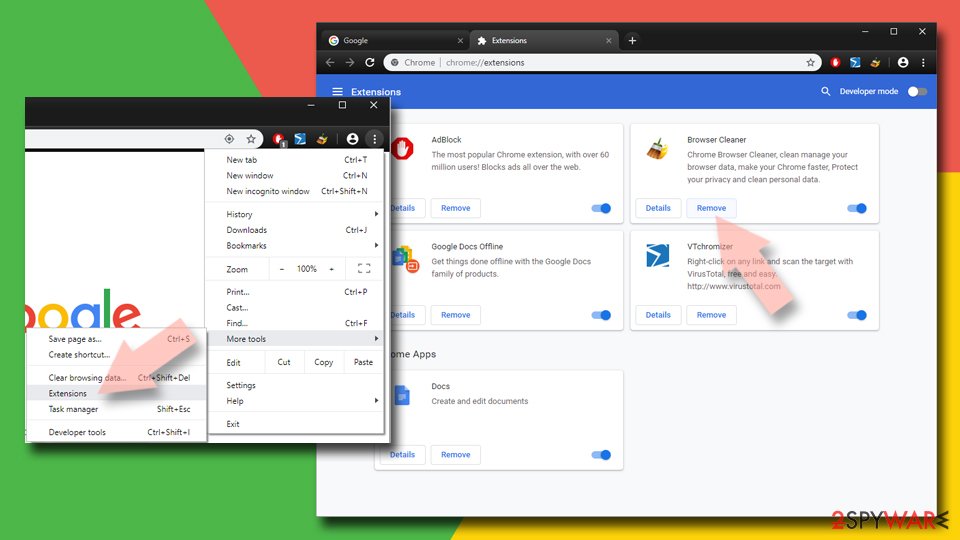
Delete malicious extensions from Google Chrome:
- Open Google Chrome, click on the Menu (three vertical dots at the top-right corner) and select More tools > Extensions.
- In the newly opened window, you will see all the installed extensions. Uninstall all suspicious extensions related to the unwanted program by clicking Remove.
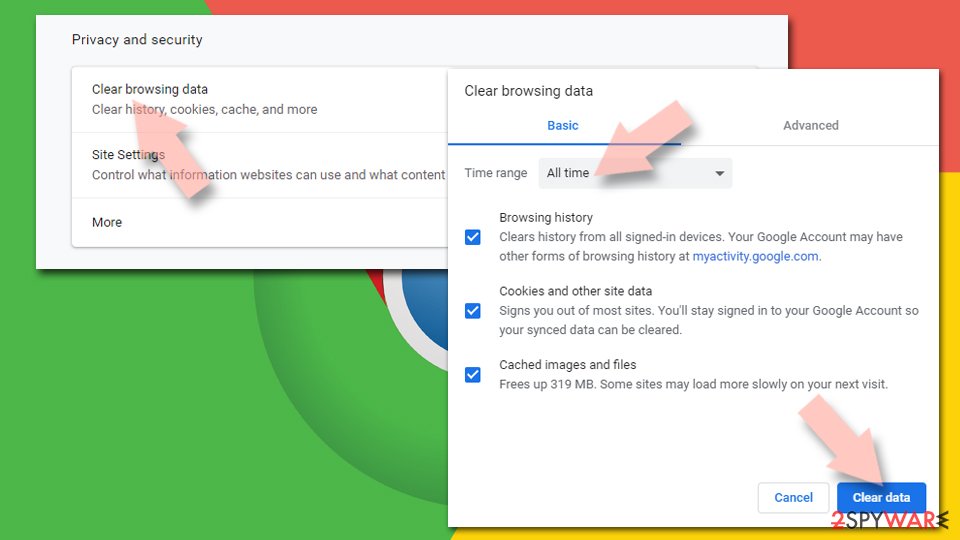
Clear cache and web data from Chrome:
- Click on Menu and pick Settings.
- Under Privacy and security, select Clear browsing data.
- Select Browsing history, Cookies and other site data, as well as Cached images and files.
- Click Clear data.
Change your homepage:
- Click menu and choose Settings.
- Look for a suspicious site in the On startup section.
- Click on Open a specific or set of pages and click on three dots to find the Remove option.
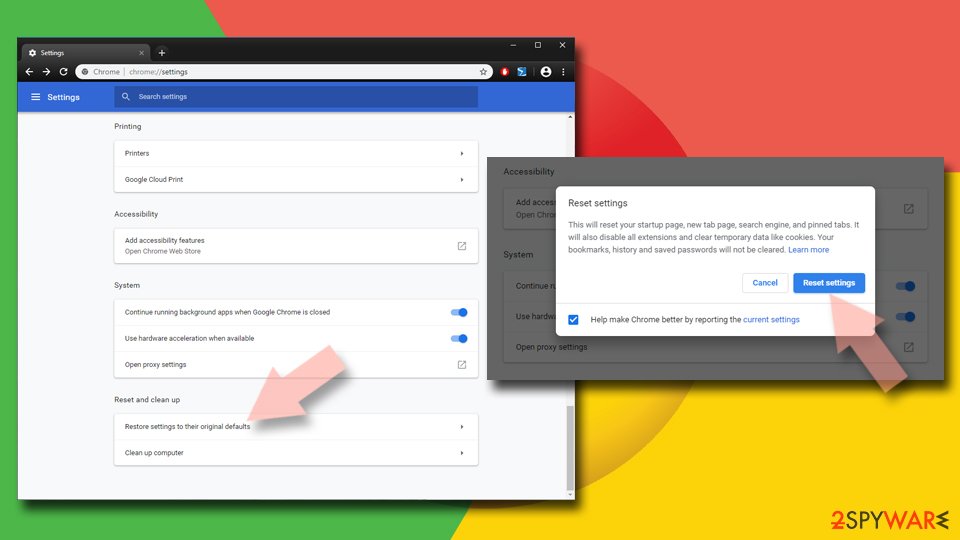
Reset Google Chrome:
If the previous methods did not help you, reset Google Chrome to eliminate all the unwanted components:
- Click on Menu and select Settings.
- In the Settings, scroll down and click Advanced.
- Scroll down and locate Reset and clean up section.
- Now click Restore settings to their original defaults.
- Confirm with Reset settings.
Remove from Microsoft Edge
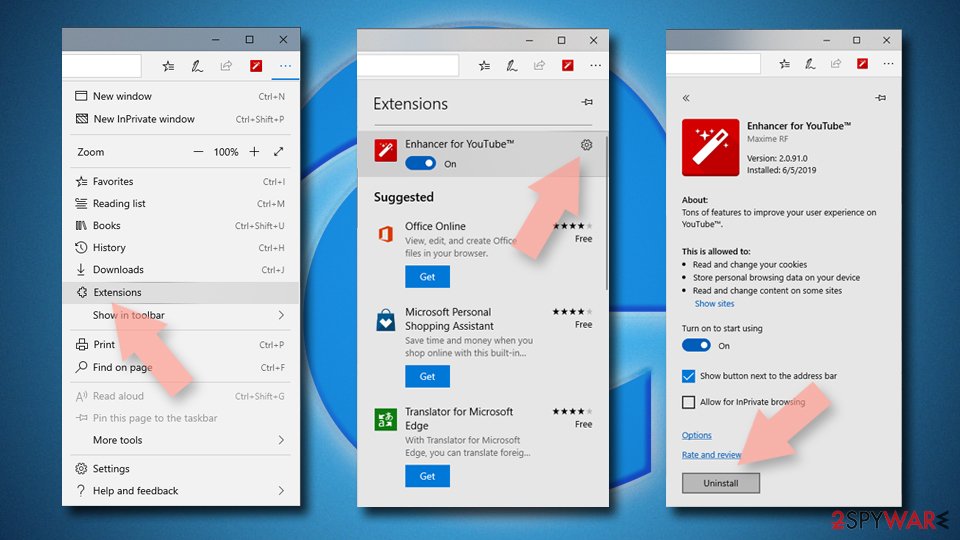
Delete unwanted extensions from MS Edge:
- Select Menu (three horizontal dots at the top-right of the browser window) and pick Extensions.
- From the list, pick the extension and click on the Gear icon.
- Click Remove.
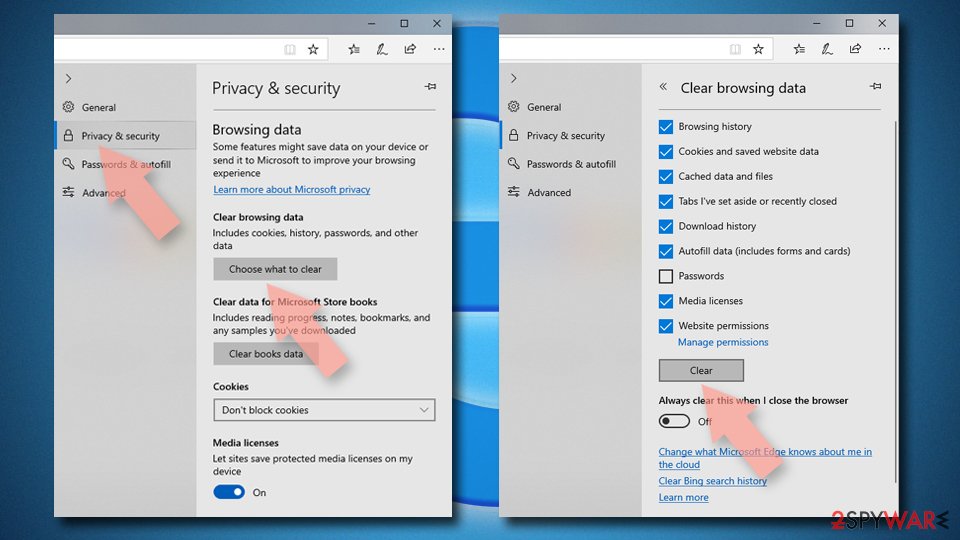
Clear cookies and other browser data:
- Click on the Menu (three horizontal dots at the top-right of the browser window) and select Settings > Privacy, search, and services..
- Under Clear browsing data, pick Choose what to clear.
- Select Cookies and other site data and Cached images and files. (apart from passwords, although you might want to include Media licenses as well, if applicable) and click on Clear.
Restore new tab and homepage settings:
- Click the menu icon and choose Settings.
- Then find On startup section.
- Click Remove next to any suspicious startup page.
Reset MS Edge if the above steps did not work:
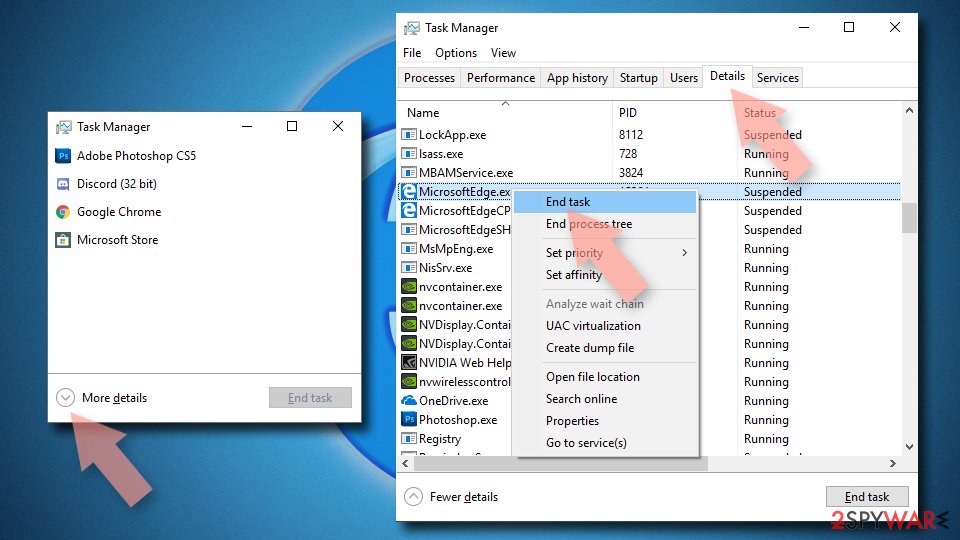
- Press on Ctrl + Shift + Esc to open Task Manager.
- Click on More details arrow at the bottom of the window.
- Select Details tab.
- Now scroll down and locate every entry with Microsoft Edge name in it. Right-click on each of them and select End Task to stop MS Edge from running.
Delete extensions from MS Edge (Chromium):
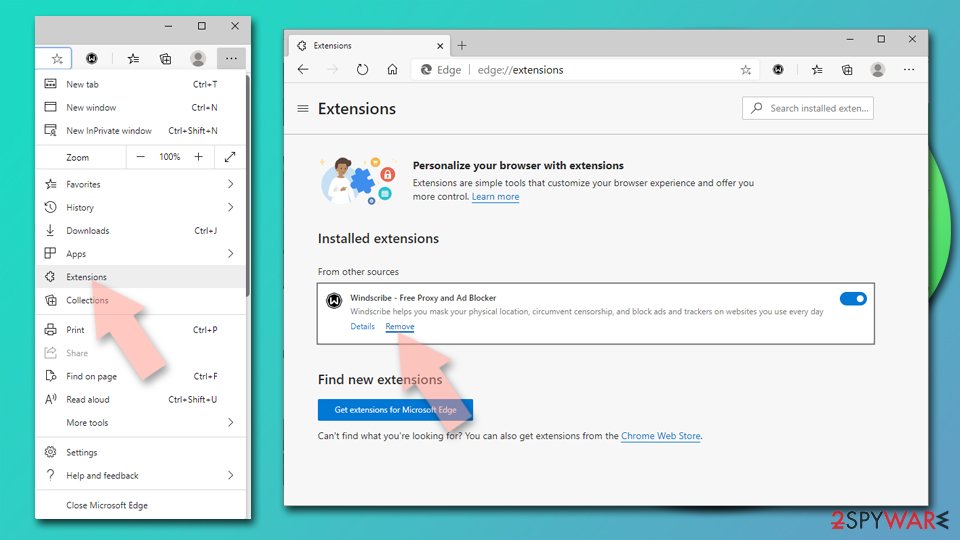
- Open Edge and click select Settings > Extensions.
- Delete unwanted extensions by clicking Remove.
Clear cache and site data:
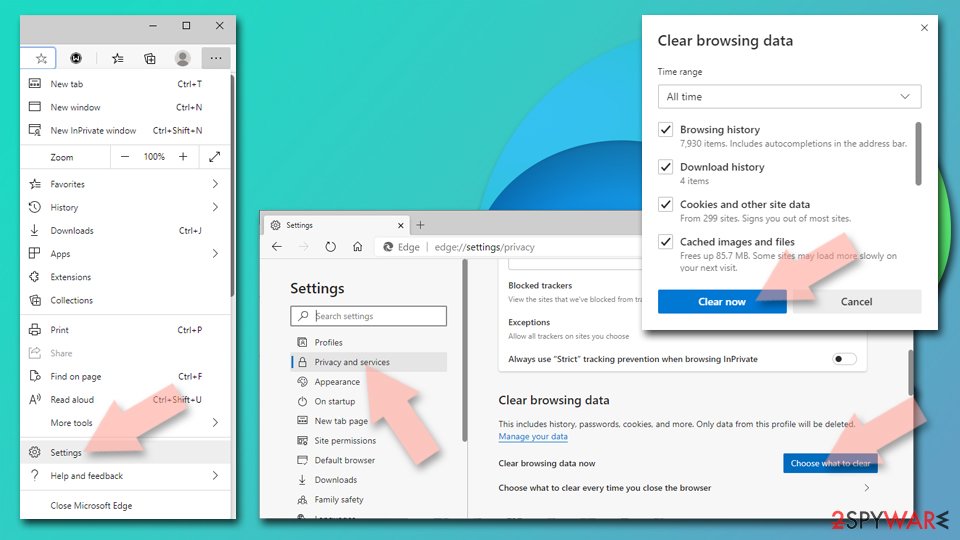
- Click on Menu and go to Settings.
- Select Privacy, search and services.
- Under Clear browsing data, pick Choose what to clear.
- Under Time range, pick All time.
- Select Clear now.
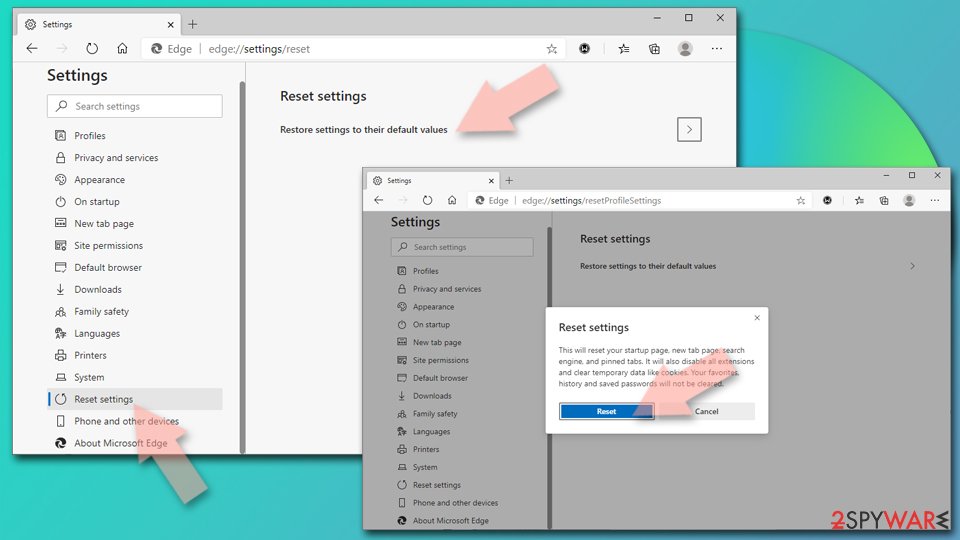
Reset Chromium-based MS Edge:
- Click on Menu and select Settings.
- On the left side, pick Reset settings.
- Select Restore settings to their default values.
- Confirm with Reset.
- This will disable extensions and reset startup pages but will not delete bookmarks, saved passwords, or browsing history.
Remove from Mozilla Firefox (FF)
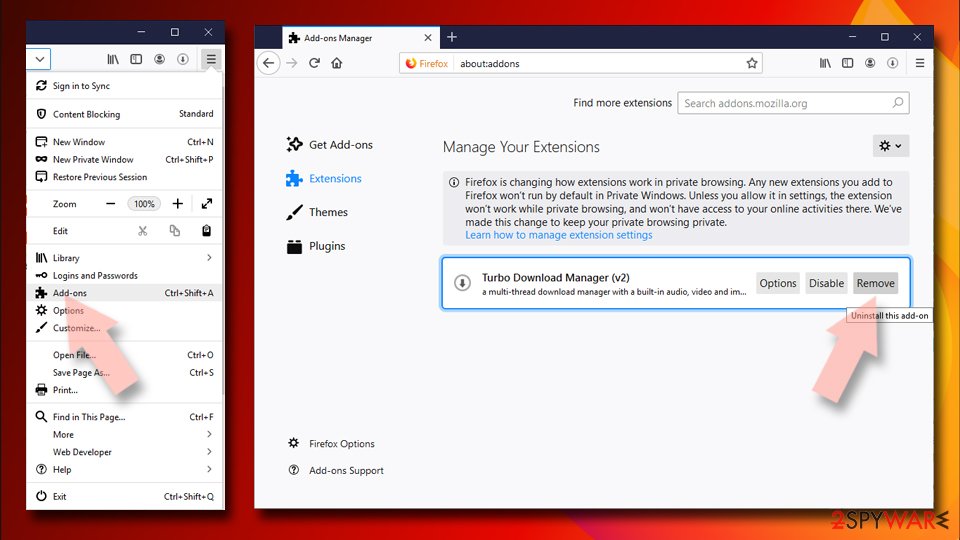
Remove dangerous extensions:
- Open Mozilla Firefox browser and click on the Menu (three horizontal lines at the top-right of the window).
- Select Add-ons.
- In here, select the unwanted extension and click Remove.
Reset the homepage:
- Click three horizontal lines at the top right corner to open the menu.
- Choose Settings.
- Under Home, set your preferred homepage and new tab settings.
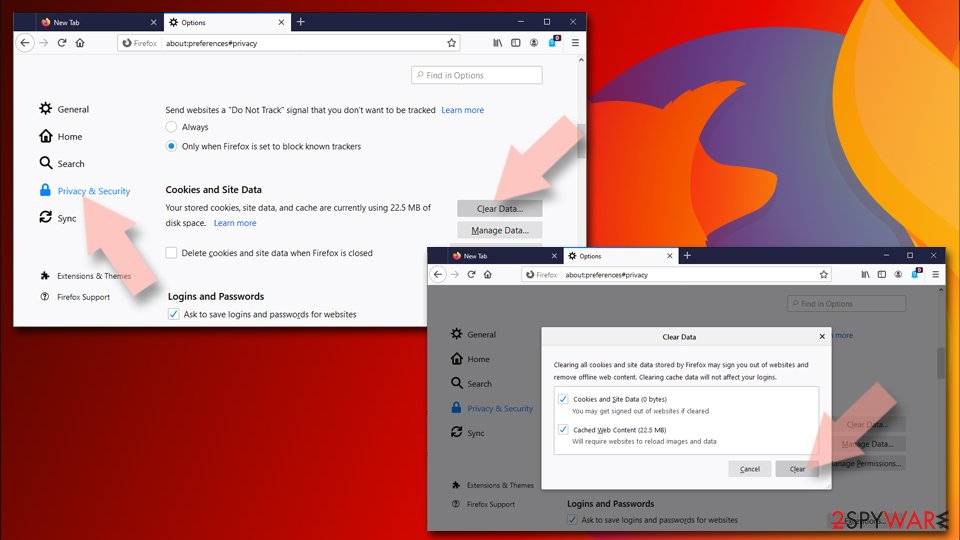
Clear cookies and site data:
- Click Menu and pick Settings.
- Go to Privacy & Security section.
- Scroll down to locate Cookies and Site Data.
- Click on Clear Data...
- Select Cookies and Site Data and Temporary cached files and pages, then click Clear.
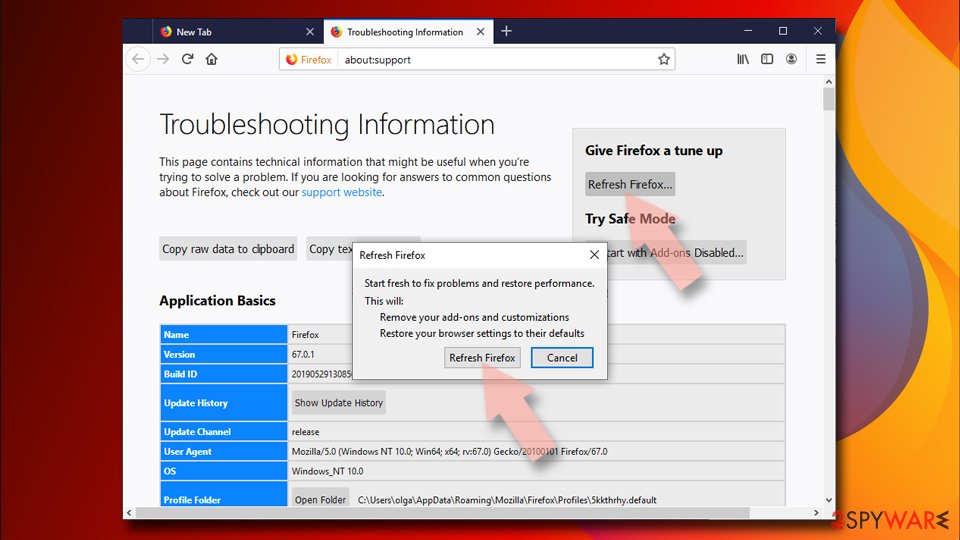
Reset Mozilla Firefox
If clearing the browser as explained above did not help, reset Mozilla Firefox:
- Open Mozilla Firefox browser and click the Menu.
- Go to Help and then choose Troubleshooting Information.
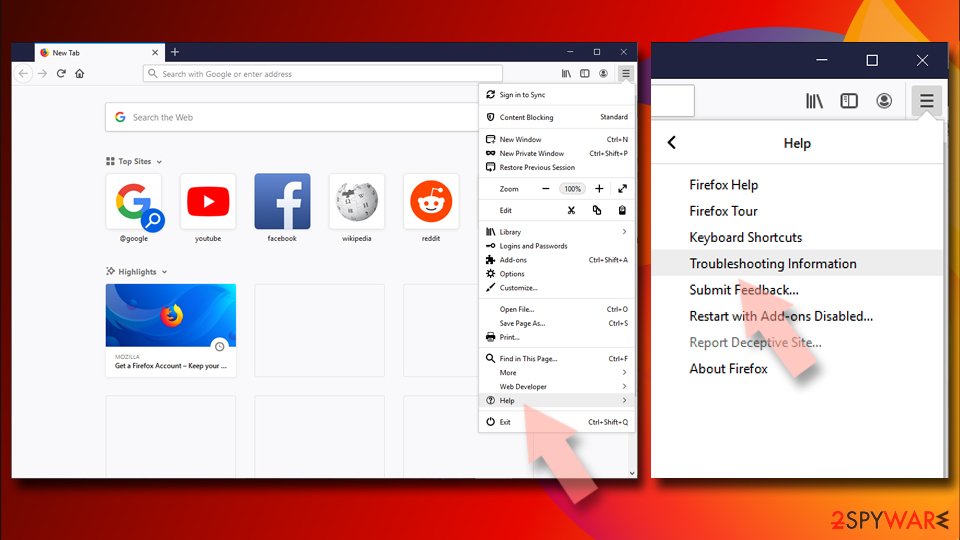
- Under Give Firefox a tune up section, click on Refresh Firefox...
- Once the pop-up shows up, confirm the action by pressing on Refresh Firefox.
Delete from Safari
To delete suspicious products from Safari, perform these instructions:
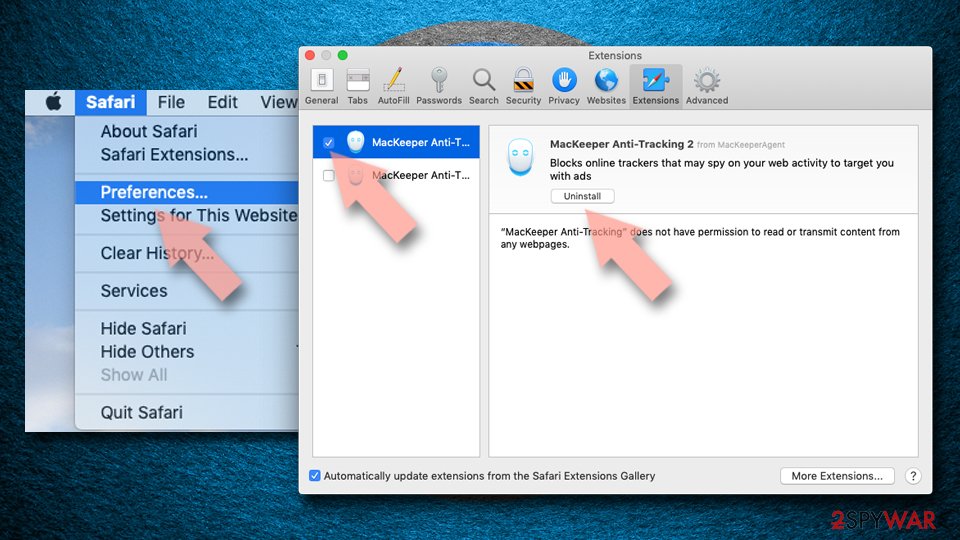
Remove dangerous extensions:
- Open Safari, click Safari in the menu at the top-left of the screen, and select Preferences.
- Go to the Extensions tab, look for any suspicious entries, and click Uninstall to remove them.
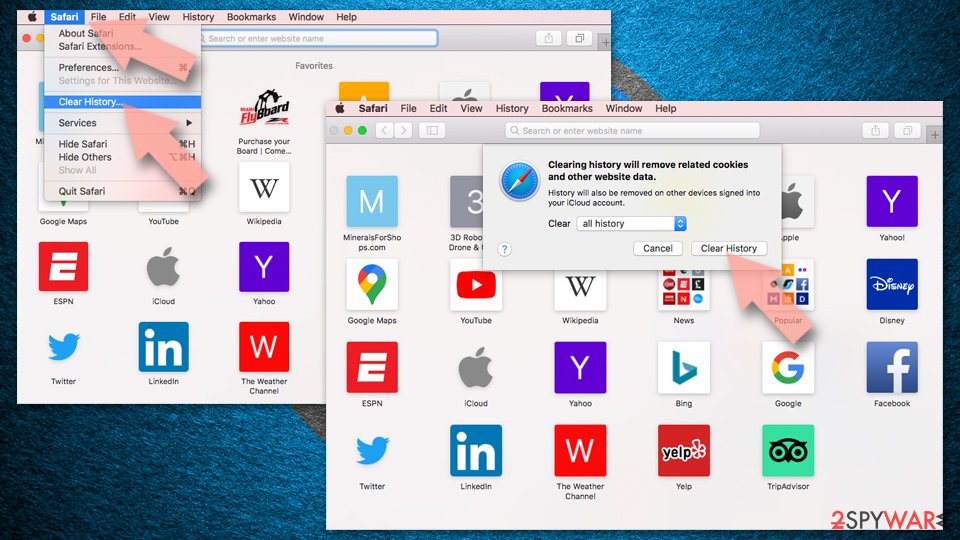
Clear history and website data:
- Click Safari in the menu and pick Clear History.
- Set Clear to all history and confirm with Clear History.
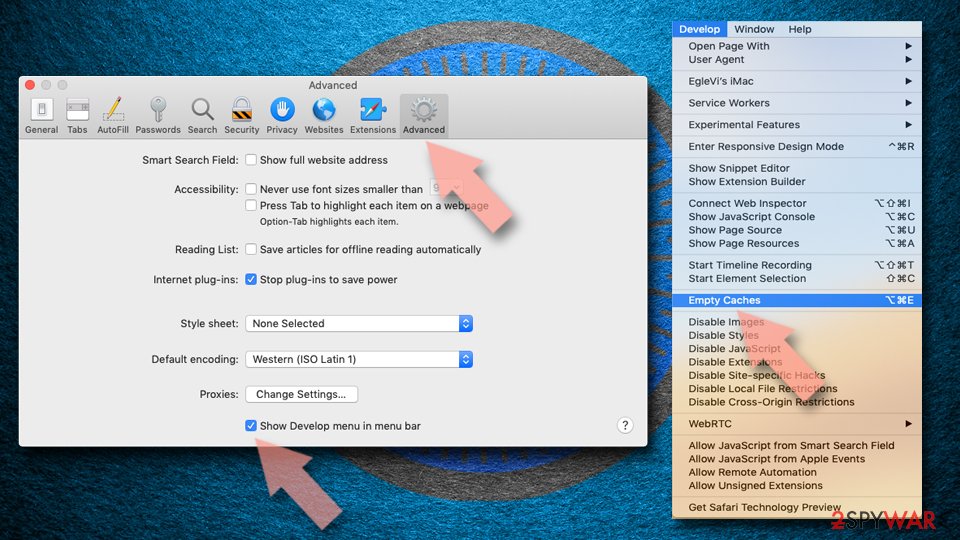
Reset Safari:
- Click Safari in the menu and select Preferences > Advanced.
- Enable Show Develop menu in menu bar.
- From the menu bar, click Develop and select Empty Caches.
Delete from macOS
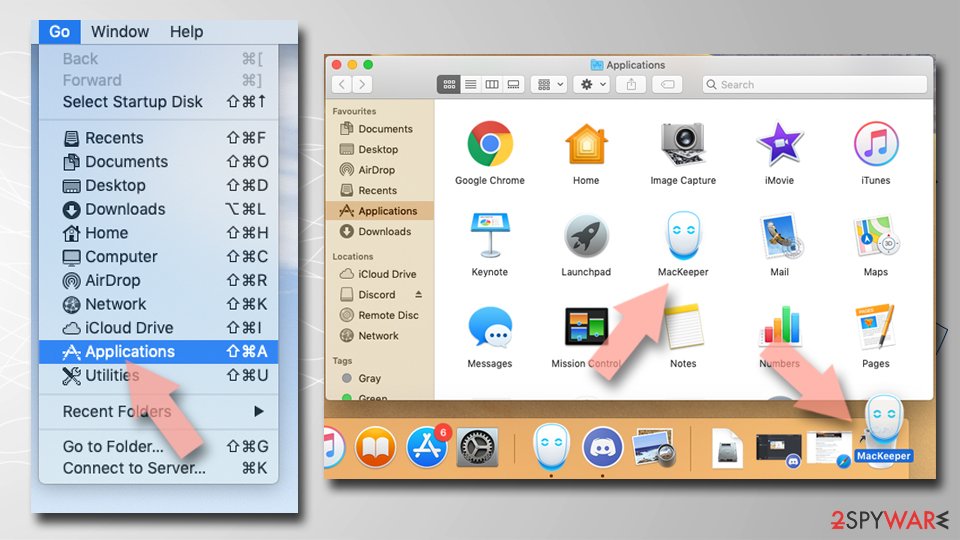
Remove the unwanted application:
- From the menu bar, select Go > Applications.
- In the Applications folder, look for any suspicious entries, then drag them to Trash (or right-click and pick Move to Trash).
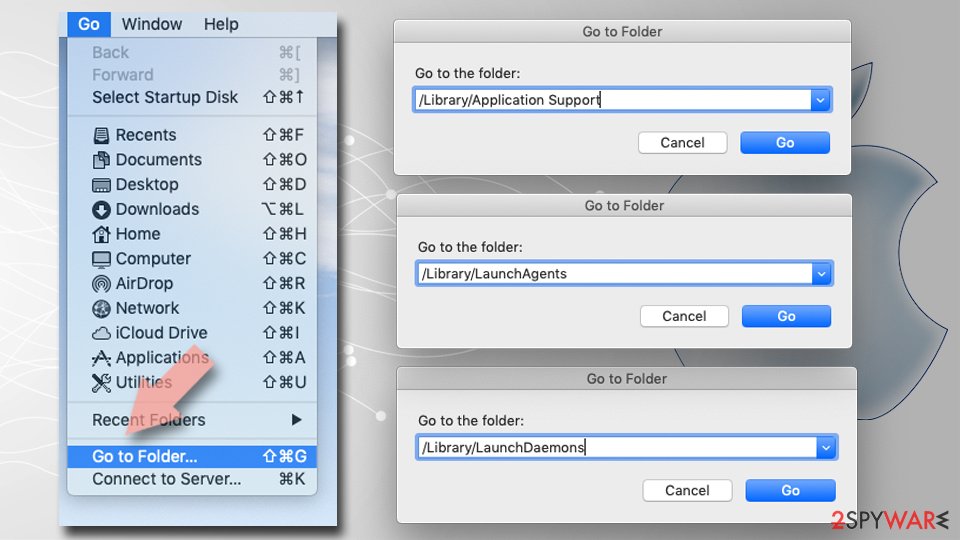
Delete leftover files and folders:
- Select Go > Go to Folder.
- Enter /Library/Application Support and remove any suspicious folders related to the unwanted program.
- Repeat the same check in the /Library/LaunchAgents and /Library/LaunchDaemons folders, deleting any suspicious entries.
- Finally, empty the Trash to permanently remove the leftovers.
Reset Internet Explorer
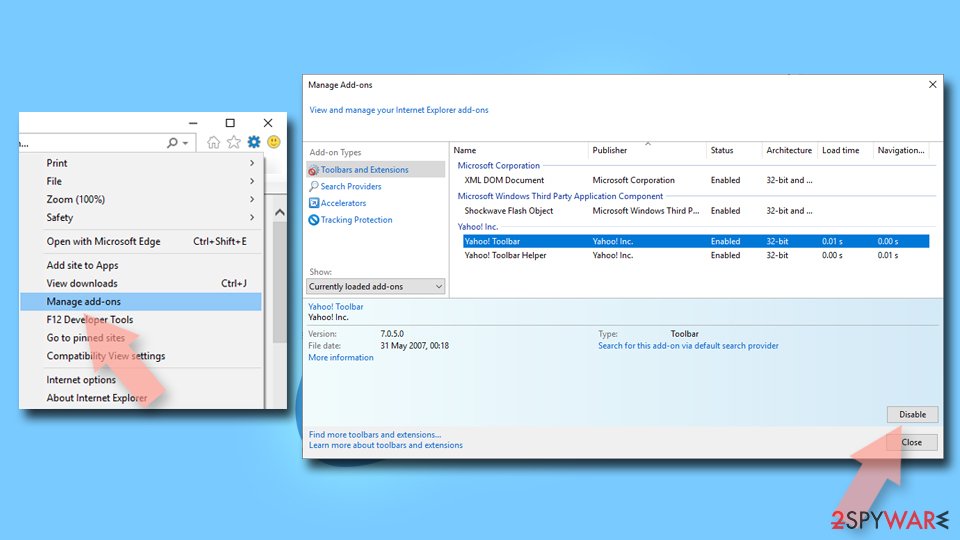
Remove dangerous add-ons:
- Open Internet Explorer, click on the Gear icon (IE menu) on the top-right corner of the browser
- Pick Manage Add-ons.
- You will see a Manage Add-ons window. Here, look for suspicious plugins. Click on these entries and select Disable.
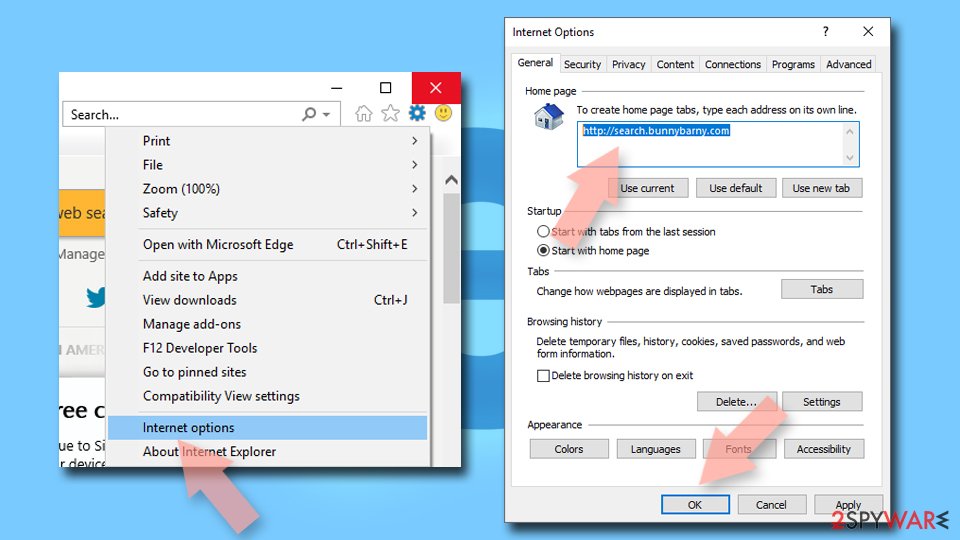
Change your homepage if it was altered:
- Open IE and click on the Gear icon.
- Select Internet Options.
- In the General tab, delete the Home page address and replace it by your preferred one (for example, Google.com).
- Click Apply and then select OK.
Delete temporary files:
- Press on the Gear icon and select Internet Options.
- Under Browsing history, click Delete...
- Select relevant fields and press Delete.
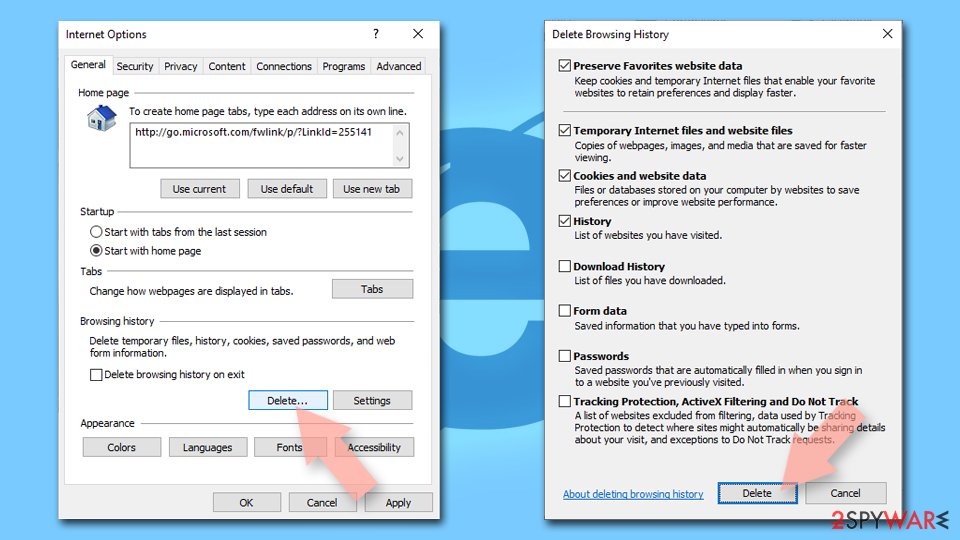
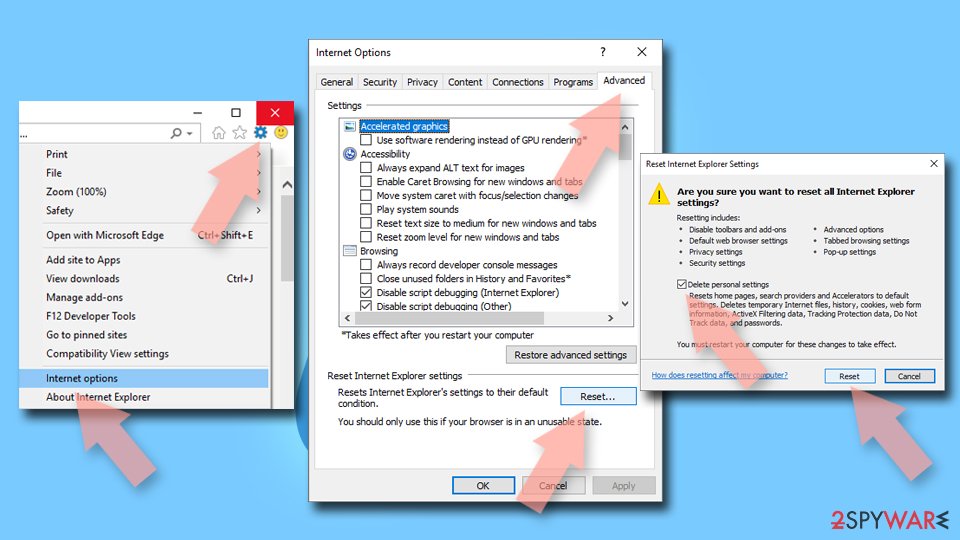
Reset Internet Explorer:
- Click on Gear icon > Internet options and select Advanced tab.
- Select Reset.
- In the new window, check Delete personal settings and select Reset.
Stream videos without limitations, no matter where you are
There are multiple parties that could find out almost anything about you by checking your online activity.
While this is highly unlikely, advertisers and tech companies are constantly tracking you online. The first step to privacy should be a secure browser that focuses on tracker reduction to a minimum.
Even if you employ a secure browser, you will not be able to access websites that are restricted due to local government laws or other reasons. In other words, you may not be able to stream Disney+ or US-based Netflix in some countries. To bypass these restrictions, you can employ a powerful VPN, which provides dedicated servers for torrenting and streaming, not slowing you down in the process.
Data backups are important - recover your lost files
Ransomware is one of the biggest threats to personal data.
Once it is executed on a machine, it launches a sophisticated encryption algorithm that locks all your files, although it does not destroy them. The most common misconception is that anti-malware software can return files to their previous states. This is not true, however, and data remains locked after the malicious payload is deleted.
While regular data backups are the only secure method to recover your files after a ransomware attack, tools such as can also be effective and restore at least some of your lost data.
From our report of Jan 2021 · not reviewed since
Web.bwanet.ca - an intrusive browser hijacker that is quite a hard one to get rid off
Web.bwanet.ca is a browser hijacker that has been reported by some users regarding its intrusive infiltration.
People claim to be annoyed by it and find the PUP difficult to get rid of. So, we are here to explain what type of program this is and how to successfully eliminate it from your computer system/web browsers.
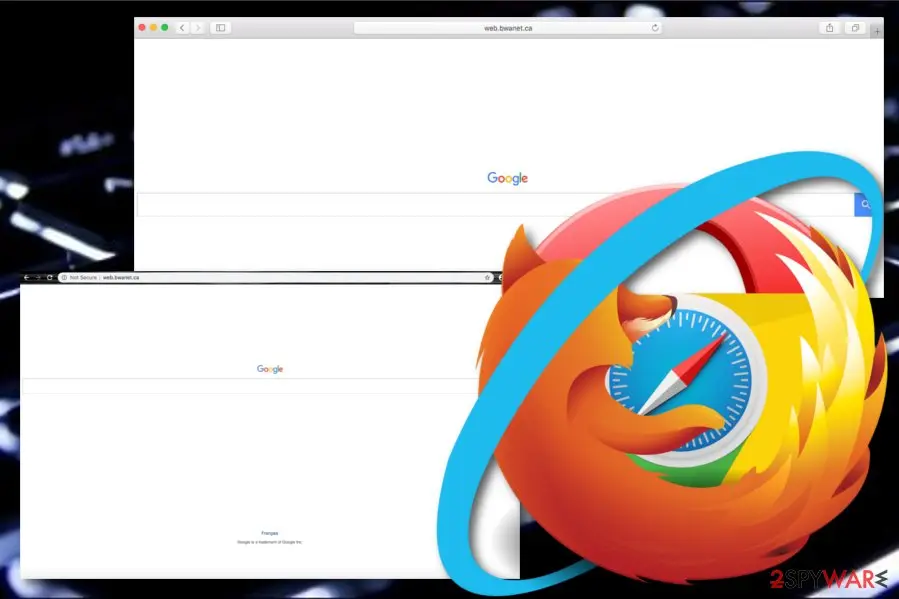
Web.bwanet.ca virus is also a name given to this browser hijacker as the app relies on stealth installation techniques to infect a bigger number of people. Afterward, users experience unexpected alterings in the browser's search engine, homepage, and new tab URL locations.
Web.bwanet.ca aims to look after the developers' needs only and is not linked towards users' needs even if it might try to look like the exact opposite. Do not get surprised if the browser hijacker starts providing fast access to popular social platforms such as Facebook, Instagram, and Twitter after hijacking your web browser.
We suggest not using these Web.bwanet.ca features as you might get taken somewhere else. As you can see, redirecting is another activity that might come after browser-hijacking. Redirects are often performed to deliver the user to other sponsored domains, however, sometimes that can result in landings on infectious locations.
If Web.bwanet.ca ever takes you to an unknown place, do not click anywhere on it and close the window immediately. If not provided with malware, you might be encouraged to purchase some questionable products and services, for example, rogue security software, converting tools, fake registry cleaners, updating programs, etc.
Web.bwanet.ca might also start loading you with bogus advertisements that can become too intense if the PUP does not get removed as soon as possible. Pop-up ads might be displayed to you for collecting pay-per-click income. You might find that some ads hold offers similar to the ones that you have recently searched for.
This might happen if Web.bwanet.ca starts recording your browsing sessions and online experience. The developers inject tracking cookies to record non-personal information such as commonly visited networks, hyperlinks clicked, bookmarks saved, your IP address, geolocation. Sometimes, email addresses might also get involved.
Do not believe in any content that comes from this browser hijacker and focus on Web.bwanet.ca removal. Download and install reliable security software to get rid of the potentially unwanted program within a few minutes or try the manual elimination guidelines that have been added to the end of this article by 2-spyware specialists.
After you remove Web.bwanet.ca from your system, check for possibly-affected content. If you discover any compromised system files or entries, you can try repairing them with specific software such as . However, feel free to give any other software a try if you are more likely using a different program that fulfills its functionality.
Keep in mind one more thing. Web.bwanet.ca might add browser helper objects such as extensions, add-ons, and plug-ins to your hijacked web browsers. This means that your browser apps also require removal, so cleaning only the operating system would not be enough as the adware might return if there is any additional content left.
From our report of Jan 2021 · not reviewed since
Browser hijackers are intensively spread via software bundles
Experts from Virusai.lt claim that browser hijackers and their siblings (adware, scareware, etc.) are mostly distributed via unsecured downloads from websites such as cnet.com, softonic.com, or soft32.com.
When the user opts for a free download via such a source, he is very likely to receive a browser hijacker if the installation mode has been set to Recommended.
To secure your downloads, we advise all users to change their downloading configuration to Custom. Here people are able to gain full control of all incoming objects and opt-out of the products that give a concerning look. Additionally, you should keep a fair distance from all third-party developers and get all of your software and services from trustable websites only.
To continue, browser-hijacking apps can easily get delivered via infectious hyperlinks, advertisements, scams, fake software updates, etc. Once you are visiting some type of online source, ensure that it is safe to proceed with. If you cannot do that, have your antivirus running 24/7 and it should alert you about all possible danger that might be waiting ahead.
From our report of Jan 2021 · not reviewed since
Advanced but simple removal instructions for Web.bwanet.ca
Web.bwanet.ca removal should be taken seriously nevermind the fact that this application is not dangerous malware.
As we have already mentioned in our article, damage can be caused indirectly - through harmful redirects. To avoid such risks, you should get rid of the cyber threat as soon as you spot it in your system. This includes cleaning both the machine and web browser applications.
There is a possibility to remove Web.bwanet.ca from your machine and web browsers with the help of the below-provided step-by-step guidelines that are here to guide you through the entire process. However, if you want to put less effort into the task or just lack some skills, you can always choose a reliable antimalware product that will complete the entire process safely and effectively for you.
Questions about Web.bwanet.ca
What is Web.bwanet.ca browser hijacker?
Web.bwanet.ca is an intrusive browser hijacker that users report as difficult to remove and annoying. It changes critical browser settings including the search engine, homepage, and new tab URL to its own domains. The hijacker primarily targets Google Chrome but can affect Firefox, Internet Explorer, Microsoft Edge, and Safari.
After hijacking your browser, the PUP appears aimed at developers' needs rather than users', generating revenue for its creators through pay-per-click advertising and search redirects. The hijacker forces users to use specific channels for browsing, creating privacy and security risks. Web.bwanet.ca uses stealth installation techniques to infiltrate computers undetected, with users only discovering the infection when unexpected browser changes occur.
How does Web.bwanet.ca spread?
Web.bwanet.ca primarily spreads through software bundling, a deceptive distribution technique where the hijacker is secretly included in installers for free programs. Users downloading freeware from third-party sites often unknowingly approve hijacker installation through pre-ticked checkboxes and hidden installation options. The hijacker can also spread through malicious advertisements, infected hyperlinks, and fake software updates.
When users change installation settings from Recommended to Custom or Advanced, they can view and reject bundled components, but most users skip these steps. Websites like cnet.com, softonic.com, and soft32.com frequently bundle potentially unwanted programs alongside legitimate software. Browser hijackers also spread through phishing emails, social engineering, and exploitation of browser vulnerabilities.
What damage does Web.bwanet.ca cause?
Web.bwanet.ca hijacks browser settings, forcing you through its controlled channels and displaying intrusive advertising. The hijacker modifies your search results to favor its affiliated websites and delivers bogus offers for questionable products and services. These may include rogue security software, fake registry cleaners, suspicious converting tools, and scam update prompts.
Web.bwanet.ca injects tracking cookies that record your IP address, geolocation, visited websites, clicked links, bookmarked pages, and sometimes email addresses. This behavioral data is sold to advertising networks and third parties for targeted advertising. The constant redirects and ad displays degrade browsing performance and create security risks, as redirects may land on malicious or phishing websites.
How does Web.bwanet.ca track my activity?
Web.bwanet.ca developers inject tracking cookies into your browser to collect non-personal information about your browsing sessions. These cookies record your commonly visited websites, clicked hyperlinks, saved bookmarks, and IP address. The hijacker may also track your geolocation based on IP data.
This tracking information allows the hijacker's operators to build profiles of your interests and online behavior. The collected data gets sold to advertising networks and marketers who use it to display targeted ads when you browse.
In some cases, email addresses may also be collected if you enter them on tracked websites. This level of tracking violates privacy and exposes you to increased commercial manipulation and potential fraud targeting.
Can I remove Web.bwanet.ca manually?
Yes, Web.bwanet.ca can be removed manually following step-by-step removal guidelines, but automatic removal is generally recommended for reliability. Manual removal requires uninstalling the browser hijacker from Windows Control Panel by finding suspicious programs and selecting Uninstall.
You must also clean browser extensions and settings by manually removing hijacker components from each affected browser. However, Web.bwanet.ca adds browser helper objects including extensions, add-ons, and plugins that must be identified and removed individually.
Simply removing the main program is insufficient because hijacker components remain in browser settings. This manual approach requires technical skills and time to identify all related files. Many users find automatic removal using antimalware software faster, safer, and more effective.
How do I remove Web.bwanet.ca completely?
Install reliable antimalware software and run a comprehensive system scan to detect and remove Web.bwanet.ca and all associated components. The software will identify browser hijacker files, registry entries, browser extensions, and potentially unwanted programs related to the hijacker.
After automatic removal, manually verify that your browser settings have been fully restored by checking your homepage, search engine, and new tab settings in each affected browser. Remove any remaining suspicious browser extensions through browser settings.
Reset each affected browser to default settings if the hijacker components persist. Clear your browsing history, cookies, and cached data to remove tracking cookies injected by Web.bwanet.ca. If damage occurred to system files during hijacking, use system repair tools to restore normal functionality.
How do I prevent Web.bwanet.ca infection?
When downloading software, change the installation mode from Recommended to Custom or Advanced to see all bundled components. Carefully review the file list and uncheck pre-marked checkboxes for browser add-ons, extensions, plugins, toolbars, and related suspicious programs.
Always download software directly from developers' official websites rather than third-party download sites. Read privacy policies and terms of service before installing programs to understand what data will be collected. Research programs before downloading by reading reviews and checking ratings on trusted tech forums.
Avoid clicking suspicious advertisements and hyperlinks on unfamiliar websites. Keep your antivirus software updated with real-time protection enabled to block malicious downloads before they install. A cautious approach to installation prevents most hijacker infections.
What if Web.bwanet.ca keeps returning?
If Web.bwanet.ca returns after removal, the adware that originally delivered it may still be present on your system. Perform another comprehensive antimalware scan using updated virus definitions to catch components that escaped initial removal.
Boot into Safe Mode before scanning, as this prevents malware from interfering with removal processes. Check for suspicious scheduled tasks in Windows Task Scheduler that might reinstall the hijacker automatically. Examine your startup programs and disable any suspicious entries.
If the problem persists, backup important files and consider performing a full Windows reinstallation as a last resort for stubborn infections. After successful removal and reinstallation, change all passwords for critical accounts as the hijacker may have recorded them through tracking.
Will Fortect remove Web.bwanet.ca?
Fortect scans Windows for malware and unwanted programs and repairs the system files and settings they change, and its free scan shows what it finds on your PC before you decide anything.
For Web.bwanet.ca, follow the plan above as well: the browser steps take back permissions and settings that no scanner treats as a threat, and uninstalling the program that brought it removes the source.
Run Microsoft Defender's full scan and, if anything was found, its offline scan as a second opinion. If the symptoms are gone after the plan and both scans are clean, there is nothing more to do.
Sources
- Google Support: My chrome browser is default opening in web.bwanet.ca..seems an virus of broswer hijack.. (no longer online) (read October 5, 2026)
- Wikipedia: Potentially unwanted program (read October 5, 2026)
- Virusai: Virusai.lt (read October 5, 2026)
- FTC: How to recognize, remove and avoid malware (read October 5, 2026)
- Microsoft Learn: Microsoft Defender Offline (read October 5, 2026)
- Google Help: Delete or disable apps on Android (read October 8, 2026)
- Google Chrome Help: Choose your homepage and startup page (Android) (read October 8, 2026)