

Zeus Virus Detected is a fake Microsoft warning distributed by scammers
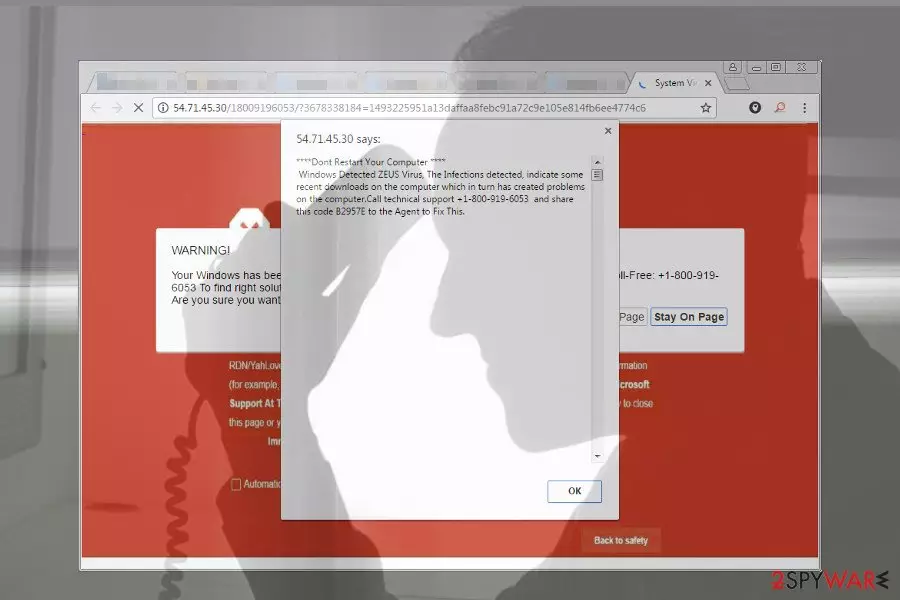
Zeus Virus Detected is a fake warning message that people can witness while browsing the Internet. It can show up on both, Mac and Windows OS and may even lock down the Google Chrome, Mozilla Firefox, Microsoft Edge, Safari or any other targeted web browser. Despite the fact that Zeus virus is a real cyber infection that had been considered as one of the most dangerous viruses from 2007 until 2011,[1] the alert has nothing in common with a genuine virus and belongs to tech support scam category.
| Name | Zeus Virus Detected |
|---|---|
| Classification | Malware |
| Category | Technical Support Scam[2] |
| Symptoms | Web browser redirects to fake websites urging people to call for support due to malicious virus infection. Browser can also freeze, crash, and generate excessive amount of commercial ads. |
| Main dangers | Microsoft Technical Support Scam alerts are not dangerous. They do not have destructive effect on the system. However, the danger level increases if the PCs owner falls for calling the given number. In this case, the risk of money loss or identity theft is high. |
| Versions |
“Windows Detected ZEUS Virus” |
| Distribution | Scam alerts are caused by adware-type programs that spread bundled with freeware |
| Elimination process | Download FortectIntego and run a full system scan with it. It will eliminate scam-related malware and other unwanted programs. After malware elimination, reset your web browser's settings. |
The name of this infection is actively misused by scammers who seek to make their Tech-Support-Scam alerts look as convincing as possible. The fake Zeus Virus alert typically renders the design of Microsoft’s official notifications[3] and impersonates “Certified Microsoft technicians.” Mobile numbers included in the alert are yet another trait that allows recognizing a scam. At the moment, security experts report about these fake Microsoft tech support numbers:
- +1-844-313-7003
- +1-866-625-5558
- +1 (888) 944-5714
- +1-877-224-2995
- +1-844-557-540
- 1-844-859-0337
- 1-844-324-6233
- 1-844-680-1071
- 1-800-363-782
- 1-877-624-3165
- 1-844-612-7496
- (866) 249-2994
- (888) 202-7560
- (855) 247-2419
- (888)-252-1520
- 0800-014-8826
- 44-800-090-3820
Since this type of scam is being actively distributed on the Internet, people have to be cautious and remember the fact that Zeus is not active since 2012 and there's no chance of getting infected with it. The pop-up is only a strategy used by criminals to make the content of fake alerts more convincing and threatening.

The modus operandi of the scam
There are many versions of the related scams, but all of them share similar circumstances of the occurrence, design, content, behavior, and intentions. Typically, this specific tech support scam strikes PC users who fail to update OS, web browser, and security programs. It is closely related to adware-type programs that are infected with malicious JavaScrip[4] code. If the potential victim falls for installing scam-infected adware, his or hers web browser experiences unauthorized modifications needed to initiate regular system’s redirects to compromised web domains.
In some of the cases, adware is not necessary to encounter the scam. It may be disguised under illegal movie streaming websites, gambling sites or domains that contain pornography. Currently, these are domains that generate the fake Zeus Virus Detected alert:
- Crash-h3a23z.info
- Certifiedinternettroubleshooting.com
- Microsoft-high-risk-alert.com
- Rajasthantent.com
- 54.71.45.30
- Defaultprogramssystem.com
- Support.windows.com
- Streetsecurity.xyz, etc.
In most of the cases, the web browser stumbles upon the alert after multiple redirects. It tends to show up in layers. First of all, a blue, black or red screen containing technical information is being displayed. In less than 10 seconds, a pop-up alert emerges and freezes web browser. That’s one of the strategies used by criminals to scare people into thinking that their PCs are severely infected.

The content of the Zeus virus detected alert is very similar, though can differ a little bit each time. As a rule, fake alerts contain the following details:
- A slogan reporting Zeus infection;
- An error code, which may be invented or randomly taken from the Windows error database (#365838d7f8a4fa5, 0XB1983959, # 0x80072ee7[5] );
- A supposedly unique victim’s identification number (WBCKL457, B2957E, G3468D);
- A list of data that is supposedly targeted by criminals (passwords, credit card details, hard disk files, etc.)
- “Toll-Free” mobile number of “Certified” Microsoft or Apple technicians (+1-844-313-7003, (866) 249-2994, (888) 202-7560).
The main goal of Zeus virus detected scams
Unlike the virus itself, Zeus-themed scams are not that dangerous. Fake pop-ups flooding web browser’s screen are triggered by the adware-type program, which does not have a destructive effect on the system. The goal of the scam is to make people dial the given number.
At best, the number provided may be the premium rate, meaning that a one minute of conversation can cost you $2.99 or more. However, usually, scammers have much bigger and much worse intentions. They can professionally impersonate Microsoft technicians to prove credibility and then extort personal information from gullible people. More often than not, impostors seek to extort information needed for remote connection to victim’s PC.

Therefore, to prevent yourself from being scammed, scan your PC with FortectIntego, SpyHunterCombo Cleaner or MalwarebytesMalwarebytes as soon as your web browser starts generating fake alert messages reporting a non-existent virus infection. No matter which version of this scam you encounter, remove Zeus Virus Detected from Chrome or another web browser without delay.
Scammers rely on bundling to distribute scam alerts
People risk encountering technical support scam alerts when visiting illegal websites, such as gambling, adult dating or pornographic websites. Such domains are usually filled with infected ads and malicious links.
Nevertheless, scam alerts typically show up right after the installation of freeware. Free applications are frequently supplemented with adware-type and other potentially unwanted programs (PUPs). Usually, they are promoted as useful browser add-ons, toolbars, extensions or plug-ins. People who opt for Quick or Recommended freeware installation setup agree with the installation of the whole bundle by default.
Consequently, if one of the adware injected in freeware was infected with a JavaScript code, web browser's settings get compromised in a way to generate fake Microsoft support notifications. NoVirus.uk[6] cybersecurity experts recommend people to opt for Advanced or Custom installation freeware and verify each installation step to prevent unwanted apps from installing.
A guide on how to remove Zeus Virus Detected scam
One of the options to initiate Zeus Virus Detected removal is to perform a full system scan with a professional anti-virus program. That's the only trustworthy way to eliminate the whole malware bundle. Our recommended programs are FortectIntego, SpyHunterCombo Cleaner, and MalwarebytesMalwarebytes, but you can opt for another reputable anti-virus of your preferences.
It's possible to remove Zeus Virus Detected alert manually as well. This procedure encompasses several stages. First of all, you have to eliminate PUPs from the system using in-built uninstallers. Then, check the system for related Registry entries, and other associated components. Finally, open a new session of the affected web browser (NOTE: do not restore the last browsing session) and reset its settings. You can find a step-by-step tutorial down below:
Uninstall from Windows
Uninstall from Windows 10/8:
- Type Control Panel into the Windows search box and open the result.
- Under Programs, select Uninstall a program.


Uninstall from Windows 7/XP:
- Click on Windows Start > Control Panel (Windows XP users should click on Add/Remove Programs).
- In Control Panel, select Programs > Uninstall a program.


Remove the unwanted program:
- In the Programs and Features window, look for any recently installed suspicious entries, select them, and click Uninstall.
- If User Account Control appears, click Yes to confirm, then complete the removal.


Delete from macOS
Remove the unwanted application:
- From the menu bar, select Go > Applications.
- In the Applications folder, look for any suspicious entries, then drag them to Trash (or right-click and pick Move to Trash).


Delete leftover files and folders:
- Select Go > Go to Folder.
- Enter /Library/Application Support and remove any suspicious folders related to the unwanted program.
- Repeat the same check in the /Library/LaunchAgents and /Library/LaunchDaemons folders, deleting any suspicious entries.

- Finally, empty the Trash to permanently remove the leftovers.

Reset Internet Explorer
Remove dangerous add-ons:
- Open Internet Explorer, click on the Gear icon (IE menu) on the top-right corner of the browser
- Pick Manage Add-ons.
- You will see a Manage Add-ons window. Here, look for suspicious plugins. Click on these entries and select Disable.


Change your homepage if it was altered:
- Open IE and click on the Gear icon.
- Select Internet Options.
- In the General tab, delete the Home page address and replace it by your preferred one (for example, Google.com).
- Click Apply and then select OK.


Delete temporary files:
- Press on the Gear icon and select Internet Options.
- Under Browsing history, click Delete...
- Select relevant fields and press Delete.


Reset Internet Explorer:
- Click on Gear icon > Internet options and select Advanced tab.
- Select Reset.
- In the new window, check Delete personal settings and select Reset.


Remove from Microsoft Edge
Delete unwanted extensions from MS Edge:
- Select Menu (three horizontal dots at the top-right of the browser window) and pick Extensions.
- From the list, pick the extension and click on the Gear icon.
- Click Remove.


Clear cookies and other browser data:
- Click on the Menu (three horizontal dots at the top-right of the browser window) and select Settings > Privacy, search, and services..
- Under Clear browsing data, pick Choose what to clear.
- Select Cookies and other site data and Cached images and files. (apart from passwords, although you might want to include Media licenses as well, if applicable) and click on Clear.


Restore new tab and homepage settings:
- Click the menu icon and choose Settings.
- Then find On startup section.
- Click Remove next to any suspicious startup page.
Reset MS Edge if the above steps did not work:
- Press on Ctrl + Shift + Esc to open Task Manager.
- Click on More details arrow at the bottom of the window.
- Select Details tab.
- Now scroll down and locate every entry with Microsoft Edge name in it. Right-click on each of them and select End Task to stop MS Edge from running.


Instructions for Chromium-based Edge
Delete extensions from MS Edge (Chromium):
- Open Edge and click select Settings > Extensions.
- Delete unwanted extensions by clicking Remove.


Clear cache and site data:
- Click on Menu and go to Settings.
- Select Privacy, search and services.
- Under Clear browsing data, pick Choose what to clear.
- Under Time range, pick All time.
- Select Clear now.


Reset Chromium-based MS Edge:
- Click on Menu and select Settings.
- On the left side, pick Reset settings.
- Select Restore settings to their default values.
- Confirm with Reset.
- This will disable extensions and reset startup pages but will not delete bookmarks, saved passwords, or browsing history.


Remove from Mozilla Firefox (FF)
Remove dangerous extensions:
- Open Mozilla Firefox browser and click on the Menu (three horizontal lines at the top-right of the window).
- Select Add-ons.
- In here, select the unwanted extension and click Remove.


Reset the homepage:
- Click three horizontal lines at the top right corner to open the menu.
- Choose Settings.
- Under Home, set your preferred homepage and new tab settings.
Clear cookies and site data:
- Click Menu and pick Settings.
- Go to Privacy & Security section.
- Scroll down to locate Cookies and Site Data.
- Click on Clear Data...
- Select Cookies and Site Data and Temporary cached files and pages, then click Clear.


Reset Mozilla Firefox
If clearing the browser as explained above did not help, reset Mozilla Firefox:
- Open Mozilla Firefox browser and click the Menu.
- Go to Help and then choose Troubleshooting Information.

- Under Give Firefox a tune up section, click on Refresh Firefox...
- Once the pop-up shows up, confirm the action by pressing on Refresh Firefox.



Remove from Google Chrome
Delete malicious extensions from Google Chrome:
- Open Google Chrome, click on the Menu (three vertical dots at the top-right corner) and select More tools > Extensions.
- In the newly opened window, you will see all the installed extensions. Uninstall all suspicious extensions related to the unwanted program by clicking Remove.


Clear cache and web data from Chrome:
- Click on Menu and pick Settings.
- Under Privacy and security, select Clear browsing data.
- Select Browsing history, Cookies and other site data, as well as Cached images and files.
- Click Clear data.


Change your homepage:
- Click menu and choose Settings.
- Look for a suspicious site in the On startup section.
- Click on Open a specific or set of pages and click on three dots to find the Remove option.
Reset Google Chrome:
If the previous methods did not help you, reset Google Chrome to eliminate all the unwanted components:
- Click on Menu and select Settings.
- In the Settings, scroll down and click Advanced.
- Scroll down and locate Reset and clean up section.
- Now click Restore settings to their original defaults.
- Confirm with Reset settings.


Delete from Safari
Remove dangerous extensions:
- Open Safari, click Safari in the menu at the top-left of the screen, and select Preferences.
- Go to the Extensions tab, look for any suspicious entries, and click Uninstall to remove them.


Clear history and website data:
- Click Safari in the menu and pick Clear History.
- Set Clear to all history and confirm with Clear History.


Reset Safari:
- Click Safari in the menu and select Preferences > Advanced.
- Enable Show Develop menu in menu bar.
- From the menu bar, click Develop and select Empty Caches.


Did this guide help?
Be the first to comment