

Quick Maps And Directions is the potentially unwanted web browser extension that redirects to search.yahoo.com every time you open the new tab
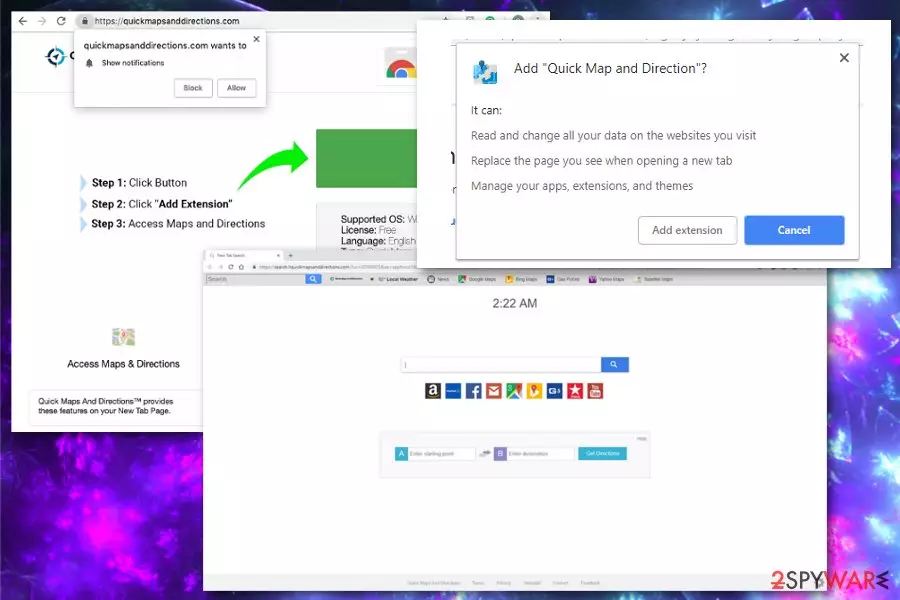
Quick Maps And Directions is a browser hijacker that is usually installed via browser extension Quick Maps And Directions New Tab Search for Google Chrome. Developed by the notorious Polarity Technologies Ltd, this browser tool claims that it can help users to access world maps with detailed satellite images, driving directions, and provide improved search results. Once settled, Quick Maps And Directions changes homepage, new tab and the search engine to hxxp://search.quickmapsanddirections.com, and redirects all the search results to hxxp://search.yahoo.com – a trusted search provider. However, users will quickly notice that the search results are not entirely genuine but instead plagued with sponsored links.
| Name | Quick Maps And Directions |
|---|---|
| Type | Browser hijacker |
| Category | Potentially unwanted program[1] |
| Developers | Polarity Technologies Ltd |
| Distribution | Deceptive advertisements, software bundling |
| Main danger | Exposes to suspicious content, tracks and collects information about the user |
| System affected | Windows OS |
| Elimination | Clean the system from any PUPs using FortectIntego |
Yet another product from Polarity Technologies Ltd, Cyprus company that delivers tons of similar tools and programs like Quick Maps And Directions. Watch TV Now, Search Encrypt, Search.htv-now.co, Easy Sports Access all are developed and distributed by the same company so you may encounter promotional content that offers to download or use these hijackers.
Quick Maps And Directions virus changes the default search engine and redirects to other deceptive websites. Also, it installs the browser extension that launches Quick Maps And Directions New Tab Search whenever you open the new browser tab on your Google Chrome. It mostly affects this browser, but you may notice malicious activity on Mozilla Firefox and Internet Explorer too.
In most cases, Quick Maps And Directions comes to the system from third-party advertisements[2] that promote the tool or even included as the additional program to the freeware installation.
Other Quick Maps And Directions symptoms may also include:
- changed appearance or setting of your web browser;
- installation of extensions, add-ons or toolbars;
- automatic startup of the browser and the Quick Maps And Directions extension.
Quick Maps And Directions hijacker is also known to track and collect information about the users. This feature is common for various potentially unwanted programs because advertisers who sponsor the distribution of the program focus on generating views from advertisement content based on users' preferences and habits.[3]
All the data tracking practices are documented in the Privacy Policy section of the official website. If you noticed that your homepage changed, you should go immediately read EULA and Privacy Policy of such a site, especially if you plan on keep using it. In any case, researchers recommend performing Quick Maps And Directions removal, as it does not benefit you in any way.
To remove Quick Maps And Directions, you can either rely on automated tools like anti-virus applications or get rid of the Quick Maps And Directions hijack manually. Both methods are effective, as long as performed correctly. Use instructions down below for a detailed description of each step.
Once you are done with PUPs elimination, you should scan your device with FortectIntego to recover from damage caused by the browser hijacker.

Deceptive advertisements trick users into installing PUPs
Browser hijackers, adware or malicious extensions are advertised and promoted on deceptive websites that may trick victims into them. When the promotional content claims that the program possesses useful features, users may believe it is true and install the extensions purposely.
However, researchers[4] also warn about the deceptive PUP distribution method – software bundling. When you allow the download from the suspicious site such as P2P service, you risk installing cyber infections on your device.
Choosing Advanced or Custom options during those processes should help you avoid infiltration of PUPs because you can de-select the optional components that are suggested seemingly for free.
The easiest way to remove Quick Maps And Directions is by using security application
When performing Quick Maps And Directions removal, make sure to employ a reputable anti-malware program. This is the best solution to terminate the potentially unwanted programs due to the process being completely automated and really fast.
It is possible to remove Quick Maps And Directions manually, but it takes more time. You still may need to check the system with antivirus program to make sure that no elements of the hijacker or other malicious software are present on the device. Follow our guide below for more information.
Uninstall from Windows
Uninstall from Windows 10/8:
- Type Control Panel into the Windows search box and open the result.
- Under Programs, select Uninstall a program.


Uninstall from Windows 7/XP:
- Click on Windows Start > Control Panel (Windows XP users should click on Add/Remove Programs).
- In Control Panel, select Programs > Uninstall a program.


Remove the unwanted program:
- In the Programs and Features window, look for any recently installed suspicious entries, select them, and click Uninstall.
- If User Account Control appears, click Yes to confirm, then complete the removal.


Reset Internet Explorer
Remove dangerous add-ons:
- Open Internet Explorer, click on the Gear icon (IE menu) on the top-right corner of the browser
- Pick Manage Add-ons.
- You will see a Manage Add-ons window. Here, look for suspicious plugins. Click on these entries and select Disable.


Change your homepage if it was altered:
- Open IE and click on the Gear icon.
- Select Internet Options.
- In the General tab, delete the Home page address and replace it by your preferred one (for example, Google.com).
- Click Apply and then select OK.


Delete temporary files:
- Press on the Gear icon and select Internet Options.
- Under Browsing history, click Delete...
- Select relevant fields and press Delete.


Reset Internet Explorer:
- Click on Gear icon > Internet options and select Advanced tab.
- Select Reset.
- In the new window, check Delete personal settings and select Reset.


Remove from Microsoft Edge
Delete unwanted extensions from MS Edge:
- Select Menu (three horizontal dots at the top-right of the browser window) and pick Extensions.
- From the list, pick the extension and click on the Gear icon.
- Click Remove.


Clear cookies and other browser data:
- Click on the Menu (three horizontal dots at the top-right of the browser window) and select Settings > Privacy, search, and services..
- Under Clear browsing data, pick Choose what to clear.
- Select Cookies and other site data and Cached images and files. (apart from passwords, although you might want to include Media licenses as well, if applicable) and click on Clear.


Restore new tab and homepage settings:
- Click the menu icon and choose Settings.
- Then find On startup section.
- Click Remove next to any suspicious startup page.
Reset MS Edge if the above steps did not work:
- Press on Ctrl + Shift + Esc to open Task Manager.
- Click on More details arrow at the bottom of the window.
- Select Details tab.
- Now scroll down and locate every entry with Microsoft Edge name in it. Right-click on each of them and select End Task to stop MS Edge from running.


Instructions for Chromium-based Edge
Delete extensions from MS Edge (Chromium):
- Open Edge and click select Settings > Extensions.
- Delete unwanted extensions by clicking Remove.


Clear cache and site data:
- Click on Menu and go to Settings.
- Select Privacy, search and services.
- Under Clear browsing data, pick Choose what to clear.
- Under Time range, pick All time.
- Select Clear now.


Reset Chromium-based MS Edge:
- Click on Menu and select Settings.
- On the left side, pick Reset settings.
- Select Restore settings to their default values.
- Confirm with Reset.
- This will disable extensions and reset startup pages but will not delete bookmarks, saved passwords, or browsing history.


Remove from Mozilla Firefox (FF)
Remove dangerous extensions:
- Open Mozilla Firefox browser and click on the Menu (three horizontal lines at the top-right of the window).
- Select Add-ons.
- In here, select the unwanted extension and click Remove.


Reset the homepage:
- Click three horizontal lines at the top right corner to open the menu.
- Choose Settings.
- Under Home, set your preferred homepage and new tab settings.
Clear cookies and site data:
- Click Menu and pick Settings.
- Go to Privacy & Security section.
- Scroll down to locate Cookies and Site Data.
- Click on Clear Data...
- Select Cookies and Site Data and Temporary cached files and pages, then click Clear.


Reset Mozilla Firefox
If clearing the browser as explained above did not help, reset Mozilla Firefox:
- Open Mozilla Firefox browser and click the Menu.
- Go to Help and then choose Troubleshooting Information.

- Under Give Firefox a tune up section, click on Refresh Firefox...
- Once the pop-up shows up, confirm the action by pressing on Refresh Firefox.



Remove from Google Chrome
Delete malicious extensions from Google Chrome:
- Open Google Chrome, click on the Menu (three vertical dots at the top-right corner) and select More tools > Extensions.
- In the newly opened window, you will see all the installed extensions. Uninstall all suspicious extensions related to the unwanted program by clicking Remove.


Clear cache and web data from Chrome:
- Click on Menu and pick Settings.
- Under Privacy and security, select Clear browsing data.
- Select Browsing history, Cookies and other site data, as well as Cached images and files.
- Click Clear data.


Change your homepage:
- Click menu and choose Settings.
- Look for a suspicious site in the On startup section.
- Click on Open a specific or set of pages and click on three dots to find the Remove option.
Reset Google Chrome:
If the previous methods did not help you, reset Google Chrome to eliminate all the unwanted components:
- Click on Menu and select Settings.
- In the Settings, scroll down and click Advanced.
- Scroll down and locate Reset and clean up section.
- Now click Restore settings to their original defaults.
- Confirm with Reset settings.


Did this guide help?
Be the first to comment