

Matrixstar.net ads might show you links to websites of dubious origin
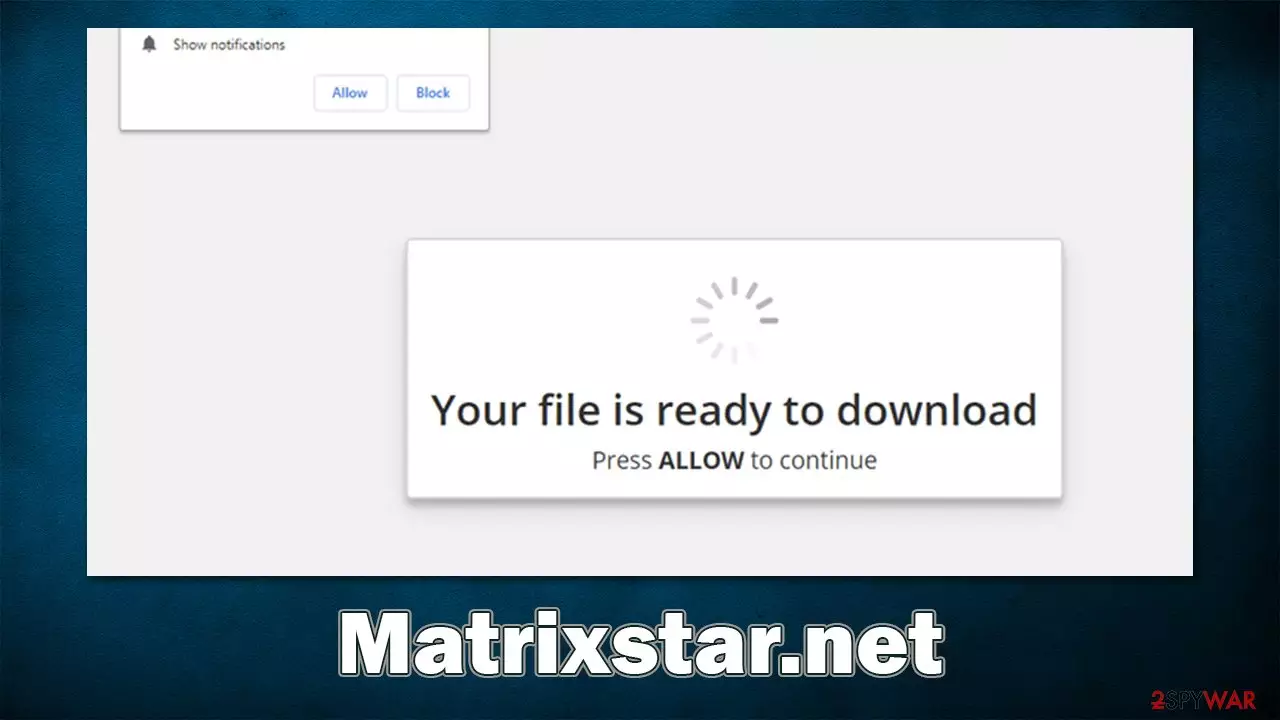
The web is full of websites that promote a variety of different scams. Matrixstar.net, for instance, utilizes Google Chrome's (or any other browser's) legitimate pop-up notifications feature to show them ads of dubious content, as well as promote links to dubious places on the internet. In fact, there are thousands of similar websites that use exact same schemes – the most recent ones we described were Leaurned-fundonals.com, Flewssyzygia.casa, and Sistheberth.xyz.
Users likely access Matrixstar.net without their own volition and are instead redirected from another place on the internet (most commonly, torrents, cracks, gambling, and similar insecure sites). Upon the website entry, they are introduced to a push notification prompt asking whether notifications are allowed and a background message that seeks to trick users into allowing them.
Unfortunately, many people don't realize that by pressing the “Allow” button, they permit the site to send them information at random times. Usually, crooks exploit this permission in order to deliver various links directly to users' screens, which can be particularly intrusive; it can interrupt one's work or entertainment time.
Clicking on these links might put you in danger, so you should stay away from them. For example, you might be tricked into providing your personal details (such as credit cards) or download potentially unwanted or malicious software. Stay away from these pop-ups and remove them as quickly as possible instead.
| Name | Matrixstar.net |
|---|---|
| Type | Push notifications, ads, scam |
| Distribution | Pop-ups start showing up as soon as the “Allow” button is pressed within the notification prompt |
| Symptoms | Intrusive pop-ups from the site will be shown directly on users' desktops |
| Dangers | Clicking on links that are embedded within the notification prompt, exploring the sites these links bring to, or downloading files can be particularly dangerous – users can get infected with malware, suffer from financial losses or privacy issues |
| Deletion | In order to stop the unwanted ads from being shown, you need to access the settings of your browser – you can find more details below |
| Further steps | Cleaning web browsers is just as important when dealing with potentially unwanted programs, so do so by following the instructions below or use FortectIntego as a quick fix |
Ads and push notifications explained
Advertisements are extremely prevalent everywhere: on TV, roads, merchandise, and, of course, on the internet. They are used to promote items, products, services, and much more. Many websites utilize ads in order to keep the service free and perhaps make it the main source of income to creators. For example, YouTube creators greatly rely on ads in order to live off of whatever they are making the videos about, and whatever they are passionate about, which is a good thing.
However, there is a much darker side to ads, as some parties tend to exploit them at the cost of users' inconvenience or even endangerment. For example, some sites use insecure advertising networks, which can put people in danger.
Cybercriminals can buy out the ad space and insert JavaScript ads that exploit software vulnerabilities[1] if such a present on visitors' devices to install malware automatically. Additionally, even the most popular websites cover their content with ads, making it very awkward and annoying to view, all in order to monetize as much as possible.
Such ads can be easily avoided – one can stop visiting sites that are filled with ads or employ an ad-blocker. These methods simply do not work for Matrixstar.net notifications, however, and it is easy to explain why.
Push notifications are quite a bit different than pop-up ads, even though they look almost identical. In order for them to work, they need to be triggered by a website entry. Alternatively, some malicious programs, such as adware,[2] could show pop-ups and ads that do not belong to websites themselves.

However, the push notification feature is different. As soon as you enter a website that uses this API, it would show a prompt for users that they can block or allow. If they allow it, they grant permission to the site deliver push notifications without restrictions, even if a different website is being viewed at the time or the browser is running in the background. Also, these pop-ups would be shown on top of all other ads, making the activity very intrusive.
Most websites would not give you a headache by constantly sending you notifications, but the story is quite a bit different for Matrixstar.net. You might receive pop-ups regularly – not only are they intrusive, but they also promote scams (get rich quick, tech support scams, etc.) and show links to dangerous websites.
Remove intrusive Matrixstar.net pop-ups
In order to trick users into subscribing to notifications, crooks use various social engineering techniques. They use elements that users might be familiar with and present them as something different. In this case, push notifications are presented as a trigger to confirm the action, download a file, or watch a video. Here is one of the most common examples you might come across when visiting Matrixstar.net or another similar site:
Click “Allow to verify, that you are not a robot
Website authors presented push notification prompt as a verification feature that is commonly employed by websites to protect themselves from DDoS[3] attacks. In reality, it is all a scam, and all users do by pressing the “Allow” button is allowing it to send notifications at any time, regardless of which website is being visited at the time.
If you were tricked in a similar way, you shouldn't worry, as this change is easily reversible. Keep in mind that you can deny or allow notifications from any other website in the same way we explained below.
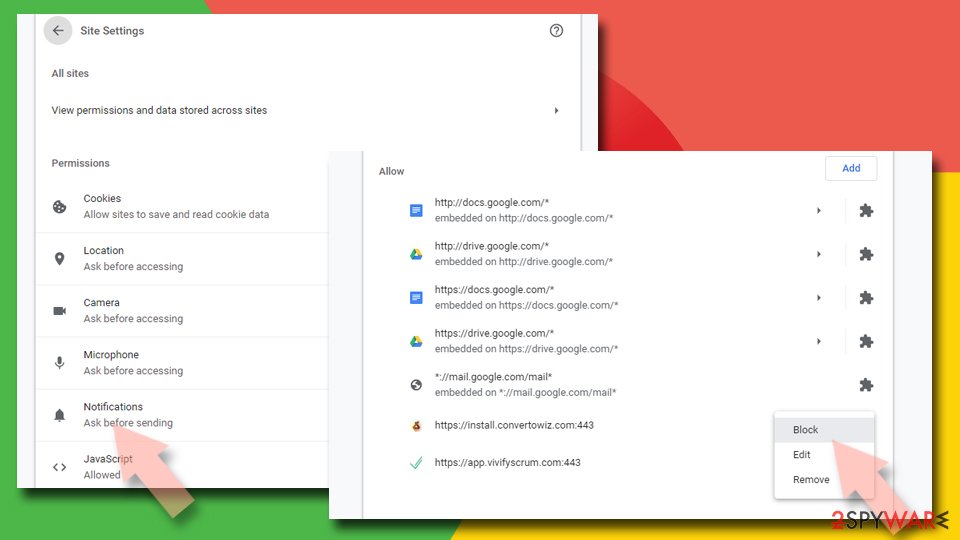
Google Chrome (desktop):
- Open Google Chrome browser and go to Menu > Settings.
- Scroll down and click on Advanced.
- Locate the Privacy and security section and pick Site Settings > Notifications.
- Look at the Allow section and look for a suspicious URL.
- Click the three vertical dots next to it and choose Block. This should remove unwanted notifications from Google Chrome.

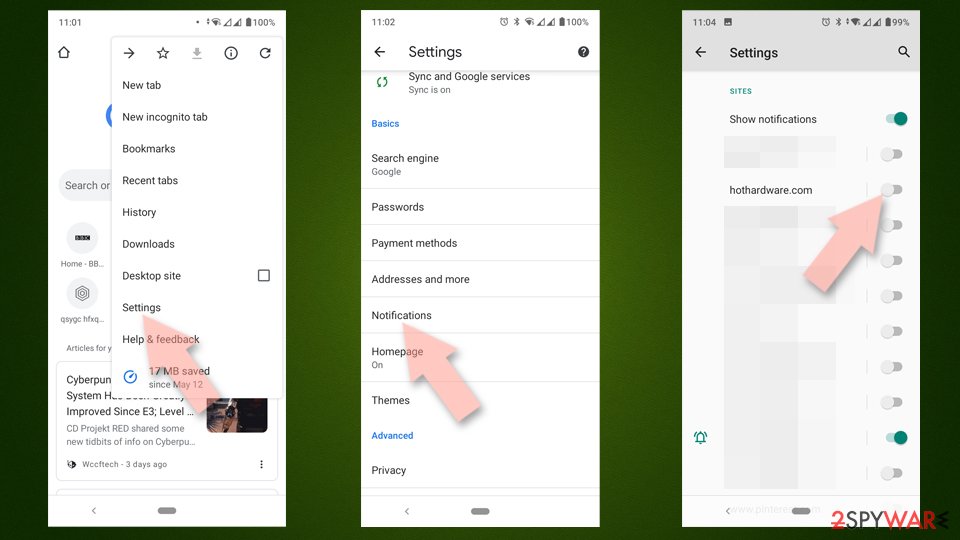
Google Chrome (Android):
- Open Google Chrome and tap on Settings (three vertical dots).
- Select Notifications.
- Scroll down to the Sites section.
- Locate the unwanted URL and toggle the button to the left (Off setting).

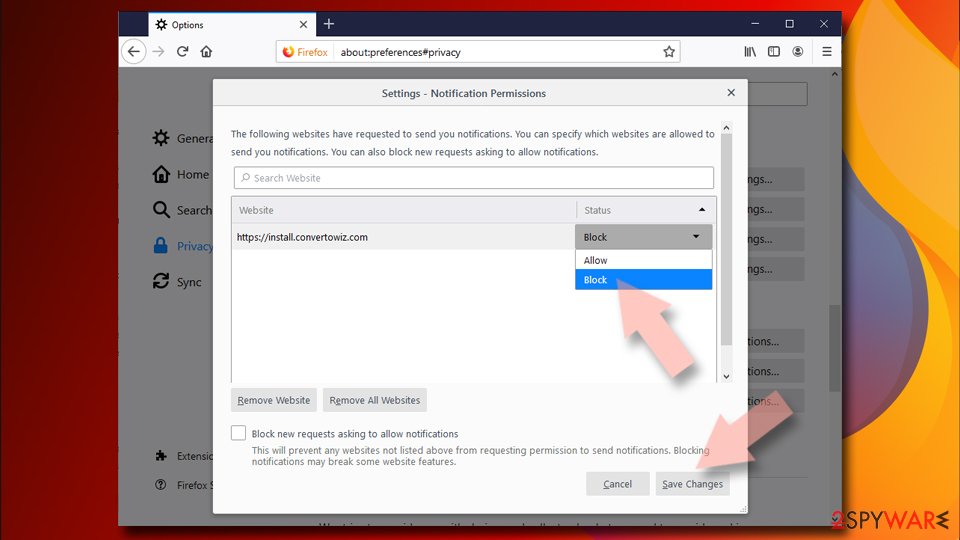
Mozilla Firefox:
- Open Mozilla Firefox and go to Menu > Options.
- Click on Privacy & Security section.
- Under Permissions, you should be able to see Notifications. Click the Settings button.
- In the Settings – Notification Permissions window, click on the drop-down menu by the URL in question.
- Select Block and then click on Save Changes. This should remove unwanted notifications from Mozilla Firefox.

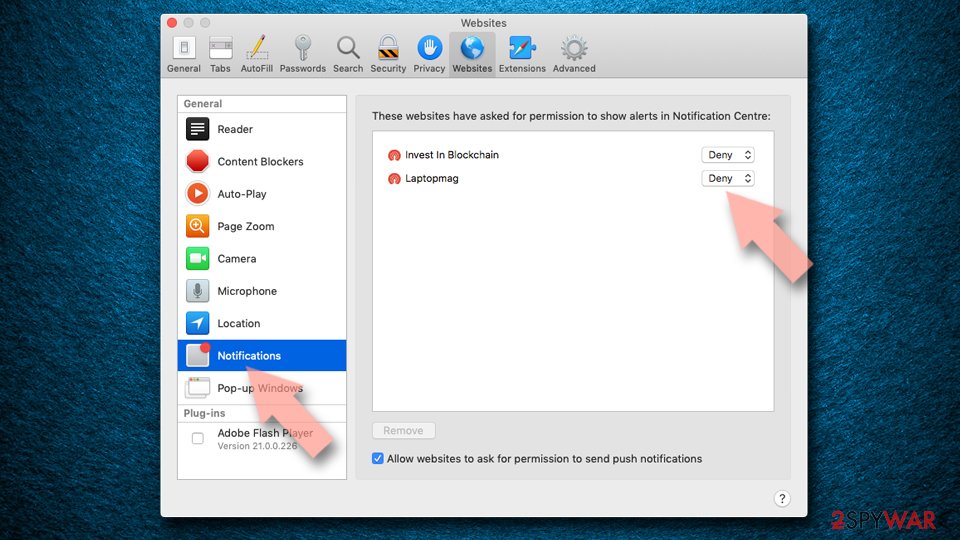
Safari:
- Click on Safari > Preferences…
- Go to the Websites tab and, under General, select Notifications.
- Select the web address in question, click the drop-down menu and select Deny.

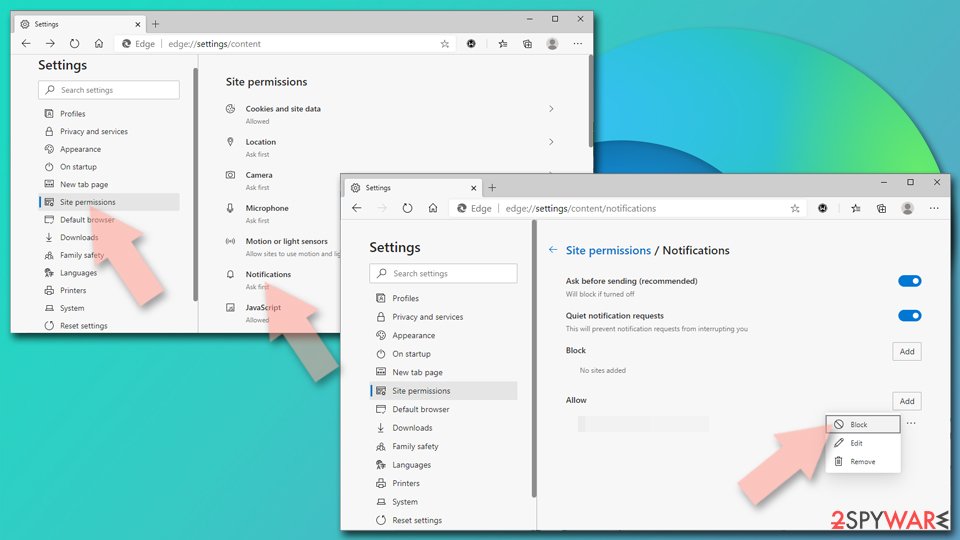
MS Edge (Chromium):
- Open Microsoft Edge, and go to Settings.
- Select Site permissions.
- Go to Notifications on the right.
- Under Allow, you will find the unwanted entry.
- Click on More actions and select Block.

Ensure there's no malware and adware installed on your device
As we already noted, you have likely not entered a scam website yourself. So why is it so that your browser is taking to places you would otherwise never visit? As we previously explained, various intrusive ads and random browser redirects could be a clear indication of adware infection.
Adware is commonly spread within software bundles, or via deceptive ads/fake updates, hence some might not be aware that it is running in the background in the first place. Likewise, malware could also behave in exact same way. Therefore, if you have followed the steps above in order to remove notifications but you still notice strange computer or browser behavior, you should immediately scan it with the powerful SpyHunterCombo Cleaner anti-malware software.
If you want, you can also try looking for PUPs yourself, although this might be quite tricky, especially if you were not aware of some apps being installed on your machine without permission. After you are done, you should take your time to clean your web browsers, and you can do that easier with FortectIntego. If you choose so, you can instead follow the instructions below. If you leave a browser the way it is without clearing browser caches, the tracking activities might continue. Additionally, ads and redirects might also not stop. So keep in mind that this step is detrimental to your security and privacy.
Uninstall from Windows
Uninstall from Windows 10/8:
- Type Control Panel into the Windows search box and open the result.
- Under Programs, select Uninstall a program.


Uninstall from Windows 7/XP:
- Click on Windows Start > Control Panel (Windows XP users should click on Add/Remove Programs).
- In Control Panel, select Programs > Uninstall a program.


Remove the unwanted program:
- In the Programs and Features window, look for any recently installed suspicious entries, select them, and click Uninstall.
- If User Account Control appears, click Yes to confirm, then complete the removal.


Delete from macOS
Remove the unwanted application:
- From the menu bar, select Go > Applications.
- In the Applications folder, look for any suspicious entries, then drag them to Trash (or right-click and pick Move to Trash).


Delete leftover files and folders:
- Select Go > Go to Folder.
- Enter /Library/Application Support and remove any suspicious folders related to the unwanted program.
- Repeat the same check in the /Library/LaunchAgents and /Library/LaunchDaemons folders, deleting any suspicious entries.

- Finally, empty the Trash to permanently remove the leftovers.

Remove from Microsoft Edge
Delete unwanted extensions from MS Edge:
- Select Menu (three horizontal dots at the top-right of the browser window) and pick Extensions.
- From the list, pick the extension and click on the Gear icon.
- Click Remove.


Clear cookies and other browser data:
- Click on the Menu (three horizontal dots at the top-right of the browser window) and select Settings > Privacy, search, and services..
- Under Clear browsing data, pick Choose what to clear.
- Select Cookies and other site data and Cached images and files. (apart from passwords, although you might want to include Media licenses as well, if applicable) and click on Clear.


Restore new tab and homepage settings:
- Click the menu icon and choose Settings.
- Then find On startup section.
- Click Remove next to any suspicious startup page.
Reset MS Edge if the above steps did not work:
- Press on Ctrl + Shift + Esc to open Task Manager.
- Click on More details arrow at the bottom of the window.
- Select Details tab.
- Now scroll down and locate every entry with Microsoft Edge name in it. Right-click on each of them and select End Task to stop MS Edge from running.


Instructions for Chromium-based Edge
Delete extensions from MS Edge (Chromium):
- Open Edge and click select Settings > Extensions.
- Delete unwanted extensions by clicking Remove.


Clear cache and site data:
- Click on Menu and go to Settings.
- Select Privacy, search and services.
- Under Clear browsing data, pick Choose what to clear.
- Under Time range, pick All time.
- Select Clear now.


Reset Chromium-based MS Edge:
- Click on Menu and select Settings.
- On the left side, pick Reset settings.
- Select Restore settings to their default values.
- Confirm with Reset.
- This will disable extensions and reset startup pages but will not delete bookmarks, saved passwords, or browsing history.


Remove from Mozilla Firefox (FF)
Remove dangerous extensions:
- Open Mozilla Firefox browser and click on the Menu (three horizontal lines at the top-right of the window).
- Select Add-ons.
- In here, select the unwanted extension and click Remove.


Reset the homepage:
- Click three horizontal lines at the top right corner to open the menu.
- Choose Settings.
- Under Home, set your preferred homepage and new tab settings.
Clear cookies and site data:
- Click Menu and pick Settings.
- Go to Privacy & Security section.
- Scroll down to locate Cookies and Site Data.
- Click on Clear Data...
- Select Cookies and Site Data and Temporary cached files and pages, then click Clear.


Reset Mozilla Firefox
If clearing the browser as explained above did not help, reset Mozilla Firefox:
- Open Mozilla Firefox browser and click the Menu.
- Go to Help and then choose Troubleshooting Information.

- Under Give Firefox a tune up section, click on Refresh Firefox...
- Once the pop-up shows up, confirm the action by pressing on Refresh Firefox.



Remove from Google Chrome
Delete malicious extensions from Google Chrome:
- Open Google Chrome, click on the Menu (three vertical dots at the top-right corner) and select More tools > Extensions.
- In the newly opened window, you will see all the installed extensions. Uninstall all suspicious extensions related to the unwanted program by clicking Remove.


Clear cache and web data from Chrome:
- Click on Menu and pick Settings.
- Under Privacy and security, select Clear browsing data.
- Select Browsing history, Cookies and other site data, as well as Cached images and files.
- Click Clear data.


Change your homepage:
- Click menu and choose Settings.
- Look for a suspicious site in the On startup section.
- Click on Open a specific or set of pages and click on three dots to find the Remove option.
Reset Google Chrome:
If the previous methods did not help you, reset Google Chrome to eliminate all the unwanted components:
- Click on Menu and select Settings.
- In the Settings, scroll down and click Advanced.
- Scroll down and locate Reset and clean up section.
- Now click Restore settings to their original defaults.
- Confirm with Reset settings.


Delete from Safari
Remove dangerous extensions:
- Open Safari, click Safari in the menu at the top-left of the screen, and select Preferences.
- Go to the Extensions tab, look for any suspicious entries, and click Uninstall to remove them.


Clear history and website data:
- Click Safari in the menu and pick Clear History.
- Set Clear to all history and confirm with Clear History.


Reset Safari:
- Click Safari in the menu and select Preferences > Advanced.
- Enable Show Develop menu in menu bar.
- From the menu bar, click Develop and select Empty Caches.


Did this guide help?
Be the first to comment