

Webnotificationservices.com ads should never be clicked on – you may end up on malicious websites

Webnotificationservices.com ads might be an unexpected occurrence on your phone or the computer, although you are definitely not the only one surprised by them. Many users have reported that they started seeing suspicious pop-ups showing up on their screens randomly, regardless of which websites they were visiting at the time. To make matters worse, these ad windows are shown at the top of all other apps running on the system at the time, making the activity intrusive.
If you are dealing with this situation, you must have enabled push notifications from Webnotificationservices.com sometime before. You might think that you have never done that, but the truth is that you were ticked by a fake message asking you to confirm you are not a robot, you are 18+, or that the browser doesn't allow video playback among other reasons.
Once the “Allow” button is clicked, users then permit that particular website to send requests via the browser API,[1], which then manifests as push notifications shown on the system level. This means that the activity is fully absent when the browser is fully turned off. However, that's not the correct way of removing Webnotificationservices.com ads.
| Name | Webnotificationservices.com |
| Type | Push notifications, ads, pop-ups, scam |
| Distribution | Users start seeing intrusive pop-ups at some point after they click the “Allow” button within the site's notification prompt |
| Symptoms | Push notifications that include misleading information links would show up on the desktop at random times |
| Risks | Various security problems due to exposure to scams, monetary losses, system infections, etc. |
| Removal | Access browser settings to block push notifications. By scanning the system with SpyHunterCombo Cleaner, you can quickly check whether or not it is infected with malware or adware |
| Recovery | Potentially unwanted programs often leave cookies on the browser, which are used for tracking. To get rid of these leftover files automatically, use FortectIntego |
What are push notifications and how do they differ from pop-up ads?
There is a lot of confusion surrounding the push notification feature, especially when it comes to desktop computers. Initially, it was used by the system or other official programs only – it was originally prevalent on smartphones and similar devices. Sometime later, in 2014,[2] Google first adapted the feature to be used within the browser environment, which allowed websites to ask users whether they wanted notifications to be enabled.
Once allowed, the push notifications can be shown at any time, as long as the browser is enabled – it does not matter which websites users are visiting or whether they are interacting with the browser in the first place. As long as Google Chrome, Mozilla Firefox, Safari, MS Edge, or another browser is running, the push notifications can be shown at any time.

Pop-up ads, on the other hand, are triggered by users accessing websites they are hosted on. In other cases, adware[3] installed on the system can also initiate pop-up ads, which would look particularly similar to what the Webnotificationservices.com scam website is doing.
How to remove the annoying pop-ups?
Due to similarities between push notifications and pop-up ads, many users immediately come to a conclusion that their systems must have been infected with some kind of a virus, which results in unwanted pop-ups. However, malware is not the direct culprit this time, and the only way to stop push notifications is by blocking the website, causing it within browser settings. If you need help with this, you can proceed with the following instructions:
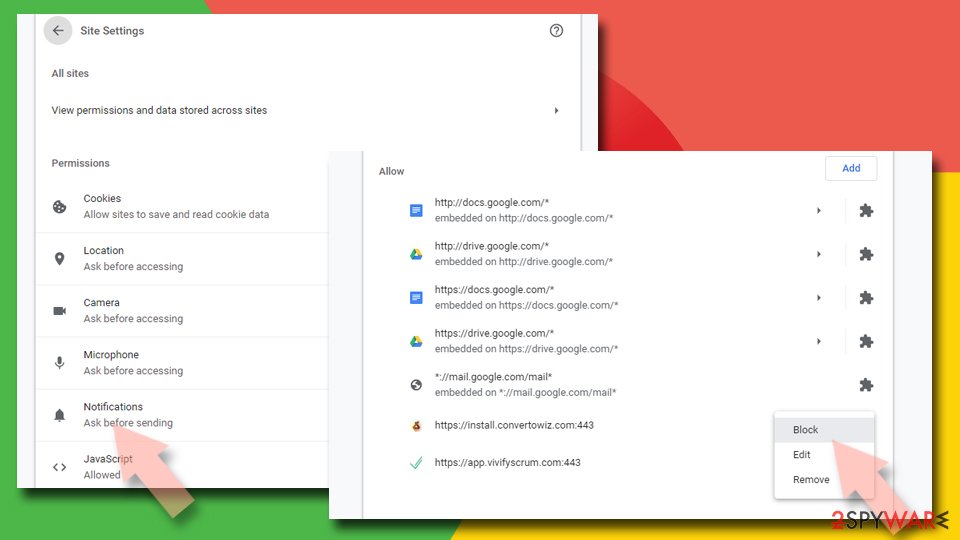
Google Chrome (desktop)
- Open the Google Chrome browser and go to Menu > Settings.
- Scroll down and click on Advanced.
- Locate the Privacy and security section and pick Site Settings > Notifications.
- Look at the Allow section and look for a suspicious URL.
- Click the three vertical dots next to it and pick Block. This should remove unwanted notifications from Google Chrome.

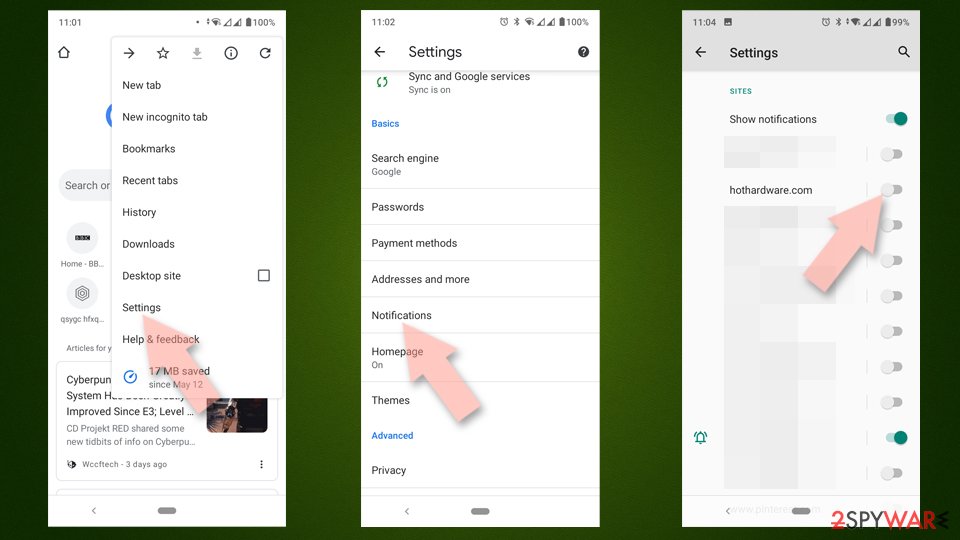
Google Chrome (Android)
- Open Google Chrome and tap on Settings (three vertical dots).
- Select Notifications.
- Scroll down to the Sites section.
- Locate the unwanted URL and toggle the button to the left (Off setting).

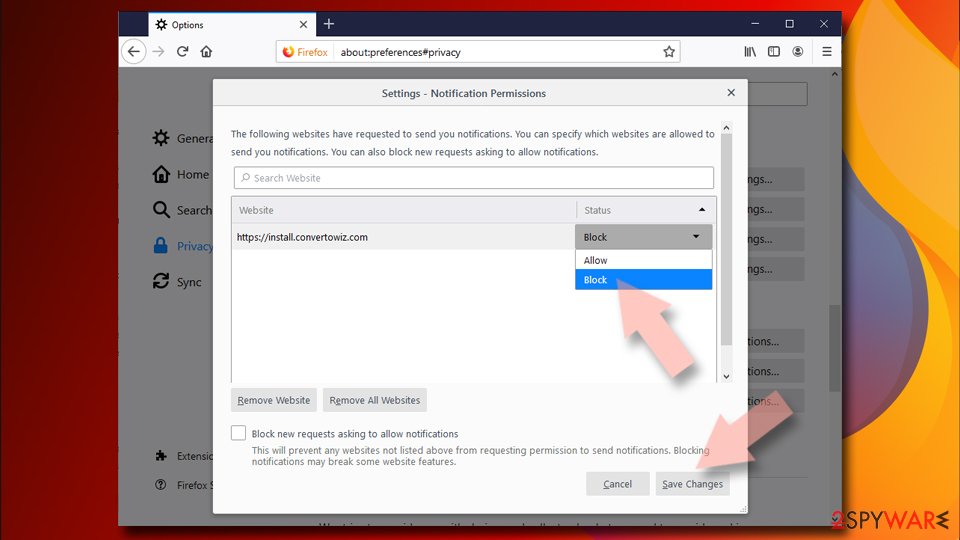
Mozilla Firefox
- Open Mozilla Firefox and go to Menu > Options.
- Click on Privacy & Security section.
- Under Permissions, you should be able to see Notifications. Click the Settings button next to it.
- In the Settings – Notification Permissions window, click on the drop-down menu by the URL in question.
- Select Block and then click on Save Changes. This should remove unwanted notifications from Mozilla Firefox.

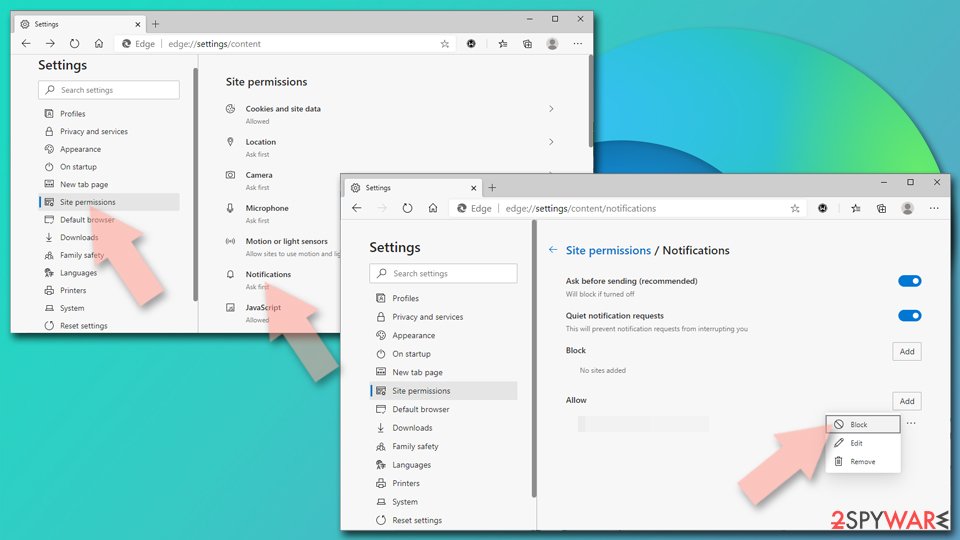
MS Edge (Chromium)
- Open Microsoft Edge, and go to Settings.
- Select Site permissions.
- Go to Notifications on the right.
- Under Allow, you will find the unwanted entry.
- Click on More actions and select Block.

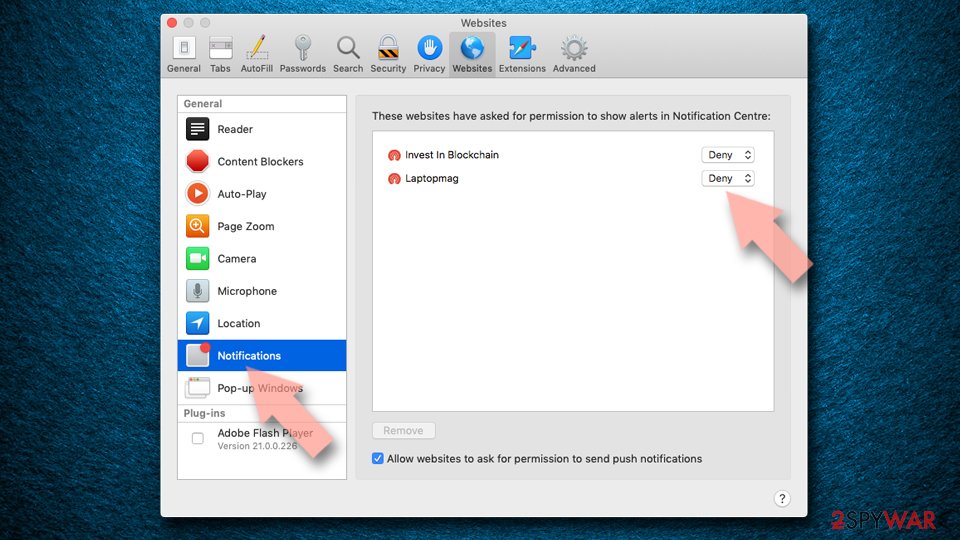
Safari
- Click on Safari > Preferences…
- Go to the Websites tab and, under General, select Notifications.
- Select the web address in question, click the drop-down menu and select Deny.

Internet Explorer
- Open Internet Explorer, and click on the Gear icon at the top-right of the window.
- Select Internet options and go to the Privacy tab.
- In the Pop-up Blocker section, click on Settings.
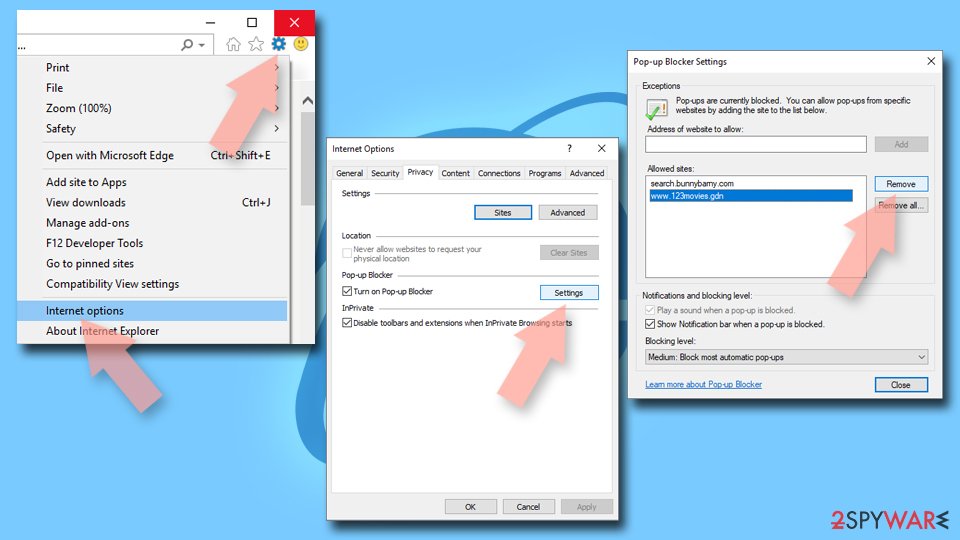
- Locate the web address in question under Allowed sites and pick Remove.

Note: you can use these guidelines to prevent any websites, regardless of whether it is legitimate or not, from continuing to show notifications to you. Also, we recommend checking the list of the “Allowed” websites and removing anything suspicious from the list, as there are plenty of similar websites that could start sending suspicious ads via the notification feature, for example, Soksicme.com, Bluestringline.com, Nathanaeldan.pro, and similar.
Taking care of adware and other infections
As mentioned, users who get redirected to suspicious websites might well be infected with adware or other malicious software. We strongly recommend using security software to check your system for adware and malware. This is especially important if you spot suspicious activity (ads, redirects, random mouse movements, crashes, etc.) on your device or explore the malicious websites you were redirected to – clicked on links, installed programs.
After removing malicious software from your system, you should repair virus damage and clean your browsers with FortectIntego. While manually cleaning your browsers is not difficult, as we explain below, fixing malware damage might be. So if you experience critical system failures, using a reputable repair tool is a much easier fix than reinstalling the operating system.
Remove from Microsoft Edge
Delete unwanted extensions from MS Edge:
- Select Menu (three horizontal dots at the top-right of the browser window) and pick Extensions.
- From the list, pick the extension and click on the Gear icon.
- Click Remove.


Clear cookies and other browser data:
- Click on the Menu (three horizontal dots at the top-right of the browser window) and select Settings > Privacy, search, and services..
- Under Clear browsing data, pick Choose what to clear.
- Select Cookies and other site data and Cached images and files. (apart from passwords, although you might want to include Media licenses as well, if applicable) and click on Clear.


Restore new tab and homepage settings:
- Click the menu icon and choose Settings.
- Then find On startup section.
- Click Remove next to any suspicious startup page.
Reset MS Edge if the above steps did not work:
- Press on Ctrl + Shift + Esc to open Task Manager.
- Click on More details arrow at the bottom of the window.
- Select Details tab.
- Now scroll down and locate every entry with Microsoft Edge name in it. Right-click on each of them and select End Task to stop MS Edge from running.


Instructions for Chromium-based Edge
Delete extensions from MS Edge (Chromium):
- Open Edge and click select Settings > Extensions.
- Delete unwanted extensions by clicking Remove.


Clear cache and site data:
- Click on Menu and go to Settings.
- Select Privacy, search and services.
- Under Clear browsing data, pick Choose what to clear.
- Under Time range, pick All time.
- Select Clear now.


Reset Chromium-based MS Edge:
- Click on Menu and select Settings.
- On the left side, pick Reset settings.
- Select Restore settings to their default values.
- Confirm with Reset.
- This will disable extensions and reset startup pages but will not delete bookmarks, saved passwords, or browsing history.


Remove from Mozilla Firefox (FF)
Remove dangerous extensions:
- Open Mozilla Firefox browser and click on the Menu (three horizontal lines at the top-right of the window).
- Select Add-ons.
- In here, select the unwanted extension and click Remove.


Reset the homepage:
- Click three horizontal lines at the top right corner to open the menu.
- Choose Settings.
- Under Home, set your preferred homepage and new tab settings.
Clear cookies and site data:
- Click Menu and pick Settings.
- Go to Privacy & Security section.
- Scroll down to locate Cookies and Site Data.
- Click on Clear Data...
- Select Cookies and Site Data and Temporary cached files and pages, then click Clear.


Reset Mozilla Firefox
If clearing the browser as explained above did not help, reset Mozilla Firefox:
- Open Mozilla Firefox browser and click the Menu.
- Go to Help and then choose Troubleshooting Information.

- Under Give Firefox a tune up section, click on Refresh Firefox...
- Once the pop-up shows up, confirm the action by pressing on Refresh Firefox.



Remove from Google Chrome
Delete malicious extensions from Google Chrome:
- Open Google Chrome, click on the Menu (three vertical dots at the top-right corner) and select More tools > Extensions.
- In the newly opened window, you will see all the installed extensions. Uninstall all suspicious extensions related to the unwanted program by clicking Remove.


Clear cache and web data from Chrome:
- Click on Menu and pick Settings.
- Under Privacy and security, select Clear browsing data.
- Select Browsing history, Cookies and other site data, as well as Cached images and files.
- Click Clear data.


Change your homepage:
- Click menu and choose Settings.
- Look for a suspicious site in the On startup section.
- Click on Open a specific or set of pages and click on three dots to find the Remove option.
Reset Google Chrome:
If the previous methods did not help you, reset Google Chrome to eliminate all the unwanted components:
- Click on Menu and select Settings.
- In the Settings, scroll down and click Advanced.
- Scroll down and locate Reset and clean up section.
- Now click Restore settings to their original defaults.
- Confirm with Reset settings.


Delete from Safari
Remove dangerous extensions:
- Open Safari, click Safari in the menu at the top-left of the screen, and select Preferences.
- Go to the Extensions tab, look for any suspicious entries, and click Uninstall to remove them.


Clear history and website data:
- Click Safari in the menu and pick Clear History.
- Set Clear to all history and confirm with Clear History.


Reset Safari:
- Click Safari in the menu and select Preferences > Advanced.
- Enable Show Develop menu in menu bar.
- From the menu bar, click Develop and select Empty Caches.


Did this guide help?
Be the first to comment