

Defimedia.best shows fake messages to convince users to subscribe to notifications
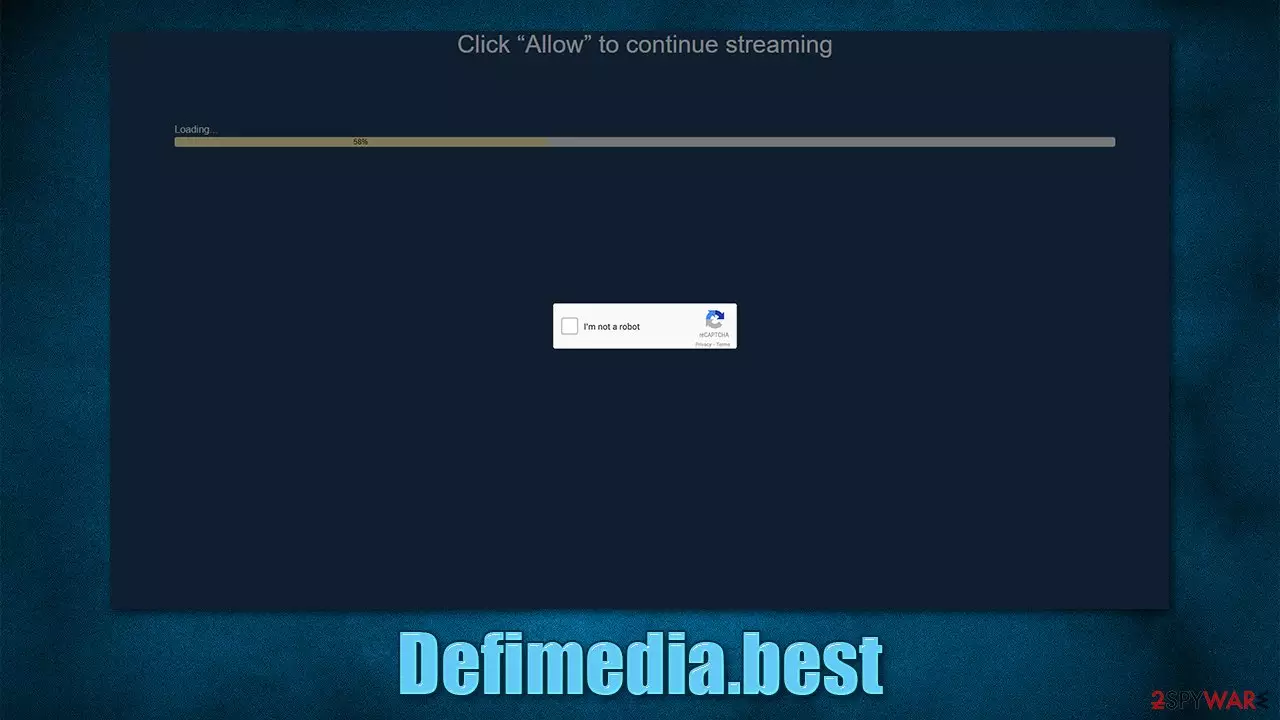
Push notifications can be informative – they provide access to the most relevant information to users as soon as it is published. Unfortunately, some websites tend to abuse this feature for personal gain, all while tricking users into subscribing by using cheap tricks. This time, we are talking about Defimedia.best – a deceptive website that should never be trusted due to numerous reasons.
First of all, it is rare that people would visit this website intentionally. Instead, they are usually rerouted through a link they click somewhere else. As soon as they enter the landing page, they are bound to see some type of false information, e.g., that a video is about to be played or that visitors need to perform a simple verification check to prove they are bot bots.
Of course, for this alleged condition to be met, people are asked to provide consent to receive notifications, although this might not be immediately apparent. The suspicious activity does not start immediately, so most users don't think anything of it and move on with their browsing routines.
However, sometime later, suspicious Defimedia.best pop-ups might start showing up at the top-right or bottom-right (depending on whether macOS or Windows is used) corner of the screen. These notifications commonly include misleading information about computer health or promote too-good-to-be-true offers that would allegedly earn them a lot of money in exchange for a small investment.[1]
All of these links can not be trusted, so we strongly recommend staying away from them. If you have indeed clicked it or downloaded something, you should make sure that your system is checked with powerful anti-malware software immediately for potential malware infections.
To take care of the push notification problem, you would have to access the page settings section of your browser and block the particular website from sending you information by using this feature. Check for more details below.
| Name | Defimedia.best |
|---|---|
| Type | Push notifications, ads, pop-ups |
| Distribution | The activity is triggered by pressing the “Allow” button with the notification prompt |
| Symptoms | Pop-up notifications show up on a regular basis at the bottom-right corner of the desktop – these ads often include inappropriate, scam, phishing, or other similar content |
| Risks | Installation of potentially unwanted programs or malware, data loss, information leak, financial losses due to encountered scams |
| Removal | You can stop the intrusive notifications by accessing web browser settings, as explained in the instructions below. If you suspect adware infection, you should scan your machine with a system security application |
| Further steps | Cleaning web browsers is just as important when dealing with potentially unwanted programs, so do so by following the instructions below or use FortectIntego as an automatic fix |
How simple tricks deceive users online
At first sight, Defimedia.best might look just like any other website that specializes in all about Bitcoin and other cryptos. Indeed, the digital currency has been a hot topic for a while now, especially since the pandemic began in early 2020. However, this is not the version of the page that most users encounter.

Instead, visitors are redirected to the website from somewhere else and instantly caught off guard. Here are a few examples of the most commonly used phrases on push notification scam websites:
- If you are 18+ tap Allow
- Click Allow to watch the video
- Your file is ready to download – press Allow to continue
- Press Allow if you are not a robot
Besides these messages, there is usually a general picture of a robot, a video that is about to be played, and similar elements. In fact, many other similar scam websites such as Eruthoxup.com or Mnemicguaza.cam simply reuse the same templates – there is barely anything new there. Thus, once you get familiar with a few of these scams, it is really easy to recognize others. Keep in mind that there is no other purpose besides making users click that Allow button in order to send them links to potentially dangerous websites later.
Push notifications are generally harmless as a feature – most legitimate websites would not bother people more than necessary and would not include links to dangerous websites, sending only information that the visitor was interested in. However, malicious actors knew straight away that this API[2] can be used for not so legitimate purposes and this can guarantee easy monetization from ads.
This is why security experts advise users not to subscribe to receive them from websites that can hardly be trusted. Later on, the links embedded within the prompts can be clicked accidentally and result in unexpected consequences. The best thing to do is remove the unwanted notifications, and we show how to do that in the next section.

How to get rid of Defimedia.best pop-ups
While many users might consider Defimedia.best push notifications a virus, it is not the case at all. It is true that intrusive pop-up ads are a sign of adware or similar unwanted software, but push notifications are not the same (even though they might look almost identical). In fact, the feature can be selected at the website creation stage.
Thus, once users press the allow button within the prompt after accessing the website, the push notifications can be shown on the system level directly on the users' screen. The frequency of these pop-ups and the contents are decided by website authors, so you can see how easily this can be abused.
In any case, if you have agreed to receive notifications for some website by accident, you can easily undo this decision. Follow the steps below.
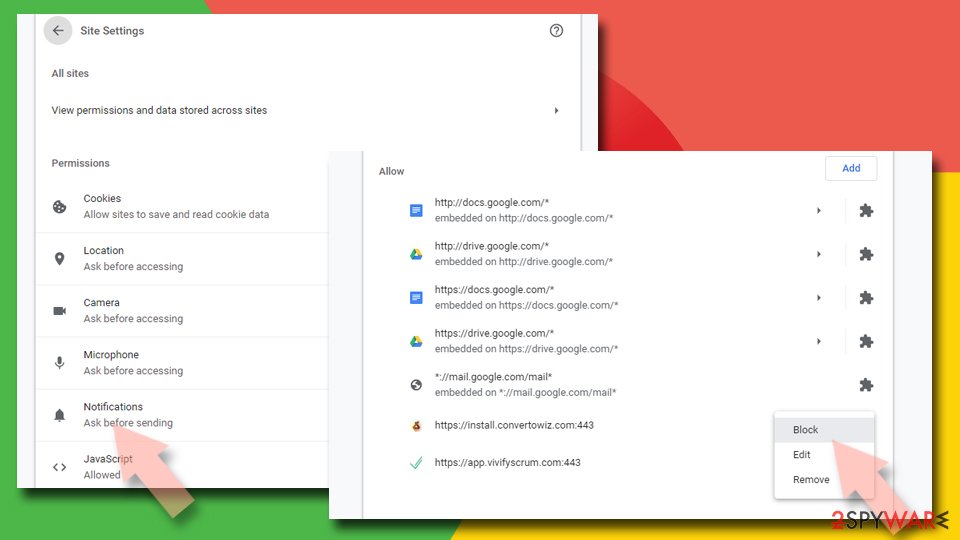
Google Chrome (desktop):
- Open Google Chrome browser and go to Menu > Settings.
- Scroll down and click on Advanced.
- Locate Privacy and security section and pick Site Settings > Notifications.
- Look at the Allow section and look for a suspicious URL.
- Click the three vertical dots next to it and pick Block. This should remove unwanted notifications from Google Chrome.

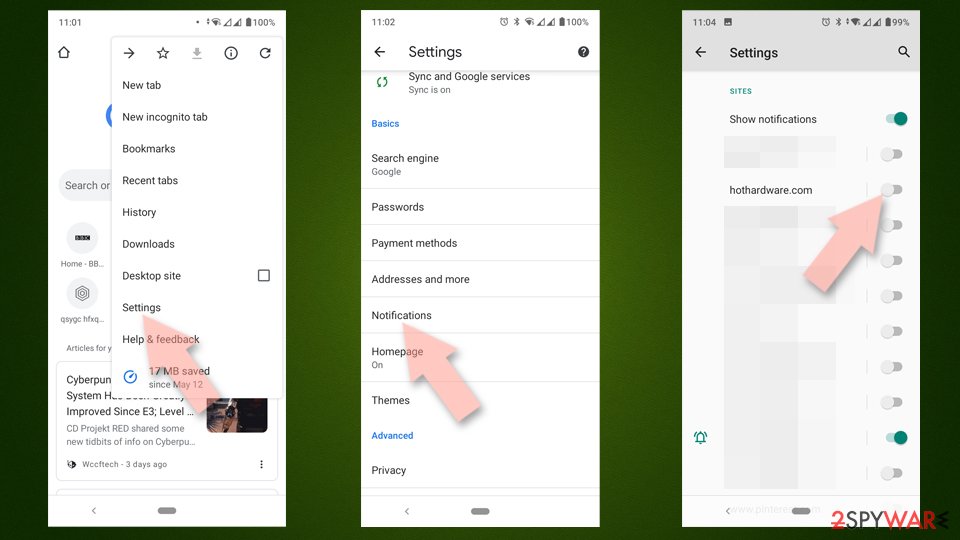
Google Chrome (Android):
- Open Google Chrome and tap on Settings (three vertical dots).
- Select Notifications.
- Scroll down to the Sites section.
- Locate the unwanted URL and toggle the button to the left (Off setting).

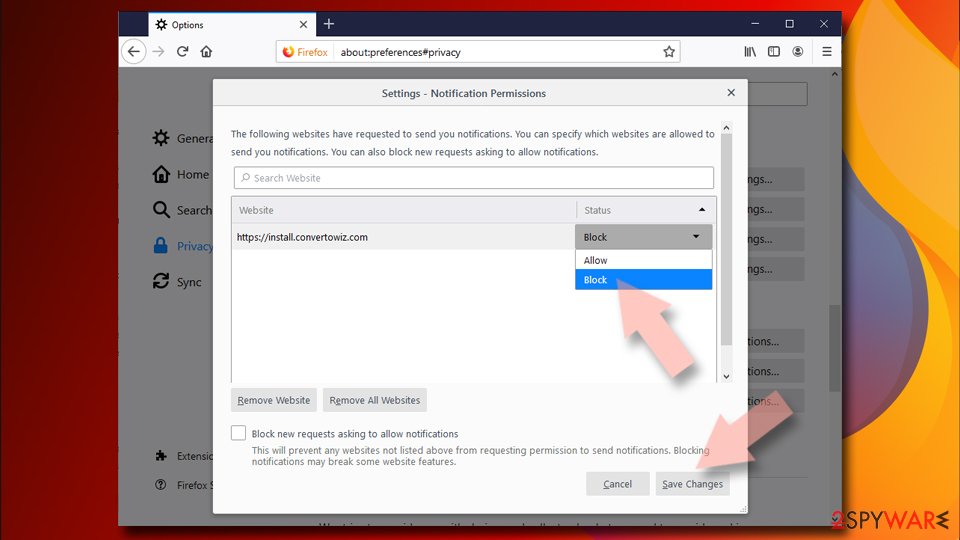
Mozilla Firefox:
- Open Mozilla Firefox and go to Menu > Options.
- Click on Privacy & Security section.
- Under Permissions, you should be able to see Notifications. Click the Settings button next to it.
- In the Settings – Notification Permissions window, click on the drop-down menu by the URL in question.
- Select Block and then click on Save Changes. This should remove unwanted notifications from Mozilla Firefox.

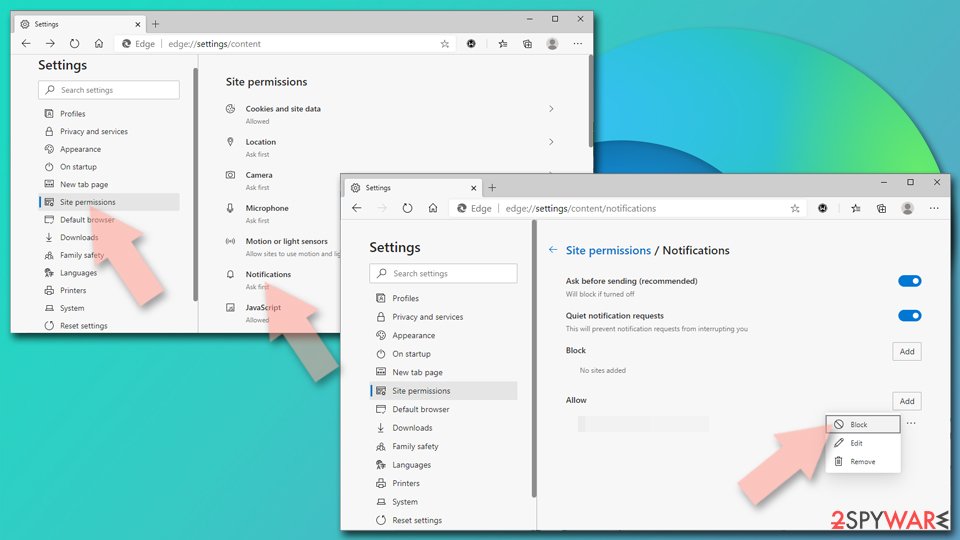
MS Edge (Chromium):
- Open Microsoft Edge, and go to Settings.
- Select Site permissions.
- Go to Notifications on the right.
- Under Allow, you will find the unwanted entry.
- Click on More actions and select Block.

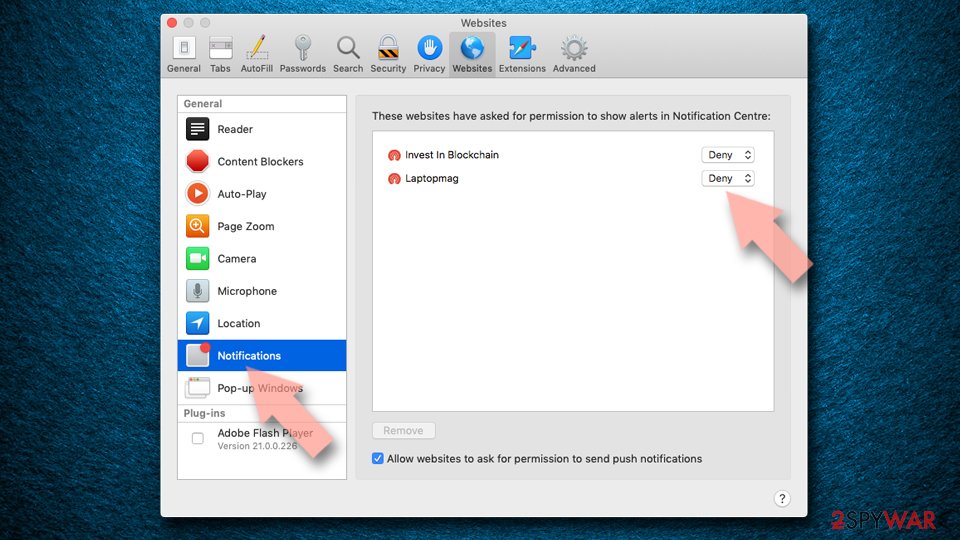
Safari:
- Click on Safari > Preferences…
- Go to the Websites tab and, under General, select Notifications.
- Select the web address in question, click the drop-down menu and select Deny.

Use this information to stop any other website from showing you notifications. You can also include the site on the allowed list as well.
Don't forget to check your system thoroughly
As we already explained, if you do see push notifications from some website showing up on your screen, it does not automatically mean that your device is infected. At the same time, you should not completely dismiss the possibility of that being the case. The only way to find out is to check your system properly.
If you remember that you have recently installed some type of software and later started experiencing redirects and encounter more ads, you should uninstall it immediately. On the other hand, you might not even realize that you have a potentially unwanted program installed due to their deceptive distribution techniques, such as software bundling.[3]
Thus, you can either follow the instructions below to eliminate programs installed on your system or extensions installed on your browser. We strongly recommend you perform a full system scan with robust security software, to ensure no malicious processes are running in the background.
Additionally, thoroughly cleaning your web browsers is something that every person should do regularly, especially after removing malware or adware. Otherwise, the unwanted ads might continue showing up, as well as data tracking activities. Employ repair tools to make the process much easier, although you can follow our instructions below as well.
Uninstall from Windows
Uninstall from Windows 10/8:
- Type Control Panel into the Windows search box and open the result.
- Under Programs, select Uninstall a program.


Uninstall from Windows 7/XP:
- Click on Windows Start > Control Panel (Windows XP users should click on Add/Remove Programs).
- In Control Panel, select Programs > Uninstall a program.


Remove the unwanted program:
- In the Programs and Features window, look for any recently installed suspicious entries, select them, and click Uninstall.
- If User Account Control appears, click Yes to confirm, then complete the removal.


Delete from macOS
Remove the unwanted application:
- From the menu bar, select Go > Applications.
- In the Applications folder, look for any suspicious entries, then drag them to Trash (or right-click and pick Move to Trash).


Delete leftover files and folders:
- Select Go > Go to Folder.
- Enter /Library/Application Support and remove any suspicious folders related to the unwanted program.
- Repeat the same check in the /Library/LaunchAgents and /Library/LaunchDaemons folders, deleting any suspicious entries.

- Finally, empty the Trash to permanently remove the leftovers.

Remove from Microsoft Edge
Delete unwanted extensions from MS Edge:
- Select Menu (three horizontal dots at the top-right of the browser window) and pick Extensions.
- From the list, pick the extension and click on the Gear icon.
- Click Remove.


Clear cookies and other browser data:
- Click on the Menu (three horizontal dots at the top-right of the browser window) and select Settings > Privacy, search, and services..
- Under Clear browsing data, pick Choose what to clear.
- Select Cookies and other site data and Cached images and files. (apart from passwords, although you might want to include Media licenses as well, if applicable) and click on Clear.


Restore new tab and homepage settings:
- Click the menu icon and choose Settings.
- Then find On startup section.
- Click Remove next to any suspicious startup page.
Reset MS Edge if the above steps did not work:
- Press on Ctrl + Shift + Esc to open Task Manager.
- Click on More details arrow at the bottom of the window.
- Select Details tab.
- Now scroll down and locate every entry with Microsoft Edge name in it. Right-click on each of them and select End Task to stop MS Edge from running.


Instructions for Chromium-based Edge
Delete extensions from MS Edge (Chromium):
- Open Edge and click select Settings > Extensions.
- Delete unwanted extensions by clicking Remove.


Clear cache and site data:
- Click on Menu and go to Settings.
- Select Privacy, search and services.
- Under Clear browsing data, pick Choose what to clear.
- Under Time range, pick All time.
- Select Clear now.


Reset Chromium-based MS Edge:
- Click on Menu and select Settings.
- On the left side, pick Reset settings.
- Select Restore settings to their default values.
- Confirm with Reset.
- This will disable extensions and reset startup pages but will not delete bookmarks, saved passwords, or browsing history.


Remove from Mozilla Firefox (FF)
Remove dangerous extensions:
- Open Mozilla Firefox browser and click on the Menu (three horizontal lines at the top-right of the window).
- Select Add-ons.
- In here, select the unwanted extension and click Remove.


Reset the homepage:
- Click three horizontal lines at the top right corner to open the menu.
- Choose Settings.
- Under Home, set your preferred homepage and new tab settings.
Clear cookies and site data:
- Click Menu and pick Settings.
- Go to Privacy & Security section.
- Scroll down to locate Cookies and Site Data.
- Click on Clear Data...
- Select Cookies and Site Data and Temporary cached files and pages, then click Clear.


Reset Mozilla Firefox
If clearing the browser as explained above did not help, reset Mozilla Firefox:
- Open Mozilla Firefox browser and click the Menu.
- Go to Help and then choose Troubleshooting Information.

- Under Give Firefox a tune up section, click on Refresh Firefox...
- Once the pop-up shows up, confirm the action by pressing on Refresh Firefox.



Remove from Google Chrome
Delete malicious extensions from Google Chrome:
- Open Google Chrome, click on the Menu (three vertical dots at the top-right corner) and select More tools > Extensions.
- In the newly opened window, you will see all the installed extensions. Uninstall all suspicious extensions related to the unwanted program by clicking Remove.


Clear cache and web data from Chrome:
- Click on Menu and pick Settings.
- Under Privacy and security, select Clear browsing data.
- Select Browsing history, Cookies and other site data, as well as Cached images and files.
- Click Clear data.


Change your homepage:
- Click menu and choose Settings.
- Look for a suspicious site in the On startup section.
- Click on Open a specific or set of pages and click on three dots to find the Remove option.
Reset Google Chrome:
If the previous methods did not help you, reset Google Chrome to eliminate all the unwanted components:
- Click on Menu and select Settings.
- In the Settings, scroll down and click Advanced.
- Scroll down and locate Reset and clean up section.
- Now click Restore settings to their original defaults.
- Confirm with Reset settings.


Delete from Safari
Remove dangerous extensions:
- Open Safari, click Safari in the menu at the top-left of the screen, and select Preferences.
- Go to the Extensions tab, look for any suspicious entries, and click Uninstall to remove them.


Clear history and website data:
- Click Safari in the menu and pick Clear History.
- Set Clear to all history and confirm with Clear History.


Reset Safari:
- Click Safari in the menu and select Preferences > Advanced.
- Enable Show Develop menu in menu bar.
- From the menu bar, click Develop and select Empty Caches.


Did this guide help?
Be the first to comment