

Juicycelebinfo.com uses social engineering to make users click the “Allow” button
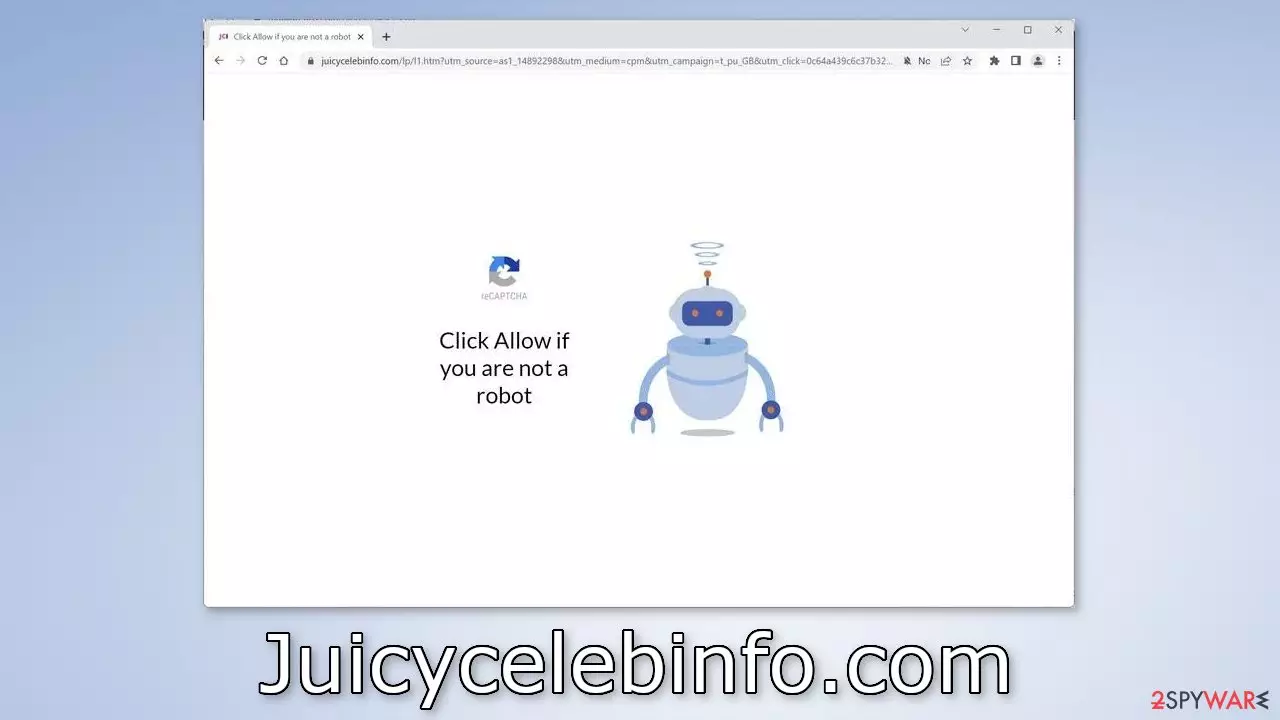
Juicycelebinfo.com is a bogus website disguised as a human verification step. It asks users to press the “Allow” button to confirm that they are not robots. However, the “Allow” button actually adds users to the push notification subscriber list. After this action, people start getting spammed with annoying pop-up ads that can appear even when the browser is closed.
| NAME | Juicycelebinfo.com |
| TYPE | Push notification spam; adware |
| SYMPTOMS | Intrusive pop-up ads start appearing in the corner of the screen |
| DISTRIBUTION | Shady websites, misleading advertisements, bundled software |
| DANGERS | The website could be using unsafe advertising networks that place ads leading to dangerous websites |
| ELIMINATION | Go to your browser settings and disable push notifications |
| FURTHER STEPS | Use a repair tool FortectIntego to fix any remaining damage and clear your browsers |
Why are push notification spam sites dangerous?
The creators of Juicycelebinfo.com may be using rogue advertising networks[1] that place ads leading to dangerous websites. As a result, people can end up on scam pages that try to trick them into providing personal information, downloading PUPs (potentially unwanted programs),[2] and even malware.
If you receive pop-ups from this site, you may see ads promoting fake security programs, software deals, giveaways, etc. You should not click on the links embedded in the ads. Social engineering tactics[3] can lead to monetary losses, identity theft, and operating system damage.

Distribution methods
Push notification spam pages rarely appear in the search results. Usually, they hide in other shady sites that are full of deceptive ads and sneaky redirects. Illegal streaming sites are especially dangerous since they can display fake “Download” and “Play” buttons that open new tabs with harmful websites.
You should only visit pages that you know and trust. Do not click on random links and ads. Even if the advertisements seem to be promoting legitimate products or services, it is best to go to the source directly. Choose legitimate streaming services instead of shady online movie pages.
Another possibility is that Juicycelebinfo.com is not because of user error. It might have been opened automatically by adware. If you are infected, you may experience an increased amount of commercial content, like pop-ups, banners, and redirects.
Most of the time, adware sneaks into the system through freeware[4] installation platforms. They include PUPs as bundled software. So when installing programs, always choose “Custom” or “Advanced” installation methods and untick the boxes next to any unrelated files to minimize the risk of adware infection.
Block notifications via settings
Because push notifications are based on a subscription model, users need to disable them manually. Here are the instructions for the most popular browsers:
Google Chrome (desktop):
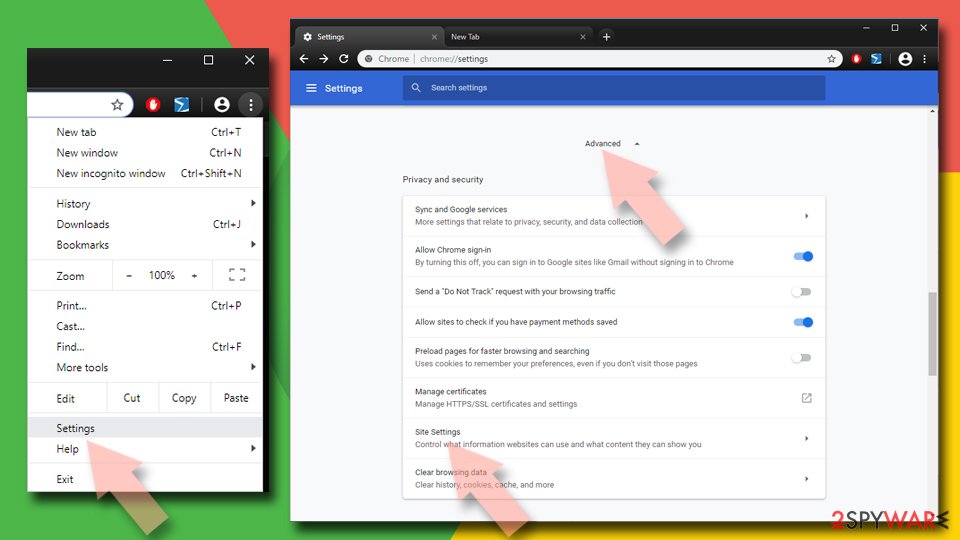
- Open Google Chrome browser and go to Menu > Settings.
- Scroll down and click on Advanced.
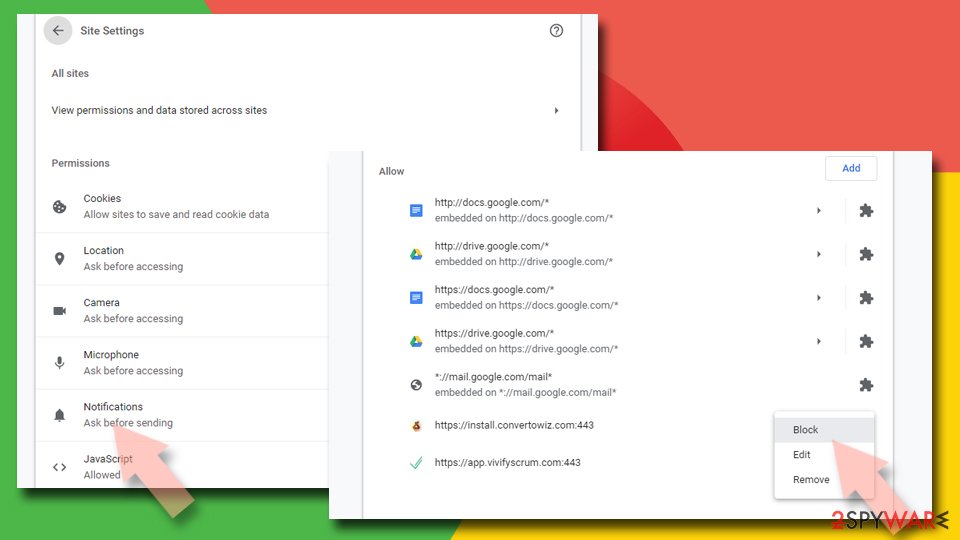
- Locate the Privacy and security section and pick Site Settings > Notifications.
- Look at the Allow section and look for a suspicious URL.
- Click the three vertical dots next to it and pick Block. This should remove unwanted notifications from Google Chrome.


Google Chrome (Android):
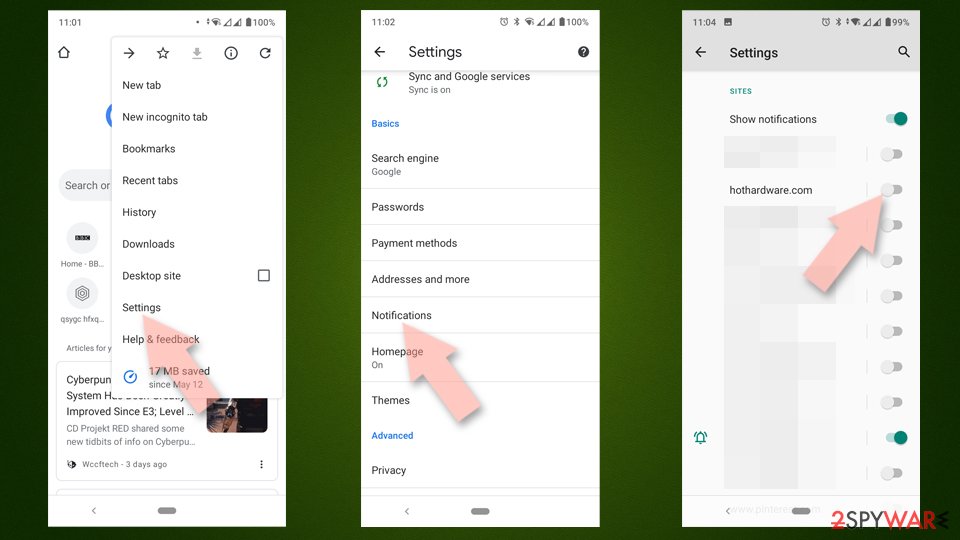
- Open Google Chrome and tap on Settings (three vertical dots).
- Select Notifications.
- Scroll down to Sites section.
- Locate the unwanted URL and toggle the button to the left (Off setting).

Mozilla Firefox:
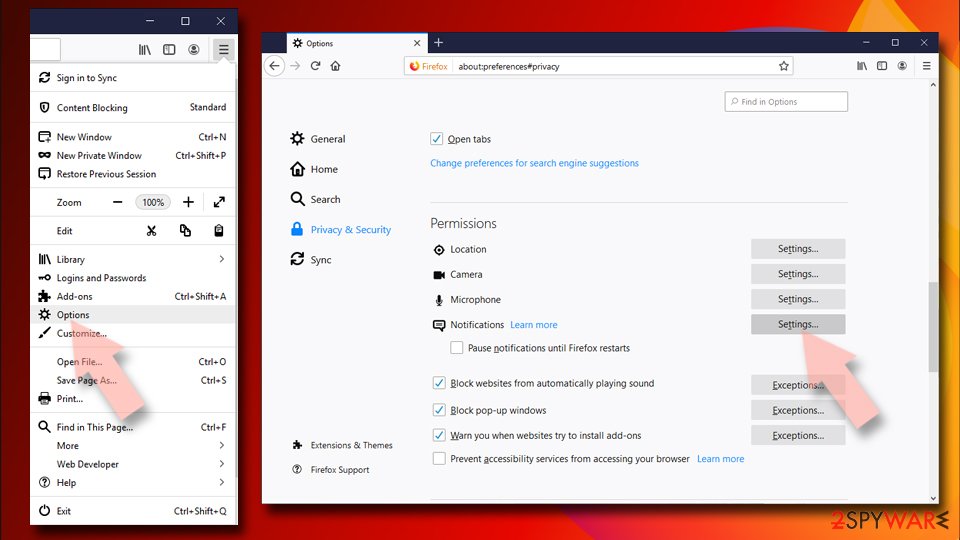
- Open Mozilla Firefox and go to Menu > Options.
- Click on Privacy & Security section.
- Under Permissions, you should be able to see Notifications. Click Settings button next to it.
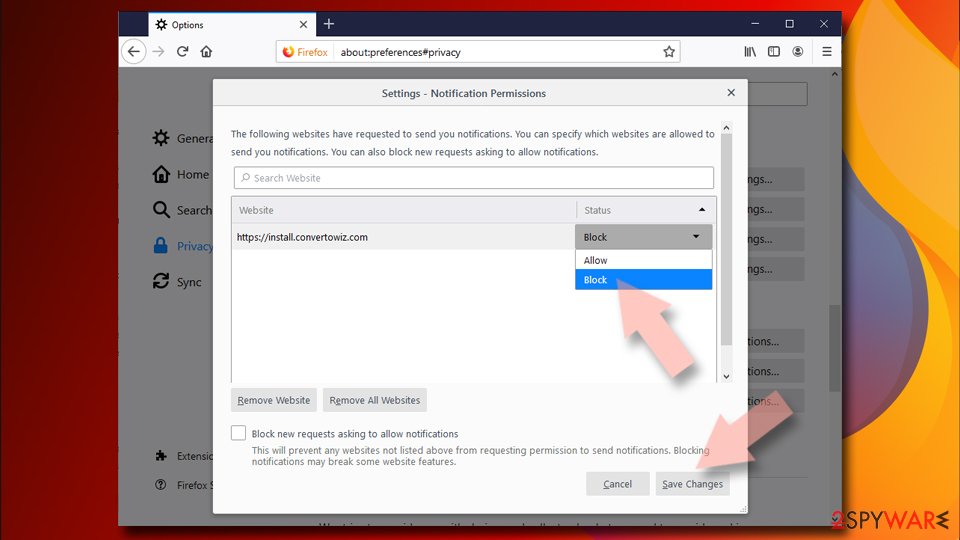
- In the Settings – Notification Permissions window, click on the drop-down menu by the URL in question.
- Select Block and then click on Save Changes. This should remove unwanted notifications from Mozilla Firefox.


Safari:
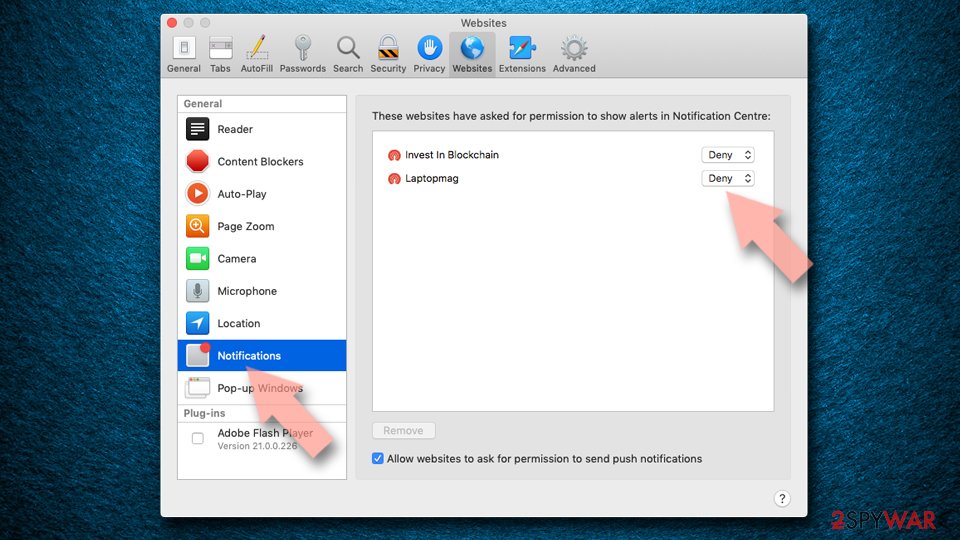
- Click on Safari > Preferences…
- Go to Websites tab and, under General, select Notifications.
- Select the web address in question, click the drop-down menu and select Deny.

MS Edge:
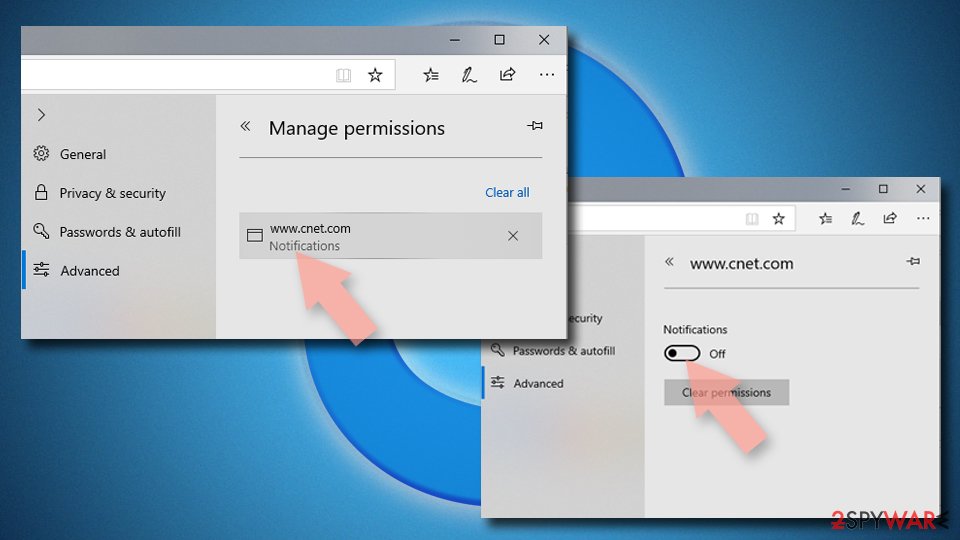
- Open Microsoft Edge, and click the Settings and more button (three horizontal dots) at the top-right of the window.
- Select Settings and then go to Advanced.
- Under Website permissions, pick Manage permissions and select the URL in question.
- Toggle the switch to the left to turn notifications off on Microsoft Edge.

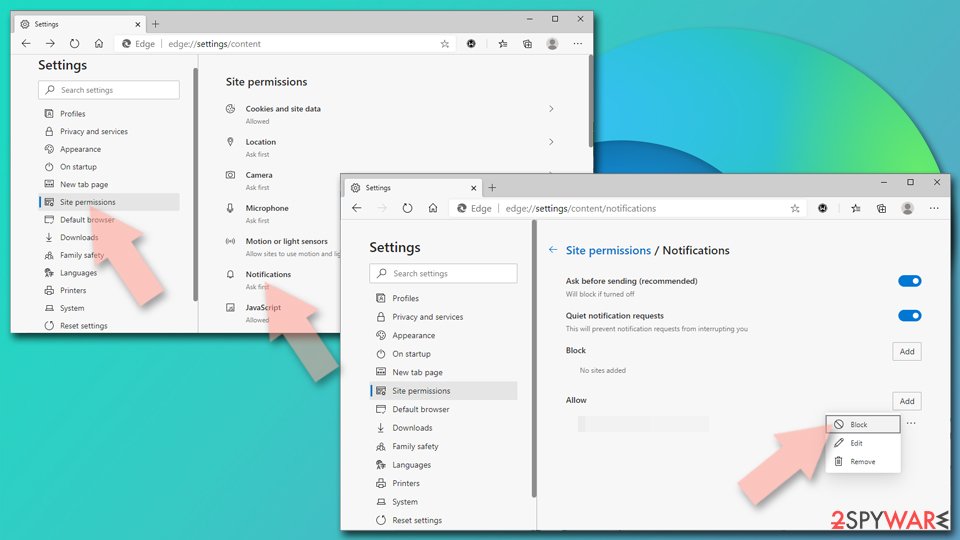
MS Edge (Chromium):
- Open Microsoft Edge, and go to Settings.
- Select Site permissions.
- Go to Notifications on the right.
- Under Allow, you will find the unwanted entry.
- Click on More actions and select Block.

Clear your browsers
Cookies are small data files that can track your browsing activity and store information, like your IP address, geolocation, websites you visit, links you click on, and things you purchase. This data can be used to personalize the user experience but nowadays, they are used to make a profit more and more often.
They can be sold to advertising networks and other third parties. They can even be hijacked, and used for malicious purposes, that is why security experts recommend clearing them regularly. This process can be made easy with a maintenance tool like FortectIntego. Besides, this powerful software can fix various system errors, corrupted files, and registry issues which is especially helpful after a virus infection.
Check your system for adware
If blocking push notifications from the browser settings did not help, or you have not found the website in the list, the ad spam could be caused by a PUA hiding in your system. Some of the symptoms include redirects to shady websites, an increased amount of commercial content like banners or surveys.
Because there is no way of knowing which specific app is causing the annoying behavior, we always suggest our readers use professional security tools like SpyHunterCombo Cleaner or MalwarebytesMalwarebytes to scan their PCs. Anti-malware tools can detect suspicious programs that are active in the background and eliminate them completely with all the related files. Of course, if you know which application is causing this, you can follow the manual guides for Windows and Mac machines:
Windows 10/8:
- Enter Control Panel into Windows search box and hit Enter or click on the search result.
- Under Programs, select Uninstall a program.

- From the list, find the entry of the suspicious program.
- Right-click on the application and select Uninstall.
- If User Account Control shows up, click Yes.
- Wait till uninstallation process is complete and click OK.



Windows 7/XP:
- Click on Windows Start > Control Panel located on the right pane (if you are Windows XP user, click on Add/Remove Programs).
- In Control Panel, select Programs > Uninstall a program.

- Pick the unwanted application by clicking on it once.
- At the top, click Uninstall/Change.
- In the confirmation prompt, pick Yes.
- Click OK once the removal process is finished.

Mac:
- From the menu bar, select Go > Applications.
- In the Applications folder, look for all related entries.
- Click on the app and drag it to Trash (or right-click and pick Move to Trash)


To fully remove an unwanted app, you need to access Application Support, LaunchAgents, and LaunchDaemons folders and delete relevant files:
- Select Go > Go to Folder.
- Enter /Library/Application Support and click Go or press Enter.
- In the Application Support folder, look for any dubious entries and then delete them.
- Now enter /Library/LaunchAgents and /Library/LaunchDaemons folders the same way and terminate all the related .plist files.


Did this guide help?
Be the first to comment