

Analysis of Trending Articles virus
Have you noticed the advertisements suggesting to read provocative articles? This occurrence is not merely a regular phenomenon but it suggests that Trending Articles virus has taken over your computer. It is necessary to know that the latter PUP is considered to be adware. Its primary field of activity includes the display of vivid online articles. Moreover, you may also notice other kinds of advertisements, such as coupons, daily deals, and shopping discounts. Beware of its tendency to mislead you to potentially infected websites. Therefore, we recommend proceeding to Trending Articles removal at once.
As you already guessed, the aim of such advertisements is to tempt users into visiting specific domains. Such articles mainly aim at inexperienced users and female users who might give in to their curiosity to read intriguing details from celebrity life or peculiar stories. However, proficient users do not get this cheap bait because they are aware of possible consequences. Since the creators of Trending Articles adware get paid for promoting third-party websites, they try to create as persuasive advertisements and headlines as possible. Thus, when this PUP gets into your computer, it will apply a certain code in your browser. This action will result in Trending Articles redirect tendency. Likewise, you might find yourself in the domains, containing disturbing content and possibly sheltering high-scale viruses. If they occupy your computer, important system programs might cease to function properly.
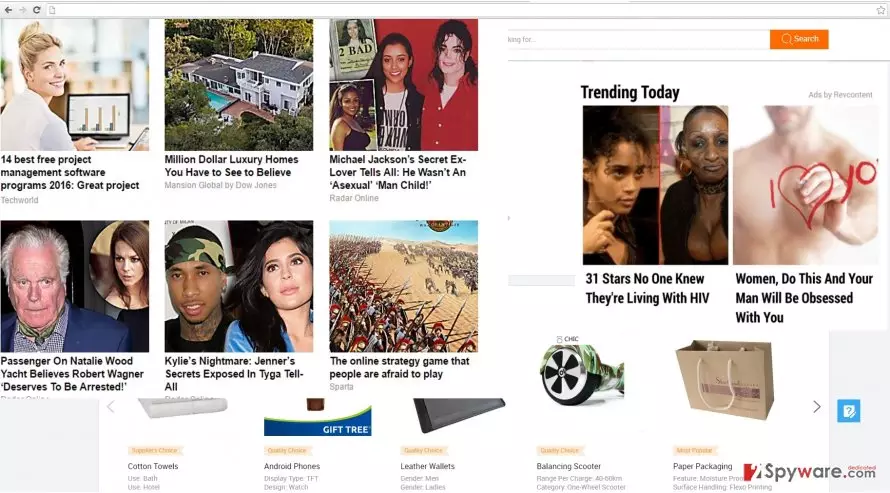
Furthermore, the longer this PUP stays on the device, more adware-type applications are likely to get installed. They occupy quite a big amount of space in a hard drive. Their performance may also require a significant portion CPU speed. Additionally, you never know whether these applications do not contain malevolent elements. Therefore, we encourage you to hurry up with Trending Articles removal. FortectIntego is one of those programs which ensure that the elimination is complete.
When did the adware infect the operating system?
The PUP exploited the opportunity to infect your computer when you were installing a new application. Media players, pdf viewers, usually come up with optionally packaged applications. They are often overlooked by users since they are attached under “Recommended” settings. Thus, once the latter mode is chosen and the installation enabled, the primary and optional applications are installed altogether. If you intend not to repeat the same mistake, use this precaution tips. Before hitting the “Install” button, choose “Custom” settings. After that, you will be able to spot any unnecessary add-ons. Only when you are sure that no irrelevant attachments will be installed, start installing the primary application.
Trending Articles removal guide
If you do not want to waste meddling with this odd adware, opt for the automatic elimination. Install an anti-spyware application which put an end to this PUP within a blink of an eye. In addition, every user should have such program because it, along with the anti-virus program, will ensure that no PUP or more serious virus sneaks into the computer. Update it regularly for it to maintain real-time protection. You can also remove Trending Articles manually. Do not miss any detail so that the PUP would not hijack your computer again.
Uninstall from Windows
Uninstall from Windows 10/8:
- Type Control Panel into the Windows search box and open the result.
- Under Programs, select Uninstall a program.


Uninstall from Windows 7/XP:
- Click on Windows Start > Control Panel (Windows XP users should click on Add/Remove Programs).
- In Control Panel, select Programs > Uninstall a program.


Remove the unwanted program:
- In the Programs and Features window, look for any recently installed suspicious entries, select them, and click Uninstall.
- If User Account Control appears, click Yes to confirm, then complete the removal.


Delete from macOS
Remove the unwanted application:
- From the menu bar, select Go > Applications.
- In the Applications folder, look for any suspicious entries, then drag them to Trash (or right-click and pick Move to Trash).


Delete leftover files and folders:
- Select Go > Go to Folder.
- Enter /Library/Application Support and remove any suspicious folders related to the unwanted program.
- Repeat the same check in the /Library/LaunchAgents and /Library/LaunchDaemons folders, deleting any suspicious entries.

- Finally, empty the Trash to permanently remove the leftovers.

Remove from Microsoft Edge
Delete unwanted extensions from MS Edge:
- Select Menu (three horizontal dots at the top-right of the browser window) and pick Extensions.
- From the list, pick the extension and click on the Gear icon.
- Click Remove.


Clear cookies and other browser data:
- Click on the Menu (three horizontal dots at the top-right of the browser window) and select Settings > Privacy, search, and services..
- Under Clear browsing data, pick Choose what to clear.
- Select Cookies and other site data and Cached images and files. (apart from passwords, although you might want to include Media licenses as well, if applicable) and click on Clear.


Restore new tab and homepage settings:
- Click the menu icon and choose Settings.
- Then find On startup section.
- Click Remove next to any suspicious startup page.
Reset MS Edge if the above steps did not work:
- Press on Ctrl + Shift + Esc to open Task Manager.
- Click on More details arrow at the bottom of the window.
- Select Details tab.
- Now scroll down and locate every entry with Microsoft Edge name in it. Right-click on each of them and select End Task to stop MS Edge from running.


Instructions for Chromium-based Edge
Delete extensions from MS Edge (Chromium):
- Open Edge and click select Settings > Extensions.
- Delete unwanted extensions by clicking Remove.


Clear cache and site data:
- Click on Menu and go to Settings.
- Select Privacy, search and services.
- Under Clear browsing data, pick Choose what to clear.
- Under Time range, pick All time.
- Select Clear now.


Reset Chromium-based MS Edge:
- Click on Menu and select Settings.
- On the left side, pick Reset settings.
- Select Restore settings to their default values.
- Confirm with Reset.
- This will disable extensions and reset startup pages but will not delete bookmarks, saved passwords, or browsing history.


Remove from Mozilla Firefox (FF)
Remove dangerous extensions:
- Open Mozilla Firefox browser and click on the Menu (three horizontal lines at the top-right of the window).
- Select Add-ons.
- In here, select the unwanted extension and click Remove.


Reset the homepage:
- Click three horizontal lines at the top right corner to open the menu.
- Choose Settings.
- Under Home, set your preferred homepage and new tab settings.
Clear cookies and site data:
- Click Menu and pick Settings.
- Go to Privacy & Security section.
- Scroll down to locate Cookies and Site Data.
- Click on Clear Data...
- Select Cookies and Site Data and Temporary cached files and pages, then click Clear.


Reset Mozilla Firefox
If clearing the browser as explained above did not help, reset Mozilla Firefox:
- Open Mozilla Firefox browser and click the Menu.
- Go to Help and then choose Troubleshooting Information.

- Under Give Firefox a tune up section, click on Refresh Firefox...
- Once the pop-up shows up, confirm the action by pressing on Refresh Firefox.



Remove from Google Chrome
Delete malicious extensions from Google Chrome:
- Open Google Chrome, click on the Menu (three vertical dots at the top-right corner) and select More tools > Extensions.
- In the newly opened window, you will see all the installed extensions. Uninstall all suspicious extensions related to the unwanted program by clicking Remove.


Clear cache and web data from Chrome:
- Click on Menu and pick Settings.
- Under Privacy and security, select Clear browsing data.
- Select Browsing history, Cookies and other site data, as well as Cached images and files.
- Click Clear data.


Change your homepage:
- Click menu and choose Settings.
- Look for a suspicious site in the On startup section.
- Click on Open a specific or set of pages and click on three dots to find the Remove option.
Reset Google Chrome:
If the previous methods did not help you, reset Google Chrome to eliminate all the unwanted components:
- Click on Menu and select Settings.
- In the Settings, scroll down and click Advanced.
- Scroll down and locate Reset and clean up section.
- Now click Restore settings to their original defaults.
- Confirm with Reset settings.


Delete from Safari
Remove dangerous extensions:
- Open Safari, click Safari in the menu at the top-left of the screen, and select Preferences.
- Go to the Extensions tab, look for any suspicious entries, and click Uninstall to remove them.


Clear history and website data:
- Click Safari in the menu and pick Clear History.
- Set Clear to all history and confirm with Clear History.


Reset Safari:
- Click Safari in the menu and select Preferences > Advanced.
- Enable Show Develop menu in menu bar.
- From the menu bar, click Develop and select Empty Caches.


Did this guide help?
3 comments
Allison
Those adult-content pop-ups are becoming a real pain in the neck...
Zack
Finally, something new in the virus world.
Tracey505
Does the anti-virus program help?