

Verysilenitm.work uses fake messages to make people subscribe to push notifications
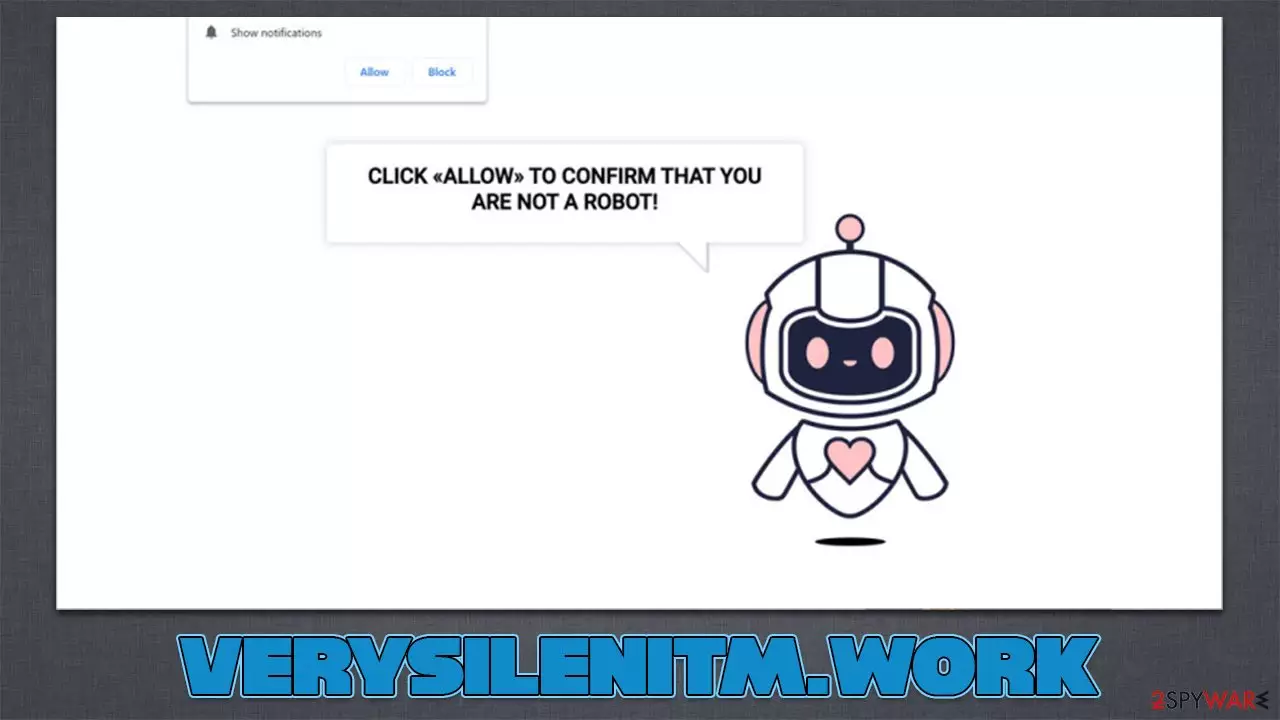
One might encounter Verysilenitm.work ads while typing a post on your favorite social media, streaming a video on YouTube, or even when you aren't doing anything in particular on your browser. These ads show up in a pop-up box that is identical to that of system notifications and always covers all the other running apps – media players, browsers, and even full-screen games. This experience is not unique to just a few instances, and many users were complaining about it.
This issue is also prominent across all the popular web browsers (Google Chrome, Mozilla Firefox, MS Edge, etc.) and all viable platforms, including Microsoft Windows, macOS, Android, and iOS. So, what is causing the Verysilenitm.work ads, and how to remove them?
While the elimination of the pop-ups is relatively easy, there are several other checks that should be performed when dealing with disruptive browser or system symptoms – adware[1] might be the main reason for persistent redirects to malicious websites.
| Name | Verysilenitm.work |
| Type | Push notifications, ads, scam |
| Distribution | The entry point is via the notification prompt – users need to press the “Allow” button |
| Symptoms | Notifications show up at the bottom-right corner of the screen – these include fraudulent content and links to potentially dangerous websites |
| Dangers | Ads and links to sites displayed by the website might be dangerous: users might suffer from monetary losses, install malware or potentially unwanted programs on their systems, or disclose their sensitive data to cybercrooks |
| Elimination | You can stop the unwanted notifications by accessing web browser settings. If you suspect adware infection, you should use SpyHunterCombo Cleaner security software to get rid of it |
| Recovery | Potentially unwanted programs often leave traces within web browsers – cookies, for example, are used for tracking. You should get rid of these leftovers with FortectIntego or employ our manual guide |
Push notification scam scheme
When speaking of how the ads managed to get into your device, the answer is that users themselves are tricked into accepting them. As soon as they access the website, they are shown a lot of misleading information on purpose in order to make people subscribe to push notifications without realizing it. Here are a few examples one might see:
- Can't play this video! Browser may block video autoplay. Click “Allow” to play the video
- Click “Allow” to confirm you are not a robot
- Just one more step! “Allow” to continue
- Click Allow to start downloading
- Click Allow to verify that you are not a robot, etc.
Evidently, these messages are designed in a way so that users would misunderstand the meaning of the “Allow” button within the notification prompt which is shown at the top-left corner of the browser window. Many might believe that it's a simple robot check similar to captcha or that there's a video to be watched.
These social engineering[2] tricks are not new at all. Thousands of similar websites – with no content in them – are created by crooks on a regular basis. Usually, after people agree to the request, they are either redirected to another malicious site (for example, Repairquickcompletelythefile.vip, Edp445.com, Bruperchrophone.com, and many others) or nothing really happens.
Users then proceed with their daily routine, completely forgetting the ordeal, only to later see the intrusive Verysilenitm.work pop-ups showing up on their screen, and this is precisely where the confusion is coming from. The best thing to do once encountering a scam like this is to leave the page immediately and not interact with it in any way.
Websites like these have no content in them and are created using a simple template. This is why there are so many of these fakes showing up every day, and it doesn't even matter that service providers remove them once deception is detected – crooks can launch a new one under a different name in mere minutes. The good news is that is not difficult to remove these ads, as long as you follow the detailed instructions in the next section.

Verysilenitm.work pop-ups removal
Once users subscribe to notifications, they permit that particular website to send the information through the API to users' desktops at any time. Since the whole scheme is made to expose users to as much advertising content as possible, the pop-ups might be extremely intrusive and annoying.
This is not the most worrisome issue with these ads, however – it's the contents what matter. Creators of these websites do not care about the safety of users who are exposed to them, so they pick ad networks that are cheap but unreliable.
For this reason, users might see all sorts of scams that show up on their screens while they browse the web, e.g., they might be told that their system needs to be updated, it has been affected by a virus, or that they have won a free gift. All these messages aim to make users install potentially unwanted/malicious software, make them subscribe to useless services, or extort personally-identifiable information.
Thus, make sure you completely ignore these ads and never click on pop-ups, as the consequences might be dire. Instead, proceed with the steps below in order to stop the activity altogether:
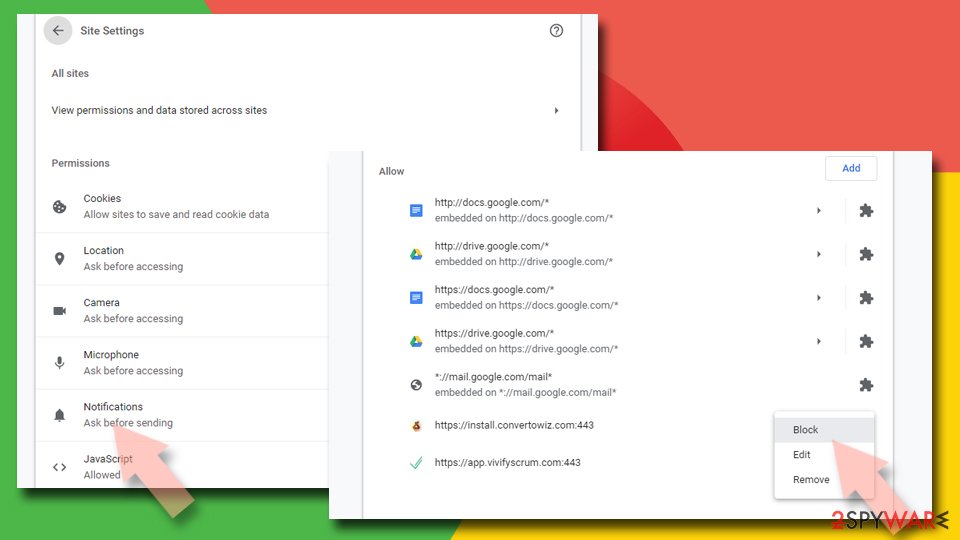
Google Chrome (desktop):
- Open Google Chrome browser and go to Menu > Settings.
- Scroll down and click on Advanced.
- Locate the Privacy and security section and pick Site Settings > Notifications.
- Look at the Allow section and look for a suspicious URL.
- Click the three vertical dots next to it and pick Block. This should remove unwanted notifications from Google Chrome.

Google Chrome (Android):
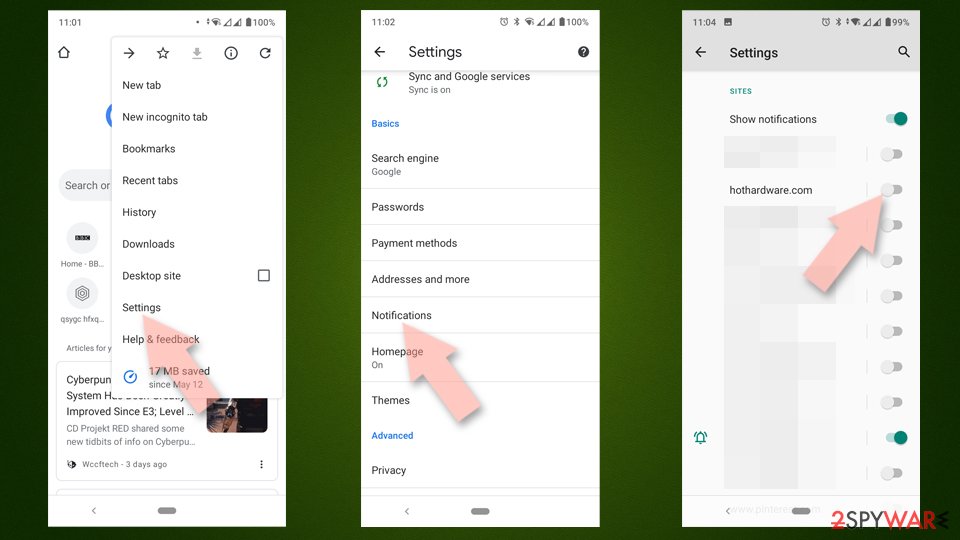
- Open Google Chrome and tap on Settings (three vertical dots).
- Select Notifications.
- Scroll down to the Sites section.
- Locate the unwanted URL and toggle the button to the left (Off setting).

Mozilla Firefox:
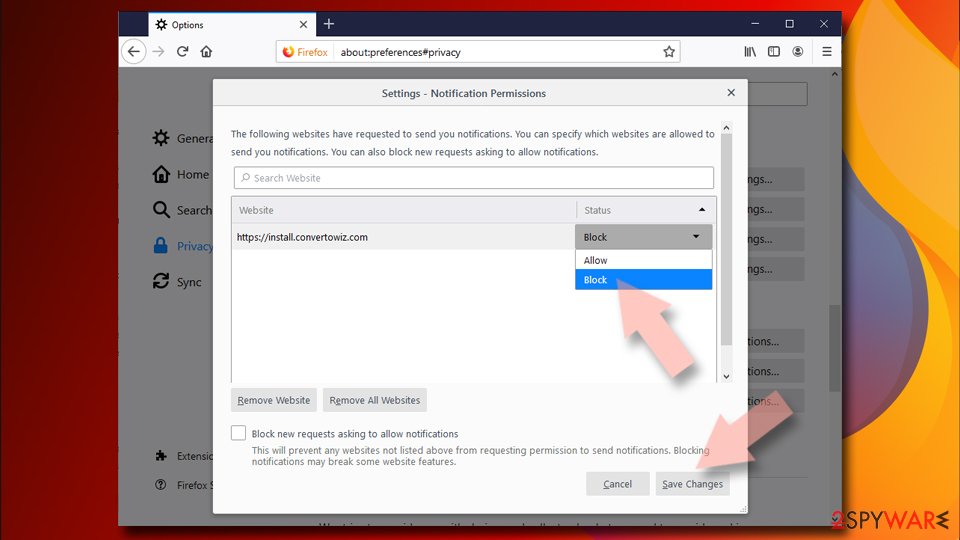
- Open Mozilla Firefox and go to Menu > Options.
- Click on Privacy & Security section.
- Under Permissions, you should be able to see Notifications. Click the Settings button next to it.
- In the Settings – Notification Permissions window, click on the drop-down menu by the URL in question.
- Select Block and then click on Save Changes. This should remove unwanted notifications from Mozilla Firefox.

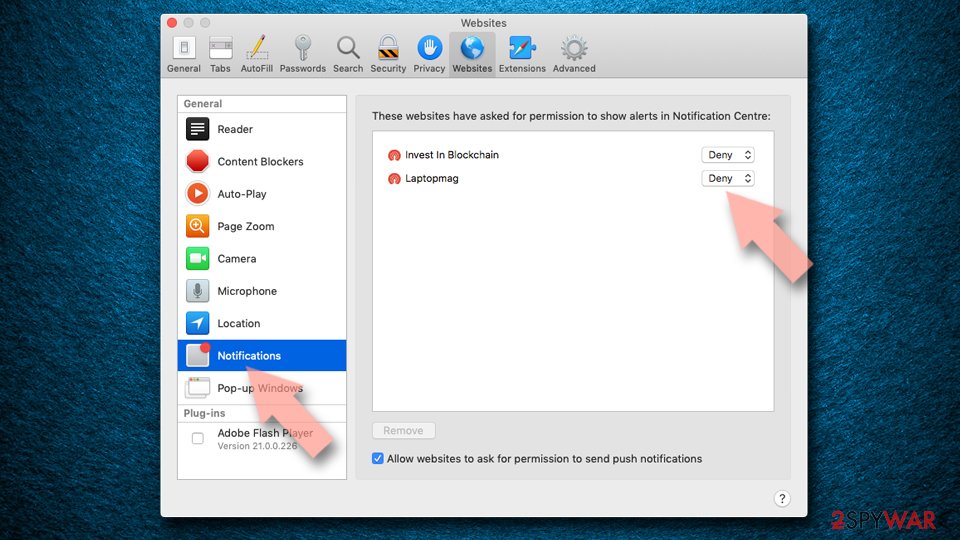
Safari:
- Click on Safari > Preferences…
- Go to Websites tab and, under General, select Notifications.
- Select the web address in question, click the drop-down menu and select Deny.

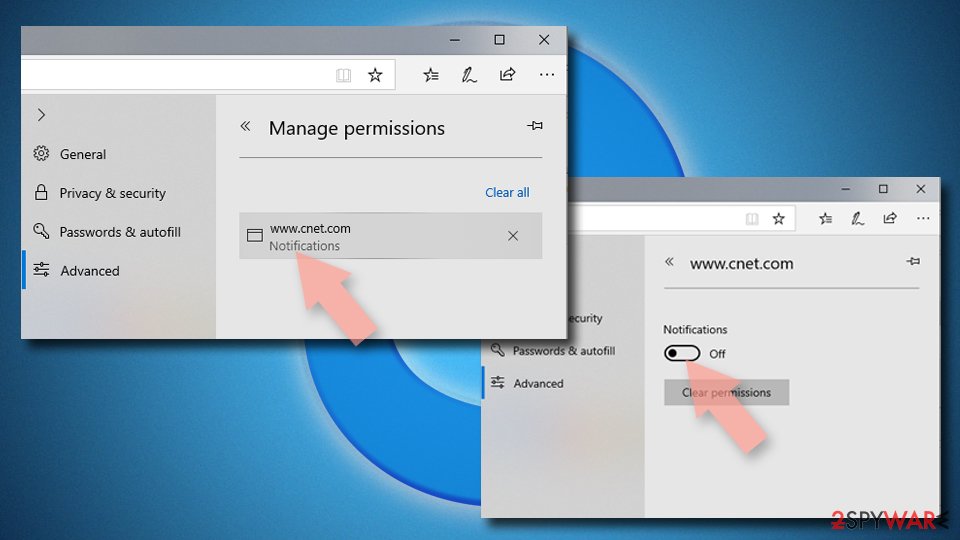
MS Edge:
- Open Microsoft Edge, and click the Settings and more button (three horizontal dots) at the top-right of the window.
- Select Settings and then go to Advanced.
- Under Website permissions, pick Manage permissions and select the URL in question.
- Toggle the switch to the left to turn notifications off on Microsoft Edge.

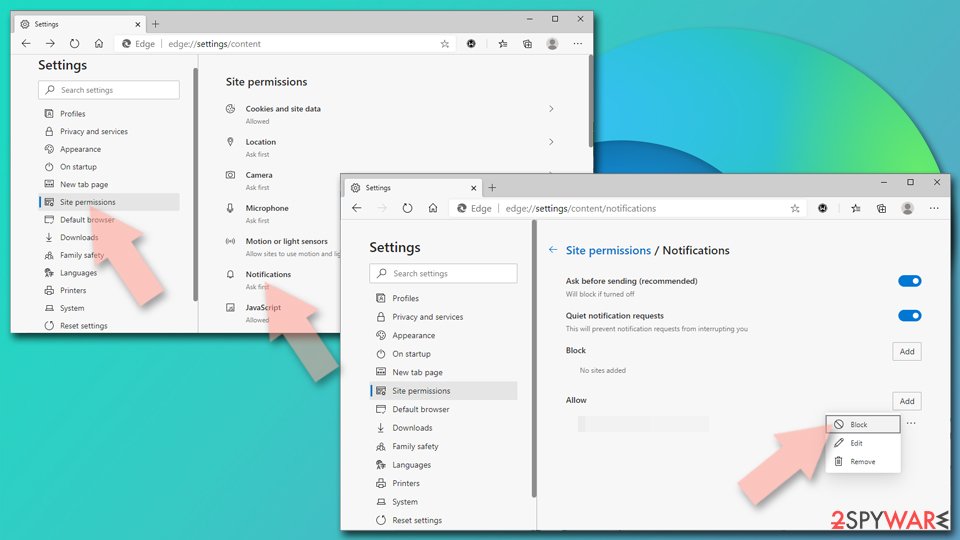
MS Edge (Chromium):
- Open Microsoft Edge, and go to Settings.
- Select Site permissions.
- Go to Notifications on the right.
- Under Allow, you will find the unwanted entry.
- Click on More actions and select Block.

Take care of the adware problem
By performing the steps in the previous section, you should be able to get rid of Verysilenitm.work pop-ups once and for all. Likewise, if you ever subscribe to notifications from a malicious website, you can remove them in the precisely same manner. However, the work is not done yet.
As we already mentioned, those infected by adware are more likely to encounter various online scams and malicious websites. Therefore, it is important to make sure this is not the case.
In order to do that, you can either look for it yourself (you would have to check the installed program list, as well as the extensions on your web browsers) or rely on reputable anti-malware, such as SpyHunterCombo Cleaner or MalwarebytesMalwarebytes, to do the job for you. Due to various factors and variables that could be present in your case, we recommend combining both elimination methods to ensure that malware, in case there is one installed, is also deleted at once.
Many people are not even aware that they have it installed due to software bundling and other deceptive distribution tactics their developers use. Adware is potentially unwanted software that specializes in showing ads to users and tracking their online activities by using cookies[3] and other technologies.
You can employ FortectIntego to clean your browser from caches automatically (the app can also repair any system damage after adware or malware infection) or proceed with the instruction we provide below.
Uninstall from Windows
Uninstall from Windows 10/8:
- Type Control Panel into the Windows search box and open the result.
- Under Programs, select Uninstall a program.


Uninstall from Windows 7/XP:
- Click on Windows Start > Control Panel (Windows XP users should click on Add/Remove Programs).
- In Control Panel, select Programs > Uninstall a program.


Remove the unwanted program:
- In the Programs and Features window, look for any recently installed suspicious entries, select them, and click Uninstall.
- If User Account Control appears, click Yes to confirm, then complete the removal.


Delete from macOS
Remove the unwanted application:
- From the menu bar, select Go > Applications.
- In the Applications folder, look for any suspicious entries, then drag them to Trash (or right-click and pick Move to Trash).


Delete leftover files and folders:
- Select Go > Go to Folder.
- Enter /Library/Application Support and remove any suspicious folders related to the unwanted program.
- Repeat the same check in the /Library/LaunchAgents and /Library/LaunchDaemons folders, deleting any suspicious entries.

- Finally, empty the Trash to permanently remove the leftovers.

Remove from Microsoft Edge
Delete unwanted extensions from MS Edge:
- Select Menu (three horizontal dots at the top-right of the browser window) and pick Extensions.
- From the list, pick the extension and click on the Gear icon.
- Click Remove.


Clear cookies and other browser data:
- Click on the Menu (three horizontal dots at the top-right of the browser window) and select Settings > Privacy, search, and services..
- Under Clear browsing data, pick Choose what to clear.
- Select Cookies and other site data and Cached images and files. (apart from passwords, although you might want to include Media licenses as well, if applicable) and click on Clear.


Restore new tab and homepage settings:
- Click the menu icon and choose Settings.
- Then find On startup section.
- Click Remove next to any suspicious startup page.
Reset MS Edge if the above steps did not work:
- Press on Ctrl + Shift + Esc to open Task Manager.
- Click on More details arrow at the bottom of the window.
- Select Details tab.
- Now scroll down and locate every entry with Microsoft Edge name in it. Right-click on each of them and select End Task to stop MS Edge from running.


Instructions for Chromium-based Edge
Delete extensions from MS Edge (Chromium):
- Open Edge and click select Settings > Extensions.
- Delete unwanted extensions by clicking Remove.


Clear cache and site data:
- Click on Menu and go to Settings.
- Select Privacy, search and services.
- Under Clear browsing data, pick Choose what to clear.
- Under Time range, pick All time.
- Select Clear now.


Reset Chromium-based MS Edge:
- Click on Menu and select Settings.
- On the left side, pick Reset settings.
- Select Restore settings to their default values.
- Confirm with Reset.
- This will disable extensions and reset startup pages but will not delete bookmarks, saved passwords, or browsing history.


Remove from Mozilla Firefox (FF)
Remove dangerous extensions:
- Open Mozilla Firefox browser and click on the Menu (three horizontal lines at the top-right of the window).
- Select Add-ons.
- In here, select the unwanted extension and click Remove.


Reset the homepage:
- Click three horizontal lines at the top right corner to open the menu.
- Choose Settings.
- Under Home, set your preferred homepage and new tab settings.
Clear cookies and site data:
- Click Menu and pick Settings.
- Go to Privacy & Security section.
- Scroll down to locate Cookies and Site Data.
- Click on Clear Data...
- Select Cookies and Site Data and Temporary cached files and pages, then click Clear.


Reset Mozilla Firefox
If clearing the browser as explained above did not help, reset Mozilla Firefox:
- Open Mozilla Firefox browser and click the Menu.
- Go to Help and then choose Troubleshooting Information.

- Under Give Firefox a tune up section, click on Refresh Firefox...
- Once the pop-up shows up, confirm the action by pressing on Refresh Firefox.



Remove from Google Chrome
Delete malicious extensions from Google Chrome:
- Open Google Chrome, click on the Menu (three vertical dots at the top-right corner) and select More tools > Extensions.
- In the newly opened window, you will see all the installed extensions. Uninstall all suspicious extensions related to the unwanted program by clicking Remove.


Clear cache and web data from Chrome:
- Click on Menu and pick Settings.
- Under Privacy and security, select Clear browsing data.
- Select Browsing history, Cookies and other site data, as well as Cached images and files.
- Click Clear data.


Change your homepage:
- Click menu and choose Settings.
- Look for a suspicious site in the On startup section.
- Click on Open a specific or set of pages and click on three dots to find the Remove option.
Reset Google Chrome:
If the previous methods did not help you, reset Google Chrome to eliminate all the unwanted components:
- Click on Menu and select Settings.
- In the Settings, scroll down and click Advanced.
- Scroll down and locate Reset and clean up section.
- Now click Restore settings to their original defaults.
- Confirm with Reset settings.


Delete from Safari
Remove dangerous extensions:
- Open Safari, click Safari in the menu at the top-left of the screen, and select Preferences.
- Go to the Extensions tab, look for any suspicious entries, and click Uninstall to remove them.


Clear history and website data:
- Click Safari in the menu and pick Clear History.
- Set Clear to all history and confirm with Clear History.


Reset Safari:
- Click Safari in the menu and select Preferences > Advanced.
- Enable Show Develop menu in menu bar.
- From the menu bar, click Develop and select Empty Caches.


Did this guide help?
Be the first to comment