
Booking.com virus on Mac: what the adware is and how to remove it
The "Booking.com virus" is a Mac adware app that adds a Booking.com icon to the Dock and shows ads, and the real travel site is not infected. To remove it, quit and bin the app, remove its login item and traces, then reset each browser.
Facts checked October 6, 2026. Removal steps checked against Apple's current documentation and the security vendors' reports. We have not run the malware on a Mac.
Automatic
Get a free scan and check if your Mac is infected.
Fortect for Mac scans for malware and unwanted programs, and its free scan shows what it finds before you decide anything.
An automatic scan checks installed programs, startup items and browser extensions for anything that came with an unknown app or startup item on a Mac that came with a fake update.
Do it yourself · free Remove Booking.com virus yourself 5 steps, about 15 minutes, no software needed.
Booking.com virus: summary
| Type | A Mac adware app (unwanted program) that shows a Booking.com demo window; not the travel site, which is genuine |
|---|---|
| Risk | Medium: ads, redirects and settings changes; tracking and email use are not confirmed |
| Symptoms | A Booking.com icon in the Dock, pop-up ads and banners in the browser, redirects, a changed homepage |
| How to get rid of it | Quit and bin the app, remove its login item and traces in the Library folders, then reset each browser |
| Our check (6 October 2026) | Genuine booking.com: nothing on one visit. One clean Mac (macOS 26.4.1): no such app, startup file, proxy or profile; no sample run |
| Running since | First reported by us 12 December 2018 (updated 17 December 2018) |
| Removal | Scan the Mac with security software to find the malware and anything installed with it. Fortect for Mac scans for malware and unwanted programs. Remove it nowTo use the full-featured product, you have to purchase a license for Fortect. The scan is free. |
Show 9 more facts
| Detection | No Microsoft detection name is known for this app. Its behaviour resembles bundleware such as Bundlore, but no source we read names it |
|---|---|
| Distribution | Fake Flash Player updates, and bundles with PDF readers, media players, installation managers and fake optimizers |
| Not to be confused with | Booking.com the travel service (domain registered 17 April 1998), which is not infected |
| Name | Booking.com virus |
| Domain registered | 17 April 1998 |
| Evidence | 0 write-ups by security sites; details still limited |
| First seen | 12 December 2018 |
| Damage | Installs other malware, often several programs at once |
| Facts checked | 6 October 2026 |
Facts checked on 6 October 2026 against Sophos, Malwarebytes, Microsoft, Adobe and Apple Support. We tested the genuine booking.com once and checked one clean Mac (macOS 26.4.1); we had no copy of the app and found no vendor write-up that names it. The removal steps were not tested on an infected Mac.
What the "Booking.com virus" is, and what it is not
The "Booking.com virus" is not the travel site. It is a Mac app, in the adware class, that put a Booking.com shortcut on the Dock and rode in with a fake Flash Player update or a free download.
- 1
What the Mac app does
Our 2018 guide described a potentially unwanted app that adds a shortcut to the Dock. Opening it shows only a demo window with the Booking.com start page and limited functions. The real work happens in the background: pop-up ads, flashing windows, in-text links and banners in your browser.
- 2
What it is not
Booking.com is a well-known, reputable service for hotels, flights and car rentals, and the genuine site is not infected. The app is not made by it: our 2018 guide guessed its authors were affiliates of the site, and we found no source that confirms that, so treat it as a guess.
- 3
What kind of program it is
We found no security vendor write-up that names this app, so we cannot give you a family or a detection name. Its way of arriving matches what Sophos describes as bundleware: an installer that drops several unwanted apps under the cover of one wanted app, and that lists "recommended applications" in its default (Express) setup.
- 4
What it does for its makers
Adware earns money from the ads, clicks and searches it pushes into your browser. That is the reason it exists, and it gives you nothing in return: to book a trip, use the official site instead.
What Booking.com virus does on an infected PC
What we checked on the real site and on a Mac, and what we could not
We checked two things on 6 October 2026: the genuine Booking.com site, to see whether it does anything of what the old guide described, and one clean Mac, for the places this kind of app leaves traces. We had no copy of the app.
Chromium desktop from Lithuania, and macOS 26.4.1 on Apple silicon · 6 October 2026
- The genuine site
booking.comled towww.booking.com, titled "Booking.com | Official site". The domain was registered on 17 April 1998 with MarkMonitor Inc. (RDAP). This is the travel service, not the app. - Notifications and windowsOn this one visit the site asked for no notification permission, registered no service worker and opened no pop-up window.
- Bot checkThe address carried a
chal_tparameter and answered with status 202, which is a challenge step. Our automated browser may not see what a person sees. - Ad hostsThe page loaded files from Google's ad hosts, such as
pagead2.googlesyndication.com. We did not look at what was shown through them. - Apps on the MacNo app in
/Applicationshad Booking, Flash, Mac Cleaner or SearchIt in its name. - Startup foldersNone of the 8, 14 and 12 files in
~/Library/LaunchAgents,/Library/LaunchAgentsand/Library/LaunchDaemonshad booking, search, flash, cleaner or bundle in its name. - Proxy and profilesThe SOCKS proxy for Wi-Fi was off, and
profiles listshowed no configuration profile for the user. - Not testedA Mac that has the app, the app's present builds, and what it shows in Safari, Chrome, Firefox or Opera.
Real site: nothing on this one visit. Mac: one clean machine Nothing on this one visit does not mean the real site never does anything: sites can behave differently by country, device or a second visit. The clean Mac only shows what normal looks like; it says nothing about yours.
How it reached Macs in 2018: two pictures from our old guide
Our 2018 guide gave two pictures. They are not screenshots we took. They show the page the app opens to and the installer that carried it.
2018
The window the app opens: the real site
The shortcut opens a demo-app window whose start page is the genuine Booking.com. That is why the name stuck to the app and why it looks harmless at first glance.
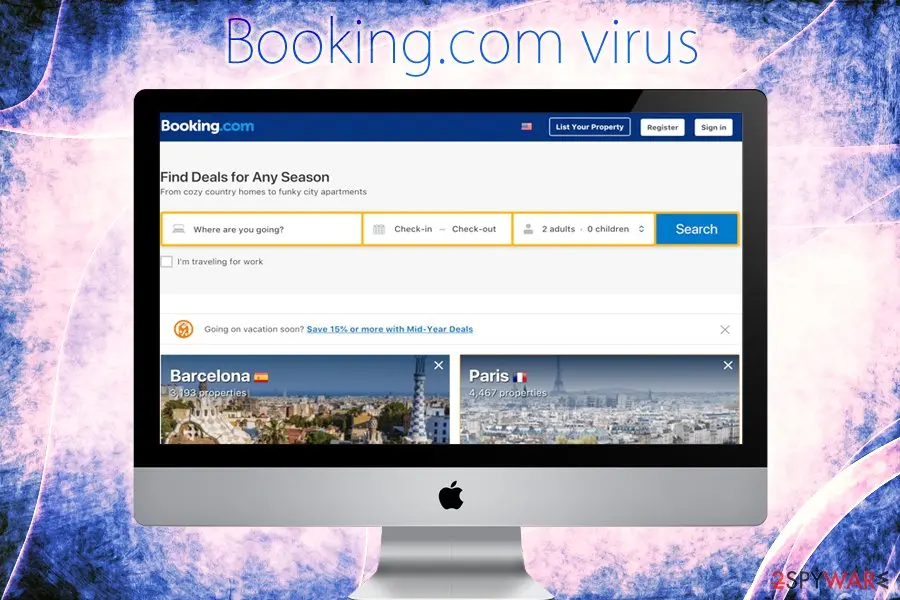
From our 2018 guide: the real Booking.com home page on a Mac screen. It is the page the app's window opens to, not the adware: the site itself is genuine. 2018
A Flash Player installer with the app ticked
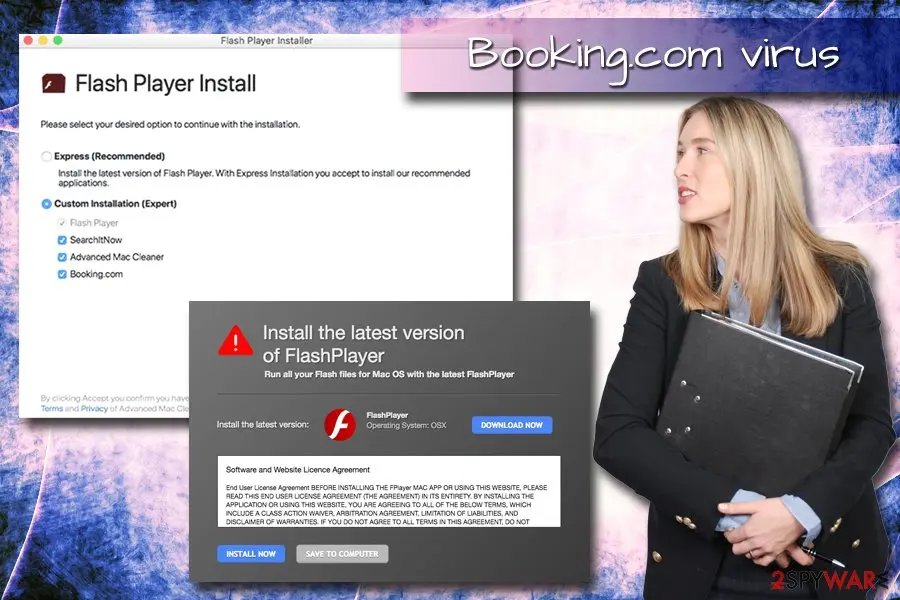
A fake Flash Player installer lists SearchItNow, Advanced Mac Cleaner and Booking.com as extras, with Custom Installation selected. The old guide also named PDF readers, media players, installation managers and fake system optimizers as carriers. Adobe ended Flash Player support on 31 December 2020, so any Flash update prompt now is a lure.
From our 2018 guide: a Flash Player installer window with Flash Player, SearchItNow, Advanced Mac Cleaner and Booking.com all ticked, over a page that says "Install the latest version of FlashPlayer". A picture of the lure, not a screenshot we took.
What it shows and what else came with it
The table sets what our 2018 guide reported next to what we can confirm today.
| What was reported | What we can confirm | What to do |
|---|---|---|
| A fake Booking.com icon in the Dock | From the old guide and its picture; not seen on our clean Mac | Check Applications and the Dock |
| Pop-up ads, flashing windows, in-text links and banners in Chrome, Safari, Firefox or Opera | Typical of adware, and Sophos documents ad injection by Bundlore extensions in Safari. Not tested with this app | Remove unknown extensions in each browser |
| Redirects, even without a click | Reported by readers of the old guide; not tested | Treat any redirect page as hostile and close it |
| A changed homepage, such as Search.hwildforscrapbooking.com | A reader of ours reported it in 2017 and that it came back after a restart. We did not test that domain | See the Mac and browser steps below |
| Cookies, JavaScript and web beacons used to track you | Common for adware; not confirmed for this app | Remove the app, then clear site data |
| Your email address used for marketing | Not confirmed | Watch for new spam; do not answer it |
What Booking.com virus can steal or download
The main damage is ads and redirects. The risk grows when you click a page that offers a "fix".
- Medium
Redirects to bad sites
Our 2018 guide said adware can send you to hacked, phishing or other dangerous sites, and can do it without any click from you. That is the main way ads turn into harm.
- Medium
Bogus software and useless services
A redirect can lead you into installing a fake program or paying for a service you do not need. Never pay or install anything a pop-up pushes.
- Medium
Extra apps and settings changes
Bundleware drops several apps at once, and Malwarebytes describes the Bundlore family as droppers that install other adware. The old guide named a similar hijacker that raises the number of ads and redirects.
Tracking and your email address
The old guide said such apps track you with cookies, JavaScript and web beacons and may take your email address for marketing. We could not confirm this for this app.
Locky or XMRig
The old guide warned that a clicked Flash prompt can bring Locky or XMRig. We found no source that ties either to this app, and we did not check it on a Mac. The safe rule stands: do not follow a Flash prompt.
How to remove Booking.com virus
A loader's job is to install other malware, so treat the PC as infected with more than one program until the scans are clean.
Which browser shows the ads?
Look for the app and for the things that keep it running. Do not delete anything yet.
Remove extensions you do not recognise
Paste
chrome://extensionsinto the address bar and click Remove on anything you did not install yourself, especially search helpers.Full procedure with screenshots: Remove a browser extension
Set the homepage and search engine
Open Settings > On startup and Settings > Search engine and put back your own choice.
Reset Chrome
Open Settings > Reset settings > Restore settings to their original defaults and confirm. This resets the start page and search engine and turns off extensions; bookmarks and saved passwords stay. Locked settings point to a profile: see the Mac chapter above.
Full procedure with screenshots: Reset a browser and fix a hijacked search engine
Remove extensions you do not recognise
Paste
edge://extensionsinto the address bar and click Remove under anything you did not install yourself.Full procedure with screenshots: Remove a browser extension
Clear the site data
Open Settings > Privacy, search, and services > Delete browsing data > Choose what to clear, set All time, tick Cookies and other site data and Cached images and files, and click Clear now.
Reset Edge
Open Settings > Reset settings > Restore settings to their default values and confirm with Reset. Extensions are turned off and the start page goes back to default; favourites, history and saved passwords stay. To stop notifications after you close Edge, turn off Settings > System and performance > Continue running background extensions and apps when Microsoft Edge is closed.
Full procedure with screenshots: Reset a browser and fix a hijacked search engine
Remove add-ons you do not recognise
Paste
about:addonsinto the address bar, open Extensions, click the three dots beside an add-on you did not install and choose Remove.Set the homepage and search engine
Open Firefox > Settings > Home and set Homepage and new windows and New tabs to Firefox Home (Default), then Settings > Search and choose your own Default Search Engine.
Refresh Firefox
Paste
about:supportinto the address bar and click Refresh Firefox. This removes extensions and resets settings; bookmarks and passwords stay.
Remove extensions you did not add
Open Safari > Settings > Extensions, select every extension you do not recognise and click Uninstall. Safari extensions are optional, so you can remove all of them and add back the ones you want.
Set the homepage and search engine
In Safari > Settings > General set the Homepage, and in Settings > Search pick your own Search engine.
Clear the website data
Open Safari > Settings > Privacy > Manage Website Data, select the sites you do not trust or click Remove All, then Remove. If settings change back, the cause is outside Safari: see the Mac chapter above.
Then, whichever browser you use
Step 1: Delete scheduled tasks that bring it back
Programs like Booking.com virus add a scheduled task so they return after an uninstall or reopen a page at every sign-in. Start Task Scheduler, open Task Scheduler Library and sort by Last Run Time to see what ran recently.
On the Actions tab, a program in a user folder, a script or a web address is a warning sign; right-click such a task and choose Delete.
Tasks with names copying Google, Edge or Windows updaters but pointing to an odd folder are typical. The tool looks the same in Windows 11 and Windows 10.
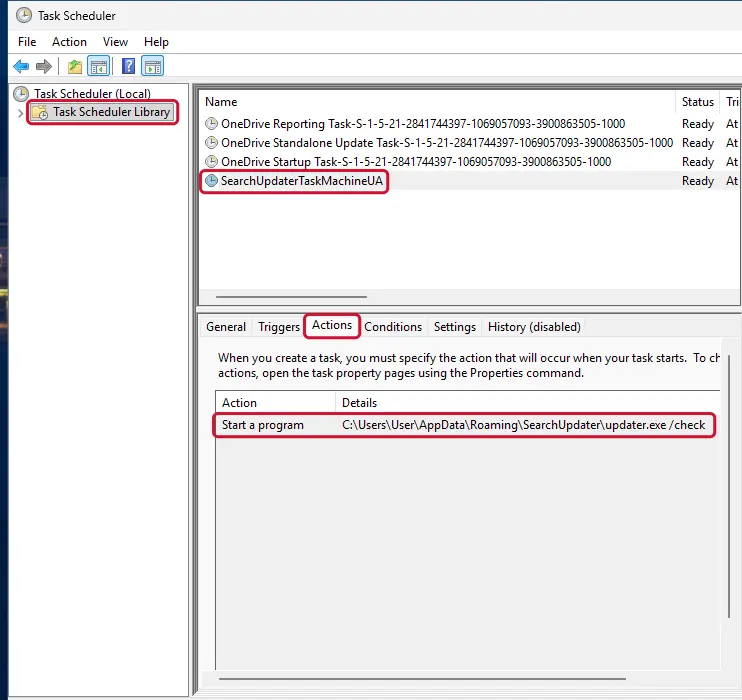
Windows 11: Task Scheduler Library, the task selected, the Actions tab shows the file it runs. Full procedure with screenshots: Remove what malware leaves behind in Windows
Step 2: Remove it from startup
Press Ctrl + Shift + Esc to open Task Manager and select Startup apps (Windows 11) or the Startup tab (Windows 10). Disable entries you do not recognise, especially ones with no publisher or with a name that copies a Windows component.
Right-click an entry and choose Open file location to see where it runs from: programs in
%AppData%or%Temp%deserve a closer look. Some entries are not listed there but in the registry Run keys, which the procedure below shows how to check.Full procedure with screenshots: Stop apps from opening at startup On uGetFix
Step 3: Delete the folders left behind
Uninstalling often leaves the program's folders, and some threats reinstall themselves from them.
Press Windows + R, type
%LocalAppData%and press Enter, then do the same for%AppData%and %ProgramData%, and look for folders named after Booking.com virus, its publisher or created on the day the problem started.Delete those folders, and check
C:\Program FilesandC:\Program Files (x86)too.If Windows says a file is in use, end it in Task Manager or delete the folder after a restart in Safe Mode. The folders are the same in Windows 11 and Windows 10.
Full procedure with screenshots: Remove what malware leaves behind in Windows
Step 4: Scan the PC, then run the offline scan
A scan finds the parts of Booking.com virus that the manual steps cannot see. In Windows Security > Virus & threat protection > Scan options, start a Full scan and quarantine what it reports.
Follow it with Microsoft Defender Antivirus (offline scan) > Scan now, which restarts the PC and checks the disk while Windows and the malware are not running.
It takes about 15 minutes and works the same in Windows 11 and Windows 10. If either scan finds something, run the full scan again after removal until it comes back clean.
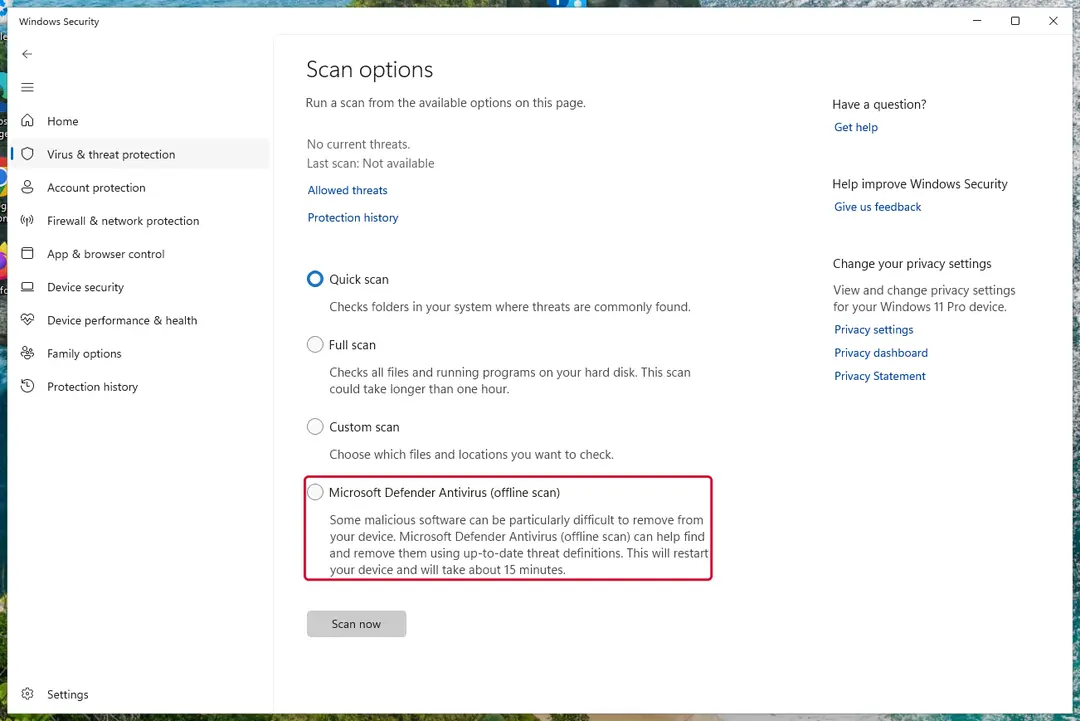
Windows 11: Windows Security > Virus & threat protection > Scan options. Full procedure with screenshots: Run a Microsoft Defender Offline scan
Step 5: Change passwords from another device and sign out other sessions
Booking.com virus can copy saved passwords, cookies and session tokens and send them out in seconds, so cleaning the PC does not undo the theft.
Change your passwords on a device that was never infected, starting with the e-mail account, since every other reset goes through it. On each account, end all other sessions and check the recovery e-mail, phone number and forwarding rules.
Then turn on two-step verification. Sign in on the Windows 11 or Windows 10 PC again only after the offline scan is clean.
Full procedure with screenshots: Turn on two-step verification / secure a hacked account
Remove it from a Mac
Removal is a little tricky because the app leaves traces in the system. Uninstall the app first, then the traces, then reset each browser. We could not test these steps on a Mac with the app.
- 1
Quit it and move the app to the Bin
Open Activity Monitor, choose View > All Processes, select the app's name, click the stop button and choose Quit (Force Quit if it stays). Then open Finder > Applications and drag the app to the Bin. Do this first.
- 2
Remove its login item and extensions
In System Settings > General > Login Items & Extensions select the entry from your check and click the minus button, and turn off added extensions you do not know.
- 3
Go to the folders and look for its traces
Click Finder, choose Go > Go to Folder and enter each of
/Library/Application Support,~/Library/Application Support,/Library/LaunchAgents,~/Library/LaunchAgents,/Library/LaunchDaemonsand/Library/PrivilegedHelperTools. Move to the Bin only entries that match the app from your check (for example a folder named after Booking). Daemons need your administrator password. - 4
Reset each browser
Reset every browser you use with the steps in the tabs above: Safari, Chrome, Firefox and Edge. Removing the app alone does not undo what it set in the browser.
- 5
Empty the Bin, restart and check again
Empty the Bin, restart the Mac and run the ten-minute check again after an hour. A file that came back means a startup item is still there; repeat the folder step.
- 6
Optionally, scan
A reputable Mac security product that finds unwanted programs can find what you missed. Malwarebytes, for one, says its Mac product detects and removes Adware.Bundlore, which is a related bundleware family. You still have to reset each browser by hand.
The old guide told you to check "the following locations" but its list of folders did not survive. The six above are the places where Mac adware commonly keeps its files; we could not confirm which of them this app uses.
After removal: passwords, accounts and prevention
Accounts come next
Because the PC showed an unknown app or startup item on a Mac that came with a fake update in the list of installed apps, a sign of a program that could read browser data, the clean-up is only half of the work. The other half happens in your online accounts.
Change passwords from a clean device, beginning with e-mail; sign out of all sessions; check forwarding rules and recovery phone numbers; and turn on two-step verification with an authenticator app or a passkey. Ask your bank to replace cards saved in the browser.
Why the order matters and what to check in each account: secure your accounts after malware.
If you ran the Flash or free-software installer
An installer that asked for your administrator password had the power to install more than it showed.
- 1
Change passwords from another device
Start with your Apple Account and email, then banks, and turn on two-step sign-in.
- 2
Look at your bank cards
Check recent statements for charges you do not know.
- 3
Erase the Mac if it keeps coming back
Back up documents only, erase the Mac from macOS Recovery, reinstall macOS and restore the documents, not apps or a system image from after the infection.
Keep bundled adware off your Mac
The old guide's advice about bundles still holds. Here it is with current details.
Do
- Install apps from the App Store or from the developer's own site, and read each installer screen.
- Pick Custom or Advanced installation; Sophos found that the default Express option adds "recommended applications".
- Untick every third-party app in the list before you finish the installation.
- Keep Gatekeeper on: System Settings > Privacy & Security, Allow apps downloaded from set to App Store or App Store and identified developers.
- Keep macOS updated and keep a Time Machine backup on a disk you unplug afterwards.
Don't
- Do not click pop-ups that promote Flash or other player updates: Flash is gone.
- Do not accept "By continuing, you agree to terms" without reading what else is bundled.
- Do not type your administrator password into an installer you did not start.
Questions about Booking.com virus
Is Booking.com a virus?
No, the travel site Booking.com is not a virus, and our test of it on 6 October 2026 showed no notification request and no pop-up on that one visit.
The "Booking.com virus" is a Mac app of the adware kind that uses the name and opens a demo window with the real site's start page. It usually arrives with a fake Flash Player update or a free download.
The site and the app have nothing to do with each other, as far as we could confirm. If you still see the Booking.com icon in your Dock and ads in your browser, the problem is on your Mac, not at the travel service, and the removal plan on this page applies to it.
What is the Booking.com virus on Mac?
It is a potentially unwanted app for macOS that our 2018 guide classed as adware. Once installed it adds a shortcut to the Dock, and the shortcut opens a demo-app window with a Booking.com start page and almost no functions.
In the background it shows pop-up ads, flashing windows, in-text links and banners in browsers such as Chrome, Safari, Firefox and Opera. That earns money for its makers and ruins browsing for you.
We found no vendor write-up that names this app, so we cannot say which family it belongs to. Treat it as adware, remove it and reset your browsers.
Why is there a Booking.com icon in my Dock?
Because an app you did not choose added it. Our 2018 guide listed a fake Booking.com icon in the Dock as the first symptom.
Open Finder, then Applications, and look for an app with that name or one you do not remember installing. If you find it, the removal steps above apply:
- quit it in Activity Monitor
- move it to the Bin
- remove its login item in System Settings
- check the Library folders
Do not use the icon to book a trip; go to the official site by typing its address yourself, since the icon only opens a demo window.
How do I remove the Booking.com virus from my Mac?
Remove it in five steps, in this order. First quit the app in Activity Monitor and drag it from Applications to the Bin. Second, remove its login item and unknown extensions in System Settings, General, Login Items & Extensions.
Third, in Finder use Go, Go to Folder to look in the Application Support, LaunchAgents, LaunchDaemons and PrivilegedHelperTools folders and bin the entries that match. Fourth, reset Safari, Chrome, Firefox and Edge with the tabs on this page.
Fifth, empty the Bin, restart and check again after an hour. We could not test these steps on a Mac with the app, so a scan by a reputable Mac security product is a sensible second check.
How did the Booking.com virus get on my Mac?
Most likely you installed it yourself without knowing. Our 2018 guide said it comes bundled with PDF readers, media players, installation managers and fake system optimizers, and that a fake Flash Player update can also deliver it.
Sophos describes the same bundleware method in its Bundlore analysis: an installer shows one wanted app, then adds "recommended applications" in its default Express setup, and the opt-out may not work.
Adobe ended Flash Player support on 31 December 2020, so a Flash update prompt today is a trick. Think back to what you installed or which prompt you clicked just before the icon appeared.
Can the Booking.com virus steal my passwords or card details?
We cannot confirm that it does. Our 2018 guide said adware like this tracks users with cookies, JavaScript and web beacons and may take an email address for marketing, but it did not show theft of passwords or cards, and we found no vendor source for this app.
The real risk is indirect: redirects can lead to phishing pages or fake software offers. If you ran an installer that asked for your administrator password, act as if more was installed. Change your passwords from another device, starting with your Apple Account and email, check card statements and turn on two-step sign-in.
Is cleaning my browser enough?
No, not on its own. The browser shows the symptoms:
- unknown extensions
- a changed homepage or search engine
- ads on every page
But the app sits outside the browser, on the Mac, and it can set things back after you reset. Our 2018 guide said you still have to reset each installed browser even after a security program has removed the app, and that is also true in reverse.
Remove the app and its traces first, then reset Safari, Chrome, Firefox and Edge. Cleaning only the browser is the usual reason the ads return the next day.
What is Search.hwildforscrapbooking.com?
It is a browser hijacker domain that our 2018 guide named as a similar third-party app that changes browser settings and raises the number of ads and redirects. A reader wrote to us in 2017 that it became his homepage and came back after a restart, even after he removed it in the browser settings.
We did not test this domain, so we do not know what it does today. A homepage that returns after a restart points to something on the Mac that sets it again:
- check Login Items
- the startup folders and profiles
- remove the app behind it
- then reset the browser
How do I stop it coming back?
Change how you install software. Download apps from the App Store or from the developer's own site, pick Custom or Advanced installation, and untick every third-party app before you finish. Do not follow Flash or other player update prompts.
Keep Gatekeeper on, with Allow apps downloaded from set to App Store or App Store and identified developers, keep macOS updated, and keep a Time Machine backup on a disk you unplug afterwards.
Never type your administrator password into an installer you did not start. If the Dock icon returns after a restart, something on the Mac still starts it: check the login items again.
Will Fortect remove Booking.com virus?
Fortect scans Windows for malware and unwanted programs and repairs the system files and settings they change, and its free scan shows what it finds on your PC before you decide anything.
For Booking.com virus, follow the plan above as well: the browser steps take back permissions and settings that no scanner treats as a threat, and uninstalling the program that brought it removes the source.
Run Microsoft Defender's full scan and, if anything was found, its offline scan as a second opinion. If the symptoms are gone after the plan and both scans are clean, there is nothing more to do.
Sources
- Sophos: New Bundlore adware targets macOS with updated Safari extensions (18 June 2020) (read October 6, 2026)
- Malwarebytes: Adware.Bundlore threat alert (read October 6, 2026)
- Microsoft: Adware:MacOS/Bundlore.E threat description (published 16 March 2022; no technical details given) (read October 6, 2026)
- Apple Support: Change Login Items & Extensions settings on Mac (read October 6, 2026)
- Apple Support: Safely open apps on your Mac (read October 6, 2026)
- Adobe: Flash Player End of Life (read October 5, 2026)
- RDAP record for booking.com (registered 17 April 1998, registrar MarkMonitor Inc.) (read October 6, 2026)
- Our own test of booking.com and of one Mac (macOS 26.4.1): ls, launch folders, networksetup, profiles (read October 6, 2026)