

Facebook Malware warning is the scam showing pop-ups without having the particular site open
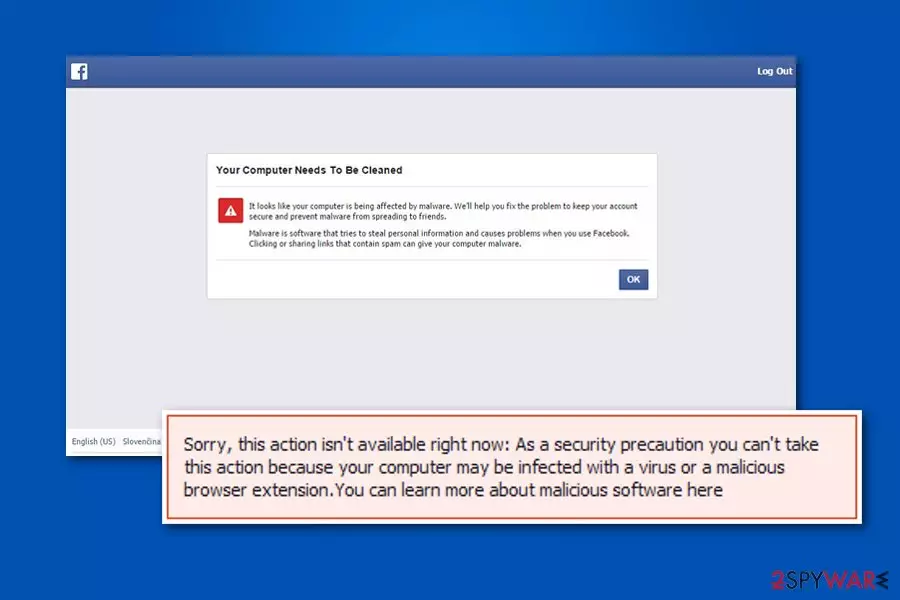
Facebook Malware warning is a fake alert and experts categorize it as the new version of the notorious Facebook virus. Once the computer is infected, people start receiving legitimate-looking messages which state that their computers should be scanned for malware. Unfortunately, this is merely a trick to lure users into downloading the potentially dangerous software and infiltrate the system with other cyber threats. These scams are only created to trick people into visiting malicious sites or allowing direct downloads of the programs that can later on share malware on the OS and directly affect the security of the targeted devices or even access valuable data.
| Name | Facebook Malware warning |
|---|---|
| Type | Scam, adware |
| Danger level | Medium |
| Related to | Facebook virus |
| Distribution | Software bundles, infected links on shady websites, etc. |
| Main issues caused | Interrupts its victims with exaggerated alerts offering users to download the fake software |
| Removal | To get rid of these fake security warnings, use a robust antivirus. Anti-malware tool is the top choice because this program can infiltrate other threats |
| Repair | Programs can stop working properly due to changes in system folders, so rely on FortectIntego and fix any affected parts yourself |
Recently, we received several reports from users claiming that Facebook is not letting them log in because of malware.[1] People are wondering whether such alerts are true or not. Well, at first it is essential to understand that cybercriminals are highly trained in social engineering tactics. Likewise, they create notifications that appear similar to legitimate ones and are extremely convincing at first sight.
Even though the Facebook Malware warning appeared back in 2017, our experts are still finding it active. The most common symptoms of this type of infection appear as the following:
- Suspicious messages from unknown people which contain a link;
- Redirects to fake Facebook pages asking to log in;
- Fake warnings which are claiming that your computer is infected.
Despite how true these warning messages might look, you should never trust them. Sadly, if you fall into the trap of the criminals, they will either trick you into downloading malicious software, swindle money, or hijack the account and use it for further infection spreading. Likewise, it is vital to protect your computer and account from this cyber threat.

If you have encountered Facebook Malware warning virus and received multiple notifications that raise concerns, please, do not hesitate. Immediately, get professional security software before it's too late. Keep in mind that such malicious programs are designed to act right after the activation. Thus, each minute is important if you want to avoid computer and personal information damage. Try SpyHunterCombo Cleaner or MalwarebytesMalwarebytes for the system clearing.
Unfortunately, hackers have created these type of infections with numerous components. Each one of them is located in a different place on the system. If you want to remove the virus that causes the scam messages, you must identify and eliminate all of the related threats as well. Likewise, it becomes almost impossible.
For this reason, we highly recommend PC repair tools like FortectIntego. This professional tool will quickly scan your computer files and locate all of the elements that might be supporting malicious activity on your system. Also, it will protect your PC from further infections after Facebook Malware warning removal as well.
Scam messages can be triggered by the malicious program or a direct link
During our years of experience, we have noticed that most of the people get infected with various types of malware and potentially unwanted programs[2] by clicking on suspicious and dangerous links. This cyber threat also spreads the same way as people are convinced to visit the rogue page by hackers.
Usually, people receive an innocent-looking message which claims about something exciting, like:
Wow! Check this out!
or
Today is my birthday.
Give me one SHARE as my gift, only one SHARE.
….
Because I don’t Have one leg Nobody shared My picture
As soon as criminals catch user's attention, they append a link which is set to start the download of an adware program. This application is created to deliver fake malware warnings to Facebook users and trick them into downloading more potentially unwanted programs.
Therefore, it is crucial to monitor your online activity: never open messages and emails from people you don't know, do not click on potentially dangerous links, do not accept friend requests from people you are not familiar with and avoid visiting unreliable websites.
Facebook Malware warning removal is a must for everyone
As we have already mentioned, such cyber infections are dangerous due to their ability to infiltrate the system with other potentially unwanted programs. NoVirus.uk[3] team reminds that all infections have negative consequences on the PC, starting from slowdowns, freezes, and even permanent damage.
For this reason, you must remove Facebook Malware warning and do it quickly. If you leave it on your system for an extensive period of time, there is a substantial risk that you will encounter more problems in the long-run. Thus, please, do not delay the elimination.
Facebook Malware warning removal can be completed with a robust antivirus. You will find our recommended software down below. Download it, run a full system scan and make sure that none of the components are left on your PC.
Uninstall from Windows
Uninstall from Windows 10/8:
- Type Control Panel into the Windows search box and open the result.
- Under Programs, select Uninstall a program.


Uninstall from Windows 7/XP:
- Click on Windows Start > Control Panel (Windows XP users should click on Add/Remove Programs).
- In Control Panel, select Programs > Uninstall a program.


Remove the unwanted program:
- In the Programs and Features window, look for any recently installed suspicious entries, select them, and click Uninstall.
- If User Account Control appears, click Yes to confirm, then complete the removal.


Delete from macOS
Remove the unwanted application:
- From the menu bar, select Go > Applications.
- In the Applications folder, look for any suspicious entries, then drag them to Trash (or right-click and pick Move to Trash).


Delete leftover files and folders:
- Select Go > Go to Folder.
- Enter /Library/Application Support and remove any suspicious folders related to the unwanted program.
- Repeat the same check in the /Library/LaunchAgents and /Library/LaunchDaemons folders, deleting any suspicious entries.

- Finally, empty the Trash to permanently remove the leftovers.

Remove from Microsoft Edge
Delete unwanted extensions from MS Edge:
- Select Menu (three horizontal dots at the top-right of the browser window) and pick Extensions.
- From the list, pick the extension and click on the Gear icon.
- Click Remove.


Clear cookies and other browser data:
- Click on the Menu (three horizontal dots at the top-right of the browser window) and select Settings > Privacy, search, and services..
- Under Clear browsing data, pick Choose what to clear.
- Select Cookies and other site data and Cached images and files. (apart from passwords, although you might want to include Media licenses as well, if applicable) and click on Clear.


Restore new tab and homepage settings:
- Click the menu icon and choose Settings.
- Then find On startup section.
- Click Remove next to any suspicious startup page.
Reset MS Edge if the above steps did not work:
- Press on Ctrl + Shift + Esc to open Task Manager.
- Click on More details arrow at the bottom of the window.
- Select Details tab.
- Now scroll down and locate every entry with Microsoft Edge name in it. Right-click on each of them and select End Task to stop MS Edge from running.


Instructions for Chromium-based Edge
Delete extensions from MS Edge (Chromium):
- Open Edge and click select Settings > Extensions.
- Delete unwanted extensions by clicking Remove.


Clear cache and site data:
- Click on Menu and go to Settings.
- Select Privacy, search and services.
- Under Clear browsing data, pick Choose what to clear.
- Under Time range, pick All time.
- Select Clear now.


Reset Chromium-based MS Edge:
- Click on Menu and select Settings.
- On the left side, pick Reset settings.
- Select Restore settings to their default values.
- Confirm with Reset.
- This will disable extensions and reset startup pages but will not delete bookmarks, saved passwords, or browsing history.


Remove from Mozilla Firefox (FF)
Remove dangerous extensions:
- Open Mozilla Firefox browser and click on the Menu (three horizontal lines at the top-right of the window).
- Select Add-ons.
- In here, select the unwanted extension and click Remove.


Reset the homepage:
- Click three horizontal lines at the top right corner to open the menu.
- Choose Settings.
- Under Home, set your preferred homepage and new tab settings.
Clear cookies and site data:
- Click Menu and pick Settings.
- Go to Privacy & Security section.
- Scroll down to locate Cookies and Site Data.
- Click on Clear Data...
- Select Cookies and Site Data and Temporary cached files and pages, then click Clear.


Reset Mozilla Firefox
If clearing the browser as explained above did not help, reset Mozilla Firefox:
- Open Mozilla Firefox browser and click the Menu.
- Go to Help and then choose Troubleshooting Information.

- Under Give Firefox a tune up section, click on Refresh Firefox...
- Once the pop-up shows up, confirm the action by pressing on Refresh Firefox.



Remove from Google Chrome
Delete malicious extensions from Google Chrome:
- Open Google Chrome, click on the Menu (three vertical dots at the top-right corner) and select More tools > Extensions.
- In the newly opened window, you will see all the installed extensions. Uninstall all suspicious extensions related to the unwanted program by clicking Remove.


Clear cache and web data from Chrome:
- Click on Menu and pick Settings.
- Under Privacy and security, select Clear browsing data.
- Select Browsing history, Cookies and other site data, as well as Cached images and files.
- Click Clear data.


Change your homepage:
- Click menu and choose Settings.
- Look for a suspicious site in the On startup section.
- Click on Open a specific or set of pages and click on three dots to find the Remove option.
Reset Google Chrome:
If the previous methods did not help you, reset Google Chrome to eliminate all the unwanted components:
- Click on Menu and select Settings.
- In the Settings, scroll down and click Advanced.
- Scroll down and locate Reset and clean up section.
- Now click Restore settings to their original defaults.
- Confirm with Reset settings.


Delete from Safari
Remove dangerous extensions:
- Open Safari, click Safari in the menu at the top-left of the screen, and select Preferences.
- Go to the Extensions tab, look for any suspicious entries, and click Uninstall to remove them.


Clear history and website data:
- Click Safari in the menu and pick Clear History.
- Set Clear to all history and confirm with Clear History.


Reset Safari:
- Click Safari in the menu and select Preferences > Advanced.
- Enable Show Develop menu in menu bar.
- From the menu bar, click Develop and select Empty Caches.


Did this guide help?
Be the first to comment