

Notadslife.com shows fake messages that should not be trusted
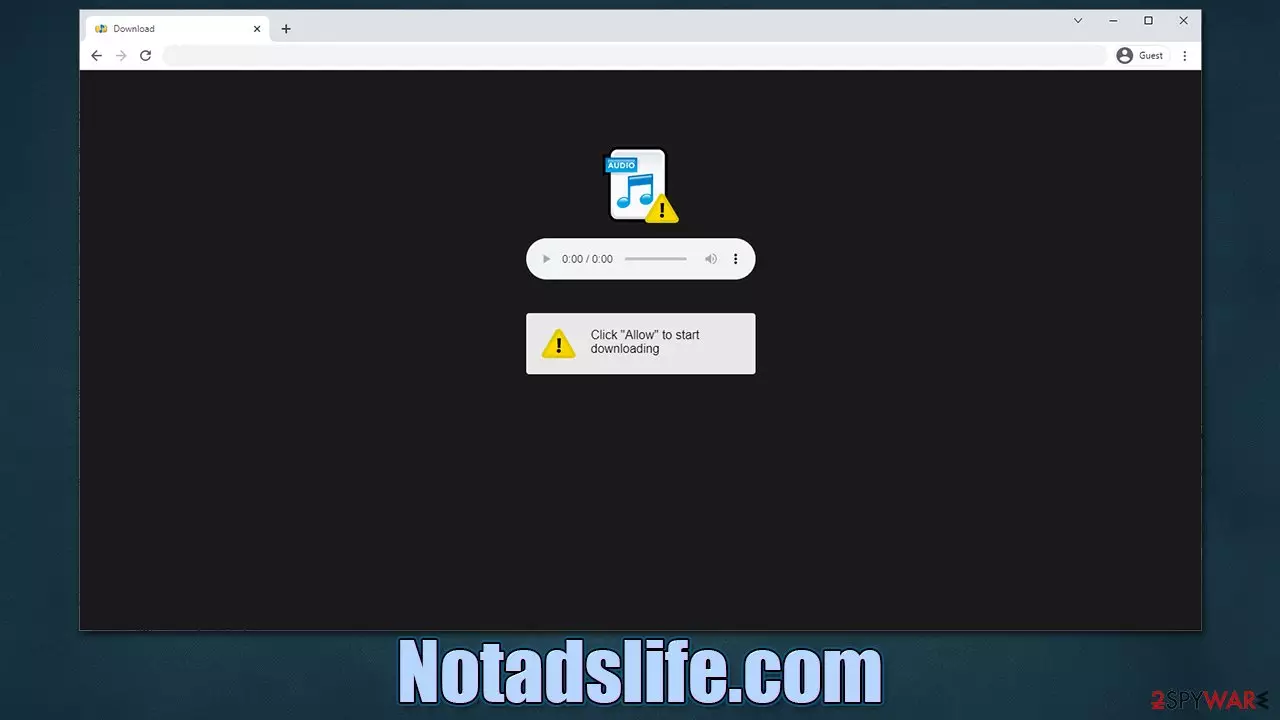
Notadslife.com is a fake website created to trick users into subscribing to push notifications so that revenue could be gained via ads sent directly to users' desktops. Such scam sites are not new, and they always try to come up with a fake reason why users should click the “Allow” button within the prompt, e.g., to allow video playback.
Once users do what they are asked to by Notadslife.com, nothing much happens at the time, and most simply go on with their daily routines. Only sometime later, they might notice intrusive pop-ups that are shown on top of every other application running at the time.
To make matters worse, Notadslife.com ads can be not only misleading but also dangerous, as insecure advertising networks are used to promote them. If interacted with, the links can lead users to other fake websites, where they would be asked to enable notifications once again, purchase fake goods, participate in fake surveys, or install malware/PUPs.
| Name | Notadslife.com |
| Type | Push notifications, ads, pop-ups, scam |
| Distribution | The entry point is via the notification prompt – users need to press the “Allow” button |
| Symptoms | Intrusive pop-ups show up directly on the desktop, on top of all other opened apps or websites |
| Risks | Monetary losses, installation of potentially unwanted programs/malware, personal data leak |
| Removal | Access browser settings to stop intrusive push notifications. After that, make sure that your system is not infected with adware or malware – scan it with SpyHunterCombo Cleaner |
| Recovery | Potentially unwanted programs often leave traces within web browsers – cookies, for example, are used for tracking. You should get rid of these leftovers with FortectIntego or employ our manual guide |
Push notification scams are extremely common, and they are all almost identical. Our previously-researched scam sites include Sexaview.ru, Ddenkno.xyz, Wellsurfacestore.xyz, and many others. In this article, we dive into peculiarities about Notadslife.com – yet another phishing[1] attempt by malicious actors.
What causes redirects to Mydefensivesoft.com?
Evidently, users would not visit malicious websites on purpose – they are rather redirected there under various circumstances. Most commonly, redirects occur during users' visits to potentially dangerous websites, such as those that distribute illegal pirated software installers.
Less secure websites do not implement adequate security measures, as unauthorized parties are allowed to host files and other content which visitors can interact with. They could sometimes host malicious ads that would install malware if vulnerable software[2] is present on the user's machine or redirect to suspicious websites, including Notadslife.com.
Unexpected redirects could be caused by an aggressive form of adware[3] or malware installed on the device. In order to stop these redirects, you have to find and eradicate all potentially unwanted and malicious software from your system. The easiest way to do that is by employing SpyHunterCombo Cleaner, MalwarebytesMalwarebytes, or another powerful security software.

Examples of fake messages used
The request to enable notifications is not as straightforward on Google Chrome especially and can be easily misinterpreted by the visitors. Here are a few examples you might encounter when accessing a push notification scam website (all of them are relatively identical, with few differences in message wording and pictures used):
- Click “Allow” to start downloading
- Please tap Allow to continue
- Press “Allow” to verify, that you are not a robot
- Click “Allow” to win a prize and get it in our shop!
- Can't play this video! Perhaps your browser doesn't allow video playback. Please click the Allow button to watch the video
Do not get fooled by these excuses to allow notifications, as these are all misleading. If you do what you are asked to, you would immediately allow the website to show you ads without restrictions, which would be run on the system level. Push notification scam sites never have any content in them, so you would not get anything out of it.
Remove the unwanted push notifications
Whenever users are presented with unexpected activity, it makes them alarmed, and they tend to come to some sort of conclusions. In the case of push notifications, they are likely to forget the previous encounter with the site, hence they can't recognize its name. Naturally, many immediately assume that their systems are infected by some type of virus.
While the checks for malware and adware should be performed due to the aforementioned reasons, the Notadslife.com ads are not directly related to any type of infection. The unwanted activity is present because you have allowed notifications to be shown to you. In order to block the website from continuing this activity, you need to access browser settings and perform the following steps:
Google Chrome
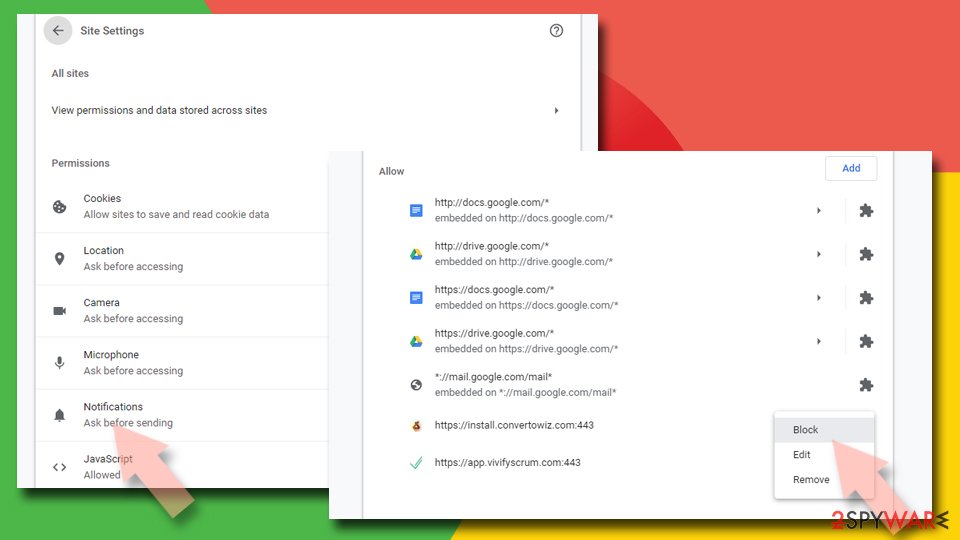
- Open Google Chrome browser and go to Menu > Settings.
- Scroll down and click on Advanced.
- Locate the Privacy and security section and pick Site Settings > Notifications.
- Look at the Allow section and look for a suspicious URL.
- Click the three vertical dots next to it and pick Block. This should remove unwanted notifications from Google Chrome.

Google Chrome (Android)
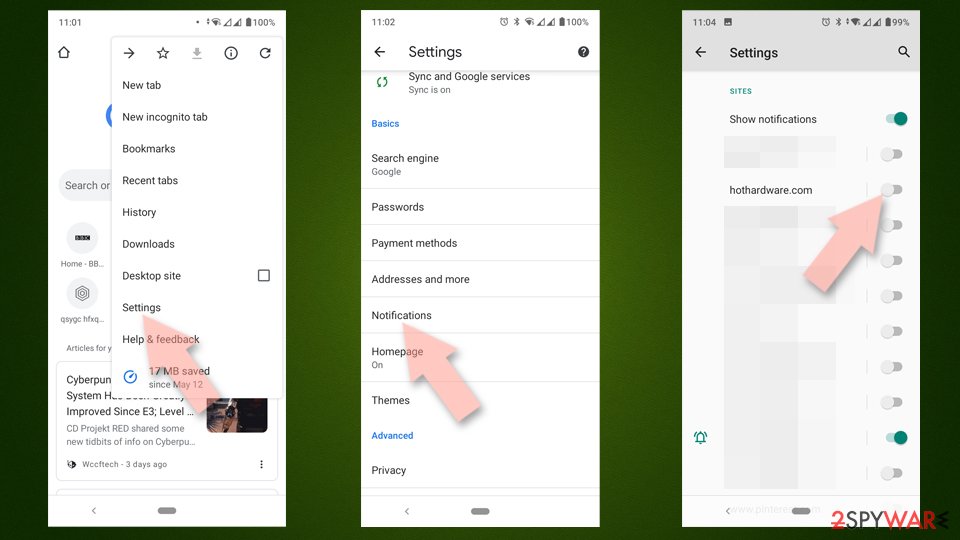
- Open Google Chrome and tap on Settings (three vertical dots).
- Select Notifications.
- Scroll down to the Sites section.
- Locate the unwanted URL and toggle the button to the left (Off position).

Mozilla Firefox
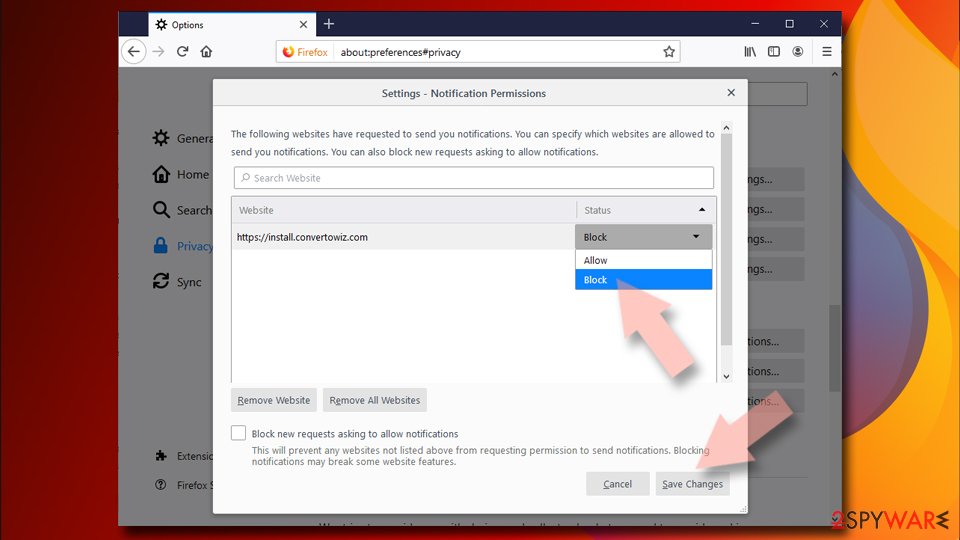
- Open Mozilla Firefox and go to Menu > Options.
- Click on Privacy & Security section.
- Under Permissions, you should be able to see Notifications. Click the Settings button next to it.
- In the Settings – Notification Permissions window, click on the drop-down menu by the URL in question.
- Select Block and then click on Save Changes. This should remove unwanted notifications from Mozilla Firefox.

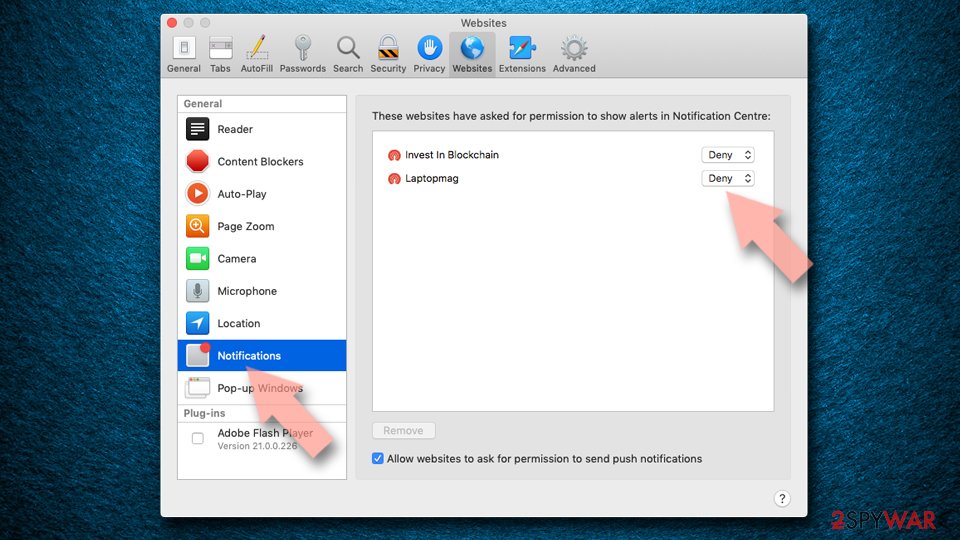
Safari
- Click on Safari > Preferences…
- Go to the Websites tab and, under General, select Notifications.
- Select the web address in question, click the drop-down menu and select Deny.

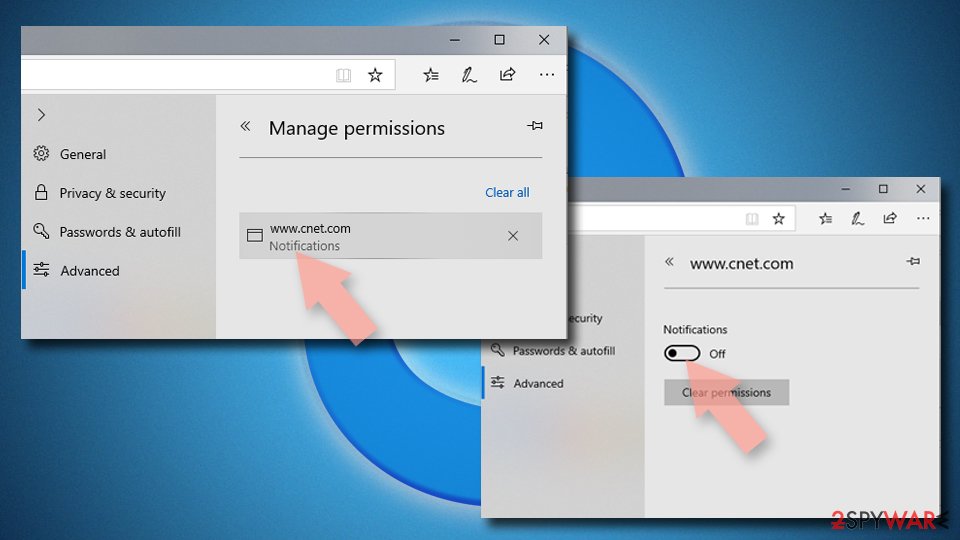
MS Edge
- Open Microsoft Edge, and click the Settings and more button (three horizontal dots) at the top-right of the window.
- Select Settings and then go to Advanced.
- Under Website permissions, pick Manage permissions and select the URL in question.
- Toggle the switch to the left to turn notifications off on Microsoft Edge.

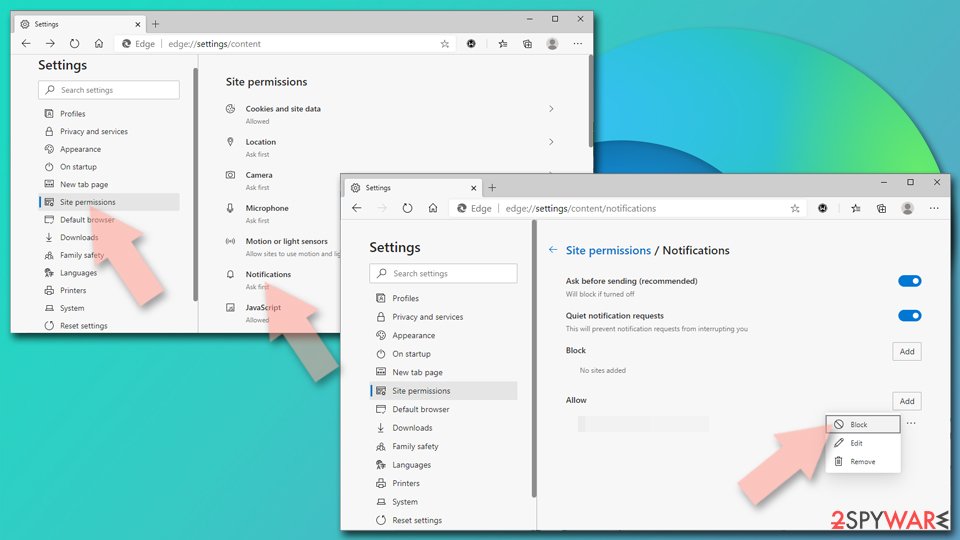
MS Edge (Chromium)
- Open Microsoft Edge, and go to Settings.
- Select Site permissions.
- Go to Notifications on the right.
- Under Allow, you will find the unwanted entry.
- Click on More actions and select Block.

Internet Explorer
- Open Internet Explorer, and click on the Gear icon at the top-right of the window.
- Select Internet options and go to the Privacy tab.
- In the Pop-up Blocker section, click on Settings.
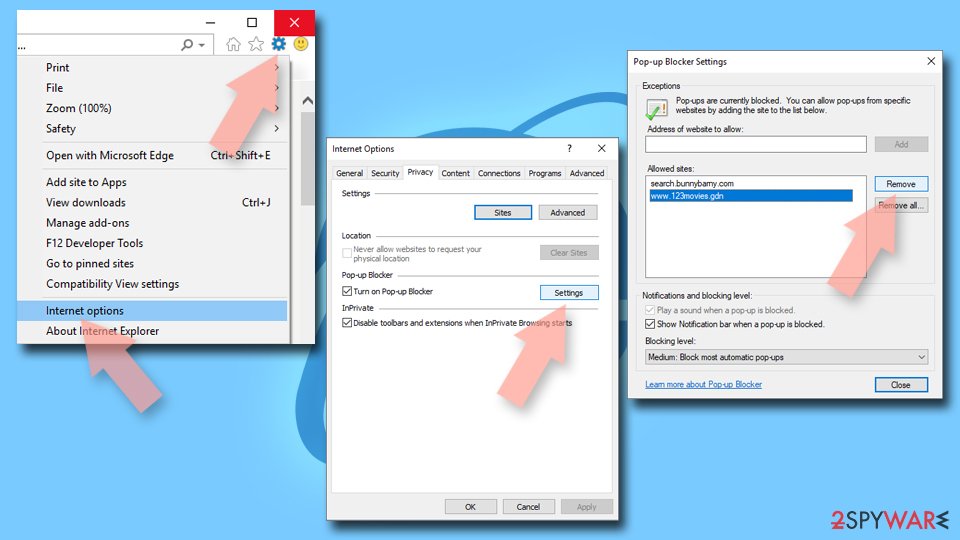
- Locate the web address in question under Allowed sites and pick Remove.

Check your system for adware
As mentioned, unexpected browser redirects could be a direct result of adware or malware infection, thus we recommend making important system checks. While you could try finding malware on your device manually (we provide the step-by-step guide below), we strongly recommend you perform a full system scan with security software.
Once done, make sure you clean your web browsers from cookies and other web data to ensure your privacy, as they are used to collect various user information by third parties. For a quick solution, you can employ FortectIntego repair and maintenance utility – it can also fix system damage if such was sustained due to malware or other reasons.
Uninstall from Windows
Uninstall from Windows 10/8:
- Type Control Panel into the Windows search box and open the result.
- Under Programs, select Uninstall a program.


Uninstall from Windows 7/XP:
- Click on Windows Start > Control Panel (Windows XP users should click on Add/Remove Programs).
- In Control Panel, select Programs > Uninstall a program.


Remove the unwanted program:
- In the Programs and Features window, look for any recently installed suspicious entries, select them, and click Uninstall.
- If User Account Control appears, click Yes to confirm, then complete the removal.


Delete from macOS
Remove the unwanted application:
- From the menu bar, select Go > Applications.
- In the Applications folder, look for any suspicious entries, then drag them to Trash (or right-click and pick Move to Trash).


Delete leftover files and folders:
- Select Go > Go to Folder.
- Enter /Library/Application Support and remove any suspicious folders related to the unwanted program.
- Repeat the same check in the /Library/LaunchAgents and /Library/LaunchDaemons folders, deleting any suspicious entries.

- Finally, empty the Trash to permanently remove the leftovers.

Remove from Microsoft Edge
Delete unwanted extensions from MS Edge:
- Select Menu (three horizontal dots at the top-right of the browser window) and pick Extensions.
- From the list, pick the extension and click on the Gear icon.
- Click Remove.


Clear cookies and other browser data:
- Click on the Menu (three horizontal dots at the top-right of the browser window) and select Settings > Privacy, search, and services..
- Under Clear browsing data, pick Choose what to clear.
- Select Cookies and other site data and Cached images and files. (apart from passwords, although you might want to include Media licenses as well, if applicable) and click on Clear.


Restore new tab and homepage settings:
- Click the menu icon and choose Settings.
- Then find On startup section.
- Click Remove next to any suspicious startup page.
Reset MS Edge if the above steps did not work:
- Press on Ctrl + Shift + Esc to open Task Manager.
- Click on More details arrow at the bottom of the window.
- Select Details tab.
- Now scroll down and locate every entry with Microsoft Edge name in it. Right-click on each of them and select End Task to stop MS Edge from running.


Instructions for Chromium-based Edge
Delete extensions from MS Edge (Chromium):
- Open Edge and click select Settings > Extensions.
- Delete unwanted extensions by clicking Remove.


Clear cache and site data:
- Click on Menu and go to Settings.
- Select Privacy, search and services.
- Under Clear browsing data, pick Choose what to clear.
- Under Time range, pick All time.
- Select Clear now.


Reset Chromium-based MS Edge:
- Click on Menu and select Settings.
- On the left side, pick Reset settings.
- Select Restore settings to their default values.
- Confirm with Reset.
- This will disable extensions and reset startup pages but will not delete bookmarks, saved passwords, or browsing history.


Remove from Mozilla Firefox (FF)
Remove dangerous extensions:
- Open Mozilla Firefox browser and click on the Menu (three horizontal lines at the top-right of the window).
- Select Add-ons.
- In here, select the unwanted extension and click Remove.


Reset the homepage:
- Click three horizontal lines at the top right corner to open the menu.
- Choose Settings.
- Under Home, set your preferred homepage and new tab settings.
Clear cookies and site data:
- Click Menu and pick Settings.
- Go to Privacy & Security section.
- Scroll down to locate Cookies and Site Data.
- Click on Clear Data...
- Select Cookies and Site Data and Temporary cached files and pages, then click Clear.


Reset Mozilla Firefox
If clearing the browser as explained above did not help, reset Mozilla Firefox:
- Open Mozilla Firefox browser and click the Menu.
- Go to Help and then choose Troubleshooting Information.

- Under Give Firefox a tune up section, click on Refresh Firefox...
- Once the pop-up shows up, confirm the action by pressing on Refresh Firefox.



Remove from Google Chrome
Delete malicious extensions from Google Chrome:
- Open Google Chrome, click on the Menu (three vertical dots at the top-right corner) and select More tools > Extensions.
- In the newly opened window, you will see all the installed extensions. Uninstall all suspicious extensions related to the unwanted program by clicking Remove.


Clear cache and web data from Chrome:
- Click on Menu and pick Settings.
- Under Privacy and security, select Clear browsing data.
- Select Browsing history, Cookies and other site data, as well as Cached images and files.
- Click Clear data.


Change your homepage:
- Click menu and choose Settings.
- Look for a suspicious site in the On startup section.
- Click on Open a specific or set of pages and click on three dots to find the Remove option.
Reset Google Chrome:
If the previous methods did not help you, reset Google Chrome to eliminate all the unwanted components:
- Click on Menu and select Settings.
- In the Settings, scroll down and click Advanced.
- Scroll down and locate Reset and clean up section.
- Now click Restore settings to their original defaults.
- Confirm with Reset settings.


Delete from Safari
Remove dangerous extensions:
- Open Safari, click Safari in the menu at the top-left of the screen, and select Preferences.
- Go to the Extensions tab, look for any suspicious entries, and click Uninstall to remove them.


Clear history and website data:
- Click Safari in the menu and pick Clear History.
- Set Clear to all history and confirm with Clear History.


Reset Safari:
- Click Safari in the menu and select Preferences > Advanced.
- Enable Show Develop menu in menu bar.
- From the menu bar, click Develop and select Empty Caches.


Did this guide help?
Be the first to comment