

Get to know teracreative: should you be worrying about these ads?
There is a quite a variety of adware-type programs[1] wandering around the Web, and teracreative virus is one of them. This highly irritating and unwanted program is quite nerve-racking for the Internet users since it can also act as a browser hijacker[2]. It often redirects to its affiliated websites: clickus.teracreative.com, 55.teracreative.com, or 41.teracreative.com. Needless to say that these and other websites this suspicious adware can redirect you to might be potentially dangerous. Moreover, the virtual parasite causes multiple pop-ups to appear in front of your screen. Due to such behavior, your browsing and system performance highly deteriorate. Therefore, you should not delay teracreative removal. One of the alternatives is to install FortectIntego and let it do the magic. It is possible to remove this potentially unwanted program (PUP) manually, but it takes more time and can cause a lot of stress to you.
Firstly, let us start with the most prevailing feature of this PUP. The adware causes sponsored commercial offers. Thus, teracreative ads, banners, in-text commercial offers stuff your browser. If you prefer shopping online, you might notice that only subjective advertisements are displayed. In other words, you might be denied the right to see ads of other companies. If you do not prefer shopping online, and advertising is not relevant to you, the surplus of ads might become quite bothersome. Due to the pop-ups, your browser might start acting sluggishly, besides, the speed of the entire computer system processes decreases as well.
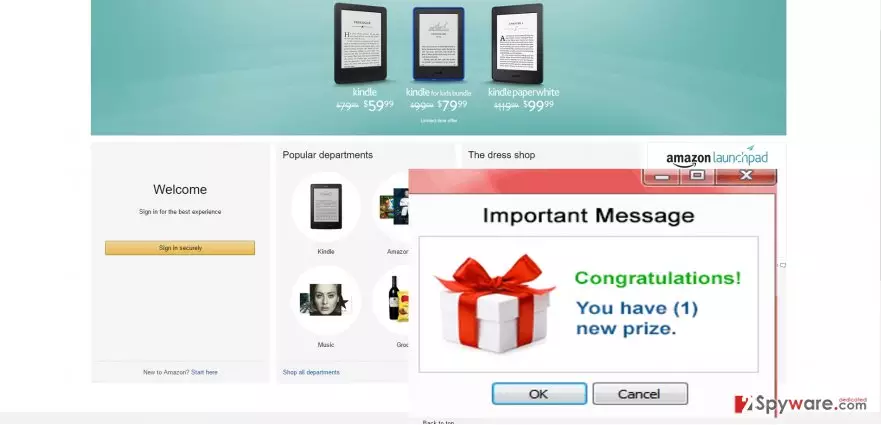
Another distinct feature of the PUP is teracreative redirect problem[3]. Before you reach the wanted website, you might be forced to cancel several redirects to 55.teracreative.com, 41.teracreative.com or similar sites including the trademark title. These web pages might look like legitimate ones, but they can actually be dangerous and lead to various issues regarding the computer system. It is highly recommended to quit websites that 41.teracreative.com virus takes you to, in case you care about your computer’s safety. Despite the fact that some of these sites can be safe, you should not underestimate the danger these redirects pose. In case 41.teracreative.com ads seem interesting to you, remember that they are designed to draw your attention and that you shouldn’t fall for this adware program’s tricks. It is often the case that those websites victims get redirected to might shelter highly damaging viruses. If one of them manages to sneak into your computer, its removal might be quite tiring. That is why you should remove teracreative as soon as possible.
How is this mid-level computer parasite distributed?
If you are wondering how the adware got into your computer, then we will tell you about the strategy to spread adware and similar unwanted applications[4]. This technique enables scammers to cling adware onto frequently downloadable programs. Due to users’ habit not to read the installation instructions, the add-ons are installed along with the primary programs. If you have recently downloaded a new pdf viewer, then, teracreative adware has infiltrated your system the same way. If you are interested in precautions, then take note of these tips. Choose “Custom” installation rather than “Recommended.” Afterward, uncheck all pre-marked attachments. If you follow these recommendations each time you download a new program, you will be able to escape teracreative hijack again.
How to uninstall?
It is not difficult to get rid of this adware. There are mainly two ways to remove teracreative virus. The first option includes automatic Teracreative removal. We highly recommend installing a reputable anti-spyware program[5] since it will not only terminate this adware, but it also protects you against other minor and more serious malware. The second option encompasses manual elimination. We must point out that these ads can be caused by the infamous DNS Unlocker adware, so if you decide to clean your PC manually, you should definitely look for files and components related to this adware. You can remove the threats effectively if you follow each step carefully, Our IT specialists have provided the instructions below so feel free to use them. Lastly, we would like to remind you to remain vigilant while installing new software. Download it only from official sources.
Uninstall from Windows
Uninstall from Windows 10/8:
- Type Control Panel into the Windows search box and open the result.
- Under Programs, select Uninstall a program.


Uninstall from Windows 7/XP:
- Click on Windows Start > Control Panel (Windows XP users should click on Add/Remove Programs).
- In Control Panel, select Programs > Uninstall a program.


Remove the unwanted program:
- In the Programs and Features window, look for any recently installed suspicious entries, select them, and click Uninstall.
- If User Account Control appears, click Yes to confirm, then complete the removal.


Delete from macOS
Remove the unwanted application:
- From the menu bar, select Go > Applications.
- In the Applications folder, look for any suspicious entries, then drag them to Trash (or right-click and pick Move to Trash).


Delete leftover files and folders:
- Select Go > Go to Folder.
- Enter /Library/Application Support and remove any suspicious folders related to the unwanted program.
- Repeat the same check in the /Library/LaunchAgents and /Library/LaunchDaemons folders, deleting any suspicious entries.

- Finally, empty the Trash to permanently remove the leftovers.

Reset Internet Explorer
Remove dangerous add-ons:
- Open Internet Explorer, click on the Gear icon (IE menu) on the top-right corner of the browser
- Pick Manage Add-ons.
- You will see a Manage Add-ons window. Here, look for suspicious plugins. Click on these entries and select Disable.


Change your homepage if it was altered:
- Open IE and click on the Gear icon.
- Select Internet Options.
- In the General tab, delete the Home page address and replace it by your preferred one (for example, Google.com).
- Click Apply and then select OK.


Delete temporary files:
- Press on the Gear icon and select Internet Options.
- Under Browsing history, click Delete...
- Select relevant fields and press Delete.


Reset Internet Explorer:
- Click on Gear icon > Internet options and select Advanced tab.
- Select Reset.
- In the new window, check Delete personal settings and select Reset.


Remove from Microsoft Edge
Delete unwanted extensions from MS Edge:
- Select Menu (three horizontal dots at the top-right of the browser window) and pick Extensions.
- From the list, pick the extension and click on the Gear icon.
- Click Remove.


Clear cookies and other browser data:
- Click on the Menu (three horizontal dots at the top-right of the browser window) and select Settings > Privacy, search, and services..
- Under Clear browsing data, pick Choose what to clear.
- Select Cookies and other site data and Cached images and files. (apart from passwords, although you might want to include Media licenses as well, if applicable) and click on Clear.


Restore new tab and homepage settings:
- Click the menu icon and choose Settings.
- Then find On startup section.
- Click Remove next to any suspicious startup page.
Reset MS Edge if the above steps did not work:
- Press on Ctrl + Shift + Esc to open Task Manager.
- Click on More details arrow at the bottom of the window.
- Select Details tab.
- Now scroll down and locate every entry with Microsoft Edge name in it. Right-click on each of them and select End Task to stop MS Edge from running.


Instructions for Chromium-based Edge
Delete extensions from MS Edge (Chromium):
- Open Edge and click select Settings > Extensions.
- Delete unwanted extensions by clicking Remove.


Clear cache and site data:
- Click on Menu and go to Settings.
- Select Privacy, search and services.
- Under Clear browsing data, pick Choose what to clear.
- Under Time range, pick All time.
- Select Clear now.


Reset Chromium-based MS Edge:
- Click on Menu and select Settings.
- On the left side, pick Reset settings.
- Select Restore settings to their default values.
- Confirm with Reset.
- This will disable extensions and reset startup pages but will not delete bookmarks, saved passwords, or browsing history.


Remove from Mozilla Firefox (FF)
Remove dangerous extensions:
- Open Mozilla Firefox browser and click on the Menu (three horizontal lines at the top-right of the window).
- Select Add-ons.
- In here, select the unwanted extension and click Remove.


Reset the homepage:
- Click three horizontal lines at the top right corner to open the menu.
- Choose Settings.
- Under Home, set your preferred homepage and new tab settings.
Clear cookies and site data:
- Click Menu and pick Settings.
- Go to Privacy & Security section.
- Scroll down to locate Cookies and Site Data.
- Click on Clear Data...
- Select Cookies and Site Data and Temporary cached files and pages, then click Clear.


Reset Mozilla Firefox
If clearing the browser as explained above did not help, reset Mozilla Firefox:
- Open Mozilla Firefox browser and click the Menu.
- Go to Help and then choose Troubleshooting Information.

- Under Give Firefox a tune up section, click on Refresh Firefox...
- Once the pop-up shows up, confirm the action by pressing on Refresh Firefox.



Remove from Google Chrome
Delete malicious extensions from Google Chrome:
- Open Google Chrome, click on the Menu (three vertical dots at the top-right corner) and select More tools > Extensions.
- In the newly opened window, you will see all the installed extensions. Uninstall all suspicious extensions related to the unwanted program by clicking Remove.


Clear cache and web data from Chrome:
- Click on Menu and pick Settings.
- Under Privacy and security, select Clear browsing data.
- Select Browsing history, Cookies and other site data, as well as Cached images and files.
- Click Clear data.


Change your homepage:
- Click menu and choose Settings.
- Look for a suspicious site in the On startup section.
- Click on Open a specific or set of pages and click on three dots to find the Remove option.
Reset Google Chrome:
If the previous methods did not help you, reset Google Chrome to eliminate all the unwanted components:
- Click on Menu and select Settings.
- In the Settings, scroll down and click Advanced.
- Scroll down and locate Reset and clean up section.
- Now click Restore settings to their original defaults.
- Confirm with Reset settings.


Delete from Safari
Remove dangerous extensions:
- Open Safari, click Safari in the menu at the top-left of the screen, and select Preferences.
- Go to the Extensions tab, look for any suspicious entries, and click Uninstall to remove them.


Clear history and website data:
- Click Safari in the menu and pick Clear History.
- Set Clear to all history and confirm with Clear History.


Reset Safari:
- Click Safari in the menu and select Preferences > Advanced.
- Enable Show Develop menu in menu bar.
- From the menu bar, click Develop and select Empty Caches.


Did this guide help?
2 comments
Will
This virus is very disturbing. Had to deal with it automatically. Thanks for the tips.
Patricia
Those pop-ups are really pain in the neck!