

Therecode247.com is a fake site created by scammers that tricks people into subscribing to intrusive push notifications

Therecode247.com is one of the thousands of scam websites that use push notifications to try and trick people into clicking on ads or giving away personal information. However, most people don't remember the name of this page – they recognize it because they see intrusive pop-up ads appearing randomly on their desktops.
Push notifications are foreign to most people because the ads shown on their screens are not something they've seen before. In short, users fall for phishing messages and unknowingly subscribe to push notifications, which begin to show intrusive ads later down the road. Therecode247.com ads may lead to malicious websites where users may disclose their personal information, install malicious software, or waste money on useless services.
| Name | Therecode247.com |
| Type | Push notifications, pop-ups, ads, scam |
| Distribution | Adware could lead to suspicious websites; the activity only starts after users accept the push notification prompt upon site entry |
| Symptoms | Notifications show up at the bottom-right corner of the screen – these include fraudulent content and links to potentially dangerous websites |
| Risks | If you click on links provided by the website, you might end up infecting your system with malware/PUPs, disclosing your personal information to cybercriminals, or losing money for useless services |
| Removal | Push notifications can be stopped by blocking the web address of the malicious website via browser settings. Checking the device with SpyHunterCombo Cleaner security software is also recommended |
| Other checks | We advise scanning the system with FortectIntego to clear browser caches and automatically repair virus damage after removing PUPs and malware |
What is a push notification feature?
Over the past few years, push notifications have increased in popularity, but many users don't understand them. Google Chrome introduced the feature for desktops back in 2015, and other browsers soon followed this trend. Consequently, when visiting almost any website today, you're likely to see a pop-up notification asking if you want to enable push notifications for that site.
Although it offers benefits to both users and website owners, this feature is not well-received by most users because it invades their privacy with unsolicited pop-ups. In other words, people simply don't want to be bothered by notifications that may interrupt the movie they watch or game they play.
According to Mozilla's research from 2019,[1] almost all users did not accept the request to enable push notifications when presented with that opportunity. This does not come as a surprise, as malicious websites can easily abuse the feature and force people to view ads whether they like it or not.
Fake prompts make users subscribe
Users frequently get redirected to Therecode247.com after clicking links on high-risk websites, but this can also happen without user input if there is a script present. Adware might be the root cause behind strange browser behavior as well. In any case, no users access these kind of websites intentionally, which only adds to users' confusion.

As soon as they enter, they are not shown that much – only a small picture and a request correlating with it. For example, you might be shown a picture of a robot and human along with the following message:
Click Allow to confirm that you are not a robot.
It all makes sense logically at the time because users have previously seen similar requests (for example, using captcha is one of the most common practices when it comes to websites defense against the dangerous DDoS[2] cyberattacks.
In other cases, users might be told that their browsers prevent a video from being played, or that there's a free gift to reclaim, and users need to press the “Allow” button to proceed. These techniques are very prevalent among all push notification websites, including Captchaglow.top, Arachidenews.com, Sulseerg.com, and many others.
Removal of Therecode247.com ads
The push notification feature is based on a simple concept: website authors can offer users the ability to allow notifications, and if they agree, any type of information can be sent to their desktop via the browser's API.[3] For this work, users need to have browsers running but don't have to be actively using them.
However, since users see suspicious pop-ups, they often assume that they are dealing with some kind of malware infection. Scanning the system with security software, while beneficial, will not remove Therecode247.com ads, and you have to do that by accessing browser settings as we explain below.
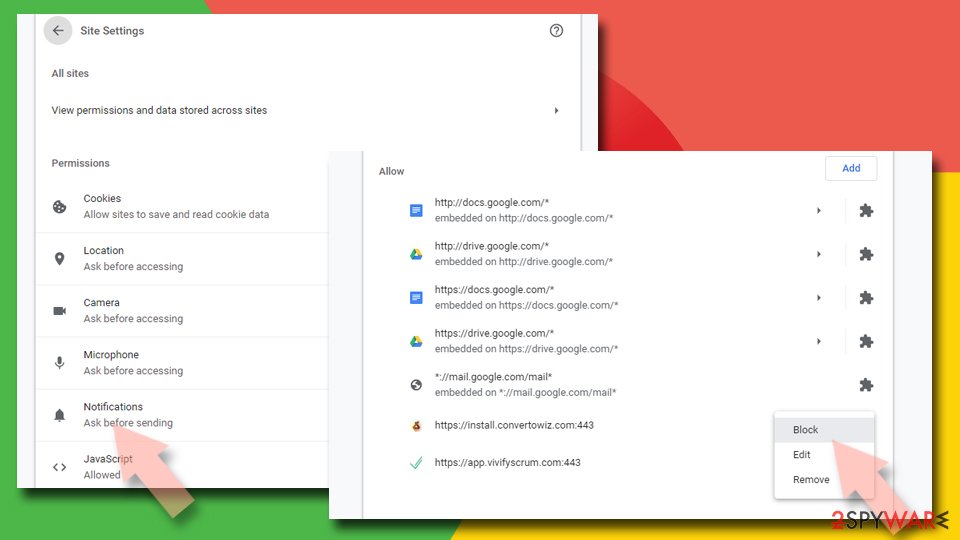
Google Chrome (desktop)
- Open the Google Chrome browser and go to Menu > Settings.
- Scroll down and click on Advanced.
- Locate the Privacy and security section and pick Site Settings > Notifications.
- Look at the Allow section and look for a suspicious URL.
- Click the three vertical dots next to it and pick Block. This should remove unwanted notifications from Google Chrome.

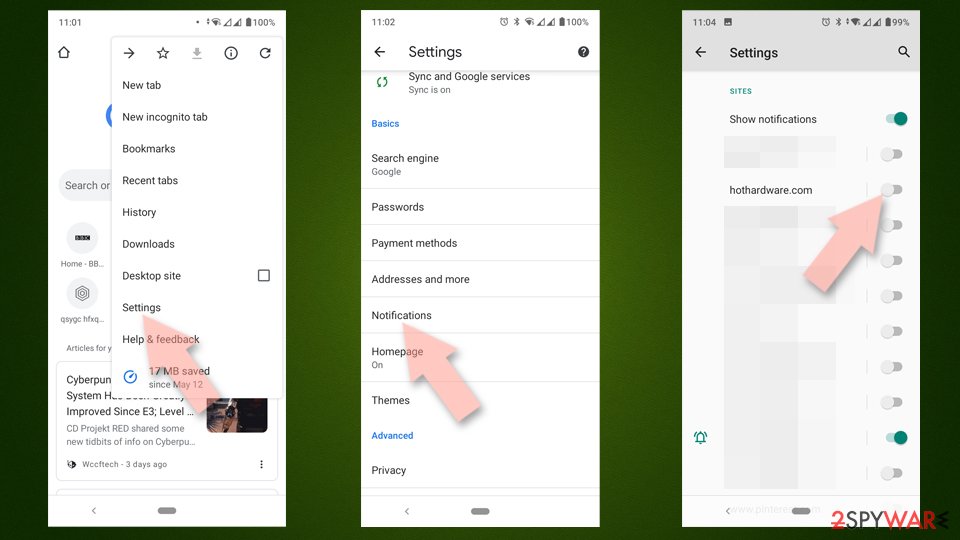
Google Chrome (Android)
- Open Google Chrome and tap on Settings (three vertical dots).
- Select Notifications.
- Scroll down to the Sites section.
- Locate the unwanted URL and toggle the button to the left (Off setting).

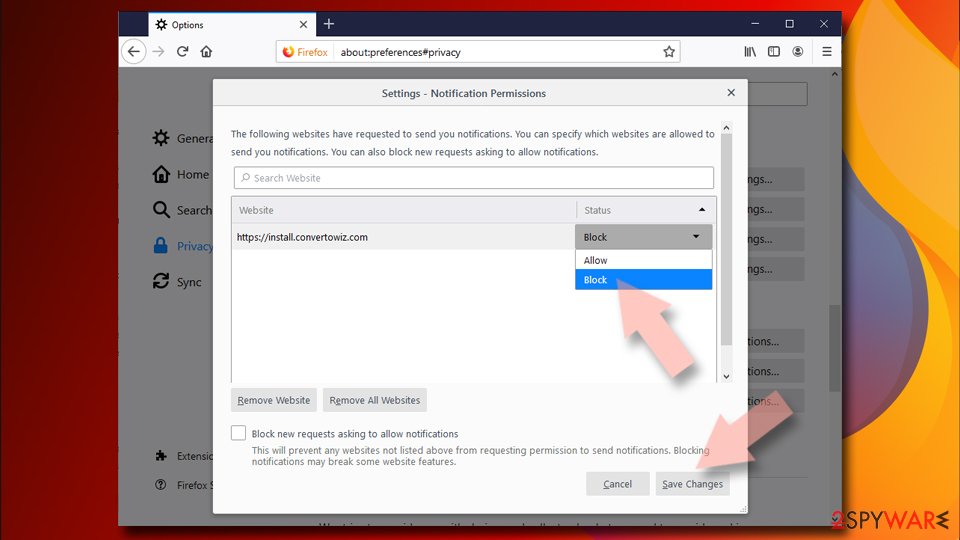
Mozilla Firefox
- Open Mozilla Firefox and go to Menu > Options.
- Click on Privacy & Security section.
- Under Permissions, you should be able to see Notifications. Click the Settings button next to it.
- In the Settings – Notification Permissions window, click on the drop-down menu by the URL in question.
- Select Block and then click on Save Changes. This should remove unwanted notifications from Mozilla Firefox.

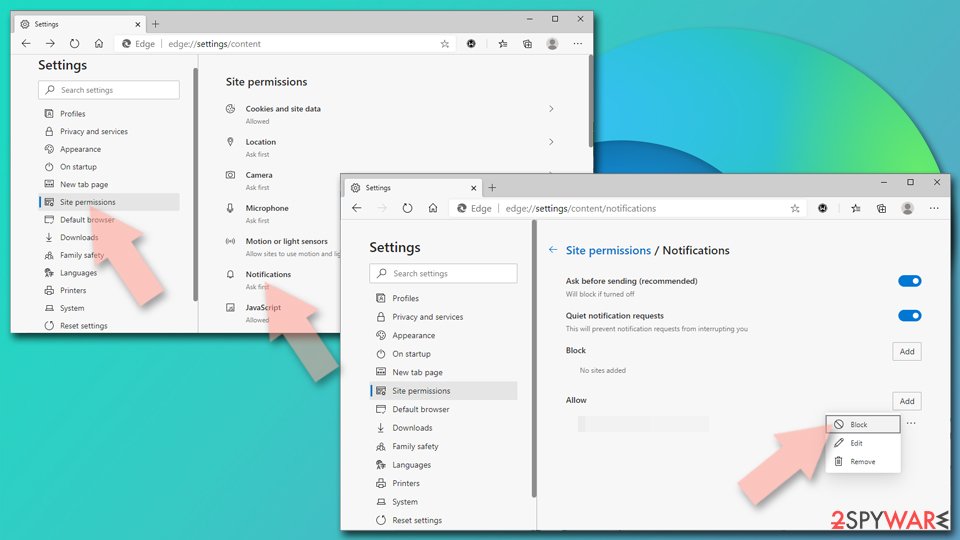
MS Edge (Chromium)
- Open Microsoft Edge, and go to Settings.
- Select Site permissions.
- Go to Notifications on the right.
- Under Allow, you will find the unwanted entry.
- Click on More actions and select Block.

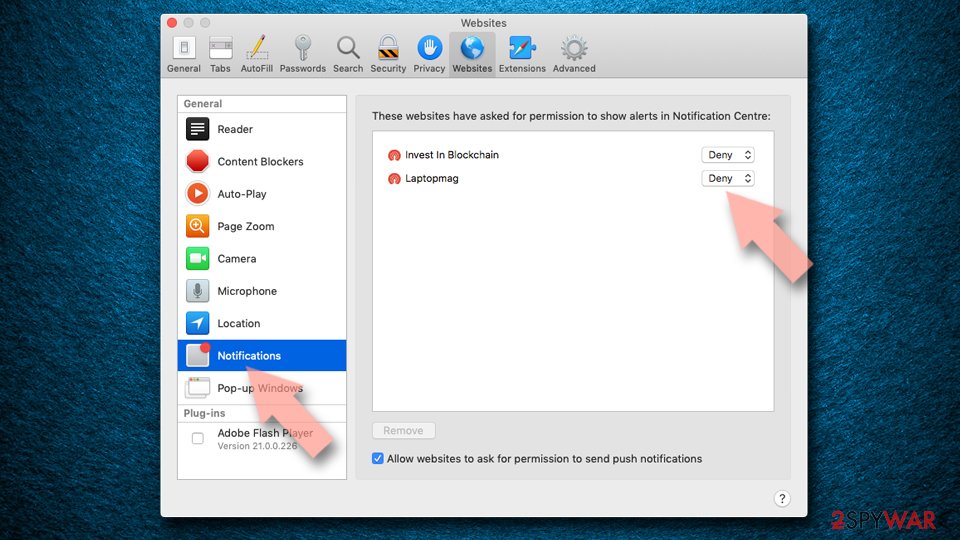
Safari
- Click on Safari > Preferences…
- Go to the Websites tab and, under General, select Notifications.
- Select the web address in question, click the drop-down menu and select Deny.

Internet Explorer
- Open Internet Explorer, and click on the Gear icon at the top-right of the window.
- Select Internet options and go to the Privacy tab.
- In the Pop-up Blocker section, click on Settings.
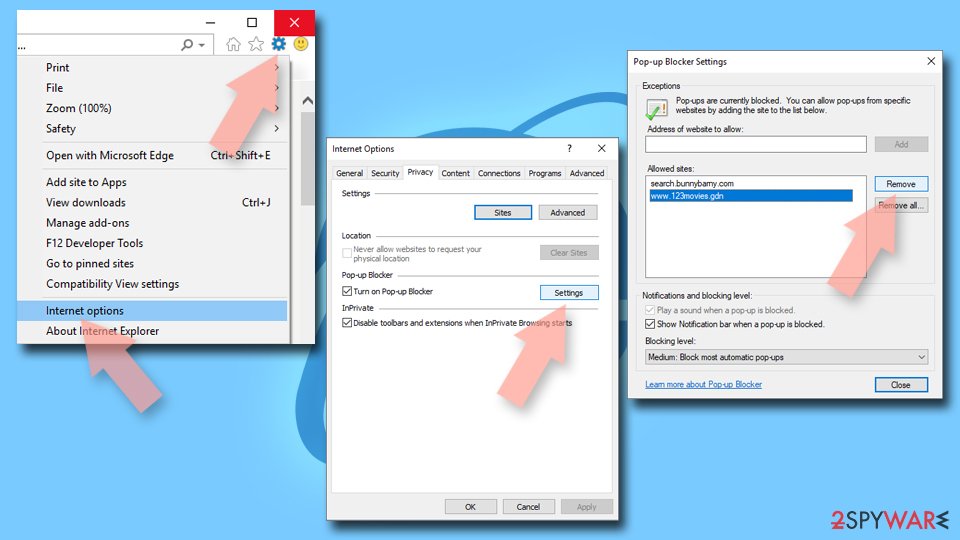
- Locate the web address in question under Allowed sites and pick Remove.

Get rid of adware and other dangerous programs
If you often run into problematic ads and strange messages while browsing the internet, your device might be infected with adware or other malicious software. You can usually uninstall software on the system level or from your browser 4yourself, but some malicious programs might go unnoticed by regular computer users.
We suggest that you scan your system with a reputable anti-malware program, such as SpyHunterCombo Cleaner or MalwarebytesMalwarebytes. If you would prefer to manually remove any threats, please see the instructions below. Additionally, if you want to clear your browser of cookies[2] and other tracking automatically, we recommend using FortectIntego. Not only will this get rid of any leftover malware on your system, but it can also help resolve any stability issues caused by the infection.
Uninstall from Windows
Uninstall from Windows 10/8:
- Type Control Panel into the Windows search box and open the result.
- Under Programs, select Uninstall a program.


Uninstall from Windows 7/XP:
- Click on Windows Start > Control Panel (Windows XP users should click on Add/Remove Programs).
- In Control Panel, select Programs > Uninstall a program.


Remove the unwanted program:
- In the Programs and Features window, look for any recently installed suspicious entries, select them, and click Uninstall.
- If User Account Control appears, click Yes to confirm, then complete the removal.


Delete from macOS
Remove the unwanted application:
- From the menu bar, select Go > Applications.
- In the Applications folder, look for any suspicious entries, then drag them to Trash (or right-click and pick Move to Trash).


Delete leftover files and folders:
- Select Go > Go to Folder.
- Enter /Library/Application Support and remove any suspicious folders related to the unwanted program.
- Repeat the same check in the /Library/LaunchAgents and /Library/LaunchDaemons folders, deleting any suspicious entries.

- Finally, empty the Trash to permanently remove the leftovers.

Remove from Microsoft Edge
Delete unwanted extensions from MS Edge:
- Select Menu (three horizontal dots at the top-right of the browser window) and pick Extensions.
- From the list, pick the extension and click on the Gear icon.
- Click Remove.


Clear cookies and other browser data:
- Click on the Menu (three horizontal dots at the top-right of the browser window) and select Settings > Privacy, search, and services..
- Under Clear browsing data, pick Choose what to clear.
- Select Cookies and other site data and Cached images and files. (apart from passwords, although you might want to include Media licenses as well, if applicable) and click on Clear.


Restore new tab and homepage settings:
- Click the menu icon and choose Settings.
- Then find On startup section.
- Click Remove next to any suspicious startup page.
Reset MS Edge if the above steps did not work:
- Press on Ctrl + Shift + Esc to open Task Manager.
- Click on More details arrow at the bottom of the window.
- Select Details tab.
- Now scroll down and locate every entry with Microsoft Edge name in it. Right-click on each of them and select End Task to stop MS Edge from running.


Instructions for Chromium-based Edge
Delete extensions from MS Edge (Chromium):
- Open Edge and click select Settings > Extensions.
- Delete unwanted extensions by clicking Remove.


Clear cache and site data:
- Click on Menu and go to Settings.
- Select Privacy, search and services.
- Under Clear browsing data, pick Choose what to clear.
- Under Time range, pick All time.
- Select Clear now.


Reset Chromium-based MS Edge:
- Click on Menu and select Settings.
- On the left side, pick Reset settings.
- Select Restore settings to their default values.
- Confirm with Reset.
- This will disable extensions and reset startup pages but will not delete bookmarks, saved passwords, or browsing history.


Remove from Mozilla Firefox (FF)
Remove dangerous extensions:
- Open Mozilla Firefox browser and click on the Menu (three horizontal lines at the top-right of the window).
- Select Add-ons.
- In here, select the unwanted extension and click Remove.


Reset the homepage:
- Click three horizontal lines at the top right corner to open the menu.
- Choose Settings.
- Under Home, set your preferred homepage and new tab settings.
Clear cookies and site data:
- Click Menu and pick Settings.
- Go to Privacy & Security section.
- Scroll down to locate Cookies and Site Data.
- Click on Clear Data...
- Select Cookies and Site Data and Temporary cached files and pages, then click Clear.


Reset Mozilla Firefox
If clearing the browser as explained above did not help, reset Mozilla Firefox:
- Open Mozilla Firefox browser and click the Menu.
- Go to Help and then choose Troubleshooting Information.

- Under Give Firefox a tune up section, click on Refresh Firefox...
- Once the pop-up shows up, confirm the action by pressing on Refresh Firefox.



Remove from Google Chrome
Delete malicious extensions from Google Chrome:
- Open Google Chrome, click on the Menu (three vertical dots at the top-right corner) and select More tools > Extensions.
- In the newly opened window, you will see all the installed extensions. Uninstall all suspicious extensions related to the unwanted program by clicking Remove.


Clear cache and web data from Chrome:
- Click on Menu and pick Settings.
- Under Privacy and security, select Clear browsing data.
- Select Browsing history, Cookies and other site data, as well as Cached images and files.
- Click Clear data.


Change your homepage:
- Click menu and choose Settings.
- Look for a suspicious site in the On startup section.
- Click on Open a specific or set of pages and click on three dots to find the Remove option.
Reset Google Chrome:
If the previous methods did not help you, reset Google Chrome to eliminate all the unwanted components:
- Click on Menu and select Settings.
- In the Settings, scroll down and click Advanced.
- Scroll down and locate Reset and clean up section.
- Now click Restore settings to their original defaults.
- Confirm with Reset settings.


Delete from Safari
Remove dangerous extensions:
- Open Safari, click Safari in the menu at the top-left of the screen, and select Preferences.
- Go to the Extensions tab, look for any suspicious entries, and click Uninstall to remove them.


Clear history and website data:
- Click Safari in the menu and pick Clear History.
- Set Clear to all history and confirm with Clear History.


Reset Safari:
- Click Safari in the menu and select Preferences > Advanced.
- Enable Show Develop menu in menu bar.
- From the menu bar, click Develop and select Empty Caches.


Did this guide help?
Be the first to comment