

Internet Security Alert – scam used to trick users into contacting the alleged Windows technical support
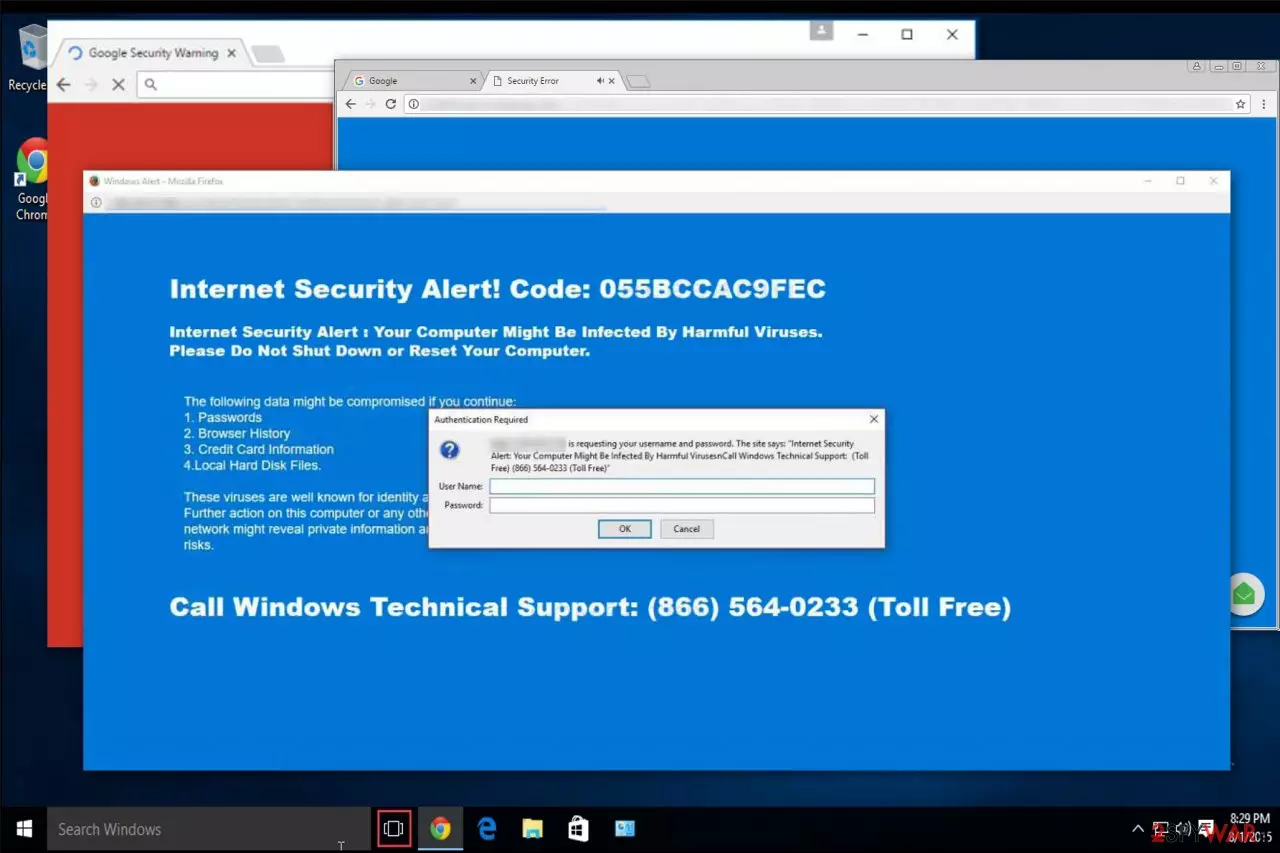
Internet Security Alert is a tech support scam that you can encounter at any time while browsing the internet. While some people might face the misleading page accidentally, users who see it continuously are most likely have their PCs infected with adware. Ad-supported software is designed to show users ads, some of which might be of dubious or even malicious nature.
Also known as Code 055BCCAC9FEC, the virus tries to make victims believe that their machines are infected with “harmful viruses” and sensitive information like passwords and credit card details might be stolen. Of course, this is not true, as no virus warnings would occur on users' browsers. There are several variations of this hoax, but most appear on a blue background with a pop-up, while some versions, are shown in bright red to scare users even more.
| Name | Internet Security Alert |
|---|---|
| Alternatively known | Code: 055BCCAC9FEC |
| Type | Adware, tech support scam |
| Colors of the fake alert | Navy blue and red screen |
| The most affected browsers | Chrome, Firefox, Edge |
| The main idea of the scam |
|
| Main risks | Revealing personal information, letting cybercriminals access to your computer system, downloading malware, paying for useless services or software. |
| Removal | Sometimes it is hard to eliminate adware from the system because it hides under different names. The easiest way to find it – using a professional tool, like FortectIntego |
Usually, the scam message shows up on Windows or Mac to trick users into dialing the special number and then asking them to provide the remote access to their computer. It uses a red color and says that this service is going to fix the critical “error” on the victim's computer. At this point, we want to assure you that scammers who are working behind this scam should never get access to your computer system.
The scam[1] also states that your personal data, like passwords, bank account details or local hard disk files might be compromised. However, such alerts have no possibility to check the system, so you can be sure that adware is the only problem you have. Even though the message claims the alert is related to Windows Technical Support group, do not call use (866) 564-0233 telephone number to fix the “problem.”[2]
Sometimes the scam page uses audio voice to scare its victims even more. The message used for that states the following:
Internet Security Alert! Code: 055BCCAC9FEC
Your computer might be infected by harmful viruses. Please do not shut down or reset your computer.
The following data might be compromised if you continue:
1. Passwords
2. Browser History
3. Credit Card information
4. Local Hard Disk Files.Call Windows Technical Support: (866) 564-0233 (Toll Free)

Beware that the malicious message on Mac or Windows is designed to promote the fake security software or deceive you into giving personal information to swindle money and generate revenue. Various suspicious websites may redirect you to such an “alert” since they distribute rogue ads and pop-ups. Even accidental clicks may be the reason why the malware infected your computer.
Be aware that Microsoft Windows neither display alerts about possible threads of your computer, nor publish their technical support number elsewhere than on their official website. Thus do not be deceived by this scam and instead of agreeing to purchase unreliable security application or submit personal information, we encourage you to scan your computer using security software to ensure that no adware is present on it. Additionally, we suggest you used FortectIntego to restore Windows Registry which might have been altered due to the infection.
In addition, the described scam pop-up is very similar to other deceptive messages that cybercriminals compose to trick unsuspecting users into calling fraudsters. One of the most prevalent ones, according to Usunwirusa.pl team[3], are “Microsoft System Security Alert” and “Windows Security Alert.” Make sure you get rid of them by eliminating related adware right after you start seeing them. To remove adware from Microsoft Edge, Chrome, or other web browsers, check recently installed freeware and remove suspicious entries. Additionally, you should reset your web browsers to eliminate any modifications made by criminals.
Red Screen used to deceive Google Chrome users
Red Screen Internet Security alert is a variant of the scam that appears in the red-colored window and uses the same misleading techniques to scare its victims. There is barely any difference from the original fake warning. However, users may encounter two different pop-ups that accompany the scam.
The red color is known to be the one to makes people worried, so scammers opted for it to make them automatically assume that something is wrong. It is a clever psychological trick used by cybercrooks. Additionally, Red Screen alert is using scare tactics by claiming that personal information might be leaked if the PC is restarted. Having in mind numerous data leaks and breaches, there is no surprise that people are convinced into contacting hackers via the given phone number.

As usual, this is just a hoax and should not be trusted. While most users are already aware of Red Screen Internet Security alert and similar scams,[4] there as still thousands of less computer-savvy individuals who most likely will call the number. Bad actors may, and most likely will do the following once contacted:
- Will speak in technical terms to confuse the user even more
- Will try to convince that the machine is heavily infected and needs fixing using dodgy software that they promote
- Will ask for remote access, steal personal information, or install data-tracking malware on the device
- Will prolong the conversation due to a premium number
Thus, do not be a victim of a scam – scan your machine with anti-malware tools or get rid of the PUP using our guide below. If you encountered this scam, remove Red Screen adwaret before it starts redirecting you to malicious sites. Simply close down your browser and make sure that recently opened tabs do not show up again. Next, check the system with security software to see if it infected and get rid of detected malware.
Malicious websites can trigger an installation of adware
The developers typically make considerable investments to design appealing advertisements and attract naive computer users into clicking it.
Malicious ads usually promote:
- Shopping coupons;
- Gambling sites;
- Adult dating websites;
- Unknown their party software or plug-ins.
Once the user clicks the ad, it may redirect to websites promoting malicious content or even trigger an installation of another high-risk malware. Thus, if you encounter various redirects to less than reliable pages, immediately leave the site and avoid clicking on ads in the future.
Besides, if your computer is infected with this adware, it may stealthily download other potentially unwanted programs (PUPs) or plug-ins and collect browsing-related data, such as (IP address or geolocation) and use it in designing more attractive advertisements or the ones related to your interests.
Tips to avoid being scammed online

- Keep your security software regularly updated in order to eliminate vulnerabilities that hacker use to develop various types of adware, malware, spyware, etc.;
- Never submit your credit card or bank account details;
- Avoid clicking malicious ads and never agree to install plug-ins from unrecognized developers;
- Download applications only from verified distributors and use the direct link if possible;
- Never skip steps of download/installation process since some of the potentially unwanted programs are hidden among the “optional components” of regular applications;
Adware removal instructions
To remove Internet Security Alert virus, you can choose between two options — manual and automatic removal. However, our IT professionals highly recommend using automatic removal with security software since your computer might be infected with other malicious programs you are not aware of.
To find all suspicious components and get rid of the fake popup for good, you should run a full system scan with updated anti-spyware. Of course, don't forget to choose a reliable security program and download it from verified distributors.
Remember, cybercriminals are offering useless or over-priced security applications, so you should never trust them. Besides, they can infect your computer with malware after tricking you into thinking that the alert is real. Yet, if you have already been tricked into downloading or purchasing one, contact your bank immediately and inform about an unauthorized transaction.
If you are considering opting for manual adware removal option, use the following steps. Make sure you are very attentive while following them because, after the removal of useful system files, you may lead your computer to additional problems.
Uninstall from Windows
Uninstall from Windows 10/8:
- Type Control Panel into the Windows search box and open the result.
- Under Programs, select Uninstall a program.


Uninstall from Windows 7/XP:
- Click on Windows Start > Control Panel (Windows XP users should click on Add/Remove Programs).
- In Control Panel, select Programs > Uninstall a program.


Remove the unwanted program:
- In the Programs and Features window, look for any recently installed suspicious entries, select them, and click Uninstall.
- If User Account Control appears, click Yes to confirm, then complete the removal.


Delete from macOS
Remove the unwanted application:
- From the menu bar, select Go > Applications.
- In the Applications folder, look for any suspicious entries, then drag them to Trash (or right-click and pick Move to Trash).


Delete leftover files and folders:
- Select Go > Go to Folder.
- Enter /Library/Application Support and remove any suspicious folders related to the unwanted program.
- Repeat the same check in the /Library/LaunchAgents and /Library/LaunchDaemons folders, deleting any suspicious entries.

- Finally, empty the Trash to permanently remove the leftovers.

Remove from Microsoft Edge
Delete unwanted extensions from MS Edge:
- Select Menu (three horizontal dots at the top-right of the browser window) and pick Extensions.
- From the list, pick the extension and click on the Gear icon.
- Click Remove.


Clear cookies and other browser data:
- Click on the Menu (three horizontal dots at the top-right of the browser window) and select Settings > Privacy, search, and services..
- Under Clear browsing data, pick Choose what to clear.
- Select Cookies and other site data and Cached images and files. (apart from passwords, although you might want to include Media licenses as well, if applicable) and click on Clear.


Restore new tab and homepage settings:
- Click the menu icon and choose Settings.
- Then find On startup section.
- Click Remove next to any suspicious startup page.
Reset MS Edge if the above steps did not work:
- Press on Ctrl + Shift + Esc to open Task Manager.
- Click on More details arrow at the bottom of the window.
- Select Details tab.
- Now scroll down and locate every entry with Microsoft Edge name in it. Right-click on each of them and select End Task to stop MS Edge from running.


Instructions for Chromium-based Edge
Delete extensions from MS Edge (Chromium):
- Open Edge and click select Settings > Extensions.
- Delete unwanted extensions by clicking Remove.


Clear cache and site data:
- Click on Menu and go to Settings.
- Select Privacy, search and services.
- Under Clear browsing data, pick Choose what to clear.
- Under Time range, pick All time.
- Select Clear now.


Reset Chromium-based MS Edge:
- Click on Menu and select Settings.
- On the left side, pick Reset settings.
- Select Restore settings to their default values.
- Confirm with Reset.
- This will disable extensions and reset startup pages but will not delete bookmarks, saved passwords, or browsing history.


Remove from Mozilla Firefox (FF)
Remove dangerous extensions:
- Open Mozilla Firefox browser and click on the Menu (three horizontal lines at the top-right of the window).
- Select Add-ons.
- In here, select the unwanted extension and click Remove.


Reset the homepage:
- Click three horizontal lines at the top right corner to open the menu.
- Choose Settings.
- Under Home, set your preferred homepage and new tab settings.
Clear cookies and site data:
- Click Menu and pick Settings.
- Go to Privacy & Security section.
- Scroll down to locate Cookies and Site Data.
- Click on Clear Data...
- Select Cookies and Site Data and Temporary cached files and pages, then click Clear.


Reset Mozilla Firefox
If clearing the browser as explained above did not help, reset Mozilla Firefox:
- Open Mozilla Firefox browser and click the Menu.
- Go to Help and then choose Troubleshooting Information.

- Under Give Firefox a tune up section, click on Refresh Firefox...
- Once the pop-up shows up, confirm the action by pressing on Refresh Firefox.



Remove from Google Chrome
Delete malicious extensions from Google Chrome:
- Open Google Chrome, click on the Menu (three vertical dots at the top-right corner) and select More tools > Extensions.
- In the newly opened window, you will see all the installed extensions. Uninstall all suspicious extensions related to the unwanted program by clicking Remove.


Clear cache and web data from Chrome:
- Click on Menu and pick Settings.
- Under Privacy and security, select Clear browsing data.
- Select Browsing history, Cookies and other site data, as well as Cached images and files.
- Click Clear data.


Change your homepage:
- Click menu and choose Settings.
- Look for a suspicious site in the On startup section.
- Click on Open a specific or set of pages and click on three dots to find the Remove option.
Reset Google Chrome:
If the previous methods did not help you, reset Google Chrome to eliminate all the unwanted components:
- Click on Menu and select Settings.
- In the Settings, scroll down and click Advanced.
- Scroll down and locate Reset and clean up section.
- Now click Restore settings to their original defaults.
- Confirm with Reset settings.


Delete from Safari
Remove dangerous extensions:
- Open Safari, click Safari in the menu at the top-left of the screen, and select Preferences.
- Go to the Extensions tab, look for any suspicious entries, and click Uninstall to remove them.


Clear history and website data:
- Click Safari in the menu and pick Clear History.
- Set Clear to all history and confirm with Clear History.


Reset Safari:
- Click Safari in the menu and select Preferences > Advanced.
- Enable Show Develop menu in menu bar.
- From the menu bar, click Develop and select Empty Caches.


Did this guide help?
Be the first to comment