

Jecromaha.info ads might include links to malicious websites
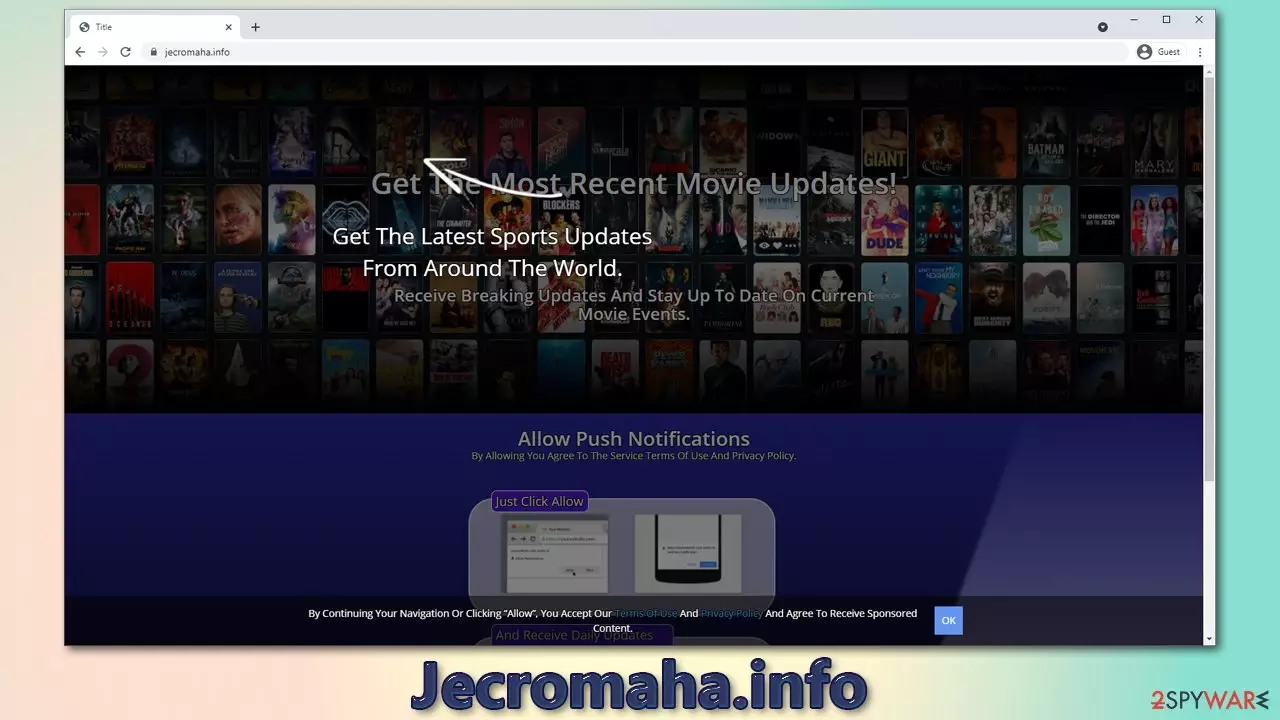
While the overall safety of web browsing has been drastically improved over the years, there are plenty of sites that are created for the sole purpose of manipulating and scamming users into doing something they normally wouldn't. Jecromaha.info is a website that can not be considered useful or even secure – mainly because it uses fraud to make users subscribe for push notifications. Many users to this day don't understand how push notifications work, and this simple fact is really easy to abuse.
Upon the Jecromaha.info website entry, visitors are recommended to press the “Allow” button to “Get the most recent movie updates.” The page has otherwise no other substance, i.e., there are no “updates” or “news” there. The sole purpose of it is to acquire permission from users to send them pop-ups. Unfortunately, many users do get tricked and then are forced to see intrusive push notifications from the site on a regular basis.
Not only is the activity disruptive, but it might also be quite dangerous. By permitting the notifications to be shown, users might receive links that lead to malicious websites. It is extremely important not to browse these sites, as you might be tricked into exposing your sensitive details to cybercriminals or downloading malware/potentially unwanted programs.
| Name | Jecromaha.info |
|---|---|
| Type | Push notifications, scam, ads |
| IP address | 107.22.28.167 |
| Distribution | The intrusive push notifications show up as soon as the “Allow” button is pressed |
| Symptoms | You may start seeing intrusive pop-ups on your desktop – clicking these may lead to insecure or even malicious websites |
| Risks | Clicking on links that are embedded within the notification prompt, navigating the sites these links bring to or downloading files can be very dangerous. This can result in malware infections, financial losses or privacy issues |
| Elimination | To prevent the site from displaying notifications to you, access the site permission section via your web browser settings – you can find more details below |
| Further steps | Redirects and ads might indicate adware infection, so you should check your system with anti-malware, clean your browsers, and attempt to fix virus damage with a repair tool FortectIntego |
Push notification scams are extremely common and often lead to users subscribing to several websites due to several redirects that they might experience. We have previously discussed Zationtothe.online, News-tabiva.cc, Start-xyz.com, and many others that are practically identical and operate in a similar way. In this article, we will discuss how to remove the annoying ads and ways to prevent being a victim of the scam in the future.
Why am I seeing Jecromaha.info?
It is evident that users do not visit the page intentionally – they are rather redirected from another website. In most cases, this happens after visiting sites of dubious origin. Commonly they lack security implementations and allow various actors to insert malicious ads, scripts, or other content.[1] Visitors are then tricked into clicking on a fake button or might be redirected automatically[2] until they land on Jecromaha.info or another suspicious page.
If that happens to you, please do not click on links or download content on the websites you get redirected to. All you have to do is leave the site immediately – simply press the “X” on your current browser tab. If you do engage with the content on such websites, you might be a victim of further scams or malware infections.
Another reason you might see redirects to suspicious websites is adware[3] infection. Initially, this type of software used to be called spyware due to its excessive data tracking practices. While this trait has been diminished over time, adware is still considered generally undesirable software that focuses on ad delivery and collects information about users to profit from targeted advertising.

To make matters worse, adware is also commonly distributed unfairly, so people might not even know that they have one of such apps installed on their system. Alternatively, a seemingly useful app or browser extension might go rogue after a while. Thus, if you see an increased amount of URL redirects, pop-ups, in-text links, banners, and other intrusive content, you should check your system for potentially unwanted programs.
The easiest way to tackle adware is by performing a full system scan with powerful anti-malware software such as SpyHunterCombo Cleaner. Security software is initially very beneficial to any user's online safety, so you should ensure that it is running all the time while you are using your computer. It can not only warn you about PUPs but also prevent ransomware, trojans, and other dangerous software from entering your device.
Alternatively, you can also look for adware yourself – simply access Control Panel (Windows) or Applications folder and uninstall it. If you need further instructions, follow these steps:
Windows
- Enter Control Panel into Windows search box and hit Enter or click on the search result.
- Under Programs, select Uninstall a program.
- From the list, find the entry of the suspicious program.
- Right-click on the application and select Uninstall.
- If User Account Control shows up, click Yes.
- Wait till uninstallation process is complete and click OK.


Mac
- From the menu bar, select Go > Applications.
- In the Applications folder, look for all related entries.
- Click on the app and drag it to Trash (or right-click and pick Move to Trash)
To fully remove an unwanted app, you need to access Application Support, LaunchAgents, and LaunchDaemons folders and delete relevant files:
- Select Go > Go to Folder.
- Enter /Library/Application Support and click Go or press Enter.
- In the Application Support folder, look for any dubious entries and then delete them.
- Now enter /Library/LaunchAgents and /Library/LaunchDaemons folders the same way and terminate all the related .plist files.


Keep in mind that adware can be installed as an extension within your browser, so don't forget to check that area too. Cleaning your web browser's cache and web data is also important adware the elimination of unwanted software to prevent further tracking and ensure the ads won't return. If you want to do that manually, you can check the instructions we provide at the bottom of this post, although you can do it much quicker and more efficiently with FortectIntego repair and maintenance utility.
What is a push notification feature?
While it might not be apparent to many people, push notifications are not initially malicious. They are often employed by various websites, and visitors are free to accept or decline them. If they agree (by pressing the “Allow” button), they give the site permission to send them the push notifications at any time, even if the browser is only running in the background.
Even though some users might find it useful and subscribe to notifications from particular sites, the majority of visitors decline this offer immediately. Besides, they find it annoying, as it is simply another step into accessing the website without having annoying pop-ups around.
In the meantime, crooks realized that push notifications could be used to send ads within these prompts. What makes it a perfect opportunity to expose users to these advertisements is that they are shown on the system level, regardless of which website is currency accessed. As a result, many don't know how to remove these push notifications. Below you can find detailed steps on how to remove them easily.
Jecromaha.info pop-up removal instructions
Many users complain that, after they scan their computers with anti-malware, the annoying pop-ups do not go away. This is understandable because many believe that push notifications are the same as pop-up ads, which is not the case. Pop-ups are generally considered (smaller) browser windows that show up as soon as you click on a deceptive link or visit a website that chooses to show you them.
This is why many wrongly perceive that they can remove notifications with security software. If you have tried that and it didn't work (if you haven't scanned your PC with anti-malware yet, you should definitely do it regardless), you shouldn't worry. You can deny permission for a website to show you notifications as follows:
Chrome
- Open Google Chrome browser and go to Menu > Settings.
- Scroll down and click on Advanced.
- Locate Privacy and security section and pick Site Settings > Notifications.
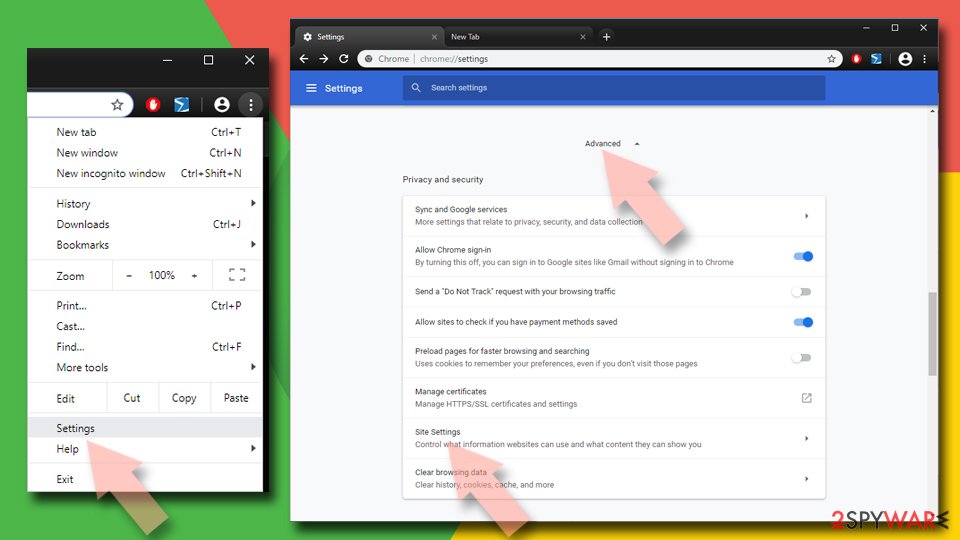

- Look at the Allow section and look for a suspicious URL.
- Click the three vertical dots next to it and pick Block. This should remove unwanted notifications from Google Chrome.
Mozilla Firefox
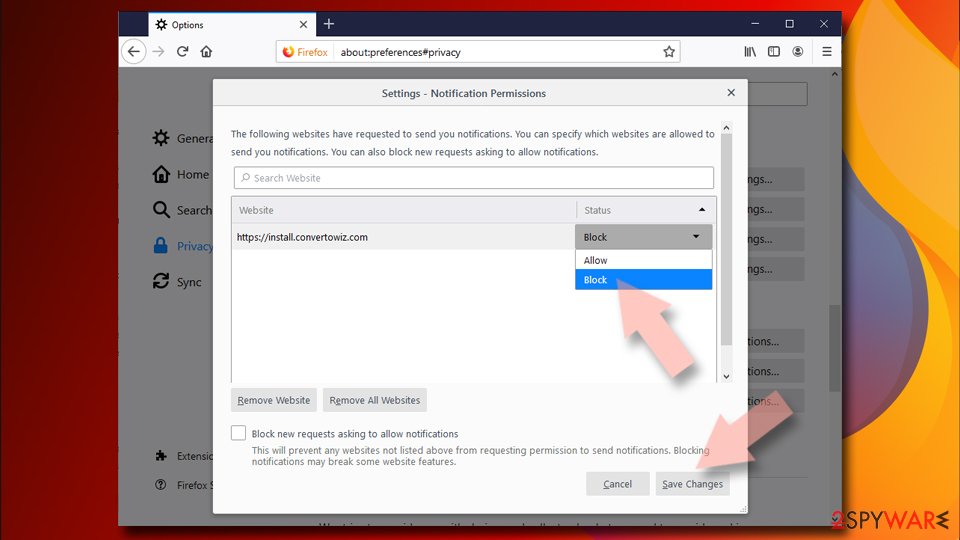
- Open Mozilla Firefox and go to Menu > Options.
- Click on Privacy & Security section.
- Under Permissions, you should be able to see Notifications. Click Settings button next to it.
- In the Settings – Notification Permissions window, click on the drop-down menu by the URL in question.
- Select Block and then click on Save Changes. This should remove unwanted notifications from Mozilla Firefox.

MS Edge (Chromium)
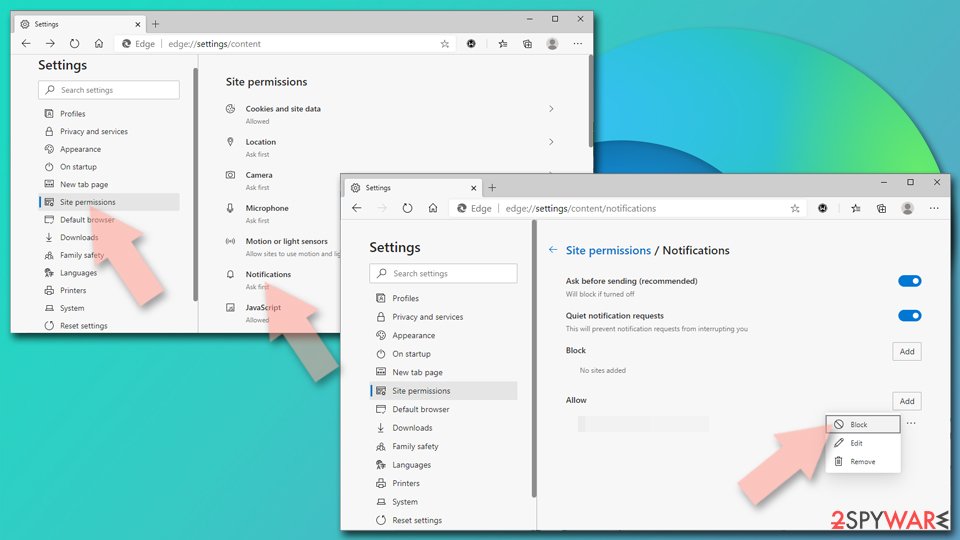
- Open Microsoft Edge, and go to Settings.
- Select Site permissions.
- Go to Notifications on the right.
- Under Allow, you will find the unwanted entry.
- Click on More actions and select Block.

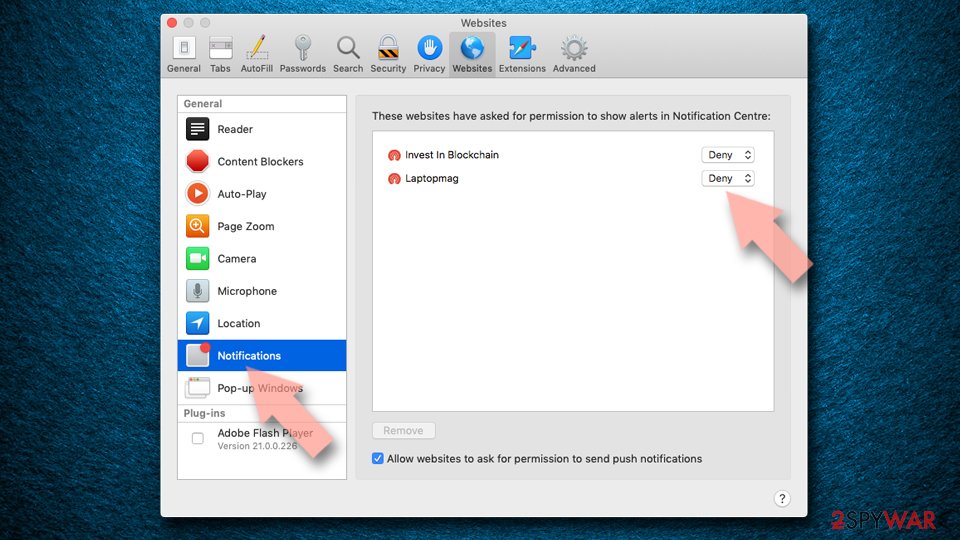
Safari
- Click on Safari > Preferences…
- Go to Websites tab and, under General, select Notifications.
- Select the web address in question, click the drop-down menu and select Deny.

Remove from Microsoft Edge
Delete unwanted extensions from MS Edge:
- Select Menu (three horizontal dots at the top-right of the browser window) and pick Extensions.
- From the list, pick the extension and click on the Gear icon.
- Click Remove.


Clear cookies and other browser data:
- Click on the Menu (three horizontal dots at the top-right of the browser window) and select Settings > Privacy, search, and services..
- Under Clear browsing data, pick Choose what to clear.
- Select Cookies and other site data and Cached images and files. (apart from passwords, although you might want to include Media licenses as well, if applicable) and click on Clear.


Restore new tab and homepage settings:
- Click the menu icon and choose Settings.
- Then find On startup section.
- Click Remove next to any suspicious startup page.
Reset MS Edge if the above steps did not work:
- Press on Ctrl + Shift + Esc to open Task Manager.
- Click on More details arrow at the bottom of the window.
- Select Details tab.
- Now scroll down and locate every entry with Microsoft Edge name in it. Right-click on each of them and select End Task to stop MS Edge from running.


Instructions for Chromium-based Edge
Delete extensions from MS Edge (Chromium):
- Open Edge and click select Settings > Extensions.
- Delete unwanted extensions by clicking Remove.


Clear cache and site data:
- Click on Menu and go to Settings.
- Select Privacy, search and services.
- Under Clear browsing data, pick Choose what to clear.
- Under Time range, pick All time.
- Select Clear now.


Reset Chromium-based MS Edge:
- Click on Menu and select Settings.
- On the left side, pick Reset settings.
- Select Restore settings to their default values.
- Confirm with Reset.
- This will disable extensions and reset startup pages but will not delete bookmarks, saved passwords, or browsing history.


Remove from Mozilla Firefox (FF)
Remove dangerous extensions:
- Open Mozilla Firefox browser and click on the Menu (three horizontal lines at the top-right of the window).
- Select Add-ons.
- In here, select the unwanted extension and click Remove.


Reset the homepage:
- Click three horizontal lines at the top right corner to open the menu.
- Choose Settings.
- Under Home, set your preferred homepage and new tab settings.
Clear cookies and site data:
- Click Menu and pick Settings.
- Go to Privacy & Security section.
- Scroll down to locate Cookies and Site Data.
- Click on Clear Data...
- Select Cookies and Site Data and Temporary cached files and pages, then click Clear.


Reset Mozilla Firefox
If clearing the browser as explained above did not help, reset Mozilla Firefox:
- Open Mozilla Firefox browser and click the Menu.
- Go to Help and then choose Troubleshooting Information.

- Under Give Firefox a tune up section, click on Refresh Firefox...
- Once the pop-up shows up, confirm the action by pressing on Refresh Firefox.



Remove from Google Chrome
Delete malicious extensions from Google Chrome:
- Open Google Chrome, click on the Menu (three vertical dots at the top-right corner) and select More tools > Extensions.
- In the newly opened window, you will see all the installed extensions. Uninstall all suspicious extensions related to the unwanted program by clicking Remove.


Clear cache and web data from Chrome:
- Click on Menu and pick Settings.
- Under Privacy and security, select Clear browsing data.
- Select Browsing history, Cookies and other site data, as well as Cached images and files.
- Click Clear data.


Change your homepage:
- Click menu and choose Settings.
- Look for a suspicious site in the On startup section.
- Click on Open a specific or set of pages and click on three dots to find the Remove option.
Reset Google Chrome:
If the previous methods did not help you, reset Google Chrome to eliminate all the unwanted components:
- Click on Menu and select Settings.
- In the Settings, scroll down and click Advanced.
- Scroll down and locate Reset and clean up section.
- Now click Restore settings to their original defaults.
- Confirm with Reset settings.


Delete from Safari
Remove dangerous extensions:
- Open Safari, click Safari in the menu at the top-left of the screen, and select Preferences.
- Go to the Extensions tab, look for any suspicious entries, and click Uninstall to remove them.


Clear history and website data:
- Click Safari in the menu and pick Clear History.
- Set Clear to all history and confirm with Clear History.


Reset Safari:
- Click Safari in the menu and select Preferences > Advanced.
- Enable Show Develop menu in menu bar.
- From the menu bar, click Develop and select Empty Caches.


Did this guide help?
Be the first to comment