
Facebook Suspension virus: what the message is and how to remove the risk
The Facebook Suspension "virus" is a phishing e-mail that says your Page broke the Terms of Service and asks you to verify through a link. Delete it and report it; only if you clicked or typed something do you need to secure your Facebook account.
Facts checked October 5, 2026. Removal steps tested on Windows 11 (26H2) and checked against Microsoft's and the browser makers' current documentation.
Automatic
Get a free scan and check if your PC is infected.
Fortect finds malware, unwanted programs and the Windows damage they leave behind, and repairs it in one pass.
Do it yourself · free Remove Facebook Suspension virus yourself 4 steps, about 12 minutes, no software needed.
Start the steps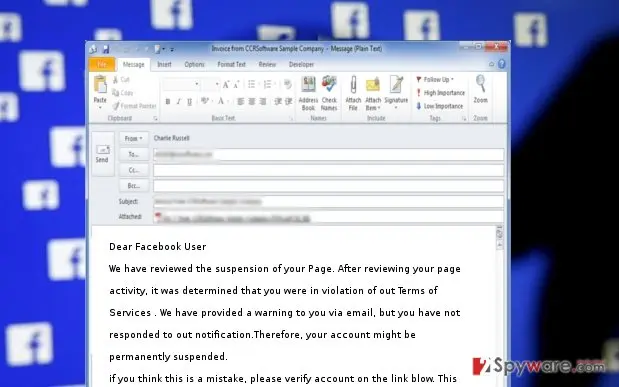
Facebook Suspension virus: summary
| Type | Phishing e-mail posing as Facebook's security team; not a virus |
|---|---|
| Risk | High if you type your password on the linked page: the account can be taken over. Reading the e-mail alone is harmless |
| Symptoms | An e-mail saying your Page was reviewed for a Terms of Service violation and may be permanently suspended, with a "verify account" link |
| How to get rid of it | Delete and report the e-mail. If you clicked or typed anything, report the account at facebook.com/hacked, reset the password and sign out unknown devices; see the plan |
| Our check | Source check on 5 October 2026: the sender's domain is not registered now; we did not open the link, so what its page does is unconfirmed |
| First seen | Our report of 26 August 2016; a reader's report of 29 August 2016 |
| Removal | Scan the PC with security software to find and remove the malware and anything installed with it. Fortect scans Windows for malware and repairs the system files and settings it damaged. Remove it nowTo use the full-featured product, you have to purchase a license for Fortect. The scan is free. |
Show 12 more facts
| Name | Facebook Suspension virus (a phishing message, not a virus) |
|---|---|
| Sender shown | facteamsupport@supportpages.online, which is not a Facebook domain |
| Link | An apps.facebook.com/ address with a made-up name; not opened by us |
| Distribution | E-mail; how recipients were chosen is not known |
| Damage | Stolen Facebook login, a taken account used on your friends, possibly a fake plug-in |
| Evidence | 2 reports from affected users and security sites; details still limited |
| Arrives as | |
| Pretends to be | |
| Claim | Your account needs urgent attention |
| Sender domain | facteamsupport@supportpages.online |
| Asks for | Your password |
| Facts checked | 5 October 2026 |
Facts checked on 5 October 2026 against Facebook's Help Center pages on phishing, e-mail checks and hacked accounts, the registry answer for the sender's domain and our own 2016 report. We did not open the link in the message.
What the Facebook Suspension message is
- What it is
- A phishing e-mail, not a virus: it installs nothing by itself
- Claims to be
- "The FacebookSecurityTeam"
- What it says
- Your Page was reviewed for breaking the Terms of Service and the account "might be permanently suspended"
- What it wants
- A click on a "verify account" link, opened on a desktop computer
- Sender shown
facteamsupport@supportpages.online- First reported
- 26 August 2016 (our report)
- 1
The e-mail arrives
It looks like a notice from Facebook's security team: a Page was reviewed, an earlier warning went unanswered, the account may be suspended for good.
- 2
You are sent to a "verification" link
The link starts with
apps.facebook.com/and ends in a made-up name. The sender asks you to open it on a desktop computer. - 3
The page asks you to prove who you are
What the page asked for is not documented. A message built like this one normally wants the Facebook password, which you would hand over yourself.
- 4
The sender uses what you typed
Facebook's phishing page describes the next stage: a taken account is used to send spam to friends and family, and the same password may open other accounts.
What the Facebook Suspension virus message looks like
What a phishing e-mail asking you to sign in said
Dear Facebook User
We have reviewed the suspension of your Page. After reviewing your page activity, it was determined that you were in violation of out Terms of Services . We have provided a warning to you via email, but you have not responded to out notification. Therefore, your account might be permanently suspended.
if you think this is a mistake, please verify account on the link blow. This would indicate that your Page does not have a violate out Terms of Service. We will immediately review your account activity, and we will keep in touch.
Verify your account at the link below: Please use Desktop (Computer) Device for more secure.
(apps.facebook.com/facbsecpagesveriiys)
Thank for being part of FacebookCommunity,
The FacebookSecurityTeam.
© Inc. 415 Department, PO Box 10005, Palo Alto, CA 94303
How it reached you
| Question | What we know |
|---|---|
| How were you chosen? | Not known. The 2016 guide had guesses only: random mailing, or a visit to an unsafe site. Mass mailing to address lists is the usual way for messages of this kind. |
| Did a virus on your PC send it? | No sign of that. It came by e-mail from a separate address, unlike the earlier worms. |
| Did the message infect you? | No. Only what the page behind the link does could. We have not seen that page, and nothing ties the message to a program bundled with a free download; check Installed apps only if you installed something around the time it arrived. |
How to tell the Facebook Suspension virus message is fake
What we checked and what we did not
Facebook Suspension message · source check · 5 October 2026
- Sender address
supportpages.onlineis not one of the domains Facebook says its mail comes from (fb.com, facebook.com, facebookmail.com, instagram.com, meta.com, metamail.com and their subdomains). - Message textRead from our 2016 report and its picture, and compared with Facebook's description of fake "you broke our rules" e-mails.
- Sender domainOn 5 October 2026 the registry for
.onlineanswered thatsupportpages.onlineis available for registration, so nobody holds it now. The wording can still come back from another domain. - The linkWe did not open
apps.facebook.com/facbsecpagesveriiys. In 2016 a reader got a server error on the first click and, on the second, a redirect to a site offering security plug-ins. What that site installed is unknown. - Our own site testNone. A test on one visit would not clear anything: scam pages can answer one visitor and not the next, or change by country, device or time.
- Current activityWe have no new samples of this exact text. Silence is not proof that it stopped: Facebook's help page still lists fake violation notices as a current pattern.
Phishing by its own wording and sender Do not use the link. We have not seen what its page does, so treat anything it asks you to type or install as hostile.
How the Facebook Suspension story went
Before 2016
Worm-style Facebook viruses
Our old guide says most earlier Facebook viruses spread like worms: an infected friend's computer posted comments and messages with a bad link that looked like a real notice from that friend.
26 August 2016
Our first report
We quoted a message about a suspended Page and said it was too new to know how victims were chosen.
29 August 2016
A reader's report
A reader wrote that the message looked like a scam but clicked anyway. The first click showed a server error. The second redirected the reader to a site offering security plug-ins.
5 October 2026
Our source check
The sender's domain
supportpages.onlineis not registered. Facebook's help pages still describe the same kind of fake rule-violation notice.
How to spot the next one
Do
- Compare the sender's domain with the six Facebook uses before anything else
- Check Recent emails or Business Support Home instead of trusting a notice
- Report it to
phish@fb.comand delete it - Install free programs in Custom or Advanced mode, where the installer lists optional extras, and untick them
- Keep Windows and Microsoft Defender up to date, so a download you did make is scanned
Don't
- Do not click a "verify your account" link or type your Facebook password where an e-mail sent you
- Do not reply, and do not trust a signature, a postal address or a team name
- Do not install a "security plug-in" from a page a message sent you to
- Do not pay anyone who offers to "unlock" your account
Is Facebook Suspension virus dangerous? What the senders want
The message, line by line
| What the message says | What is wrong with it |
|---|---|
| Dear Facebook User | A greeting that fits every recipient. The sender does not know who you are or which Page it means. |
| We have reviewed the suspension of your Page | Facebook tells businesses to check their account status in Business Support Home, not through an e-mail link. |
| in violation of out Terms of Services | "out" for "our". Facebook's help page says fake e-mails often claim you broke its Community Standards or advertising rules, so the claim is a known lure. |
| We have provided a warning to you via email, but you have not responded | An invented history, meant to make you feel late. Facebook lists the security e-mails it really sent; a warning that is not in that list was not sent by Facebook. |
| please verify account on the link blow | "blow" for "below". Facebook says it never asks for your password in an e-mail. |
| Please use Desktop (Computer) Device for more secure | Not explained, and nothing in Facebook's help pages tells anyone to switch device. Our reading: it keeps you away from the app, where the account status could be checked. The 2016 guide thought it was bait for remote access; we found nothing that confirms that. |
| apps.facebook.com/facbsecpagesveriiys | Not a security page of Facebook's own: the name after the slash is made up and misspelled ("veriiys"). We did not open it. |
| Thank for being part of FacebookCommunity, The FacebookSecurityTeam | Words run together and a missing "you". Spelling mistakes were the quickest sign in 2016 too. |
| 415 Department, PO Box 10005, Palo Alto, CA 94303 | A postal block that makes the message look official. A footer proves nothing; the sender's domain does. |
What clicking could cost
- High
Your login is handed over
If you type your password on the page, the sender has it. Facebook says one phished password can lead to several taken accounts, such as your e-mail, Facebook and WhatsApp.
- High
The account is used on your friends
A taken account is used to send spam or inappropriate content to people you know, and sometimes held hostage for money.
- Medium
A "security plug-in" or other download
The 2016 reader was redirected to a site offering security plug-ins. We could not see it. A plug-in from a page like that may be anything, so treat it as untrusted.
- Medium
Remote access
The 2016 guide feared remote access. A web page cannot give it alone; it needs a program you installed from it. If you installed nothing, this does not apply.
- Low
Reading the e-mail, or a flood of alerts
Opening the e-mail does not harm the PC. The 2016 claim that your inbox might fill with Suspension alerts has no source we could find.
If you clicked the link or replied
If you clicked or typed anything: secure Facebook
If you only read the message, report it and delete it. If you clicked the link or typed anything, follow Facebook's own steps (Help Center pages read on 5 October 2026). Use a device you have signed in on before, and open Facebook by typing the address yourself.
- 1
Report the account as compromised
Go to
facebook.com/hacked. Facebook says you can report it whether or not you can still sign in. - 2
Reset your password
Choose one you have never used, and change it anywhere else the old one was used. Facebook says that after a malicious link someone else may be able to sign in, and a reset prevents unwanted logins.
- 3
Sign out strange devices
In Settings, open Where you're logged in and log out every device or place you do not recognise.
- 4
Look at your activity
Open the activity log and delete any post you did not make.
- 5
Check the recent e-mails from Facebook
Open
facebook.com/recent_emails/security. A changed e-mail address, phone number or password you did not request shows up there. - 6
Remove apps you do not know
Click your profile picture, choose Settings & privacy > Settings > Apps and websites, find the app and click Remove. An app may keep data it already collected.
- 7
Turn on two-factor authentication
Switch it on in Facebook's security settings. We did not test the current menu names, so follow Facebook's help page for it.
- 8
Report the e-mail
Forward it to
phish@fb.comand mark it as phishing in your mail program. If money was taken, call your bank and tell the police.
If the message named a Page you run, open Business Support Home (facebook.com/accountquality) to see its real status. If the Page was taken over, use Facebook's help page "Recover a hacked Facebook Page you manage".
If the link offered you a plug-in or program
A page that only asks for a password installs nothing, so skip this if you installed nothing. If you installed a plug-in the link offered, remove it.
| Where | Open | What to do |
|---|---|---|
| Windows 11 and Windows 10 | Start > Settings > Apps > Installed apps (Windows 10: Apps & features) | Select a program you did not install on purpose and choose Uninstall. |
| Google Chrome | Type chrome://extensions | Click Remove under any extension you did not add. |
| Microsoft Edge | Type edge://extensions | Click Remove under any extension you did not add. |
| Mozilla Firefox | Type about:addons, open Extensions | Open the menu of an add-on you do not know and choose Remove. |
| Safari on a Mac | Safari > Settings > Extensions | Select the extension you did not add and uninstall it. |
| macOS | Finder > Applications | Drag the program you did not install to the Trash, then empty it. |
What to do after the Facebook Suspension virus e-mail
If you only received the message and clicked nothing, step 3 is all you need.
If you clicked the link or typed anything on the page it opened, do every step, starting with the password.
Step 1: Change the password you typed on the fake page
If you typed a password on the page the Facebook Suspension virus message opened, assume the sender has it. Go to the real site by typing its address yourself and change the password there, choosing one you have never used.
Change it anywhere else the same password was used, and sign out all other sessions if the service offers it. Any browser on Windows 11 or Windows 10 will do, as long as you do not follow the e-mail's link.
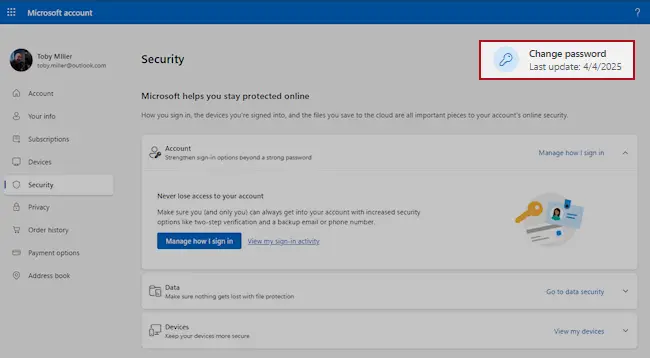
Microsoft account, Security page (account.microsoft.com/security): Change password. Full procedure with screenshots: Turn on two-step verification / secure a hacked account
Step 2: Turn on two-step verification
With two-step verification on, a stolen password alone no longer opens the account, because a sign-in from a new device also needs a code from your phone.
Switch it on for the e-mail account first, then for banking, shopping and social accounts that use that address.
Check the recovery phone, the recovery e-mail and any forwarding rules while you are in the settings, since attackers change them to come back. The pages are the same on Windows 11 and Windows 10.
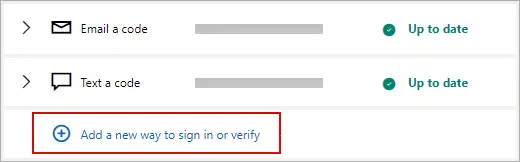
Microsoft account: Manage how I sign in, where two-step verification and the sign-in methods are. Full procedure with screenshots: Turn on two-step verification / secure a hacked account
Step 3: Report the e-mail and delete it
Do not reply and do not click anything else in the message. In Outlook select the e-mail and choose Report > Report phishing; in Gmail open the three-dot menu next to Reply and pick Report phishing.
That trains the filter for everyone on the service, and the message goes to the junk folder. If the e-mail came to a work address, forward it to your IT team as an attachment first.
The steps are the same in the web mail and the mail apps on Windows 11 and Windows 10.
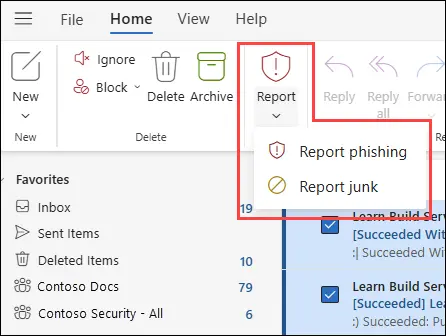
New Outlook for Windows and Outlook on the web: Report > Report phishing. Full procedure with screenshots: Report a phishing e-mail
Step 4: Scan the PC if you opened a file from the message
A fake sign-in page only steals what you type, so most readers can skip this step. If the Facebook Suspension virus e-mail made you download or open a file, delete it and scan the PC.
In Windows Security > Virus & threat protection > Scan options, run a Full scan and then Microsoft Defender Antivirus (offline scan) > Scan now. The offline scan restarts Windows 11 or Windows 10 and takes about 15 minutes.
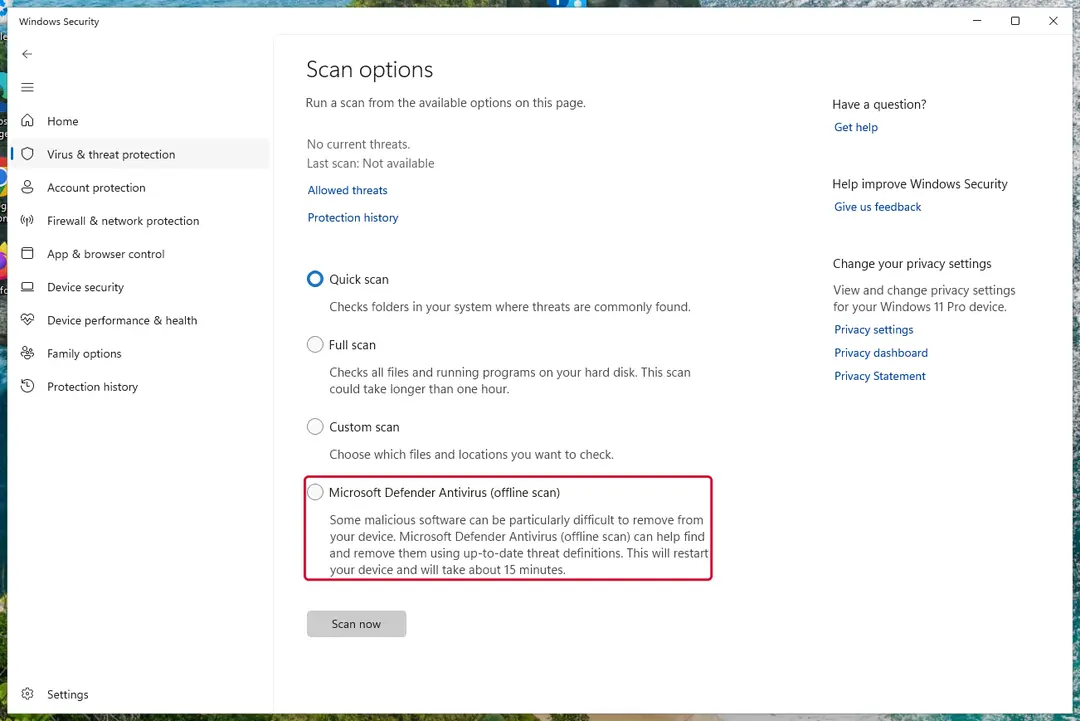
Windows 11: Windows Security > Virus & threat protection > Scan options. Full procedure with screenshots: Run a Microsoft Defender Offline scan
Questions about Facebook Suspension virus
How do I remove the Facebook virus?
There is usually nothing to remove, because the Facebook Suspension message is a phishing e-mail and not a program. It does its harm if you click the link and type your password. If you did, go to facebook.com/hacked, reset the password, sign out devices you do not know and remove unknown apps in Settings.
If the link also made you install a plug-in or a program, remove it in Installed apps or your browser's extensions page, then run a Microsoft Defender scan. If you only read the e-mail, report it to phish@fb.com and delete it; nothing was installed.
Is the Facebook Suspension message real?
No. It is a phishing message that claims to come from the Facebook security team and says your Page broke the Terms of Service.
Three things show it: the sender, facteamsupport@supportpages.online, is not on Facebook's list of mail domains (fb.com, facebook.com, facebookmail.com, instagram.com, meta.com, metamail.com); the text has mistakes such as "out Terms of Services" and "link blow"; and it asks you to verify through a link.
Facebook says it never asks for your password in an e-mail. Real security e-mails are listed under Recent emails in your Facebook settings, and the fake one is not.
I clicked the verification link but typed nothing. Am I safe?
Probably, but check two things. Typing nothing means the sender did not get your password. A page can still try to make you install something, so look at your browser's extensions and at Installed apps for anything new from the time you clicked.
If the page redirected you to a site that offered a security plug-in, as it did for a reader in 2016, and you installed it, remove it. If there is nothing new, delete the e-mail and report it to phish@fb.com. Changing your password anyway costs a minute and closes the question.
I entered my password on the page. What should I do?
Act at once from a device you have used for Facebook before. Go to facebook.com/hacked and report the account as compromised, which Facebook allows even when you can still sign in. Reset the password, then change it on any other account that used the same one, starting with your e-mail.
In Settings, open Where you're logged in and log out devices you do not know, check the activity log and delete posts you did not write. Then switch on two-factor authentication. Tell friends not to open anything odd that arrives from you.
What was the site that offered security plug-ins?
We do not know. A reader wrote on 29 August 2016 that the first click on the link gave a one-time server error, and the second sent the reader to a website offering security plug-ins. We did not open the link and no copy of that site was kept, so we cannot say what it installed.
A page that pushes a plug-in after a fake account notice is not a Facebook page, and its offer should be refused. If someone installed it, remove it in Installed apps or the browser's extensions page, change the Facebook password and run a Microsoft Defender scan.
Can I get infected just by opening the e-mail?
No, reading the e-mail is not enough. An e-mail with this text is made of words and a link; current mail programs do not run a program because you opened a message. The risk is in what you do next:
- clicking the link
- typing your password
- installing what a page offers
If you opened the message and closed it, delete it and use the Report phishing button. If you opened an attachment, which this message did not have, the situation is different and a full scan is worth running. For the message in this guide, only the link matters.
How can I tell if an e-mail is really from Facebook?
Look at the sender's domain first. Facebook says its mail comes only from fb.com, facebook.com, facebookmail.com, instagram.com, meta.com and metamail.com, or subdomains of them. Then confirm that Facebook sent it: open facebook.com/recent_emails/security, or Settings & privacy > Settings > Accounts Center > Password and security > Recent emails.
Security e-mails of the last year are listed there. Never trust a team name or a postal address in the footer, and remember that Facebook will never ask for your password in an e-mail or send one as an attachment.
Where do I report the Facebook Suspension e-mail?
Send it to phish@fb.com, which is the address Facebook gives for suspicious e-mails and messages that claim to come from it. Also use the Report phishing option in your mail program: in Outlook choose Report > Report phishing, and in Gmail open the three-dot menu and pick Report phishing.
Then delete the message. If you lost money, call your bank, and if you believe a crime was committed, Facebook recommends telling local law enforcement. Do not open attachments or links while reporting.
Will Fortect remove Facebook Suspension virus?
Fortect scans Windows for malware and unwanted programs and repairs the system files and settings they change, and its free scan shows what it finds on your PC before you decide anything.
For Facebook Suspension virus, follow the plan above as well: the browser steps take back permissions and settings that no scanner treats as a threat, and uninstalling the program that brought it removes the source.
Run Microsoft Defender's full scan and, if anything was found, its offline scan as a second opinion. If the symptoms are gone after the plan and both scans are clean, there is nothing more to do.
Sources
- Facebook Help Center: Protect yourself from phishing on Facebook (read October 5, 2026)
- Facebook Help Center: Check if an email is really from Facebook (read October 5, 2026)
- Facebook Help Center: You got a suspicious email or message claiming it's from Facebook (read October 5, 2026)
- Facebook Help Center: What to do if you've been phished on Facebook (read October 5, 2026)
- Facebook Help Center: Recover your Facebook account if you were hacked (read October 5, 2026)
- Facebook Help Center: Remove an app or game that you've added to Facebook (read October 5, 2026)
- Radix RDAP: supportpages.online (no longer online) (read October 5, 2026)
- Microsoft Support: Uninstall or remove apps and programs in Windows (read October 5, 2026)